First build in Canada - 2006 SS SC, track

Jonathan O'Hara

Active Member
Hi all,

I'm a little slow in starting this build log but I'm still far from done, so better late than never.

Adam tells me I have the honor of being their first Canadian customer, and my goal is fully licensed and street legal. Ontario's rules for kit cars seem pretty reasonable. I have a ways to go before I'm on the road though!

Here's my timeline so far:

Early October 2017 - Bought donor. A 2006 SS SC couple (black) with 220k miles for $900 Canadian (~$700 US), plus trailer rental and Ministry of Transportation registration/taxes.

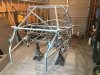
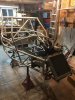
Late October 2017 - Ordered Goblin.

November 2017 - Started working on getting approval to import full kit into Canada (through Transport Canada), with lots of help from Adam to get the government all the details they needed to decide this kit should be classified as "car parts" not a "disassembled vehicle".

January 2018 - Got formal approval to import.

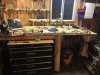
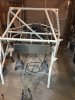
January - March 2018 - Disassembling donor, sometimes it got pretty cold (say -15F), so did a couple little things to help heat the garage (like running a temporary 220v line off my AC for a bigger heater in the garage) .

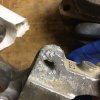
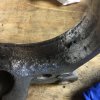
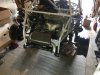
For disassembly, there was a lot of rust on a lot of stuff, makes me wonder if I should have spend a bunch more to get a lower mileage car! I had a previous post there I had to cut part of the subframe to be able to cut one of the bolts out. Also, the top bolts on the seat belts where tough, had to cut one out. Probably took me 20-30 man hours to dismantle. Part of that is the rust and part of that is that I'm a long way from being a professional.

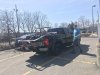
March 2018 - Kit arrives in upper NY state, so my girlfriend and I run down in my regular box pickup, toss everything in the back and bring it into Canada. Both the importation and the transport were pretty easy actually.

On the way some guy flags us down asking what the frame is because it looks so cool. I can only imagine this is the start of many such questions!
 

Attachments

Last edited:

Jonathan O'Hara

Active Member
Once the kit arrived, I really had to move on the wiring. It took a long time, which felt even longer because there's not visible progress (and I'm still not sure I did it right because I haven't made it to first start up yet!).

A lesson learned, be a bit careful when you remove and coil the wiring harnesses up, it can get shockingly tangled easily to the point where I actually wondered how many wires I was going to have to cut and re-solder to untangle it. With a bunch of patience it worked out reasonably well. There are lots of helpful pictures and diagrams on this site. Adam has a good one posted that I printed out and referred to many times: https://photos.google.com/share/AF1QipP5zuZwblkXHgdnmIetwJr08IDeRLOjrx-ZLYmgYrG9z76c7IyC6OviEyB-E5jgbw?key=N0YzY0tTQ1E4UTJvc1pRamNGMF9OcU5pNmVFaUlB

Wiring probably took me another like 25 - 30 hours, maybe more because I tangled everything to start. The lengths of the various legs of the harness aren't quite right, but hopefully it will work.
 

Attachments

Jonathan O'Hara

Active Member
My wonderful girlfriend was keen/insisted on doing the painting of the frame, and other visible parts. I can't blame her, I'm way more of a function guy than a form guy. After discussion we settled on an iridescent pearl white with charcoal accessories.

In underestimating the work/cheaping out, I figured how many rattle cans could it be. I have a decent compressor and a paint gun, but rattle cans just seemed easier and quicker. Wrong! 5 cans of primer, 30 cans of color (the Duplicolor near match stuff at like $15/can) and like 5 more of clear. Total cost of like C$600! Definitely should have just used the paint gun, but we kept telling ourselves, just a couple more cans and it will be good. The paint job is decent and I'm hoping in the sun the color shows better.
 

Attachments

Jonathan O'Hara

Active Member
Currently getting a few of the basics installed. Holy crap that Tire Wet is slick stuff! Getting those hoses through was way easier than I expected with lots of lube, frame on the ground and the GF spraying while I pulled it through tug of war style.

I've got the powertrain bolted in (no picture of that yet). I didn't paint the gas tank because aluminum seems like a fine colour to me. I'm on video 20. If I can get this started this weekend I'm going to be one really really happy boy.

I also don't have the floor sheet metal because I'm waiting for my painter (cough gf ... cough) to have time to paint it. She is definitely a way better and more patient painter than me!

Current step if figuring out the coolant hose routing, which seems much more complicated in an SC with the IC/HE hoses. I chopped up a bunch of the stock hoses during disassembly because they were so seized on and I may regret my impatience.

It would be nice if there was a little add-on document to the build videos with just a few comments here and there about things that are different in an SS/SC than the stocker they are rebuilding. Maybe I just haven't found it yet, because while I've read most posts in some parts of this forum, I haven't read all the awesome stuff that's here.

If someone is feeling generous, where is the H/E for the IC supposed to mount? I saw pic with it mounted on top of the engine. I saw another with it mounted to the left of the battery box, which seemed a little vulnerable to road debris to me, but I'm not the smart one that put this awesome kit together, so I'll just do whatever is recommended!
 

Attachments

Last edited:

ctuinstra

Goblin Guru
The HE is pretty much left up to you. Each builder seems different about where and how to put it. You're right, there isn't a lot of specific information about the differences in the SC build. You kind of figure them out as you go or ask how others did it. I did my coolant line different than some of the other, it's part of the fun of doing your own build and building it how you like to. I was wanting to make sure that I did everything by the book and then quickly realized the book is more hints and suggestions as you go along. I'm fine with that.
 

DanPerryy

Well-Known Member
Once the kit arrived, I really had to move on the wiring. It took a long time, which felt even longer because there's not visible progress (and I'm still not sure I did it right because I haven't made it to first start up yet!).

A lesson learned, be a bit careful when you remove and coil the wiring harnesses up, it can get shockingly tangled easily to the point where I actually wondered how many wires I was going to have to cut and re-solder to untangle it. With a bunch of patience it worked out reasonably well. There are lots of helpful pictures and diagrams on this site. Adam has a good one posted that I printed out and referred to many times: https://photos.google.com/share/AF1QipP5zuZwblkXHgdnmIetwJr08IDeRLOjrx-ZLYmgYrG9z76c7IyC6OviEyB-E5jgbw?key=N0YzY0tTQ1E4UTJvc1pRamNGMF9OcU5pNmVFaUlB

Wiring probably took me another like 25 - 30 hours, maybe more because I tangled everything to start. The lengths of the various legs of the harness aren't quite right, but hopefully it will work.
For others, getting wires tangled is a big pain. I got 1000 small tie wraps and used them to keep the groups together while thinning. I actually got a 16 ft table. A sheet of plywood where I put some screws in it at junction points and tied the harness to the table. It was easy.
 

Jonathan O'Hara

Active Member
The HE is pretty much left up to you. Each builder seems different about where and how to put it. You're right, there isn't a lot of specific information about the differences in the SC build. You kind of figure them out as you go or ask how others did it. I did my coolant line different than some of the other, it's part of the fun of doing your own build and building it how you like to. I was wanting to make sure that I did everything by the book and then quickly realized the book is more hints and suggestions as you go along. I'm fine with that.
Thanks for the comfort on the H/E. I totally understand (and mostly enjoy) the general guidance and letting me figure out the rest. The flip side is that Adam and Lonny are way smarter than me, so if they'd designed with something specific in mind, it is probably a lot better/easier than what I'd dream up!
 

Jonathan O'Hara

Active Member
For others, getting wires tangled is a big pain. I got 1000 small tie wraps and used them to keep the groups together while thinning. I actually got a 16 ft table. A sheet of plywood where I put some screws in it at junction points and tied the harness to the table. It was easy.
A 16' table would be brilliant. I moved to a new house (and more importantly new garage) as I was planning this build. New garage meant new custom built workbench. I built a 3' x 8' workbench (well 5' with an extra 3' fold up leaf) specifically with the wiring in mind and it wasn't really long/big enough. The wiring was time consuming, so having a really big work surface would save hours and some aggravation.
 

Jonathan O'Hara

Active Member
IT'S ALIVE!!! Did my first start today, and third try was the charm.

First attempt failed: Battery w(as pretty dead (should have anticipated this), so charged it a bit and used my engine start assist, and it start turning over.

Second attempt failed: With enough juice in the battery to make start, I realized no fuel was flowing into the line. I'd previously tried to prime the fuel pump like in the videos by jumping the relay, but could not get the pump to prime. Because I was impatient to start, I'd just (wrongly) assumed I couldn't get the jump wires into the holes far enough to make contact (and subsequently assumed the same with my multi-meter prongs). With a fuel pressure tester hooked up to the fuel rail, I saw zero pressure. The gray wire to the pump was not getting any voltage. (Sidebar: AllData actually fully mislead me on the wire color and position for the fuel pump plug. I knew AllData was wrong because the colors didn't even match. The gray wire is the power to the pump in the plug). I add a little temporary bypass switch from the positive terminal on the fuse box direct to the fuel pump gray wire. Directly powered like this, I could hear the fuel pump working and saw pressure at the fuel rail

Third attempt SUCCESS!! To my great satisfaction, adding fuel to the engine meant it started and runs pretty decently.

In part because I'm so impatient to try to get this on the road soon (I've got five months before it will be too cold/snowy), I'm on the fence as to whether to just put wire in a semi-permanent fuel pump power switch, or whether to try to trouble shoot why no power is getting to the pump. There didn't appear to be any voltage on ANY of the fuel pump relay connections at the fuse block, which was a little weird. The fuel pump fuse is good, though even if it was bad I assume the little voltage trigger would still have voltage, just not the main big voltage.

I could have added a picture, but I'm not sure it would have helped anyone to see my ridiculous smiling mug.
 

ctuinstra

Goblin Guru
Good for you on your first start! I remember how excited we were when ours started for the first time. I knew everything was going to be okay after that. So I know how excited you must be too.

For safety sake, I would figure out what is up with the pump. I wouldn't hard-wire it, it could cause a major problem later. You said the fuse was good, but can you see if there is 12vdc on the fuse? That will cut the problem in half.
 

Jonathan O'Hara

Active Member
Good for you on your first start! I remember how excited we were when ours started for the first time. I knew everything was going to be okay after that. So I know how excited you must be too.

For safety sake, I would figure out what is up with the pump. I wouldn't hard-wire it, it could cause a major problem later. You said the fuse was good, but can you see if there is 12vdc on the fuse? That will cut the problem in half.
I absolutely had the same feeling about things will be okay from here (although probably not easy).

I appreciate the guidance on the troubleshooting. I just ran out and no voltage at the fuse (from other pole to ground, or between poles, either with car in run or not). Maybe I cut something I should not have, like a power wire to going to that fuse block? I would also like to fix this for peace of mind that there isn't another gremlin waiting to pounce.

Even with my little temporary switch I added a little 10A inline fuse before using it. I figure a fused hardwired fuel pump switch should be reasonably safe (probably with a relay off a switch power for the little voltage so the fuel pump couldn't keep running without the keys in the ignition).
 

ctuinstra

Goblin Guru
Here is a document for the fuel pump relay. I cannot find the signal lines to the relay.

Sounds like you are not getting a signal to turn on the relay. That's the signal I cannot find. I'll keep looking.
 

Attachments

Jonathan O'Hara

Active Member
Got the suspension put together on the first corner (passenger rear). Does this generally look right to everyone? I cut half a round off the bottom of the spring in accordance with the write up instructions. I'll get some wheels on eventually and see how it looks in terms of ride height.

I heard people talking about "seating" the aluminum spacer, but I'm not sure how that would work, it seems to just sit on top of the strut top-hat.
 

Attachments

dperkins

Well-Known Member
Anyone encountered some kind of mouse that eats aluminum steering knuckles? Maybe it is only native to Canada.

I'm putting these on for now, so mainly this is just to emphasize the value of low mileage donors rather than my 200k + miles donor.
Those look quite strange, maybe some type of corrosion? I think you could just sand and polish the imperfections and re use it if you really don't want to replace it. Shouldn't be too bad since it's supporting less than half the weight of stock.
 

Karter2026

Goblin Guru
Anyone encountered some kind of mouse that eats aluminum steering knuckles? Maybe it is only native to Canada.

I'm putting these on for now, so mainly this is just to emphasize the value of low mileage donors rather than my 200k + miles donor.
Road salt, Calcium Chloride, Magnesium Chloride. And the fact that the aluminum is sandwiched between the steel of the strut. Mine looked the same. Not really visible when it is on the strut.
 
Top