Nuker's City Goblin build - 2007 SS SC Donor - Completed/Licensed

JSATX

Goblin Guru
Okay just confirming the pushrod on the drivers side of the shifter should be connected to the counter weighted arm on the transmission?

Thanks!
Nuker-
Nope. Unless the SS is backwards from the base.

The counterweighted lever is tied to the front-to-rear movement of the shifter.
 

Lonny

Administrator
Staff member
I think that is opposite.
When moving the shifter from front to back it should move the counter weighted arm.
When moving the shifter side to side it should move the non counter weighted arm.
 

TheNuker

Goblin Guru
Okay re bled the clutch. For anyone that is going to use a power bleeder like the Motive where you pump the tank up and apply pressure to the reservoir keep in mind that if you just bleed the clutch via the bleed valve on the hydraulic clutch elbow you will also have to pump the clutch petal 10-15 times before the system is actually bleed unlike the brakes.

Nuker-

Going to start adjusting the shifter linkages next rear wheels and tires should be here today so hoping for a Saturday first drive!
 

TheNuker

Goblin Guru
Well the rear wheels and tires are on! Just got more adjusting on the shifter cables and I'm ready to drive tomorrow!

The 235s fit good in the back

Nuker-


IMG_1742.JPG
IMG_1741.JPG
 
  • Like
Reactions: PG5

TheNuker

Goblin Guru
First drive completed! I'm still alive. First gear does not seem to want to shift into, So I need to do some more work on the shifter cable adjustment, and the videos below are in second. But ****.

Nuker-

IMG_1749.JPG


JSATX

Goblin Guru
Congrats!!

Is it just the angle of the video or does your right front wheel have some serious negative camber?
 

TheNuker

Goblin Guru
Congrats!!

Is it just the angle of the video or does your right front wheel have some serious negative camber?

Well I seen some sick slammed 95 civic, and figured they would know best on how to stance tires.

JKJK

It is all fixed now. I just had to readjust the joints and screw them out a few turns to get the tires flat.

Nuker-
 

TheNuker

Goblin Guru
Is the best way to adjust the camber the big heim joint in the top or bottom of the arm? Or the heim joints that connect the arms to the frame?

Nuker-
 

JSATX

Goblin Guru
Is the best way to adjust the camber the big heim joint in the top or bottom of the arm? Or the heim joints that connect the arms to the frame?

Nuker-
I highly recommend having it done professionally...

IMG_7619.JPG
Top is all the way in. Bottom is showing 2.5 threads ish.
 

Attachments

JSATX

Goblin Guru
Got the brake lines all setup and installed. I'll get them bled tomorrow.

Nuker-

Would you please specify exactly what brake line ends you ordered? Or send any info on the shop that made them so I can have them duplicate a set?
 

TheNuker

Goblin Guru
Would you please specify exactly what brake line ends you ordered? Or send any info on the shop that made them so I can have them duplicate a set?

http://www.tompkinsind.com/locations/kansas-city-mo

This is where I had the fronts made, I'll see if I can find the invoice to see exactly what ends they put on them. I took in a rear brake line from the stock car and they just duplicated those ends.

I think the total for both front lines 28" overall length was 63$

Nuker-
 

Silverback

Well-Known Member
Nice, Nukker. I had been admiring those, who did you use for the brake line clamps?
 
Last edited:

TheNuker

Goblin Guru
Here is the parts that I have "Left over" I think the big long silver ones on the right side are for the rear tie rod bar. I reused the donor steering rack bolts? Any ideas on the rest of these, I tried to follow the stage 2 pics as close as possible.

Nuker-

IMG_1754.JPG
 

Adam

Administrator
Staff member
I labeled each item so we could quickly identify each. Below the photo I've gone through the hardware really quickly and described the ones I could think of off the top of my head. I've left the ones I couldn't recognize immediately blank. I'll get back to you on those.

extra hardware labeled.jpg


A: 3/8 split washers - Used with B, L and H to hold down the back of the seat.
B: 3/8 flat washers - See above. Also used in many places on the front suspension, rear strut mounts and more.
C: Toe link rack washers - Used with Q to hold the toe link rack at the rear of the subframe. I think using your stock bolts is okay.
D:
E:
F: M8 BHCS - Used to tighten the steering shaft universal joints around the splined shafts top and bottom. I think using your stock bolts is okay.
G:
H: 3/8 carriage bolts - see A and B. Rear seat mounts (your second seat should be arriving this week if Corbeau ships soon)
I:
J: 1/4 flat washer - used all over the place: shifter bellcrank (under the head of the bolt and nut), brake line clamps on front control arms (you used those cool ATV clamps instead), BCM mounts, and a lot more
K:
L: 3/8 nut - See A, B and H.
M: 1/4-20 nylok nut - Would've been used on the brake line clamps on the front control arms
N: 5/8 safety washers - These are very important. They should go above and below all 4 of the big rod ends (2 washers per rod end).
O:
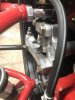
P: 10-32 SHCS - brake res adapter bolt
Q: Toe link rack bolts
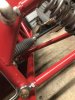
R: 1/4-20 nylok jam nut - I think these were for the floor support strap under the pan
S: Rubber isolated radiator studs - these should go between the top of the radiator and frame
T: 10-32 nylok nut - brake res adapter, brake mc adapter hold down and tail light nuts
U: M14 HHCS - These hold the top loop of the stock seat belt. You won't use them since you are running harnesses instead.
 

TheNuker

Goblin Guru
This is what all 4 of mine look like right now, I think I had 16 of them to start with. Maybe there is 8 extras?

Adam, If you want me to mail any of the extra hardware back let me know.

Nuker-

IMG_1755.JPG
 

TheNuker

Goblin Guru
Is there some voodoo magic to getting it to go into reverse?

I can shift between 1st-2nd-3rd-4th-5th but reverse is a no go. Sucks because I can't test the reverse lights. lol

Nuker-
 
Top