PHerder's Track Frame with lower entry bars
- Thread starter PHerder
- Start date
TheNuker
Goblin Guru
Well that is good news! From what I read the suggestion is to also upgrade the throw out bearing while in there the LNF one is much better from what I gathered. I installed the flydenza lightweight flywheel GMPP clutch and upgraded LNF throw out bearing. I figured I mise well do it all while the engine is out of the car.
The bolts that hold the throw out bearing on are a PITA to remove, I stripped one even being easy and with the right bit. I ended up having to hammer a socket on the head to screw it out! I replaced the bolts with hardened hex heads.
Nuker-
The bolts that hold the throw out bearing on are a PITA to remove, I stripped one even being easy and with the right bit. I ended up having to hammer a socket on the head to screw it out! I replaced the bolts with hardened hex heads.
Nuker-
k.rollin and Nuker, thanks for the info. I will keep your experience in mind when I work on the TOB.
I got the dash out. That is one heavy piece of equipment! I got it out by myself using my engine hoist!")
With the dash out, the steps in video #5 are complete!
Started on the steps in video #6.
I got the dash out. That is one heavy piece of equipment! I got it out by myself using my engine hoist!
With the dash out, the steps in video #5 are complete!
Started on the steps in video #6.
JSATX
Goblin Guru
Home Depot carries a pretty nice set that's not too expensive. I bought it when I did the initial tear down.Yea! Whoopee! Hurrah!
My transmission is NOT broke!!!!!!!
The clutch tho', is worst than toast. That is why no connection between the drive axles and the motor! AND I was going to replace the clutch anyway! I can move the clutch disk around while it is "clamped tight" to the flywheel by the pressure plate.
Now, I have to go out and buy the special socket to take off the PP bolts. Anyone know what size/name this bolt is? It looks like a reverse Torx. i.e. I have Torx screwdrivers but no Torx sockets.
Once that is off, I can asses the condition of the flywheel and see if it needs to be replaced also but the real expensive piece, the transmission with G85 LSD still works!
One thing I am in awe of is the people who change out the clutch while the transmission is in the car!
http://www.homedepot.com/p/Husky-1-4-3-8-1-2-in-E-Torx-Socket-Set-HETX13PC/206031060
Maybe yours is different but my base was E-14
Explain please... since mine are trashed, what do I need to look for to align the PP to the flywheel with the new set (not ordered yet)?Also dont forget to mark the pressure plate - flywheel alignment like I did...
JSATX
Goblin Guru
Pretty sure the assemblies are all individually balanced so it's not a big deal. I just remember thinking I should have put alignment marks on my flywheel etc when I took it all apart.Explain please... since mine are trashed, what do I need to look for to align the PP to the flywheel with the new set (not ordered yet)?
If you're replacing everything then it doesn't matter. You'd only need to mark flywheel to crank. I took everything off to check rear main seal and had to guess when I put it back together.
Thanks! That makes more sense in my mind... Looking at pictures of replacement flywheels, I see what looks like even spacing of the mounting holes which would make marking where it came off logical.
But, I really don't think it matters since IF the engine is internally balanced then the flywheel is neutrally balanced. Of course it all goes out the window if the mounting holes are NOT evenly spaced and the flywheel can only go on one way! Marking that flywheel to crank would make it much quicker to reassemble.
This and other mysteries will be solved once I get the E-Torx sockets in from Amazon Prime... tomorrow!
RichN
Well-Known Member
Nuker, Let me see what the condition of my flywheel is but I will probably take you up on your flywheel considering what the clutch plate looks like (i.e. you can move it around while it is still being held in by the PP!)Also I have a good stock flywheel out of my SS/sc 59k miles yours for shipping if you want
Nuker
I will know more once my e-torx socket set shows (by end of day IAW the UPS web site).I don't know if it will fit but in my Austin Healey Sprite days, we would put a flywheel in a Priority Mail box and since it fit, it shipped for ~ $15.
This was because we were getting it drilled to fit a Datsun 5 speed clutch/PP. Postal Delivery guys were not too happy with it since that little package weighed a lot more than it looked! Received my e-torx sockets via UPS overnight Amazon Prime. Took off 5 of the 6 PP bolts. #6 was stripped so I cut the head off. Pried the PP off and then was able to just turn the remains of the 6th bolt by hand!
Flywheel has burnt marks over most of its surface but to the fingers, it feels smooth. Nuker, I PM you.
The clutch plate is toast. BURNT toast! PP is not much better. All the adjustment on the PP is gone and with the clutch disk worn down to the rivets, there was nothing to hold to. No wonder it had no "gears".
So far I have only removed the clutch on the donor. Rest of the time was spent (so far) on the previous possible donor (2008 LS) making it ready for sale.
Ah, yes, the smell of burnt clutch in the morning. It smells of DPO!
Took off 5 of the 6 PP bolts. #6 was stripped so I cut the head off. Pried the PP off and then was able to just turn the remains of the 6th bolt by hand! Flywheel has burnt marks over most of its surface but to the fingers, it feels smooth. Nuker, I PM you.
The clutch plate is toast. BURNT toast!
PP is not much better. All the adjustment on the PP is gone and with the clutch disk worn down to the rivets, there was nothing to hold to. No wonder it had no "gears".So far I have only removed the clutch on the donor. Rest of the time was spent (so far) on the previous possible donor (2008 LS) making it ready for sale.
Ah, yes, the smell of burnt clutch in the morning. It smells of DPO!
Now to hope there isn't anything internally wrong (bad gears, etc.) since I wasn't able to drive the car. Trans should be easier to work on in the Goblin if there IS a problem.Good thing to find the smoking gun on the clutch! Nothing worse than problems that need digging deeper
Video #6 steps done! Now to #7 and stripping the dash.
Most of the steps in video #7 done EXCEPT for removing the steering wheel from the steering column. It refused to come off. Guess I will have to go and rent/borrow a steering wheel puller.
I was planning on buying a new clutch slave cylinder anyway but while moving the dash around, I broke the original one so now I have to buy a new one!
In the mean while, I will be watching video #8 (again) and pulling the fuel tank.
It refused to come off. Guess I will have to go and rent/borrow a steering wheel puller. I was planning on buying a new clutch slave cylinder anyway but while moving the dash around, I broke the original one so now I have to buy a new one!
In the mean while, I will be watching video #8 (again) and pulling the fuel tank.
FINALLY, got the steps in video #7 done and have completed the steps in video #8! Yea! Donor has been stripped!!!
It will be a while before I can get rid of the remains since I just did the paperwork to get the title in my name. The yards around here will not touch a car body without a valid title that can be signed over to them and the title I had was REALLY messed up (mother actually owned the car that the kid sold me). She had signed it in the lien section and not in the seller section so I had to get a lien release and have it notarized and I really didn't think I would be able to find them again. I was able to get a hold of the seller and he got a hold of his mother and we met at the bank and got all the paperwork legalized. I then when to the county treasurer's office and got the title (non-hwy) in my name so another checkbox checked!
That was a big worry taken care of. I thought I would have to do like PG5 was doing and make the body into small pieces. Good thing we have a dumpster. It has been filled up with assorted plastic from the donor already. And since they come in a big trash truck and grab the dumpster and dump it without ever looking at the contents, I believe I could have made the body disappear.
It will be a while before I can get rid of the remains since I just did the paperwork to get the title in my name. The yards around here will not touch a car body without a valid title that can be signed over to them and the title I had was REALLY messed up (mother actually owned the car that the kid sold me). She had signed it in the lien section and not in the seller section so I had to get a lien release and have it notarized and I really didn't think I would be able to find them again. I was able to get a hold of the seller and he got a hold of his mother and we met at the bank and got all the paperwork legalized.
I then when to the county treasurer's office and got the title (non-hwy) in my name so another checkbox checked!That was a big worry taken care of. I thought I would have to do like PG5 was doing and make the body into small pieces.
Good thing we have a dumpster. It has been filled up with assorted plastic from the donor already. And since they come in a big trash truck and grab the dumpster and dump it without ever looking at the contents, I believe I could have made the body disappear. Say goodbye to my little friend!
No one around here (Dodge City) really wanted to take the remains of the donor but I finally found a place that would take it but wouldn't give me anything for it.
At least it is gone.
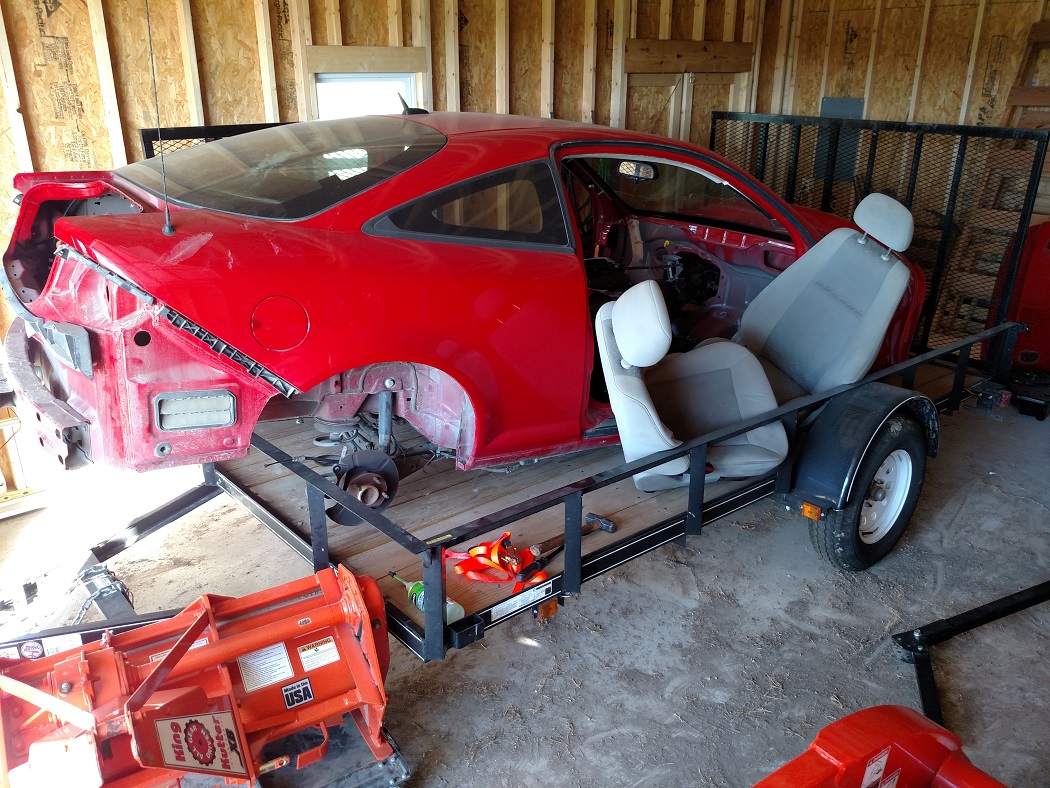
Those seats were out of my 2008 Cobalt LS and were stained and beat up pretty badly (even if they don't show it in the picture!) and the driver's side seat foam was worn up and the seat really needed to be recovered. I put the SS leather seats from this car into my 2008 LS. Once school is about to start, I will advertise the 2008 LS again and maybe it will find a new home. In the mean while, I am driving it and getting used to driving a manual stick again! I haven't had anything with a manual transmission in it since the Stalker and that went away in 2005.
No one around here (Dodge City) really wanted to take the remains of the donor but I finally found a place that would take it but wouldn't give me anything for it.
At least it is gone.
Those seats were out of my 2008 Cobalt LS and were stained and beat up pretty badly (even if they don't show it in the picture!) and the driver's side seat foam was worn up and the seat really needed to be recovered. I put the SS leather seats from this car into my 2008 LS. Once school is about to start, I will advertise the 2008 LS again and maybe it will find a new home. In the mean while, I am driving it and getting used to driving a manual stick again! I haven't had anything with a manual transmission in it since the Stalker and that went away in 2005.
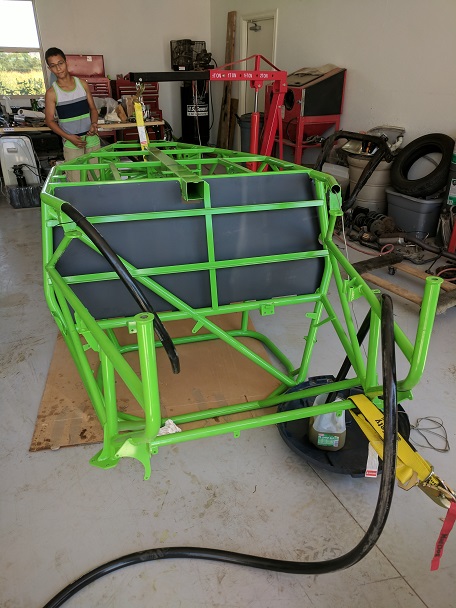
The most feared and stressful part of the build is complete! With the help of my neighbor and his son, we were able to pull the hoses thru the frame. We only broke two hoses, used up a bunch of safety wire (used to squish down the hose so that the washer wouldn't pull out) and even more nyties but the job is done! I found that the twisted safety wire did a much better job of clamping the hose than the nyties did. The problem was we ran out of the safety wire so nyties had to work. I did try some SS ties, normally used for exhaust insulation holding but could never get them tight enough to fit into the frame.
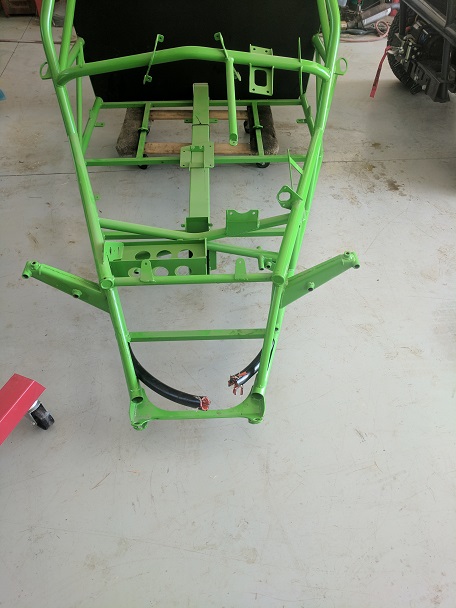
You might note that the hoses look different than the ones you were supplied in the kit. I gave up on those and purchased some silicon heater hose. Expensive and larger in diameter than what I expected. It had an 1" diameter ID with a 0.11" wall thickness means the total diameter would be 1.22" correct? Nope. There was another wall thickness of hose over top of the interior hose making it ~ the same diameter as the rubber hose supplied in the kit! I almost sent it back but I found it was easier to move in the frame (after lubing with such things as silicon spray lube and/or tire lube (which we ended up using) so in it went. Still not an easy install but I believe it was easier than the supplied rubber hoses.
You might also see a strap holding the end of the frame. It was attached to a Kubota RTV so that pulling on the hose wouldn't end up pulling the frame around the shop.
Now I am back in my man cave, pain meds taken, fluids being consumed and back to putting together an RC wing that just came in the mail!
Got a low mileage (17k) SC engine with G85 option transmission coming from CA. Assembly was in an Ariel Atom and was removed for a turbo Honda assembly. The LSJ SC engine has the Stage 2 ZZP parts/tune and all the running gear that cannot be used when the PO changed to the Honda assembly. IAW the PO, it dynoed @ 260 hp at the rear tires but that wasn't enough for the PO so the Honda assembly he has installed was dynoed @ 400 hp at the rear wheels. He purchased an entire Ariel Atom that was wrecked (front end torn off the car) and like our Goblins, the engine is in the rear and didn't suffer any damage. I am hoping that the long tube header and exhaust system that is coming will fit the Goblin.
I am getting all the wiring, plumbing, etc. so it will be interesting to see how it will work in the Goblin. Also I will be getting the Ariel Atom's instrument panel which looks like the same size as the Cobalt stock dash panel.
Now if I could only get my Stage 2 parts that were paid for last September 2016. Emailed Adam a couple of days ago (again) with no response.
I am getting all the wiring, plumbing, etc. so it will be interesting to see how it will work in the Goblin. Also I will be getting the Ariel Atom's instrument panel which looks like the same size as the Cobalt stock dash panel.
Now if I could only get my Stage 2 parts that were paid for last September 2016.
Emailed Adam a couple of days ago (again) with no response.