Turbo fuel pump orientation
- Thread starter Lonny
- Start date
IDRVSLO
Goblin Guru
Worked perfect! Just a note for some who are going to do this, one of the steel rods will come out of the top. The other has the pinch of the bottom which keeps it in place. Once you reposition the pins push down to get them started and make sure they are even once complete.
Last edited:
Christopher Sanchez
Well-Known Member
So why is it necessary to rotate the fuel pump 180 degrees? The SS fuel pumps have the one hose aimed straight up, is it simply to move your fuel pump harness away from the engine? Also being that the fuel tank is different and is now secured with bolts rather than the ring using tension to hold it in the fuel tank, what is keeping the fuel pump from falling into the tank? IDK if i am missing something or if my fuel pump assembly is broken cause the steel rods do not hold the assembly while springs are in place. Can i remove the springs?Worked perfect! Just a note for some who are going to do this, one of the steel rods will come out of the top. The other has the pinch of the bottom which keeps it in place. Once you reposition the pins push down to get them started and make sure they are even once complete. View attachment 5555View attachment 5556
Jlarson524
Active Member
Not sure why it needs to be turned 180 degrees but I had Alex and Lonnie do that. The pump will fit inside the tank you just need to push it a little. The springs will give and it will fit nicely in the tank.
Briann1177
Goblin Guru
I don't think there is an orientation for the TC fuel pump that doesn't interfere with either the walls or the baffle inside. I had to tweak my float. Or you can do what Lonny mentioned which is probably the best way.
RichRich
Well-Known Member
I turned mine, I originally installed without turning it thinking there would be just enough room but I can assure you that it will hang up. Not at first, but just one day your gauge will continuously read empty no matter how full your tank is and you will have to remove it and do it. Honestly it is very easy and it's what I should of done in the first place but I thought it would work, it is so close but just not quite enough
Jlarson524
Active Member
Is anyone else running an in-line fuel filter on a TC goblin?
Lethalcast
Well-Known Member
There is a filter on our pump so I didn't add one. I've done almost 3K miles on the car without a problemIs anyone else running an in-line fuel filter on a TC goblin?
Briann1177
Goblin Guru
Yes, I added a fuel filter to mine only because I didn't know any better. Filtered fuel is filtered for me.
Briann1177
Goblin Guru
There isn't one that I'm aware of. The orientation that caused the least interference with the fuel level arm was pointing the arm towards the front corner. I still had to tweak my arm. There is no getting around it interefereing if you don't either tweak it or do what Lonny mentioned.
aaronbuley
Well-Known Member
Thx for the heads up.I turned mine, I originally installed without turning it thinking there would be just enough room but I can assure you that it will hang up. Not at first, but just one day your gauge will continuously read empty no matter how full your tank is and you will have to remove it and do it. Honestly it is very easy and it's what I should of done in the first place but I thought it would work, it is so close but just not quite enough
OptimizePrime
Goblin Guru
I know this is old, but I just went through this and have some pictures to accompany the process to make the re-positioning a but more intuitive. Once you know what's required, it's 'easy' but there's still a risk of pulling out the wiring or cracking plastic pieces - so patience and care are necessary.Does anyone actually have a picture of the pump turned in the correct position? Theres alot of turning talked about, but no image of the way the pump actually sits in the tank. Which way does the fuel point after the pump has been clocked
I wouldn't recommend using pliers to pull the tubes out, one of the tubes is crimped and it's **** near impossible to know which one without putting the wiring and other plastic pieces at risk. Plus, to pull the tube out with it crimped requires the force necessary to remove King Arthur's sword - and you don't need to work that hard.
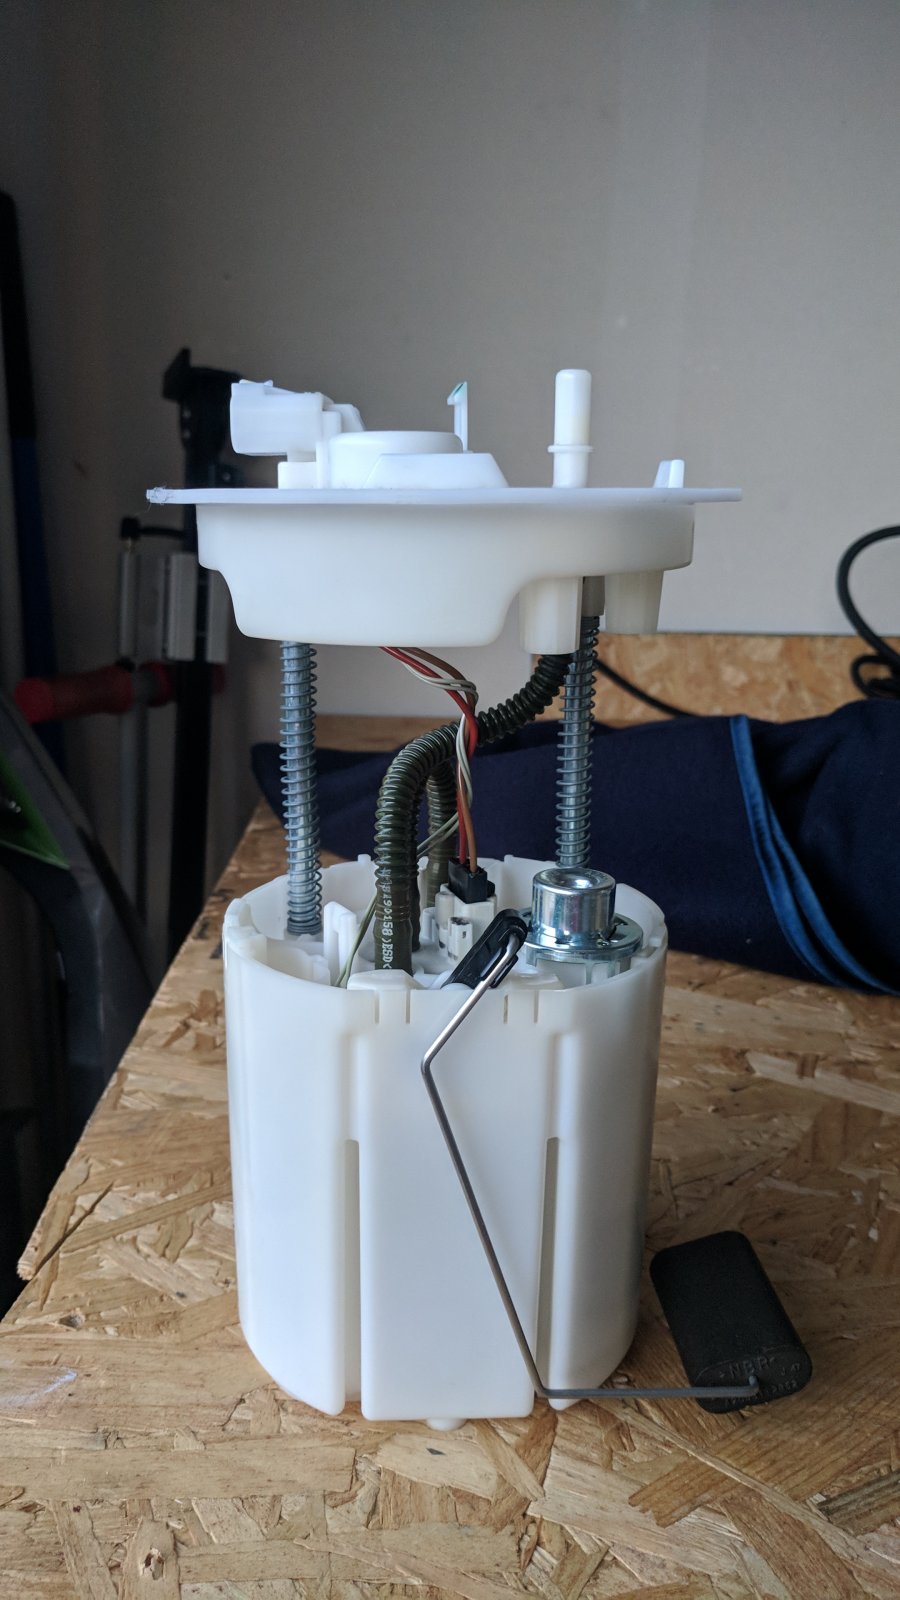
First, see the tabs that surround the pump on the outside - unlatch these. Use the springs to your advantage by just pulling up on the tab with some needle nose pliers and the spring pressure will separate the rest.
Next, find the crimped tube and use some vice grips to turn her into a circle again so it can move freely through the black insert and the white part. Then, remove the black insert holding the tubes in place.
Place the once-crimped tube into the other tubes hole and the non-crimped tube into the once-crimped tube position. ie Just swap the tubes, do not change the top white piece and be very careful with the wiring and crimping of the gas line itself when spinning things. There's a plug to the pump itself which can be removed, but there are some very thin wires without a plug - be mindful of those.
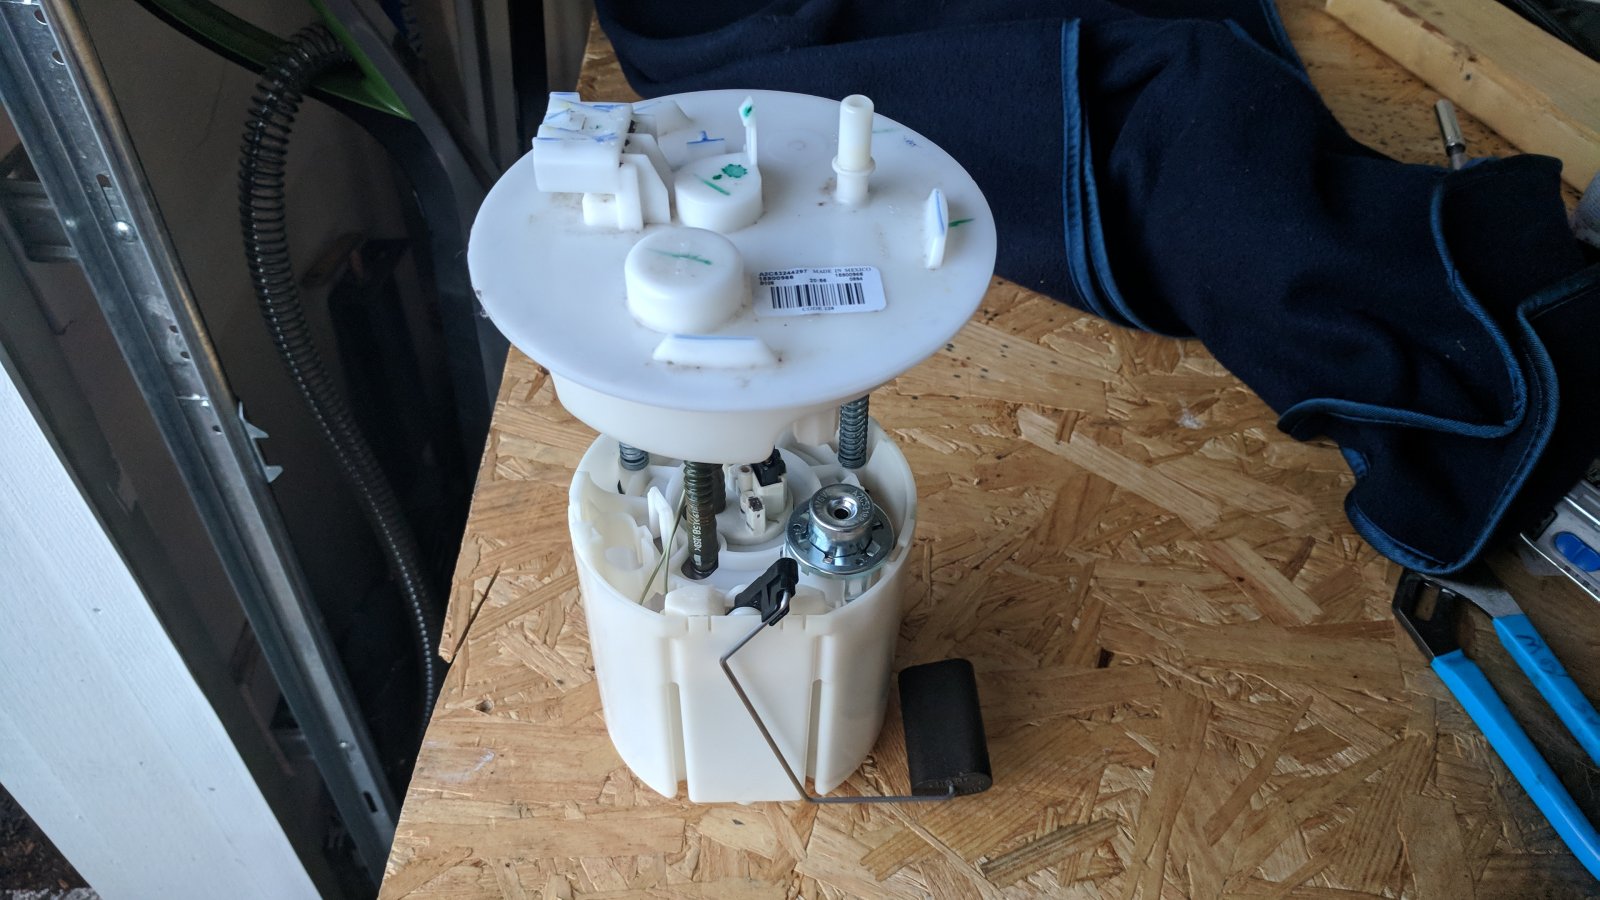
Then, replace the black inserts and don't forget to re-crimp the tube. This is what it should look like. Notice the white top centered over the pump housing now. Also notice my gas line is crimped (it can be uncrimped).
Line up the hole on the top white plastic to a stud. You will have to drill this larger or completely out. It's pretty brittle plastic and did not take kindly to my drill bit so I used a cutoff wheel to open it up a bit.
Your bobber should now be pointing towards the passenger seat - free and clear of obstruction. Opened hole at the 8 o' clock position.
Hope this helps!
JBINTX
Goblin Guru
I followed these instructions tonight. I hate this kind of tedious work with plastic about to break, wires about to pull loose, springs wanting to work against you, fuel lines wanting to crimp and pull loose. Sheesh! But, it all worked out.
Thanks Alex for the extra insight. You rock!
Thanks Alex for the extra insight. You rock!
RouteAbel
Well-Known Member
Great guide. Does the kit come with a new top ring or do you have to modify the donor ring? The slots on my Turbo too ring dont line up.I know this is old, but I just went through this and have some pictures to accompany the process to make the re-positioning a but more intuitive. Once you know what's required, it's 'easy' but there's still a risk of pulling out the wiring or cracking plastic pieces - so patience and care are necessary.
I wouldn't recommend using pliers to pull the tubes out, one of the tubes is crimped and it's **** near impossible to know which one without putting the wiring and other plastic pieces at risk. Plus, to pull the tube out with it crimped requires the force necessary to remove King Arthur's sword - and you don't need to work that hard.
First, see the tabs that surround the pump on the outside - unlatch these. Use the springs to your advantage by just pulling up on the tab with some needle nose pliers and the spring pressure will separate the rest.
View attachment 11280
Next, find the crimped tube and use some vice grips to turn her into a circle again so it can move freely through the black insert and the white part. Then, remove the black insert holding the tubes in place.
View attachment 11281
Place the once-crimped tube into the other tubes hole and the non-crimped tube into the once-crimped tube position. ie Just swap the tubes, do not change the top white piece and be very careful with the wiring and crimping of the gas line itself when spinning things. There's a plug to the pump itself which can be removed, but there are some very thin wires without a plug - be mindful of those.
Then, replace the black inserts and don't forget to re-crimp the tube. This is what it should look like. Notice the white top centered over the pump housing now. Also notice my gas line is crimped (it can be uncrimped).
View attachment 11282
Line up the hole on the top white plastic to a stud. You will have to drill this larger or completely out. It's pretty brittle plastic and did not take kindly to my drill bit so I used a cutoff wheel to open it up a bit.
Your bobber should now be pointing towards the passenger seat - free and clear of obstruction. Opened hole at the 8 o' clock position.
View attachment 11283
View attachment 11284
Hope this helps!
I know this is old, but I just went through this and have some pictures to accompany the process to make the re-positioning a but more intuitive. Once you know what's required, it's 'easy' but there's still a risk of pulling out the wiring or cracking plastic pieces - so patience and care are necessary.
I wouldn't recommend using pliers to pull the tubes out, one of the tubes is crimped and it's **** near impossible to know which one without putting the wiring and other plastic pieces at risk. Plus, to pull the tube out with it crimped requires the force necessary to remove King Arthur's sword - and you don't need to work that hard.
First, see the tabs that surround the pump on the outside - unlatch these. Use the springs to your advantage by just pulling up on the tab with some needle nose pliers and the spring pressure will separate the rest.
View attachment 11280
Next, find the crimped tube and use some vice grips to turn her into a circle again so it can move freely through the black insert and the white part. Then, remove the black insert holding the tubes in place.
View attachment 11281
Place the once-crimped tube into the other tubes hole and the non-crimped tube into the once-crimped tube position. ie Just swap the tubes, do not change the top white piece and be very careful with the wiring and crimping of the gas line itself when spinning things. There's a plug to the pump itself which can be removed, but there are some very thin wires without a plug - be mindful of those.
Then, replace the black inserts and don't forget to re-crimp the tube. This is what it should look like. Notice the white top centered over the pump housing now. Also notice my gas line is crimped (it can be uncrimped).
View attachment 11282
Line up the hole on the top white plastic to a stud. You will have to drill this larger or completely out. It's pretty brittle plastic and did not take kindly to my drill bit so I used a cutoff wheel to open it up a bit.
Your bobber should now be pointing towards the passenger seat - free and clear of obstruction. Opened hole at the 8 o' clock position.
View attachment 11283
View attachment 11284
Hope this helps!