Jason in Texas - ext. track - 09 SS/TC
- Thread starter JBINTX
- Start date
Waterdriver
Goblin Guru
Nice! That'll sure help with preventing heat build up in your heatexchanger system during idle, slow speeds, stop and go traffic or drafting! 
JBINTX
Goblin Guru
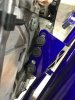
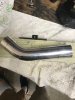
Well crud. That means I am short by about 12" on the heat exchanger water hose I cut then.View attachment 12286
This is the hose we supply for the heat exchanger, it gets cut in half.
Last edited:
JBINTX
Goblin Guru
Got a few more tasks done today. Made a few little mistakes here and there, but nothing a little re-do time couldn't fix. You really get to know this project when you do the same task more than once. Paying the beginner's price!
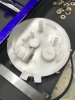
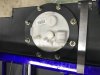
Installed the fuel pump AFTER vacuuming out the tank very well (thanks Desert Sasquatch!). Had to trim the bolt ring just a little to clear the tank mounting angle. And had to trim the pump plastic flange a little to clear one of the bolts. Some of these little details did not make it into the first build video.
Fuel filler neck with vent hoses.
Not sure how many have ordered the panel buttons. I don't remember seeing many of them. The little spacers had me scratching my head at first. Hope this helps some others.
Only thing left on the front end is to wire up the two fans. Gonna make double sure they are blowing in the right direction.
Hope to marry up the engine tomorrow.
I have been working around and staring at the pedal layout. I know some others have raised the accelerator pedal to the same level as the brake. I looked at our Mustang GT layout. The accelerator pedal is behind the brake as well - about 1.5". About the same. I am sure there are various layouts by different manufacturers. I am going to leave these pedals alone for now and change later if needed.
JBINTX
Goblin Guru
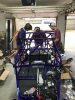
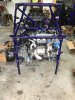
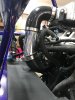
Do you Ecotec take this Goblin to be.......................Got a marriage here today!
Plenty of help from the sons - and dog. And thanks to Lonny for a few quick texts answered on a Saturday! Goblin tech support at its best!
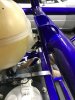
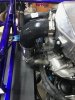
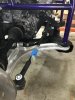
The turbo mounts in the back hole set on both sides. On the driver side there are two spacers (K21E) where two original transmission mounting bolts are used. The remaining four black bolts are from the donor seats.
Wahoooooo!!!!!!!
Plenty of help from the sons - and dog. And thanks to Lonny for a few quick texts answered on a Saturday! Goblin tech support at its best!
The turbo mounts in the back hole set on both sides. On the driver side there are two spacers (K21E) where two original transmission mounting bolts are used. The remaining four black bolts are from the donor seats.
Wahoooooo!!!!!!!
JBINTX
Goblin Guru
well if you have not figured it out yet, I cheated on the harness. I deferred to the experts in Red Oak..... by sending them my harness to re-work -----and a few dollars!....You're going to be done in no time. I really have to step up my game! It's murder, waiting on the wiring videos. LOL!
Ark :D
Goblin Guru
It's not cheating. I would have done the same, but I told myself at the beginning, I was going to do everything I could possibly do on this project, by myself. I've held true to that so far, including dismantling my (two) donor dash(es) and pulling my heater hoses. If you have no such requirements of yourself, you're good to go!well if you have not figured it out yet, I cheated on the harness. I deferred to the experts in Red Oak..... by sending them my harness to re-work -----and a few dollars!....
JBINTX
Goblin Guru
Been on a roll today. Rainy day. Theoretically quarantined kind of. So kept on working on the Goblin.
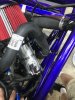
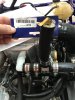
Hooked up the ECM and all the electrical computer connections.
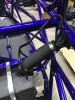
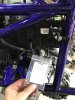
Took a good pic of the mounting hardware under the fuse box. This little spacer change is not in the part 20 video.
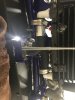
Not sure if anyone else was a bonehead like me and tore the little tab connector on the back of the plastic expansion tank. I tried reinforcing it with a metal strap and two part epoxy. The epoxy did not stick to the plastic tank. So, I just drilled two small holes on the underside of the tab bracket and used two zip ties. A little crude, but will do the job.
Hooked up the ECM and all the electrical computer connections.
Took a good pic of the mounting hardware under the fuse box. This little spacer change is not in the part 20 video.
Not sure if anyone else was a bonehead like me and tore the little tab connector on the back of the plastic expansion tank. I tried reinforcing it with a metal strap and two part epoxy. The epoxy did not stick to the plastic tank. So, I just drilled two small holes on the underside of the tab bracket and used two zip ties. A little crude, but will do the job.
Attachments
-
 280.4 KB Views: 406
 -
 335.1 KB Views: 422
 -
 188.2 KB Views: 399
 -
 203.5 KB Views: 397
Murcielago311
Well-Known Member
I remember that tab DID NOT want to come out.
JBINTX
Goblin Guru
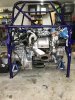
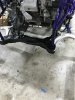
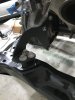
Subframe installed today. Moderately easy. I kind of followed some old instructions here:
https://dfkitcar.com/forum/index.php?threads/first-stage-assembly-instructions.58/
You will have to scroll about half way down.
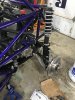
The solid engine mounts fit well. I started with the front two carriage bolts to the frame at the corners. Then installed the rear middle solid mount. Next, I put in the control arms and the rear corner bolts. I left all of the above loose. My last bolt was on the front mount where it goes through the subframe ears. Wrestled getting it exactly lined up, but it finally went. All worked, but a different order may yield an easier install.

https://dfkitcar.com/forum/index.php?threads/first-stage-assembly-instructions.58/
You will have to scroll about half way down.
The solid engine mounts fit well. I started with the front two carriage bolts to the frame at the corners. Then installed the rear middle solid mount. Next, I put in the control arms and the rear corner bolts. I left all of the above loose. My last bolt was on the front mount where it goes through the subframe ears. Wrestled getting it exactly lined up, but it finally went. All worked, but a different order may yield an easier install.
JBINTX
Goblin Guru
Got a few more tasks done today.
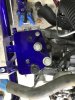
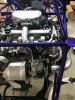
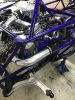
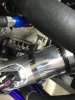
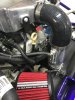
Fit up all the intake and intercooler piping. Had to cut one metal tube a little shorter. Trimmed the rubber pipes a little here and there. It is a tight fit everywhere. I did have to move the little vacuum junction box on top to make room for the aluminum inter-cooler. Just moved it to the side over a few inches.
I did find a missing port that was supposed to be next to the MAF sensor. The factory has a replacement coming tomorrow.
Using Tire Wet helps the install of the rubber pipes.
For the first time, I was unable to find the correct donor bolts. The ones that hold in the sensor right before the intake (it is loose in the pics). Bonehead move - I put them back in the holes when I removed the sensor, then sold the intake piping. Doh!!@#**
Also fitted up the oil/water separator. Those are the hoses that you see loose on the passenger side of the engine. If interested, you can see my write up about that in another thread here:
https://dfkitcar.com/forum/index.php?threads/oil-separator.1596/page-2
Hope you all are well out there in virus America.
JBINTX
Goblin Guru
Well, the spare time everyone has seems to be turning into Goblin working time. The rate of posts is great!
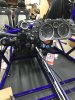
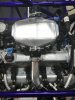
I finished up all the water lines on my intercooler. I saw a few different plugs and solutions that others have done for the fill port. I found a clean cheap solution on Amazon. See pic below.
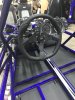
Steering wheel and quick release done.
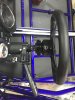
Rear toe link hardware installed, not tightened.
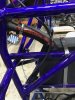
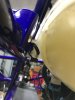
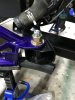
Rear suspension installed, not tightened. Man the clearance with the inlet pipe on the driver side is TIGHT! I may try to cut the pipe and move it in another 1/4".
May fill some oil and coolant tonight. Still several small tasks to complete. Getting close to firing it back up!
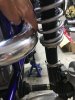
I finished up all the water lines on my intercooler. I saw a few different plugs and solutions that others have done for the fill port. I found a clean cheap solution on Amazon. See pic below.
Steering wheel and quick release done.
Rear toe link hardware installed, not tightened.
Rear suspension installed, not tightened. Man the clearance with the inlet pipe on the driver side is TIGHT! I may try to cut the pipe and move it in another 1/4".
May fill some oil and coolant tonight. Still several small tasks to complete. Getting close to firing it back up!
JeffsGoblin
Goblin Guru
Just a reminder, the new tie rods from DFG go on the front and the old ones from the donor go on the rear. It looks like your rears are the new ones.Well, the spare time everyone has seems to be turning into Goblin working time. The rate of posts is great!
I finished up all the water lines on my intercooler. I saw a few different plugs and solutions that others have done for the fill port. I found a clean cheap solution on Amazon. See pic below.
Steering wheel and quick release done.
Rear toe link hardware installed, not tightened.
Rear suspension installed, not tightened. Man the clearance with the inlet pipe on the driver side is TIGHT! I may try to cut the pipe and move it in another 1/4".
May fill some oil and coolant tonight. Still several small tasks to complete. Getting close to firing it back up!
View attachment 12399View attachment 12400View attachment 12401View attachment 12402View attachment 12403View attachment 12404
Your build is looking great!
JBINTX
Goblin Guru
Are they different sizes?Just a reminder, the new tie rods from DFG go on the front and the old ones from the donor go on the rear. It looks like your rears are the new ones.
Your build is looking great!
DCMoney
Goblin Guru
Different lengths.Are they different sizes?
Zoom Zoom
Goblin Guru
That’s nice real nice!!!!Do you Ecotec take this Goblin to be.......................Got a marriage here today!
Plenty of help from the sons - and dog. And thanks to Lonny for a few quick texts answered on a Saturday! Goblin tech support at its best!
The turbo mounts in the back hole set on both sides. On the driver side there are two spacers (K21E) where two original transmission mounting bolts are used. The remaining four black bolts are from the donor seats.
Wahoooooo!!!!!!!
View attachment 12296View attachment 12297View attachment 12298View attachment 12299View attachment 12300View attachment 12301View attachment 12302
JBINTX
Goblin Guru
So I thought about this mistake some more. And, I started thinking if there was anything else that I may have missed on the build that was not included in the instructional build video series.Just a reminder, the new tie rods from DFG go on the front and the old ones from the donor go on the rear. It looks like your rears are the new ones.
Your build is looking great!
I did receive several links to picture groups that were supposed to "fill in the gap" in the absence of details not in the final videos. They were helpful. But maybe they were not quite as dummy-proof for me as the video series.
How did everyone else (Jeff, DCMoney, ...) know this tie rod end swap and not me? What did I miss? Where was this info? Am I just a bonehead???? Is it "common knowledge" and I am stupidly uncommon? Input from all is welcome here. No pride will get hurt.
Thankfully I posted a picture that Jeff just happen to waste time perusing - and was astute enough to point out to me. Thank you, sir.
Sorry all for whining and venting. I will swap the tie rod ends and call it a lesson learned.
Briann1177
Goblin Guru
Tie rod ends replace steering rack ends or go on rear?
Was I supposed to use the provided tie rod ends on the rear? I replaced my steering rack ends with them, but I’m thinking that wasn’t correct. They are now long gone.
I'll just provide some examples. I'll let you answer all of your other questions.