Desert Sasqwatch
Goblin Guru
Looks great. Guessing the learning experience may offset the desire to purchase a new engine? There is always a level of satisfaction completing a project and getting excellent results. 
I'm In the same boat, with the money and time I have put into my 160k mile supercharged motor I would have probably been better off getting a new lnf to begin with.I haven't been idle but have been going pretty slow cleaning up and rebuilding the motor a bit. I am finally ready to take it off the engine stand and mate it to the transmission. the more time I spent with the motor the more I wished I had bought a new crate motor.
the hose goes to the intake pipe next to MAF. I replaced mine with rubber hose and an aftermarket check valve (original is the black plastic one in your pic).I'm making progress. I'm finally starting to see the end. I still have a bunch of things to do but the list is getting shorter. I'm sure as I get closer to the end the more questions I will have.
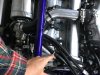
First question what is this line for? What plugs into it?
View attachment 14064
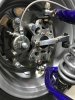
Next question, for plumbing the Turbo heat exchanger I have screwed in the white plastic elbows. Do these just get plumbed with 3/4 heater hose to the white plastic pipes? The white pipes feel a little smallish with the 3/4 hose. I could use some hose clamps. Anyone got any pictures of plumbing the heat exchanger?

Thank you. I found the pictures of your heat exchanger install last night after posting. They need to add a link to the useful photo album.the hose goes to the intake pipe next to MAF. I replaced mine with rubber hose and an aftermarket check valve (original is the black plastic one in your pic).
https://www.amazon.com/gp/product/B07CC9K599/ref=ppx_yo_dt_b_search_asin_title?ie=UTF8&psc=1
View attachment 14073View attachment 14074
yes tighten down the hose clamps on the HE pipes. Loose fit indeed.
see post #172
https://dfkitcar.com/forum/index.php?threads/jason-in-texas-ext-track-09-ss-tc.1531/page-9
both bottom holes.Thank you, that is helpful. I had not found that thread before. The other thing I notice is I have two holes for the steering arm where the videos only show a single set of holes. Did you mount through the top holes or bottom? In my picture I have it top on the left side and bottom on the right side. Thats probably not correct.
Also I see I have my washers flipped on the top rod end.
That explains it.Bottom control arms are on wrong side of car. Shock mount goes down.
Does the data wire need to be extended and tied into the other data wires in the dash area?Yours is newer than mine, but should be the same. the 2 red with white tracer wires should be ignition +, the green should be a data wire and not sure on the last one.