Rttoys
Goblin Guru
Doing some autocross, I found that you jamb on the brakes and the fronts lock instantly. Unless you are in a panic stop on the street, you’ll never experience this. At autocross, you find out quickly that you cannot jamb down on the brakes. After doing some research, I decided to decrease the pressure on the front brakes and see how it goes.
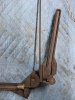
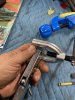
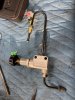
I ended up buying a Wilwood adjustable proportioning valve #260-12627. It’s an adjustable valve so you can decrease the pressure as needed. This is a version that will keep all of your fittings metric like on the cobalt/goblin. You will also need a few brake lines (need extra Incase you goof), fittings, bender and flare tools. You will need a double flare and bubble flare tool.
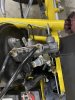
Coming off the front line T, a quick 90* will mate to the valve, then just make a small line to the master. Depending on year you’ll need a m10 or m12 fitting on the master. The master is a double flare or standard flare, all others are bubble flares.
Now to the good stuff. Once adjusted, this thing is a game changer on the brakes. Mine are adjusted where the front barely lock. Doing this, the rears are actually working and working well. This thing flat out stops. The rear works as it should now and the whole car “sinks” down when it stops. The brake pedal needs a little more pressure to work, but the feed back is great now. It’s not a brick hitting the brakes.
a few others have done this and I’m sure they will chime in on things I may have forgot.
important stuff-
Lines 3/16”
bubble flare everywhere but master
double flare on master
M10 fittings (there’s a difference between double and bubble flare fittings)
Wilwood prop valve 260-12627
I ended up buying a Wilwood adjustable proportioning valve #260-12627. It’s an adjustable valve so you can decrease the pressure as needed. This is a version that will keep all of your fittings metric like on the cobalt/goblin. You will also need a few brake lines (need extra Incase you goof), fittings, bender and flare tools. You will need a double flare and bubble flare tool.
Coming off the front line T, a quick 90* will mate to the valve, then just make a small line to the master. Depending on year you’ll need a m10 or m12 fitting on the master. The master is a double flare or standard flare, all others are bubble flares.
Now to the good stuff. Once adjusted, this thing is a game changer on the brakes. Mine are adjusted where the front barely lock. Doing this, the rears are actually working and working well. This thing flat out stops. The rear works as it should now and the whole car “sinks” down when it stops. The brake pedal needs a little more pressure to work, but the feed back is great now. It’s not a brick hitting the brakes.
a few others have done this and I’m sure they will chime in on things I may have forgot.
important stuff-
Lines 3/16”
bubble flare everywhere but master
double flare on master
M10 fittings (there’s a difference between double and bubble flare fittings)
Wilwood prop valve 260-12627
Attachments
-
 552.2 KB Views: 471
 -
 354.3 KB Views: 483
 -
 369 KB Views: 520
 -
 522 KB Views: 552
 -
 310.4 KB Views: 545
 -
 280.6 KB Views: 522
 -
 487.8 KB Views: 515
