Alex and the Extended City Frame - 08 Sport/Automatic Donor

Bretter

Well-Known Member
4/8/15 Preparing Donor Parts Video #15 In Progress

Engine wiring harness labeled, photographed and taken off for rework. Lots of prep work done on other parts. Some notable differences:

1. Brake Booster: Ours did not have an aluminum spacer. There was only 1 layer of foam and it was glued/stuck to the booster. Will have to find a foam replacement and see how it works when assembling the Goblin - not sure if the spacing will be OK without the spacer or not.

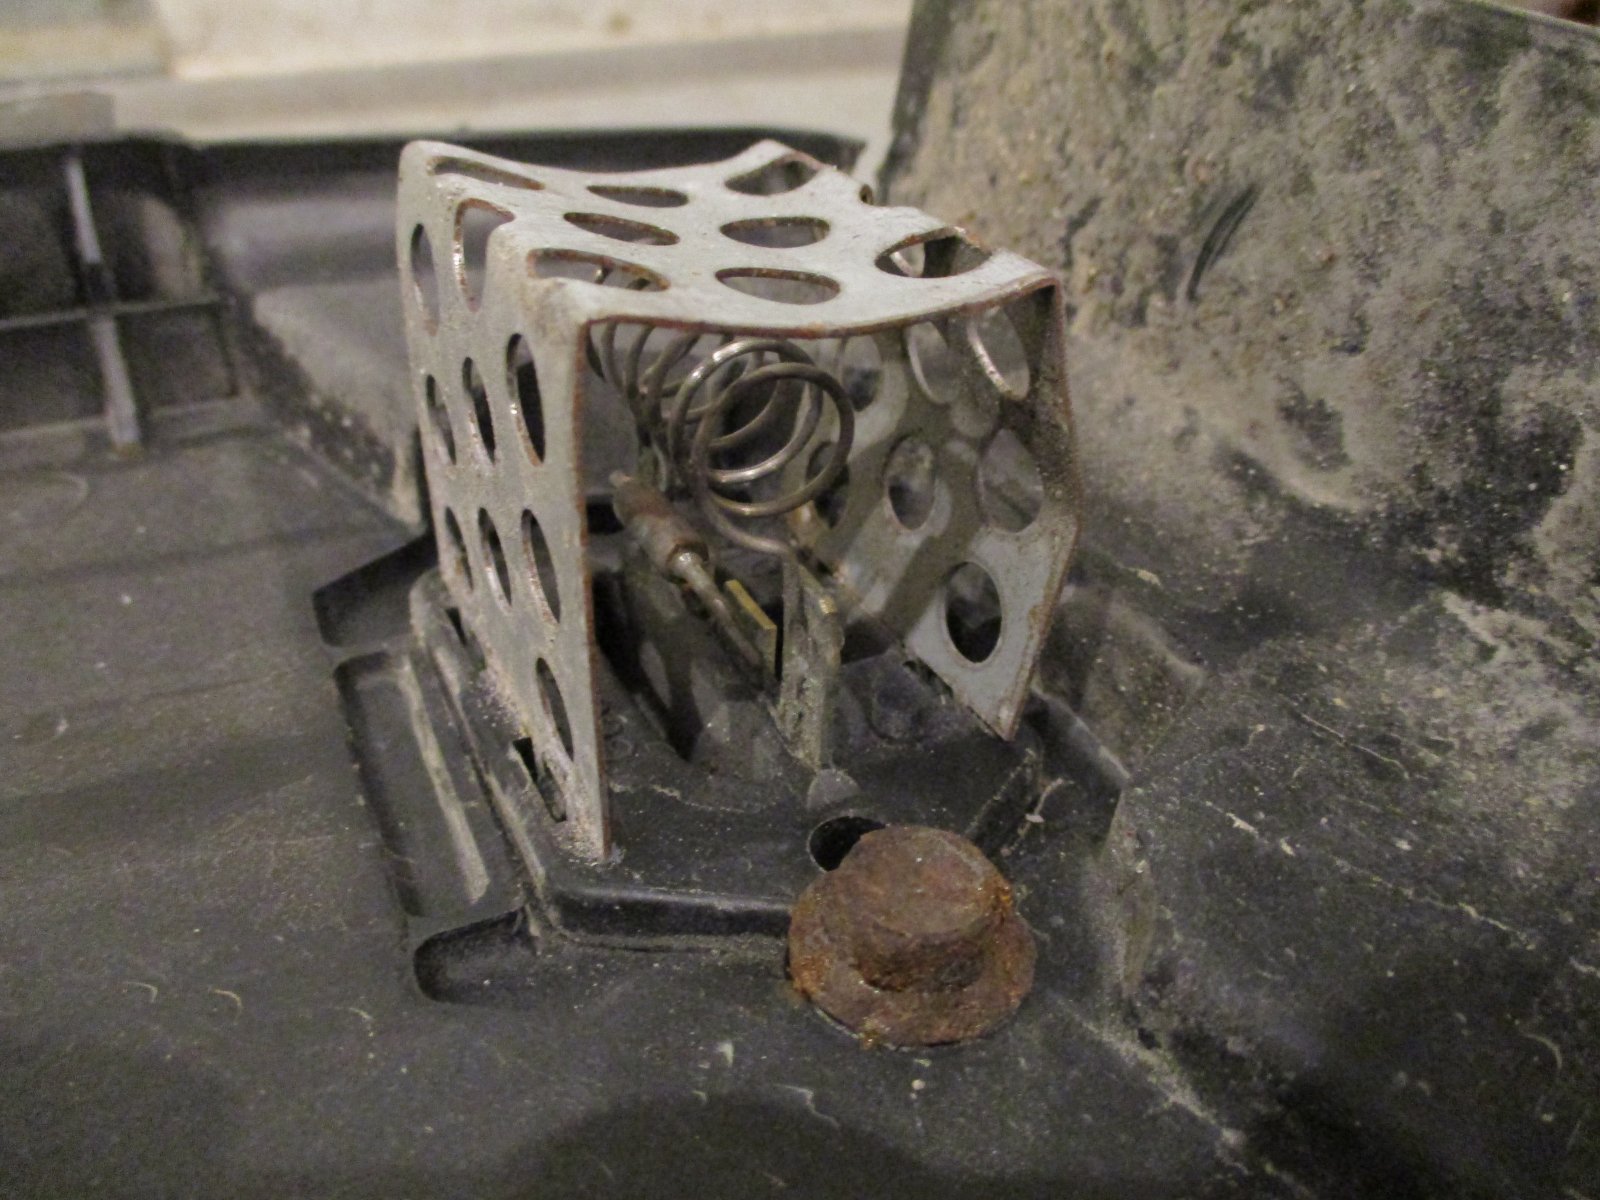
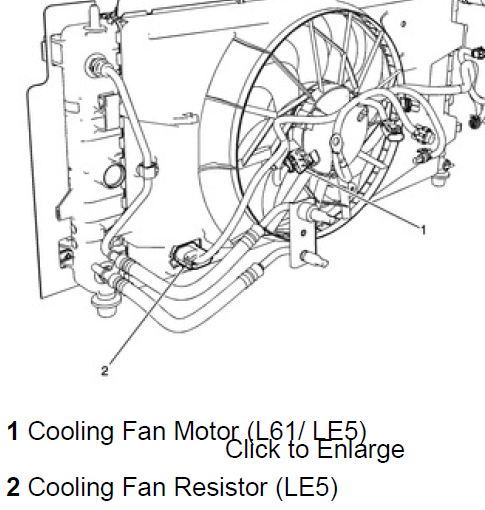
2. Radiator: We had an extra connector to the radiator fan - a black & white heavy gauge wire going to a coil on the lower left of the fan shroud. The docs say "cooling fan resistor" and it looks like it puts out a good bit of heat. I have seen motor starting resistors, but don't remember any as elaborate as this one. I'm assuming I can take out the fan and resistor wires from the Engine harness, correct? See picture:
IMG_0299.JPG

upload_2018-4-8_21-13-0.png


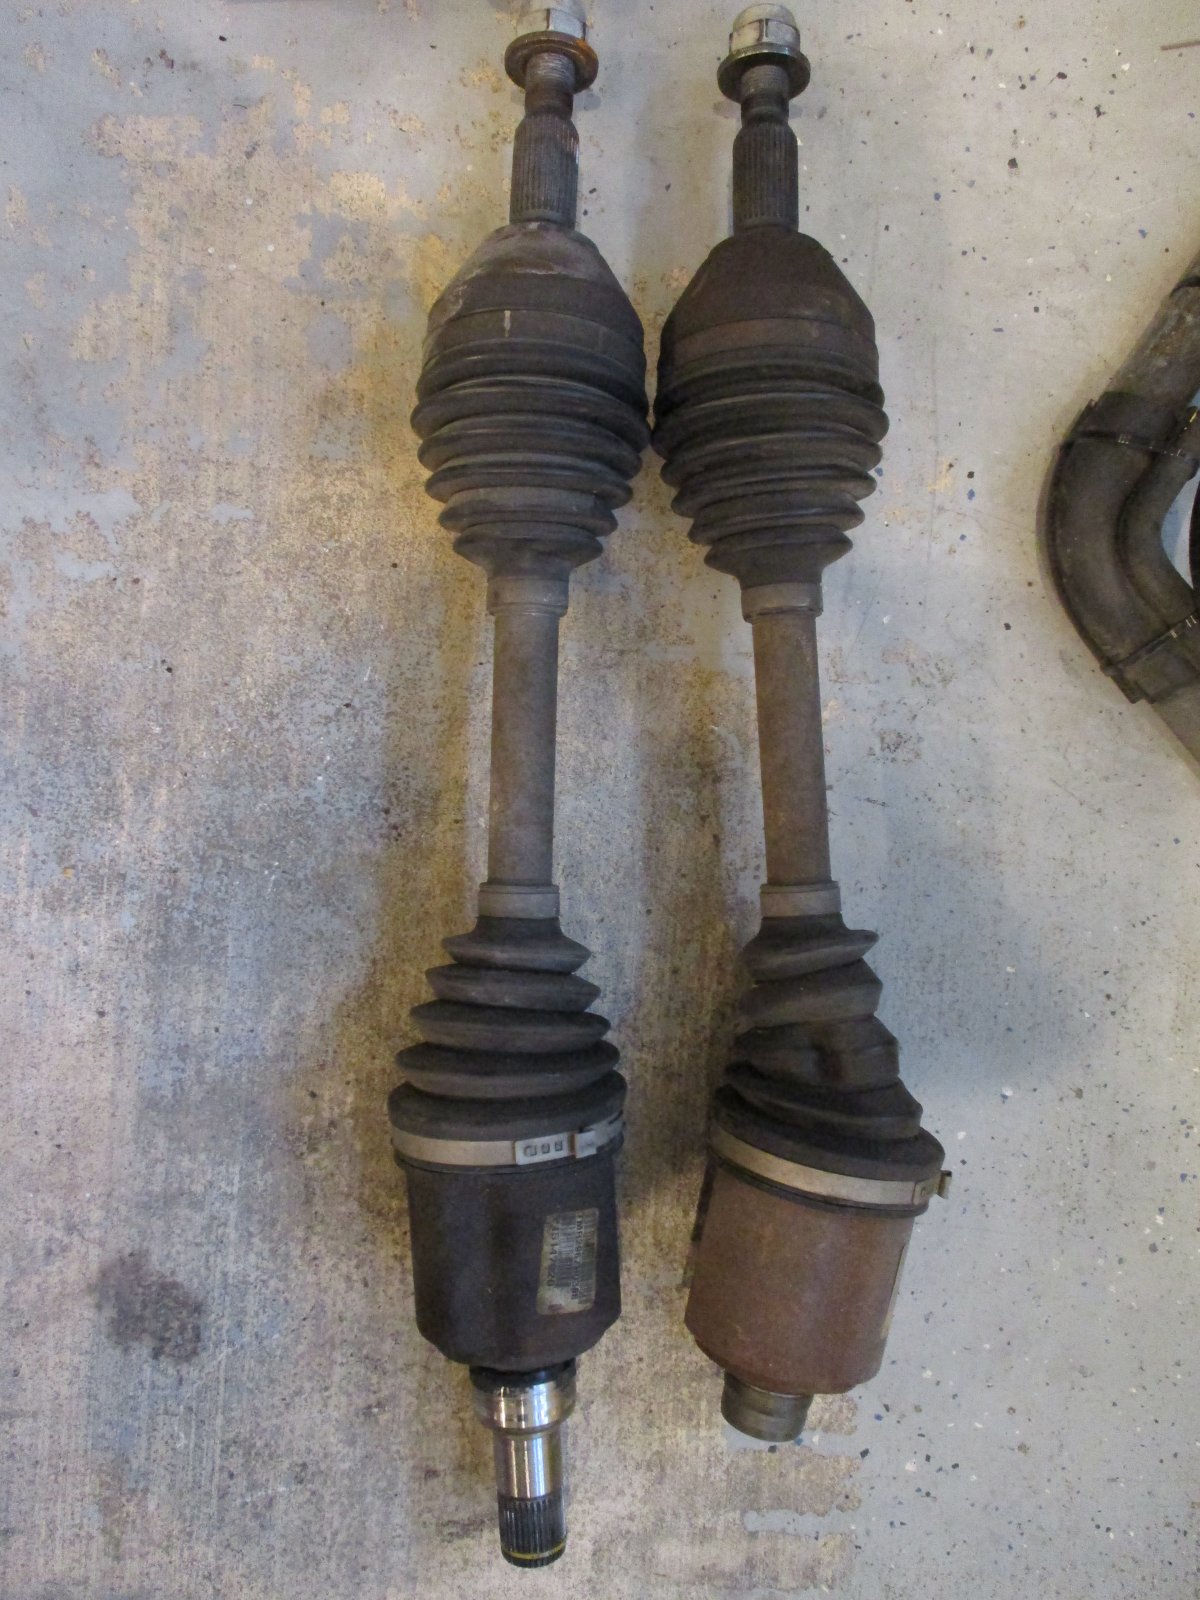
3. When we pulled the axles, they came out differently from each other. The left one came out and left the transmission sealed. The right came out - with what looks like the bearing to seal the transmission. Originally we thought that there was something wrong with the right axle, but after looking at more pictures on other builds, maybe the left one didn't come out properly? See photos below:

I took the picture and the Left was on Top, but then it came out like this. Reality in these pictures is reversed: Left axle is on the Right -and- Right axle is on the Left.
IMG_0297.JPG


IMG_0298.JPG

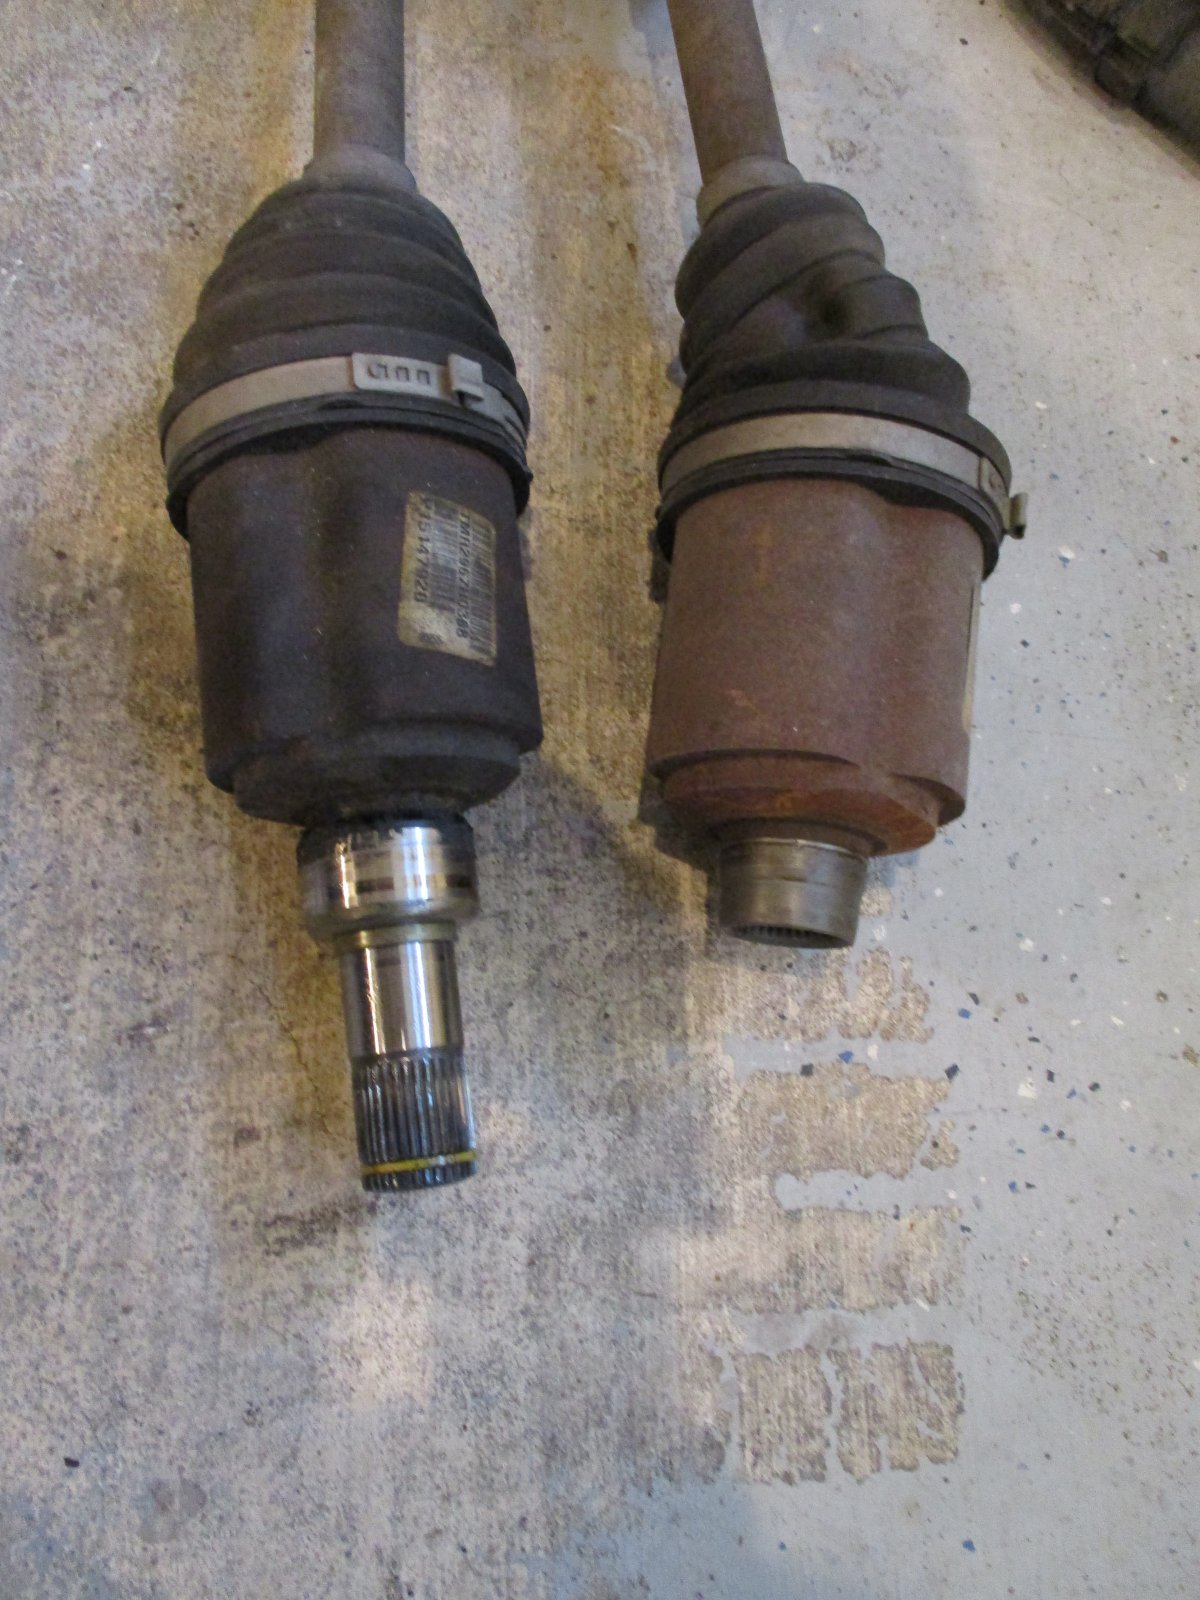
Are we going to have a problem reinstalling the axles like this? Did we do something wrong and need to fix it? Will the right axle bearing go back in and seal well to prevent any leaks? I saw in Nuker's thread that he put in new axle seals - should we consider that?

Thanks!
 

ctuinstra

Goblin Guru
You will not need the cooling fan resistor that I know of. My donor had two fans and it used on of them to cut the power in half (by wiring in series) for half speed. I assume that it what the resistor is used for in your donor. I would just wire it direct and run it full speed when it needs to come on. Especially since you don't have A/C anymore.

The axles are the same, one has a stub axle stuck to it and the other one is still in the transmission. This threw me for a loop too when working on another car. I suggest replacing the seal and the seal surface that is pressed on the stub axle. The seal surface slides off fairly easy. Just have to get the new one on straight and in the right position on the shaft.
 

ctuinstra

Goblin Guru
My brake booster was just like your. I did not worry about the spacer or the foam. I just bolted it up as is and it seems to work fine. Mine didn't have a space and my foam was like yours.
 

Bretter

Well-Known Member
Quick update on engine harness - took out the fan and A/C wires, then relocated the MAF sensor. Re-wrapped the rest and seems to fit really well so far.
IMG_0305.JPG
 

DanPerryy

Well-Known Member
You will not need the cooling fan resistor that I know of. My donor had two fans and it used on of them to cut the power in half (by wiring in series) for half speed. I assume that it what the resistor is used for in your donor. I would just wire it direct and run it full speed when it needs to come on. Especially since you don't have A/C anymore.

The axles are the same, one has a stub axle stuck to it and the other one is still in the transmission. This threw me for a loop too when working on another car. I suggest replacing the seal and the seal surface that is pressed on the stub axle. The seal surface slides off fairly easy. Just have to get the new one on straight and in the right position on the shaft.
Yep, sometimes when you pull the right axle the little stub stays with the axle and sometimes it stays in the trans. I replace both the small seal on the axle as well as the larger seals in the transmission that seal against the little ones on the shafts.
 

Bretter

Well-Known Member
Yep, sometimes when you pull the right axle the little stub stays with the axle and sometimes it stays in the trans. I replace both the small seal on the axle as well as the larger seals in the transmission that seal against the little ones on the shafts.
Dan & Chad,

I think these are the seals you are talking about, correct?
https://www.rockauto.com/en/moreinfo.php?pk=1927148&cc=1440996&jsn=561

Replace both sides? Or just the right one that came out?

I have to go look at the repair manual - how hard are these to change out?

Thanks!
 

ctuinstra

Goblin Guru
Dan & Chad,

I think these are the seals you are talking about, correct?
https://www.rockauto.com/en/moreinfo.php?pk=1927148&cc=1440996&jsn=561

Replace both sides? Or just the right one that came out?

I have to go look at the repair manual - how hard are these to change out?

Thanks!
Sure looks like the correct seal. I would replace both sides because once you know how to do it the second one goes pretty quick. The most difficult part it pushing the seal surface onto the shaft straight. You don't want to press it on crooked and bend up the lip on the shaft. Try to press it down perfectly straight. Maybe come up with a rig or temp tool to help guide it on. Also MEASURE BEFORE YOU REMOVE THE OLD ONE! You have to know exactly how far down the shaft to install it. There is no marking or stop point. Too far on and it will miss the seal and the same if not on far enough. After its built and together and putting fluid in is not the time to find out it doesn't seal.
 

ctuinstra

Goblin Guru
Dan & Chad,

I think these are the seals you are talking about, correct?
https://www.rockauto.com/en/moreinfo.php?pk=1927148&cc=1440996&jsn=561

Replace both sides? Or just the right one that came out?

I have to go look at the repair manual - how hard are these to change out?

Thanks!
If the stub axle is in there still, hopefully one swift jerk on it will release it. One thing I found out is that with the circlips, you have to yank and slam them. I tried getting one to seat all the way with a block of wood and large hammer and it never did, I thought it did because it was solid. After it leaked, I pulled it out and by hand slammed it in and it seated just fine.
 

DanPerryy

Well-Known Member
Dan & Chad,

I think these are the seals you are talking about, correct?
https://www.rockauto.com/en/moreinfo.php?pk=1927148&cc=1440996&jsn=561

Replace both sides? Or just the right one that came out?

I have to go look at the repair manual - how hard are these to change out?

Thanks!
I did both sides, the small seal is easy BUT you need to put it in the proper position on the shaft. It can go on too far and then the race on it will not match the seal on the large seal. The hard part on the large seal is getting it out. I cant remember, I did it over a year ago. As I remember the space between the seal and the shaft is very small. I think I made a tool but I could have just used a flat blade screwdriver. The removed seal is toast anyway. I've never had a drip of oil leak.
 

Bretter

Well-Known Member
Things that make you go hmmmm...

On our donor, one of the lower control arms was bent when it was wrecked. Being a Sport model, it has the FE3 suspension and thus aluminum control arms. As such, I purchased 2 replacement aluminum control arms because wanted both sides to be equal in wear etc.

After reading here that the car handles better with the Moog bushings, we decided to replace the stock ones on the replacement arms. Initially I thought there was just one replacement, purchased those and put them in. Then found out there were different ones meant for aluminum control arms so have now purchased those... and that is where the fun really begins.

Here are the listing on Rockauto: (didn't see this prior to 1st purchase - just went with the ones from ZZP not knowing there were different versions)
1525383048562.png


This picture is the control arm with the 3 different bushings.
Top=original (new) came with replacement control arm
Middle=Moog K6698 - I originally purchased these from ZZP and didn't know about the FE3 ones
Bottom=Moog K201285 - recently purchased
IMG_0306.JPG


The middle ones (K6698) we initially put in and were extremely difficult to get in compared to the stock ones. After reading some other build logs, I realized that we had the wrong ones and then purchased the bottom ones. Getting the K6698 out again was not too bad, but then when we tried to put in the final ones (K201285) meant for aluminum, they just slipped right through!

The K201295 are tapered as seen in this photo:
IMG_0310.JPG


These K201285 go all the way through no problem - when I try to hold it in the middle, it will rattle a bit inside the control arm. Alex says maybe we widened the hole in the control arm - but no way I can see us being that strong! :)

So I decide to measure them...

Original: 60.19mm
IMG_0307.JPG


Moog K6698 meant for steel control arms: 60.18mm
IMG_0308.JPG


Moog K201285 meant for aluminum control arms: 59.86mm
IMG_0309.JPG


Why would the K201285 be so much smaller? To the point of not even fitting in the control arm?

Before I call Moog to ask about it, anyone else have similar experience?
 

ctuinstra

Goblin Guru
I have the SS/SC and it came with the same arms. I replaced my bushings with the K201285 ( I just checked my RA order history) and it was a very tight fit. I sent them off to have them pressed in because I didn't feel comfortable with doing the aluminum.

I hate to say it, but my best guess is that either they are not OEM arms (I don't know if you ordered OEM) or you may very well have stretched the hole by putting the other bushings in.
 

Waterdriver

Goblin Guru
Possibly, pressing in and removing the previous bushing galled the bushing bore in the arm, removing a ever so slight amount of aluminum.
When I pressed mine in, I applied a very thin film of synthetic grease to the bore of the arm and on the outside of the bushing.

What is the measurement of the bore in the control arm? And is it the same from the top to bottom of said bore.
 

DanPerryy

Well-Known Member
I order the moog parts for the steel control arms and they went right in my steel arms. I would have figured that they would have been the same for both type of arms but that's what I get for thinking.
 

DanPerryy

Well-Known Member
BTW, I was thinking - again - when will I learn, that the stock ones that are more "compliant" in one axis are probably intended to be installed in one orientation. Would need to look at a service manual. During hard acceleration, deceleration the more compliant ones may actually change the track geometry by design. With the engine in the rear instead of the front the geometry change could be backwards.
 

Bretter

Well-Known Member
Control Arm Bushing Update

So I ended up calling Moog and talking to their tech support. According to them, the K6698 with the steel outside should be 60-60.25mm in diameter as they are designed with a bit of a bow in the steel ring and will compress when installed into the control arm. Also, the K201285 spec says the diameter should be 59.86, exactly as I measured.

The OEM control arms have a bushing hole diameter of 59.7mm so both part numbers from Moog should work well.

Since these control arms are not OEM (they do have lifetime warranty though) obviously the hole is larger than original OEM parts. I measured them at ~59.9mm which is going to force us back to the K6698 bushings. They are noticeably harder than the original ones that came with the control arms, so it should be definitely better on handling.

That leaves us with an extra set of K201285 bushings. I don't have the original boxes any more but they are essentially brand new - never been installed. If anyone is interested in them, let me know. Best price I can find is that they are $28.79 each + shipping. I'm thinking $50 for both and I'll put them in a USPS priority mail "fits it ships" box to you.
 

Bretter

Well-Known Member
5/27/2018 Sheet Metal and Main Hoses Video #16 In Progress

Finally, school is out for the summer so that means Alex has time to work on the car! :)

Almost all of the parts are painted - the undercarriage, brake booster and pedals are all black now and the engine is still in process of being cleaned. The valve cover will be red within the next couple of days and hopefully the rest of the engine will be cleaned enough to reassemble it and be ready for installation.

Today, we finished what has to be the two toughest parts that I can see. The coolant hoses through the frame and the sheet metal on the bottom. Normally wouldn't think the sheet metal to be that bad, but the main rivet puller we had somehow broke and we couldn't get it to work after the 2nd rivet - it just would not let go of the old nail and no amount of hammering or disassembly could get it unstuck. So, we had to resort to the small single hand rivet tool - and Alex really got a workout on it! This was after a wound or two trying to pull coolant lines including a bloody and fat lip after the rope let go during an early pulling session :)

After the better part of the afternoon, we finally had the coolant lines in and the bottom sheet metal and stiffener on an riveted/bolted. With summer here in Texas, we better get used to today and the near 100F days of working in the garage now as well!
IMG_0311.JPG
IMG_0312.JPG
 

ctuinstra

Goblin Guru
Are you using a Harbor Freight riveter? The one we had did the same thing but it wasn't so much broke, it just had very aggressive jaws and would bite into the rivet stem so hard that it wouldn't let go. After a while the jaws teeth "broke-in" and didn't bite quite so hard. But still we have to tap it on it's back a couple of times while releasing the trigger to get it to let go of some of them.

While I worked on the riveter, Kaleb did many of them by hand also. I thought for sure he was going to end up mashing the hand tool in to a pile of twisted metal by the time he was done with it.
 

DanPerryy

Well-Known Member
There are not that many rivets. I did all of mine with a hand tool. I would not spend the extra $ for pneumatic one unless I had to do a lot of them.
 

theeulogy

Well-Known Member
I did all my rivets with a hand tool also, one that I got from Advanced Auto 10 years ago, this more than doubled the lifetime rivet count!
 
Top