Christopher Sanchez
Well-Known Member
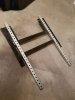
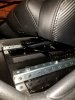
Oh I see what you mean now.. I will check mine to see if I used spacers in the front to clear the bar
I used 4 washers to clear the barI caught all that in your previous post, but in my case, it looks like the front ends of the seat rails will rest on top of the frame crossbar. Perhaps your seat rails were shorter than mine.
")
The best method I know of is to preheat the hose & frame before squeezing it thru the frame. Warm hose = flexible hose.i wonder if anyone has tried pulling a vacuum on the hose to collapse it, then push it through and re-inflate? I think this is everyone's dreaded part of the build. Sounds like the "use a bigger hammer" philosophy prevailed once again.
That is exactly how I did the hose pull.. I used dish soap instead because I had a ton of more paint work to do and did not want the silicone all over every thing.First of all, I made things easy on myself (or so I thought), by buying one of DF's hose puller tools. If you weren't aware, it's a $35 device of DF's design, that screws down to a 2x4 which is attached to the rear of the frame, where the subframe mounts. You do one side, then move your assembly to the other side, and repeat. Well, not for me. I failed all three tries I made yesterday, and damaged the DF tool in the process. I was not careful and let the nylon strap wind funny as I ran my drill on the first attempt, and it ended up somehow doubling back on itself and fraying a bit along one edge, I believe because of the sharp edge of the washer on that side of the tool. It worsened on the second and third attempts. I called it a day after failed attempt #3.
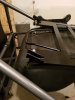
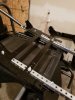
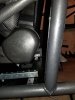
I got back at it today. I prepped the end of the hose for the 4th time, lubed the frame tube up good, soaked the hose good, and went for it. Here's the result:
View attachment 11255
I just about threw in the towel at that point. I had already chipped away at the length of heater hose so much, I didn't think I would have enough, and to make matters worse, I managed to damage my $35 puller tool. I started to clean up, but then I thought, no ... it's 65 degrees outside, it's a beautiful day, I'm not going to be beaten by this **** hose. I knew there were plenty of people on here that pulled these hoses through without the DF tool, so I started to look around to see what I could use to mimic its functionality. I don't have a winch, and there's nothing laying around to make a makeshift one out of.
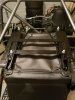
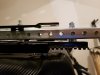
What I ended up doing was, I took a long length of nylon rope, doubled it back on itself, and mimic'd the DF tool at one end:
View attachment 11256
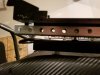
I took a piece of scrap lumber I had in the corner of the garage and knotted the other end of the rope around it, then wound up most of the slack around the lumber. I put the rope through the frame, prepped the end of the hose, lubed up the tube and the hose, and started pulling. It was easy at first, but got very difficult, very fast. I ended up laying on my back with my arms wrapped around the lumber, and using my legs to push against the frame. Paydirt:
View attachment 11258
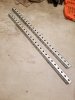
I lucked out ... this is all the hose I had left!
View attachment 11254
Shout out to DF for sending more than enough extra hose for idiots like me that screw up a lot .... errr... have lots of "learning experiences".
atta boy!!!!Yesterday and today, it was a sunny and beautiful 65 degrees just south of Lancaster, PA. Very unusual for January, for sure, so I decided to capitalize on the relatively warm conditions in my garage and pull my heater hoses through the frame.
As documented in another thread (sorry for the hijack), I had a hell of a time.
First of all, I made things easy on myself (or so I thought), by buying one of DF's hose puller tools. If you weren't aware, it's a $35 device of DF's design, that screws down to a 2x4 which is attached to the rear of the frame, where the subframe mounts. You do one side, then move your assembly to the other side, and repeat. Well, not for me. I failed all three tries I made yesterday, and damaged the DF tool in the process. I was not careful and let the nylon strap wind funny as I ran my drill on the first attempt, and it ended up somehow doubling back on itself and fraying a bit along one edge, I believe because of the sharp edge of the washer on that side of the tool. It worsened on the second and third attempts. I called it a day after failed attempt #3.
I got back at it today. I prepped the end of the hose for the 4th time, lubed the frame tube up good, soaked the hose good, and went for it. Here's the result:
View attachment 11255
I just about threw in the towel at that point. I had already chipped away at the length of heater hose so much, I didn't think I would have enough, and to make matters worse, I managed to damage my $35 puller tool. I started to clean up, but then I thought, no ... it's 65 degrees outside, it's a beautiful day, I'm not going to be beaten by this **** hose. I knew there were plenty of people on here that pulled these hoses through without the DF tool, so I started to look around to see what I could use to mimic its functionality. I don't have a winch, and there's nothing laying around to make a makeshift one out of.
What I ended up doing was, I took a long length of nylon rope, doubled it back on itself, and mimic'd the DF tool at one end:
View attachment 11256
I took a piece of scrap lumber I had in the corner of the garage and knotted the other end of the rope around it, then wound up most of the slack around the lumber. I put the rope through the frame, prepped the end of the hose, lubed up the tube and the hose, and started pulling. It was easy at first, but got very difficult, very fast. I ended up laying on my back with my arms wrapped around the lumber, and using my legs to push against the frame. Paydirt:
View attachment 11258
I lucked out ... this is all the hose I had left!
View attachment 11254
Shout out to DF for sending more than enough extra hose for idiots like me that screw up a lot .... errr... have lots of "learning experiences".
your build is looking great I had ran into big problems mounting my seats and ended up making a bracket out of galvanized sign posts and worked out great