BAustin's Extended Track - 06 SS/SC Donor - #157 Registered
- Thread starter baustin
- Start date
baustin
Well-Known Member
I did the entire harness. Me and my soldering iron: https://www.amazon.com/gp/product/B00ANZRT4M/ref=ppx_yo_dt_b_search_asin_title?ie=UTF8&psc=1hey nice build man.. I'm building the same year and SC who did your harness
Prior to this build I had only soldered a handful of times but it made sense once I started.
I worked through it when the older build videos were the only ones available, not the new and improved versions DF has been releasing. I left the dash harness to be combined into the full harness till I had my frame assembly started and could custom fit the wiring to the frame. No issues when I went to startup.
baustin
Well-Known Member
Just a quick update: I'm currently still waiting on my title from DMV, no known issues other than time right now. Good thing is that I have a license plate and registration card from DMV as well as insurance coverage, they don't make you wait till the paperwork is finished to get the registration.
I'm not expecting DMV special titles division to be considered essential though so I might be waiting a while, but not a problem since it's street legal without the actual paper title in hand.
edit: All the paperwork is in the hands of DMV, just waiting on the title to arrive to my mailbox unless they have further questions/issues.
Last edited:
Karter2026
Goblin Guru
Wow I thought PA was slow.Don't feel bad I'm still waiting on my title from August
Batlwagn
Active Member
Yeah, this whole thing with North Carolina has been a PITA. I did all the requisite paperwork an inspections mailed everything in a months went by with nothing. I contacted DMV and they said oh yeah the regs have changed now you need to redo the appraisals. WTF!? So my appraisals guy fixed the paperwork and I resubmitted still waiting...
baustin
Well-Known Member
Did a 270 mile trip yesterday which puts me about 1000 miles driven total. I'll have to measure my alignment again but there's a couple things I'm going to need to change based on the tire wear I'm starting to see.
For reference I'm running these tires in 225/45R17 at 24 psi all around.
After an hour of driving on new concrete interstates I could see buildup (possible graining) on the inner edge of the front tires and closer to the outer edge of the rear tires. I say graining but it could've just been stuff getting stuck to the tires rather than the tire wearing but it wasn't across the entire width of the tires. When ever I stopped at other points on the drive I didn't see buildup on the tires at all, I think it was just due to the new concrete on the interstate I had been driving.
Tire spec starts at 10/32". I measured tread at the inner/outer sipping grooves of all 4 tires. Side to side was consistent so I'll just list front/rear tire measurements.
Front
inner edge: 5mm (6.3/32")
outer edge: 7mm (8.8/32")
Rear
inner edge: 6mm (7.6/32")
outer edge: 6mm (7.6/32")
All measurement points were nearly dead on the mm lines so that's why I list it that way.
My initial alignment followed the DF suggested numbers and I know my front tires have more negative camber (top inward) than the rears. I'll be starting with measuring what I've got and checking front toe. My rear tires have some negative camber since I have BC coilovers and no camber bolts but with the even wear I'm happy to leave untouched. If everything is still where I set it, the rear has slight toe in as DF suggested.
A couple other notes for now:
I filled up in South Hill, VA, drove to Richmond, VA. Drove back to South Hill, VA and filled up again at the same pump. Alway running premium due to the supercharger. Took 6.5 gallons for 156 miles, letting the pump cutoff normally while clicked and hands off the handle. 24 mpg for that 156 miles. Track frame, hood, side panels, engine cover, no passenger to Richmond, did have a passenger on the way back to South Hill. Ran the speed limit which is 70 for most of the way and drops for a few miles and then also a few miles of 45 mph roads.
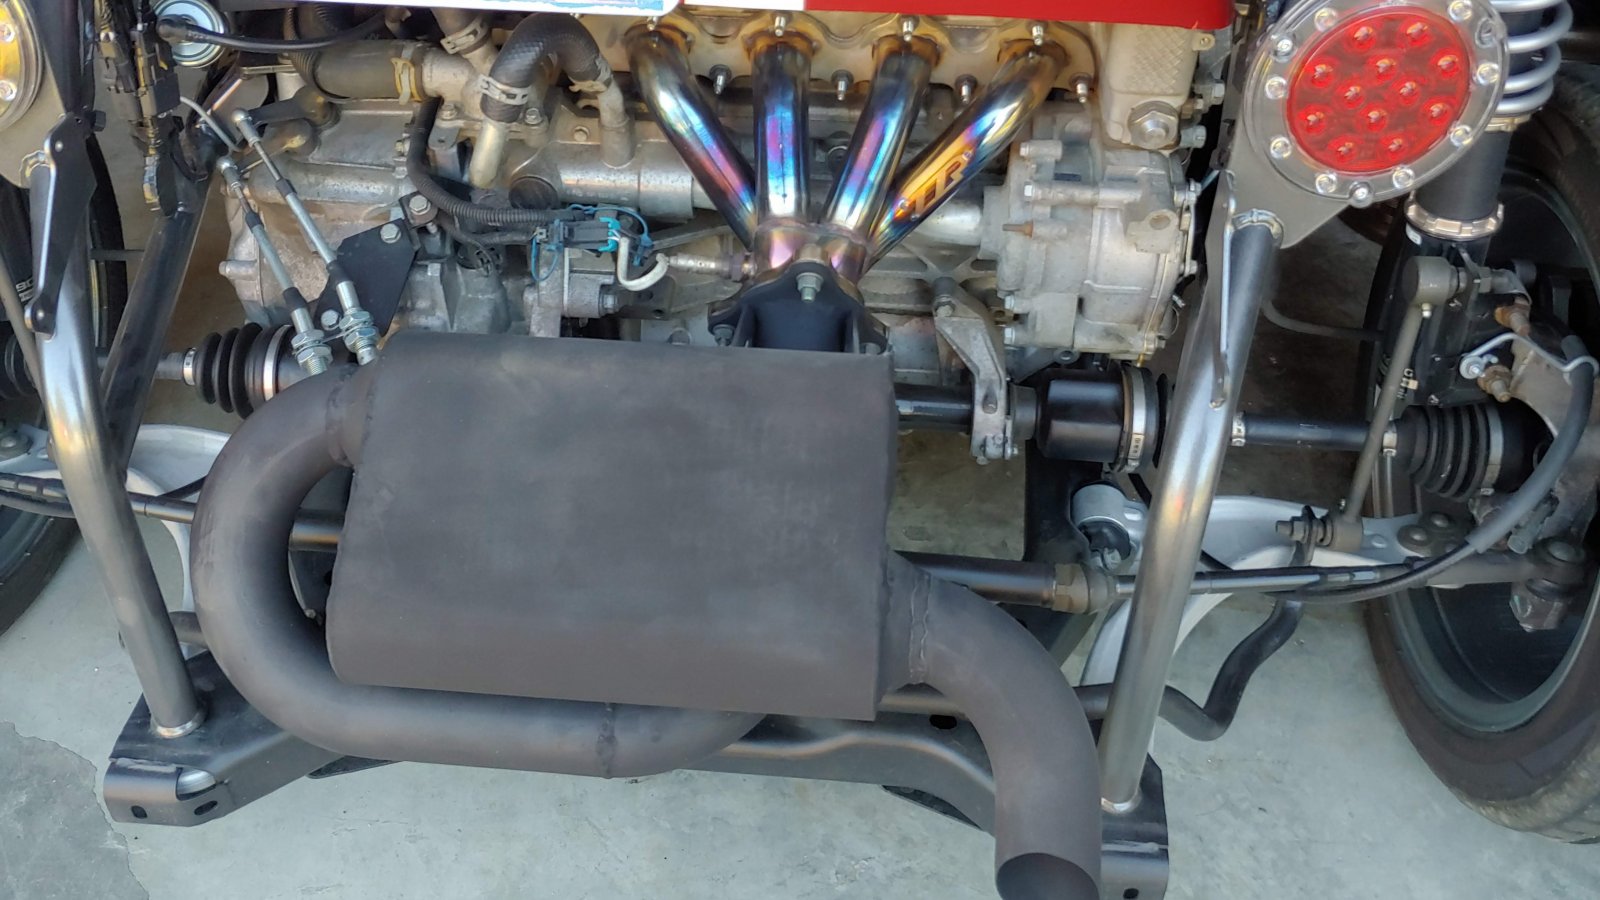
I'm still getting a pending P0300 code (random misfire) but it doesn't get another cylinder specific code. My new exhaust header keeps changing colors every drive, I took this before driving yesterday. Passenger side cylinder (I think this is #1?) has the ZZP logo which does change how the pipe heats. Spark plugs are new, coil packs are original, I didn't dive deeper than the valve cover doing the timing tensioner. I wonder if the different heat in cylinder #1 exhaust is indicating that's the random misfire cylinder. I've considered replace coil packs but they aren't real cheap and it seems to be running well.
For reference I'm running these tires in 225/45R17 at 24 psi all around.
After an hour of driving on new concrete interstates I could see buildup (possible graining) on the inner edge of the front tires and closer to the outer edge of the rear tires. I say graining but it could've just been stuff getting stuck to the tires rather than the tire wearing but it wasn't across the entire width of the tires. When ever I stopped at other points on the drive I didn't see buildup on the tires at all, I think it was just due to the new concrete on the interstate I had been driving.
Tire spec starts at 10/32". I measured tread at the inner/outer sipping grooves of all 4 tires. Side to side was consistent so I'll just list front/rear tire measurements.
Front
inner edge: 5mm (6.3/32")
outer edge: 7mm (8.8/32")
Rear
inner edge: 6mm (7.6/32")
outer edge: 6mm (7.6/32")
All measurement points were nearly dead on the mm lines so that's why I list it that way.
My initial alignment followed the DF suggested numbers and I know my front tires have more negative camber (top inward) than the rears. I'll be starting with measuring what I've got and checking front toe. My rear tires have some negative camber since I have BC coilovers and no camber bolts but with the even wear I'm happy to leave untouched. If everything is still where I set it, the rear has slight toe in as DF suggested.
A couple other notes for now:
I filled up in South Hill, VA, drove to Richmond, VA. Drove back to South Hill, VA and filled up again at the same pump. Alway running premium due to the supercharger. Took 6.5 gallons for 156 miles, letting the pump cutoff normally while clicked and hands off the handle. 24 mpg for that 156 miles. Track frame, hood, side panels, engine cover, no passenger to Richmond, did have a passenger on the way back to South Hill. Ran the speed limit which is 70 for most of the way and drops for a few miles and then also a few miles of 45 mph roads.
I'm still getting a pending P0300 code (random misfire) but it doesn't get another cylinder specific code. My new exhaust header keeps changing colors every drive, I took this before driving yesterday. Passenger side cylinder (I think this is #1?) has the ZZP logo which does change how the pipe heats. Spark plugs are new, coil packs are original, I didn't dive deeper than the valve cover doing the timing tensioner. I wonder if the different heat in cylinder #1 exhaust is indicating that's the random misfire cylinder. I've considered replace coil packs but they aren't real cheap and it seems to be running well.
Last edited:
baustin
Well-Known Member
I was thinking I had set the front wheels to have toe-in but using the toe plates, front measuring tape shows 71 1/16" and the rear tape measure shows 70 11/16". I think the calculates out to be .1 degree toe out (6/16" at 22" spread).
These numbers are without me in the car. I know there's a lot of comments about aligning with someone in the car but I'm just doing this the simple way for now, it drives great but is getting a little excess front tire wear. I'm measuring caster from my garage floor (decently flat concrete) and placing the angle gauge across the 2 upper studs of the wheel bearing (same point Lonny suggested in the original front alignment thread). My steering wheel has been very close to centered, maybe just a couple degrees clockwise while driving straight.
Front Total Toe:
-6/16" on longacre toe plates aka -1 degree (toe out)
(front edge 71 1/16" and back edge 70 11/16")
Front Driver:
camber: -1.8 degree
caster: -6.3 degree
Front Passenger:
camber: -1.5 degree
caster: -5.3 degree
Rear Toe:
+6/16" on longacre toe plates aka +1 degree (toe in)
(front edge 69 10/16" and back edge 70 0/16")
Rear Driver:
camber: -2.5 degree
Rear Passenger:
camber: -1.3 degree
I'm going to do a simple change:
-adjust the front toe to get back to slightly toe in, doing this almost evenly but different enough to center the steering wheel
-since I'm getting even tire wear on the rear, I'm not going to touch the rear wheels even though the camber is different, at least for now
Front average wheel width: 70.875"
Rear average wheel width: 69.8125"
The sawtooth wear pattern on the fronts is definitely sharp edges to the outside of the tread blocks, I think this matches the toe-out measurements I got.
Last edited:
6/16 at 22" spread for both wheels sounds too much. (recommended value is 2/16")
Little bit math (per wheel):
C = 3/16"(catheter) at
H = 22"(hypotenuse)
The angle will be arcsin(C/H) = acrsin(0.00852(27)) = 0.48832221 degree
While recommended (per wheel)
C = 1/16
H = 23.5 (I believe this is real distance on longacre)
arcsin(C/H) = arcsin(0.002659574468085) = 0.15238257 degree - as recommended
Correct me if I wrong.
baustin
Well-Known Member
I missed where I put the decimal on the total toe, meant 1.0 not 0.1, since I know it's even across the wheels I'm just using total toe numbers. I don't have a way to measure independent toe accurately anyways.6/16 at 22" spread for both wheels sounds too much. (recommended value is 2/16")
Little bit math (per wheel):
C = 3/16"(catheter) at
H = 22"(hypotenuse)
The angle will be arcsin(C/H) = acrsin(0.00852(27)) = 0.48832221 degree
While recommended (per wheel)
C = 1/16
H = 23.5 (I believe this is real distance on longacre)
arcsin(C/H) = arcsin(0.002659574468085) = 0.15238257 degree - as recommended
Correct me if I wrong.
The toe plates are 23.5" but my measuring tapes aren't off the outer edges, they are in the slots about 22" apart.
Yeah, I bumped the rear toe down to 1/8" in addition to changing the front toe to 1/8" in. Still have no idea why I set them at 3/8" out, nothing was lose.
baustin
Well-Known Member
Couple things I'll be getting to sometime soon:
- pulling the passenger rear caliper to investigate why the cable parking brake doesn't pull, I'm thinking it wasn't remanufactured correctly. Possibly will have to do a order/return at auto zone keeping the machined bracket to get one that works fully
- adding a power circuit to a dash cam (might be a multifunction dash cam), 2 ideas I haven't finished working out, I'll need a keyed 12v source and a ground point:
- I'll just tie the ground wire to an existing ground wire (solder/splice it in)
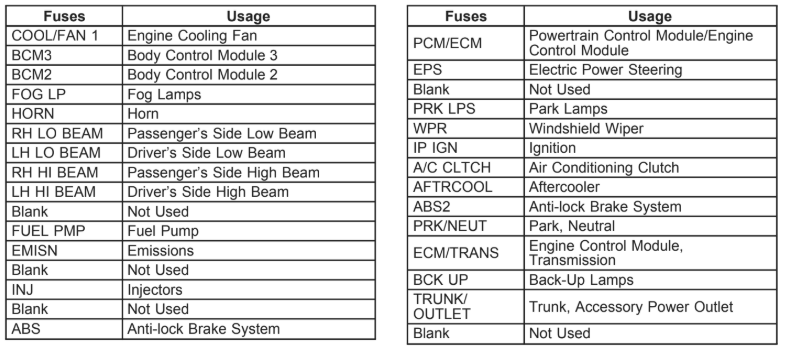
- I could just solder to one of the 2" stubs at the BCM or use an add a fuse to one of the unused fuses (first one is cleaner, second one is easier)
- need to figure out which circuit would still be live after all of the rework, or I can add a fuse to one of the current circuits at the BCM but I prefer to not piggyback though a dash cam doesn't have much power needed
- if anyone has a suggested circuit to use for 12v keyed power, toss it over. I can check through the schematics to confirm but haven't gotten to that point yet
- since I'll already be opening up the hood and footwell cover I might as well pull all the fuses that are extra/unnecessary
- the donor I started with had a lot of options, plenty of fuses should probably be pulled
- all the snipped wires at the BCM and engine fuse blocks are 2" leads with heatshrink over the ends, usable if needed but electrically safe
baustin
Well-Known Member
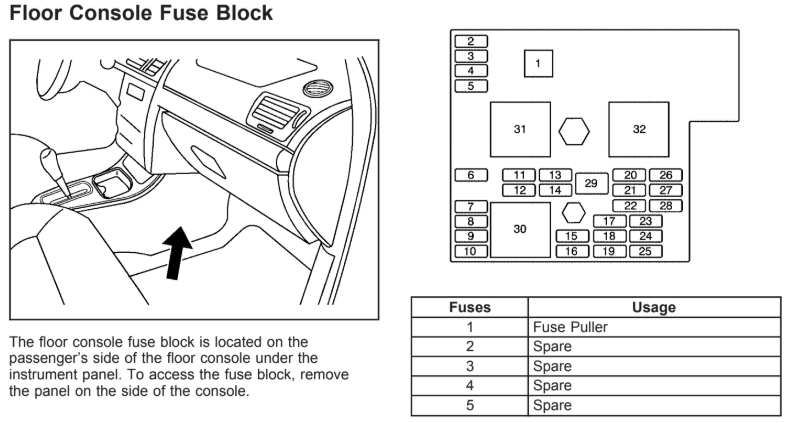
I spent some time deciding where to pick up power and I've settled on BCM plug C3, position C3
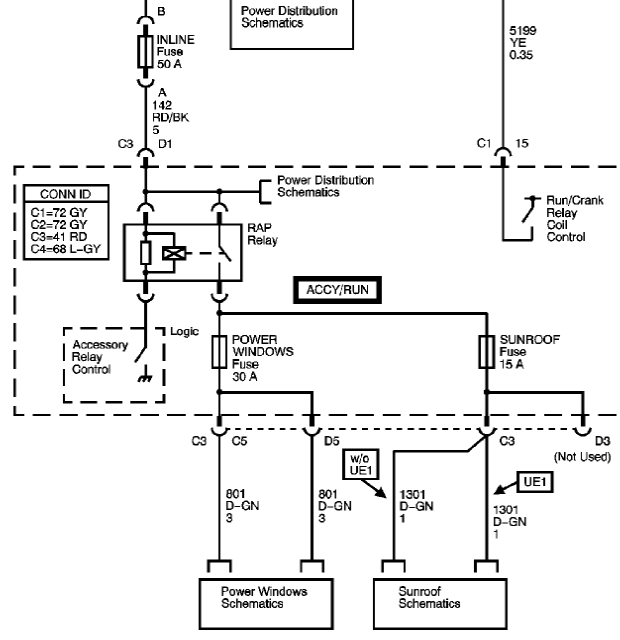
This will give me keyed power plus 10 minutes retained accessory power. The other points I checked were always powered without the key, not what I wanted. I'm not sure if this is because I don't have a driver's door to open and close or if the red/white wires are always hot but I don't want the dash cam wire to be always hot. I plan on never leaving it on up when I'm parked away from home but it's just not something I wanted. The retained accessory power circuit is perfect so I can grab videos after cutting off the car (much quieter this way) and not having to turn the key back to 'on'.
Now I just need to clean up the wires and put things back together to finish the dash cam part.
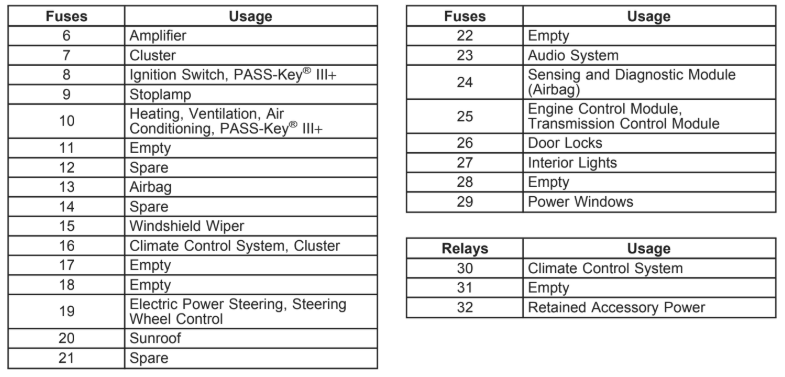
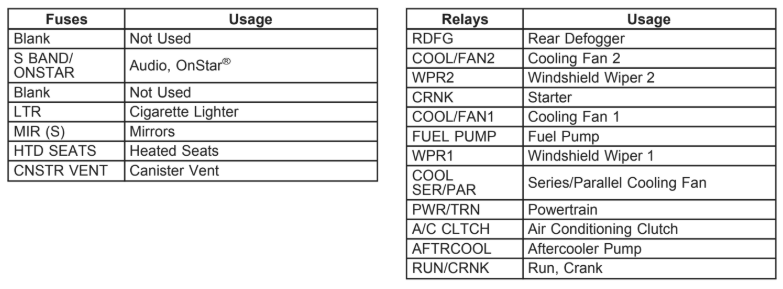
Fuses I plan on pulling since they don't seem necessary:
6 - 20A - Amplifier
13 - 10A - Airbag
15 - 10A - Windshield Wiper
20 -15A - Sunroof <-> replacing this with a 3A fuse and using this circuit for the dash cam power
23 - 10A - Audio System
24 - 10A - Sensing and Diagnostic Module (airbag)
26 - 15A - Door Locks
27 - 10A - Interior Lights
29 - 30A - Power Windows
This will give me keyed power plus 10 minutes retained accessory power. The other points I checked were always powered without the key, not what I wanted. I'm not sure if this is because I don't have a driver's door to open and close or if the red/white wires are always hot but I don't want the dash cam wire to be always hot. I plan on never leaving it on up when I'm parked away from home but it's just not something I wanted. The retained accessory power circuit is perfect so I can grab videos after cutting off the car (much quieter this way) and not having to turn the key back to 'on'.
Now I just need to clean up the wires and put things back together to finish the dash cam part.
Fuses I plan on pulling since they don't seem necessary:
6 - 20A - Amplifier
13 - 10A - Airbag
15 - 10A - Windshield Wiper
20 -
23 - 10A - Audio System
24 - 10A - Sensing and Diagnostic Module (airbag)
26 - 15A - Door Locks
27 - 10A - Interior Lights
29 - 30A - Power Windows
baustin
Well-Known Member
One other thing I plan on looking into and fixing:
My coolant tank leaks if I fill it to the seam or higher, everything's good if I leave the level about 1/2 - 1 inch below the plastic seam. I say 1/2 - 1 inch since it also sits at a slight tilt, middle of car is higher. It seems to leak from one of the clamping screws for the 2 halves. A new tank would also be clean for the first while! I don't think I have a good picture for now to show this. I can't recall where the full mark is on the tank but I assume it would normally be above the seam.
My coolant tank leaks if I fill it to the seam or higher, everything's good if I leave the level about 1/2 - 1 inch below the plastic seam. I say 1/2 - 1 inch since it also sits at a slight tilt, middle of car is higher. It seems to leak from one of the clamping screws for the 2 halves. A new tank would also be clean for the first while! I don't think I have a good picture for now to show this. I can't recall where the full mark is on the tank but I assume it would normally be above the seam.
baustin
Well-Known Member
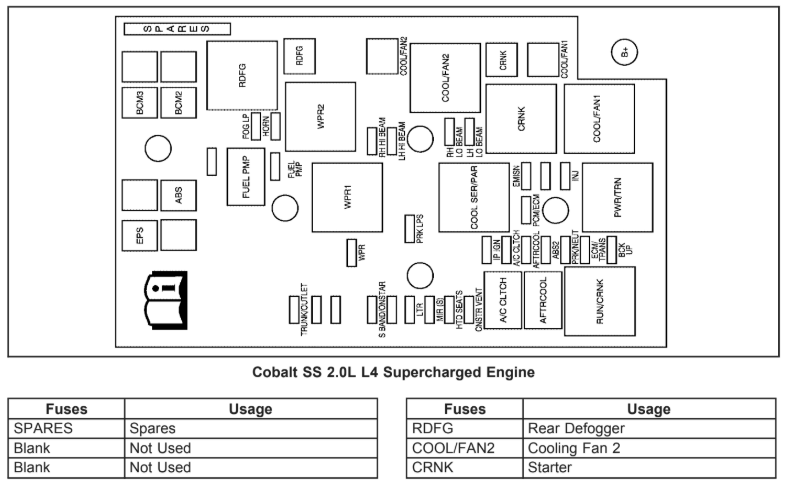
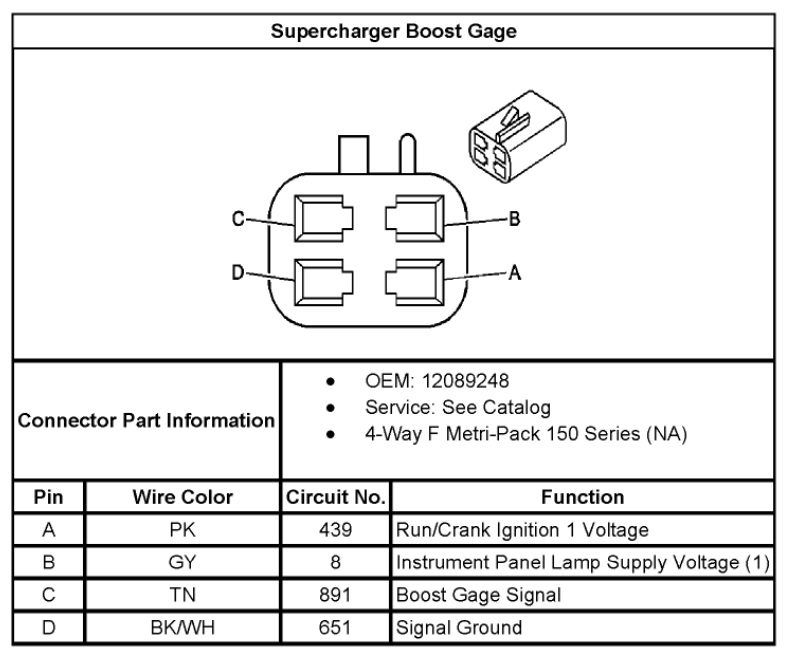
On my way home from a short drive I noticed my boost gauge was just reading -20, not actually changing with boost but my phone was showing various pressures based on throttle position being read from the OBD port. I didn't catch this earlier in the drive but I think I found the reason when I reviewed the circuit diagram.
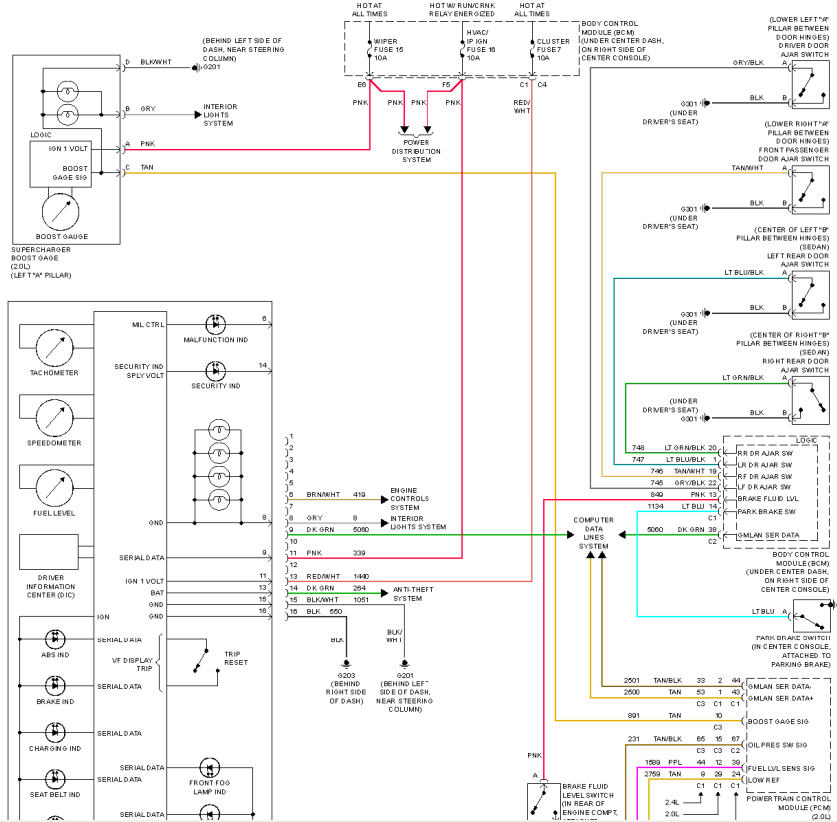
One of the fuses I pulled was the wiper fuse, position 15 (10A). I figured that was safe since I don't have wipers but you can see in the upper area of the diagram the pink wire for the boost gauge. I'll have to pull the foot rest out again to reinstall the fuse in the 15 spot. I'll confirm if that fixes it but the diagram sure seems like that should be the issue.
One of the fuses I pulled was the wiper fuse, position 15 (10A). I figured that was safe since I don't have wipers but you can see in the upper area of the diagram the pink wire for the boost gauge. I'll have to pull the foot rest out again to reinstall the fuse in the 15 spot. I'll confirm if that fixes it but the diagram sure seems like that should be the issue.
baustin
Well-Known Member
Boost gauge is working again, just had to reinstall the wiper fuse. I should just consider fuse 15 on the BCM to be my boost gauge fuse now. So that's good.
I'm also wondering if my intercooler pump is actually working. I have HPTuners and in the VM Scanner app you can command the intercooler pump to be on/off. I tested this with the key at 'on' but engine off and heard the relay flip but can't specifically hear the pump spinning. I'm not sure how loud to expect it to be, there is ambient noise from outside my garage, birds chirping and a 2 lane road at the front of the neighborhood but I had my head at the edge of the frame and couldn't hear anything. I know I kept having to top off the coolant on this path previously and it has since stayed steady, so I assumed it was working and I finally got it full. I probably have no reason for concern for now, I just like to confirm things are working right.
I'm also wondering if my intercooler pump is actually working. I have HPTuners and in the VM Scanner app you can command the intercooler pump to be on/off. I tested this with the key at 'on' but engine off and heard the relay flip but can't specifically hear the pump spinning. I'm not sure how loud to expect it to be, there is ambient noise from outside my garage, birds chirping and a 2 lane road at the front of the neighborhood but I had my head at the edge of the frame and couldn't hear anything. I know I kept having to top off the coolant on this path previously and it has since stayed steady, so I assumed it was working and I finally got it full. I probably have no reason for concern for now, I just like to confirm things are working right.
baustin
Well-Known Member
I should also add that when I loosened the coolant cap it did change pressure and the fluid level came up in the filler neck.Boost gauge is working again, just had to reinstall the wiper fuse. I should just consider fuse 15 on the BCM to be my boost gauge fuse now. So that's good.
I'm also wondering if my intercooler pump is actually working. I have HPTuners and in the VM Scanner app you can command the intercooler pump to be on/off. I tested this with the key at 'on' but engine off and heard the relay flip but can't specifically hear the pump spinning. I'm not sure how loud to expect it to be, there is ambient noise from outside my garage, birds chirping and a 2 lane road at the front of the neighborhood but I had my head at the edge of the frame and couldn't hear anything. I know I kept having to top off the coolant on this path previously and it has since stayed steady, so I assumed it was working and I finally got it full. I probably have no reason for concern for now, I just like to confirm things are working right.
Desert Sasqwatch
Goblin Guru
If you command the pump on, you should be able to feel it vibrating if it's running. Or you could do the old school stethoscope and touch a screwdriver to it and put your ear against the end of the handle to hear it running if you can't get a hand onto it.
baustin
Well-Known Member
I tried checking it again, with the engine cover parts off. Relay definitely flips with the command from VM Scanner, fuse for the intercooler pump is intact, not blown, but no noise from the pump. I also did the checking method of opening the filler neck cap and squeezing the passenger side tube and got no spinning or movement (nothing to impact a screwdriver tip). I think I need to replace that pump.
I am still getting the occasional P300 code (random misfire, not cylinder specific). I was watching the cylinder misfire info through the scanner and it was showing randomly throughtout #s 1-4 at idle and entirely went to 0 current misfires when I added throttle. I've been questioning the coil packs, pretty sure I just need to replace them at this point too. Plugs are new and are gapped to the stock LSJ spec and since under load I can't pin the problem on a bad ground.
I am still getting the occasional P300 code (random misfire, not cylinder specific). I was watching the cylinder misfire info through the scanner and it was showing randomly throughtout #s 1-4 at idle and entirely went to 0 current misfires when I added throttle. I've been questioning the coil packs, pretty sure I just need to replace them at this point too. Plugs are new and are gapped to the stock LSJ spec and since under load I can't pin the problem on a bad ground.