Blue Man's City Goblin - 05 Base Donor

Blue Man

Well-Known Member
I've been on the forum in a couple of different threads for awhile now trying to get off the ground on this project, and I've reached the point that I think a build log will be the best way to do this moving forward. Looking back, I should have started with this, right? All part of the learning process though, so here goes . . .

Hi! I'm Chris and I'm a dentist, not a mechanic, and my son, Boston, is an electrical apprentice. Neither of us has much car experience. I have changed oil and brakes and a few bulbs, but that is about the extent of my expertise with cars. My son has even less. When the car breaks down, we take it to the shop and say, "It doesn't go." That's where we are coming from. One grandfather was a life long automechanic and the other was a life long carpenter, so that kind of stuff is in the blood though.

We wanted a project that we could do together that resulted in something tangible and worthwhile. We wanted something that did not involve a screen and something we could be proud of. We searched around and thought we might try to restore a car, but were advised to start on something "simpler" first. (I think "simpler" is a relative term here.) Kit cars was a suggestion. So we looked up kit cars and came across the goblin and thought that this might be the perfect fit to see if we were cut out for this type of project and if we enjoyed it.

We jumped on the forum here and started asking if people with our background should even attempt this. We got some good feedback and support. It was also suggested that we try and meeting up with one of the two goblin buildings in the valley here. We were able to meet up with Todd. He and his son had built a goblin. They were kind enough to hang out with us for an hour and show us their goblin, take us for a ride, talk about the build and the challenges and offer advice if needed along the way. That kind of sealed the deal for us.

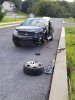
We had already been watching for donors. We posted a couple on here. One came up that would have been perfect but was gone in a day. The auctions seemed the best route, but the shipping costs put things out of our price range for the project. So we went back to one of the first cars we saw. A base automatic 2005. We were interested in this car because it was reasonably close, very cheap and only had 75K on it. The downside was that it had been in a front end accident 18 months ago and had sat in a field ever since. The owner said she had driven the car for 30K miles and never had an issue with the engine or the transmission, just an unfortunate meeting with a deer on the freeway.

We knew that this was like the most plain jane car you could get for a goblin, but all we are hoping to do is make something that looks cool and runs. If things go well to that point and we like it, we can work on upgrading things. If we REALLY like it, we could even build a second one or replace the engine with something a little better. This just seemed like a simple, cheap and easy way to start. (Hopefully we still feel that way when it's done!)

So we settled on terms, placed our order with DF (open cage, full door bars frame) and went to get the car.

Truck and Trailer.jpg
 
Last edited:

Blue Man

Well-Known Member
The car was at the owner's grandfathers place. He was also the mayor of the small town we went to. He had one of his workers bring a tractor around and I'm glad he did. There was no way that car was getting on the trailer without it. It has sunk down into the dirt. They used the bucket on the tractor to lift the back of the car, I slithered under there in the rain and the mud and hitched a chain to the rear subframe and we pulled the car back out of the mud. That's when we discovered the front right tire was pivoting rather freely. (I didn't know why at the time, but I've definitely learned why since then . . . part of my ongoing mechanic training, right?)

The car would not roll due to that front right tire, so we positioned the car and the tractor pushed the car up onto the trailer with me in the driver's seat. That was VERY exciting. But we got it done, got the car secured, ate lunch with the mayor and his wife and headed home. (My truck was not damaged getting the car, that was an unfortunate rear-ending the week before.) During the loading, we lost what was left of the front bumper. Tear down had already begun!

We were wondering how we were going to get the car off the trailer though . . . we knew it wasn't going to just roll. So we brainstormed on the way back and decided we had a solution.

Car in field.jpg
Tractor Car.jpg
Car loaded.jpg
 
Last edited:

Blue Man

Well-Known Member
Once we got home, we got my dad's truck and parked it in the garage and put a cable from it to the donor. Then I drove the trailer forward and the car "pulled" off the trailer. We have a time-lapse video of it and it looks pretty cool. The car never moves. It just kind of stays in place while everything around it moved.

We jacked the car up onto wheel dollies and pushed it back into the garage with a truck. It was finally in place and ready to go.

During this unloading process, we discovered the front right tire was not only turning but just hanging. I went into the house and jumped on the internet to see what part was broken. My mechanic education began. The front right steering knuckle had busted when the owner had driven off the road and hit a barricade after hitting the deer. That was why the air bags were deployed. Aha! I'm going to need a replacement steering knuckle. Oh well, the adventure had begun.

We decided to start by making things hard. All of that to just get a car instead of something that could just drive in. We'll see if the cost savings up front was worth it. I have my doubts . . .

Car on trailer unload.jpg
Car trailer half.jpg
Car trailer off.jpg
Truck push car.jpg
Car in garage.jpg
 

Rttoys

Goblin Guru
Welcome. Sounds like an adventure so far. Work smart, not hard. :cool:

Since you have no real automotive knowledge, I would suggest posting a bunch of pics and asking questions before you buy parts. There is some stuff you use for the goblin and some things you don’t. There’s also multiple names for the same part and what some call one thing, may be named something else. Just trying to save you money in the long run. ;)
 

Blue Man

Well-Known Member
We got to work tearing the car down. The videos are AWESOME! I don't know if we could have done this without them. However . . . (more on that in a minute)

We bought the gas disconnect tool. That worked great. The battery was dead so we didn't empty the gas tank at that time. We pulled off the tires and found the brake fluid hose was also torn on the right side. We tried to remove the axle nut with a torque bar. No go, the thing spins! I watched a bunch of Youtube videos and then just went and bought an impact wrench. The axle nut was off in seconds. In the tear down, the impact wrench is probably the best thing I bought. We used it faithfully after that and never had a bolt we couldn't get off.

Fortunately, despite the accident, the control arms, shocks, calipers, etc were not damaged. We did damage the tie rods and the sway rod arms?

In the video they just take the sway rod arms off. No biggie. Ours just spun. We could get them disconnected and had to cut them off. And the video completely skips removing the tie rods. In one frame he is removing something and you can see the tie rod still connected in the background, and then in the next shot he is taking off the knuckle and the tie rod is disconnected. Oh well. Those aren't too expensive and we will just buy new ones.

Getting the engine out was a piece of cake. I saw on another thread where someone had build a little crate on top of the wheel dollies, slid it under the car and lowered the car on it so that the engine sat on the crate. Then they undid the bolts and raised the car up and just pulled the engine out on the wheel dollies. So I did the same things and it was one of the easiest things we've done so far. The forum works again!

We got to the video on the interior. My nephew and other son helped us strip the car and they had a ball. That is where we learned that if the air bags have deployed, we will need to get new seat belts. Whoops! The list grows (sway bar arms, tie rods, brake fluid hose, right steering knuckle, seat belts, etc. Is this normal?)

We had questions along the way and the forum was/is awesome. Any question usually had some type of helpful response that allowed us to move forward within a few hours if not less.

Thanks to the videos (and a receipt in the car showing the owner had filled up with gas the night she hit the deer) I knew that that the gas tank would be heavy. I put a 2x6 that was the as long as the gas tank is wide under the tank and put my floor jack under that. When I took the straps off the tank sat nicely on the jack. I slowly lowered the jack until the one side of the tank was on the floor, then I jacked up that side of the car and easily slid the tank down the 2x6 which acted like a ramp moving the tank off the tail pipe and out from under the car. I removed the fuel pump and used a siphon to drain all the gas and took it to the local hazardous waste dump. Pretty slick.

Had a few more questions this week about the parking brake and the evap box under the car. Forum gives some more good answers and I get that taken care of.

After about a month, we finally finished tear down and I was ready to be rid of the car. I don't have the title. Owner lost it and is trying to get a new one but doesn't have it yet. What to do? Forum says: Time to cut it up.

Front Right.jpg
Car and engine.jpg
Three Strip Interior.jpg
Dash.jpg
 

Blue Man

Well-Known Member
"Welcome. Sounds like an adventure so far. Work smart, not hard. :cool:

Since you have no real automotive knowledge, I would suggest posting a bunch of pics and asking questions before you buy parts. There is some stuff you use for the goblin and some things you don’t. There’s also multiple names for the same part and what some call one thing, may be named something else. Just trying to save you money in the long run. ;)"


Will do. I appreciate it. We need all help we can get.
 

Blue Man

Well-Known Member
Cut up day: I borrow a sawsall from my brother and grab my trailer and start cutting. It's both easier and harder than I thought it would be. It took about 3 hours yesterday but I finally got it cut up and the kids helped me load it up and haul to the metal salvage. Got a few bucks and took them all out for tacos with it. (one shot below shows the easiest time I had getting something off from under the car)

Car rear.jpg
Front loaded rear not.jpg
Rear on end.jpg
Car loaded.jpg
 

Blue Man

Well-Known Member
Now on to the wire harness and rehabbing the parts and ordering/finding what is missing.

I went to a local junkyard and found a 2005 base cobalt in very good condition and not picked over yet. I plan to get the right steering knuckle and seat belts from there. I'll order the tie rods, sway bar arms and brake fluid hose.

I will have a lot of questions about getting things ready.

Hopefully the wire harness doesn't kick my butt.
 

Rttoys

Goblin Guru
We got to the video on the interior. My nephew and other son helped us strip the car and they had a ball. That is where we learned that if the air bags have deployed, we will need to get new seat belts. Whoops! The list grows (sway bar arms, tie rods, brake fluid hose, right steering knuckle, seat belts, etc. Is this normal?)
blow up the side air bags if you still have them. That’s always fun.

you won’t need the sway bar for normal use.

The tie rods are easily replaceable. Df provides new outer tie rod ends for the front, but you use the cobalt ones in the rear. Those are toast, so new outer rod ends will still need to be purchased, plus you may need the inner tie rods for the front. All depends on the damage. Again, easy replacement.

Brake lines come with the kit, but might as well upgrade to stainless steel lines.

knuckle will be an eBay/junk yard find. GM doesn’t make those anymore.

some of us have the cobalt seatbelts laying around. One of us will send them to you.
 

Desert Sasqwatch

Goblin Guru
Welcome, and good you started a build log. :D

Ask in the General forum if someone has seatbelts they will not be using, if you are not opting to purchase aftermarket harnesses.

Most of the things in your list are wear items that most builders will replace for peace of mind. The steering knuckle (hub upright) goes for about $165 on Rockauto. You may have luck finding a knuckle at a local boneyard/pick-a-part for significantly less $.
 

Ark :D

Goblin Guru
If the ditch impact was strong enough to break the knuckle, it may have affected the control arm, too. I would go over both control arms and make sure they are both shaped exactly the same, down to the millimeter. If there's any doubt, replace one/both. That is one of those things where, if the LCA's are even slightly different/damaged, you'll have a very hard time getting an accurate alignment.

For that matter, check on the subframe too. My donor's driver-side front wheel was destroyed and the subframe was damaged where the LCA bolted onto it.

More expense now is better than more headaches later.

20190823_182012.jpg
 

Goblinfanclub1234

Well-Known Member
good luck on the build, its going to be a great way to learn how all of the systems on a car works :) You will both be pros by the time you are finished.
 

Rttoys

Goblin Guru
If the ditch impact was strong enough to break the knuckle, it may have affected the control arm, too. I would go over both control arms and make sure they are both shaped exactly the same, down to the millimeter. If there's any doubt, replace one/both. That is one of those things where, if the LCA's are even slightly different/damaged, you'll have a very hard time getting an accurate alignment.

For that matter, check on the subframe too. My donor's driver-side front wheel was destroyed and the subframe was damaged where the LCA bolted onto it.

More expense now is better than more headaches later.
Might as well upgrade to the aluminum control arms while you are at it. This is how you go outside of budget
 

Blue Man

Well-Known Member
I appreciate all the helpful advice, especially how to "go outside the budget" ;) I think that is one area I can already excel at on my own.

I've been watching the wire harness videos to get ready to do the wire harness. I have a couple of questions if anyone wants to chime in...

1. I have a 4x8 OSB board, do I need the 1/4" board on top?
2. Do I need to solder? Can I use wire crimps? I'm guessing I don't want to risk bumping connections apart while driving? Any recommendations on a soldering iron and what metal do I need to solder with?
3. Several times they mention crimping a metal connector onto larger wires. Is that something i just pick up at the auto parts store?
4. Several times they mention wire extensions. Am I pulling that from the box of discarded wire or is this new wire I need to purchase?
5. Heat shrink . . . where do I get that? Is there a specific size?
6. Should I use a lighter like they do or should I get a heat gun?

Those are the things that stuck out to me. If you have any additional tips or advice, I'd love to hear it. I hope to start on the harness this week.

Thanks!
 

Ark :D

Goblin Guru
  1. The table is just to help you shape the harness during the thinning process. All you need is the tabletop to work on (with markings).
  2. Yes, you should solder, for permanence. Don't use crimps.
  3. You can probably get what you need at an auto parts store, or Amazon.
  4. You can use discarded wire from the harness. DF also sells a properly-colored extension kit on their store.
  5. Amazon. I got an assorted size kit and used almost all of it (the smaller sizes at least).
  6. Lighter works, but a heat gun is handy to have around for other things.
One additional tip: you may have a tendency to question things in the videos if they don't specifically address them, but don't do that. If it's not mentioned, leave it be, it'll get mentioned later. That happened to me numerous times while doing my harness.
 

Gtstorey

Goblin Guru
I appreciate all the helpful advice, especially how to "go outside the budget" ;) I think that is one area I can already excel at on my own.

I've been watching the wire harness videos to get ready to do the wire harness. I have a couple of questions if anyone wants to chime in...

1. I have a 4x8 OSB board, do I need the 1/4" board on top?
2. Do I need to solder? Can I use wire crimps? I'm guessing I don't want to risk bumping connections apart while driving? Any recommendations on a soldering iron and what metal do I need to solder with? At least some of the connections need to be solder. Specifically the data wires I think need to be soldered. I prefer to solder all connections and often crimp connector and then solder them. Use rosin core solder, 60/40. I prefer the non trigger type soldering iron.
3. Several times they mention crimping a metal connector onto larger wires. Is that something i just pick up at the auto parts store? Available at Home Depot.
4. Several times they mention wire extensions. Am I pulling that from the box of discarded wire or is this new wire I need to purchase? I purchase new wire for the longer runs and head lights, but many have used left over wire.
5. Heat shrink . . . where do I get that? Is there a specific size? Comes in many different sizes. You can get variety kits online or Harbor Freight to get you started.
6. Should I use a lighter like they do or should I get a heat gun? I don't use a lighter. You can also get a heat gun from Harbor Freight for just a few bucks.

Those are the things that stuck out to me. If you have any additional tips or advice, I'd love to hear it. I hope to start on the harness this week.

Thanks!
See comments in red in quote.
 

Joebob

Goblin Guru
I appreciate all the helpful advice, especially how to "go outside the budget" ;) I think that is one area I can already excel at on my own.

I've been watching the wire harness videos to get ready to do the wire harness. I have a couple of questions if anyone wants to chime in...

1. I have a 4x8 OSB board, do I need the 1/4" board on top?
2. Do I need to solder? Can I use wire crimps? I'm guessing I don't want to risk bumping connections apart while driving? Any recommendations on a soldering iron and what metal do I need to solder with?
3. Several times they mention crimping a metal connector onto larger wires. Is that something i just pick up at the auto parts store?
4. Several times they mention wire extensions. Am I pulling that from the box of discarded wire or is this new wire I need to purchase?
5. Heat shrink . . . where do I get that? Is there a specific size?
6. Should I use a lighter like they do or should I get a heat gun?

Those are the things that stuck out to me. If you have any additional tips or advice, I'd love to hear it. I hope to start on the harness this week.

Thanks!
Along with the "new" wiring videos, I would watch the "old" wiring videos as they are for a automatic non-boosted car. Like others have said, you can skip some of the turbo and supercharger specifics, but only the old videos talk about extending the automatic shift interlock and lights 20".


Joe
 

SmsDetroit

Goblin Guru
The wire kit DF sells also has all the labels you will need. It come with shrink wrap too. I’d recommend every time you cut a wire if it’s being left in the harness relabel it. Trust me on that one
 

Scott #321

Well-Known Member
I would recommend marine grade heat shrink. Odly enough harbor freight marine grade heat shrink is pretty good quality and you won't beat the price.
 

k.rollin

Goblin Guru
I like the heat shrink tubing that I can use with my label maker.

 
Top