I thought I'd post about the wing and mount build itself. Warning, it's kind of a long post.
I thought since this whole project is DIY, why not the wing as well.
So I did some research (Googling) on Ebay/Amazon aluminum wings and found a decent write up on a modded 53in dual element spoiler/wing (Same one a few other Goblins are using on the forum) producing similar downforce numbers as a 9LR 60in wing with a small increase in drag, in their testing. This was achieved by building some functional endplates and positioning of the second element properly.
(Repurposed, carelessly discarded, road sign material, 1/8" aluminum)
With the Ebay wing having a flat and channelled lower surface (Not great for generating downforce) it needed a proper shape to keep the airflow smooth and attached to the wing.
So building on the modded wing write up idea, I drew up 3D printed slide in inserts that transforms the spoiler/wing into a true airfoil shape.
This should help it create more downforce and less drag.
Wing Uprights:
Prior to purchasing a wing I thought I'd do some crude aero testing to see where and how the air is flowing behind the Goblin. Knowing higher is better for clean airflow, but how high does it have to be?
I ended up mounting some old strips of molding that I had and added yarn tufts to them. Mounted my phone pointing backwards and drove around.
With my mocked up cardboard nose panel installed, took a drive around to see what the air is actually doing back there.
In the screenshot of the video, the top two tufts were showing the best airflow. No real surprise there. The top tuft being the same height as the halo.
With that info I made a "CAD" design and an angle to create an upright mount from. I decided on a piece 28"x14" 3/16 aluminum plate to make the two wing mount from using some basic tools. Circular saw, jigsaw, flapper sanding pad, hand files. Used the Cardboard template to trace and cut out the basic shape. Then drill chassis to mounting holes in the mount.
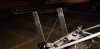
Hit the local hardware store to pick bolts and began to bolt things together.
Needless to say, there's some side to side flexing going on. Set the main wing element on top of the uprights to locate the wing leading edge mounting point and drilled out.
Used the digital angle finder and marked out different degrees of angle of attack for wings trailing edge wing mount. (0, 5, 10)
Strut brace. Here all that was used is some aluminum tubing and flat stock from HD. Cut slots in the flat stock to slide the tubing over and the used the Benzomatic Aluminum brazing rods to attach the two together. We'll see how that holds up over time, otherwise they'll get welded together.
That's enough for now.