.
- Thread starter LLBenJ
- Start date
jamesm
Goblin Guru
If you are planning on putting a sound system in, now's the time. Speaker wires, rca cables, larger gauge power and ground for amp(s) etc. I would also leave a couple more 12v accessory wires than you think you'll need. At least 1 or two in the dash portion, then maybe one or two in the tunnel. You never know when you might want to add cable for a go-pro on the main hoop.
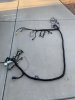
My current wiring harness is a rats nest as I've added and changed stuff over the last 4ish years.
As to the actual harness process. Plan for 25-40hrs of work depending on your comfort level with electrical work. It's not hard but it is methodical and detailed. Use Lonny's method of the big table. It helps having a lot of work area so you can stretch the harness out. Use a cleaner and some shop towels after you de-tape the original harness to make it less sticky and easier to see the wire color. I use a label machine to make the labels then put clear heat shrink tubing over them so they are protected and don't fall off. Solder and heat shrink every connection you make. Use weatherpak style connecters for your lights so they are solid and protected. Lastly, if you don't have the appropriate tools for adding connectors and stuff, just buy them. $150-200 worth of tools off of Amazon will make the job so much easier and is well worth the expense.
Just keep in mind, you are hacking like 60-70% of the factory harness out and modifying the remaining bits. You're gonna have a few issues and it will take some time but that's part of the fun of building a kit.
Sluggonaut
Goblin Guru
I did my harness prior to receiving my kit, so I had it wrapped and stored for a while before my kit arrived. I wish I had saved the final wrap until after I test-fit it in the chassis, so you are going about it the right way.- Car: 2006 SS/SC
- Every plug is currently labeled - I'll need to relabel as I purge/thin the harnesses
- I have DF's wiring harness supply kit on hand but that won't cover everything
- Basic videos don't cover the SC/TC models so slow...is fast
I plan on maintaining the following capability
- Fog lights
- 12V plug/charging
- Boost controller wiring
- Basic sound system power - could be added later?
I plan on wrapping the harness with tape every 12/18", laying it in and checking, prior to a complete wrap. What have you guys done, or not done, that you wish you would have captured earlier? Thank you in advance.
Ben
I had to unwrap a few sections - one area was at the BCM junction because my bend didn't fit the bend at the tunnel very well and it gets tight there when everything is crammed in there. The other was one of the dash wiring sections that was a little short. I don't remember which one it was, but it was just a matter of unwrapping and would have been avoided if I temp-wrapped it as you mention above.
I left several power accessory wires in my harness but used them up pretty quickly with gauges and accessory ports. Another option is to use some unused circuits from the BCM. I know the sunroof and wiper circuits are RAP, so they work at key-on all the way through several minutes after key-off. That's a good option for your radio needs and you can wire in a switch for the door sensor to be able to turn off RAP when you want. I use that circuit for my USB ports so I don't care if it stays on the full RAP duration after key-off.
escapepilot
Goblin Guru
My 06 SS/SC had the passenger side taillight extensions come up way short and I had to extend them more. Headlight wires were extremely longer than necessary and I somehow managed to run the high beam wires to the turn signals on the mirrors and the turn signals to the headlights. There is also a point in the videos where you solder together the green data wires. The SS/SC is slightly different there as there is an extra green wire that shouldn't be cut. Maybe someone else remembers exactly which one.
Desert Sasqwatch
Goblin Guru
Or you could opt for the DF wire harness service. ")
Sluggonaut
Goblin Guru
I was going to do that originally and Lonny talked me out of it. I'm glad he did.Or you could opt for the DF wire harness service.
While I had plenty of questions during my harness re-work, I didn't have any troubles come first start. That being said, the knowledge and experience I gained by doing it myself has paid off numerous times while finishing the build. I think everyone should try it and only send it in if they absolutely can't get through it.
Robinjo
Goblin Guru
Same here. I learned so much about the harness by doing it myself. I was worried at first, and hated doing it. Once done it didn't seem that bad. I do have some small electrical issues, but nothing keeping me from driving. These have also helped with the learning process.I was going to do that originally and Lonny talked me out of it. I'm glad he did.
While I had plenty of questions during my harness re-work, I didn't have any troubles come first start. That being said, the knowledge and experience I gained by doing it myself has paid off numerous times while finishing the build. I think everyone should try it and only send it in if they absolutely can't get through it.
Rttoys
Goblin Guru
Exactly. You really learn the inner workings doing it yourself. I’m colorblind and did it.
Watch all the videos to get an idea how it’s going to go. There’s a method to the madness that doesn’t look clear until later on. When you are working, watch the video you are on and the next one, so when you go back to the video you are on, you’ll know where it’s going to lead you.
some people put a big tv in their work area, so they could see the videos better.
Robinjo
Goblin Guru
I did exactly that.some people put a big tv in their work area, so they could see the videos better.
Mattc3366
Active Member
My advice for anyone doing the harness is do what you said and tape it at intervals ( I wrapped mine like a candy cane) and then get some split loom sleeving for it. If I messed up on my harness I had the ability to go into it very easily or if I wanted to add some wire down the road it’s not as big of a deal. I ordered this stuff here in multiple sizes. I did the whole body harness and engine harness with this stuff.
Attachments
-
 337 KB Views: 77
Joebob
Goblin Guru
Some of my advice on wiring:
Joe
- Do the table to help spacing
- label as you go (like the cut wire and leave knot in it.....2 weeks later you have no clue what that wire is.
- watch ahead so you know the further steps
- Biggest advice is understand what and why you are doing stuff. That way when things are different, you understand and can adapt. I had a decked out automatic car so was loaded with non-video wires (sedan, sunroof, sat radio, radio amp, Automatic, Onstar, seat heaters, ect.)
- Solder wires. I did mine inside over winter so I did heat shrink crimps. May have caused a sensor gremlin and later reran new wires.
- I reused wires but also bought spools for extending the headlight and tail light wires with new.
- I used velcro tie wraps to keep things organized so that they are removable and reusable
- I used TESA tape that is non-sticky fabric rather than electrical tape. More expensive but much better to work with now and later
- While I didn't do but with I did was wrap the wiring TO the plug rather than from it like in the videos. It is harder but if you have to undo any wrapping, it will most likely be near the plug. if you start at the plug, the overlapping means you have to cut it back. If you wrap TO the plug, you can unwrap, fix, and rewrap.
- Like others said, keep accessories not as it is messy to add later. I kept, the factory seat heaters and switch wires, door ajar, parking brake light, both accessory wires, and the video spare wires. you will have to add more grounds but will be easy at this stage.
Joe
Sluggonaut
Goblin Guru
I labeled everything including the knotted wires. I labeled the knotted wires by name if I knew what they were or the video number and time in the video to reference later. I'm glad I did as several wires get knotted and I wouldn't have remembered when or why I knotted them.Some of my advice on wiring:
- label as you go (like the cut wire and leave knot in it.....2 weeks later you have no clue what that wire is.
TravMac
Well-Known Member
Not only are there differences in the NA, SS-SC, and SS-TC, but there are differences in RPOs for each vehicle as well. It is impractical to have videos covering every model and combination, but the core architecture is about the same. The videos available provide the information for a good 90% of the vehicle functionality because of this. The rest will come from understanding what connectors are in the harness that you'll come across as "extra." I suggest finding the electrical diagram for your specific vehicle in particular to cover that last 10%. It will also describe connectors, pinouts, and other information that will help you along the way if your labeling falls apart or gets confusing mid tear-up. There's also a healthy number of "what's this plug" posts you can learn from along the way. Don't forget to check continuity along the way as well... I had a few mistakes to find later because of flipping a wire or 2.