Goblinfanclub1234
Well-Known Member
I drilled through the square tube and bolted my seats with 3/8" grade 8 hardware.
I started to do that, but with there things lined up it didn't make the most sense. For square tube to seat mount, I also used 3/8" grade 8 hardware. For seat to square tube, I used 3/8" carriage bolts. Both with lock washers. It's solid, and I have no concern about the strength of it.I drilled through the square tube and bolted my seats with 3/8" grade 8 hardware.
Ordered either from Jegs or Summit, but it's a Kirkey 55 Series 20" width and you can get them from a lot of different places. Need to order my seat cover soon.Where did you get that seat?
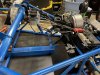
Where did you get these 3D printed brackets holding the aluminum bars for the Tilton Res? I am in the same situation and looking for a way to mount this thing.May 01, 2023
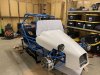
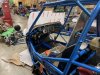
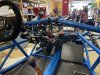
As they say, the last 10% take 90% of the time. Lot getting done though. Used 2.5" x .120 thick aluminum square tube as seat spacers between seat bracket and seat, which raised it exactly where I needed. 4 Lag bolts through the seat base to the square tube, but I still need to make 2 small angle brackets to support the rear of the seat, but should be good to go afterwards. Seat is solid.
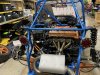
Made a basic bracket for a 1L reservoir tank, mounted behind passenger seat and will be used as an expansion/fill tank for the h/e loop. H/e has been mounted, but still need to plumb it all.
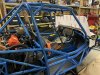
After fighting brake fluid leaks, I've decided to replace the factory reservoir and DF relocation bracket. My donor's reservoir was toast, so I bought a new one. Accidentally ordered one for an automatic, so it didn't have the barb fitting for the clutch, so I drilled and tapped the plug and put a fitting in there. No leaks there, but I don't trust it long term. However I'm having leaks from the o-ring and coming up and over the DF relocation bracket. Disassembled the system twice, and decided if I had to do it a third time it was getting replaced. Went with the 3 chamber Tilton 72-578, which I really like. It has -AN4 fittings for each chamber, so I have new pre-made braided lines on order and should be here today. Will remove the factory reservoir today as well.
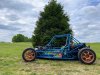
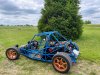
Went with the DF offered mirrors and taillights, which have been mounted and tested but I need to solder the wires and tape up/zip tie to frame. Headlights ordered from Amazon -- Audexen 7 inch round high/low light with DRL, DOT and SAE rated. About half the price as the Dominator, and I like the look. I don't expect to drive much at night, so spending a lot on lights were not a priority. Still waiting on more button panels to be made and sent to me, so I will likely have to temp wire a horn button so I can do my roadworthy inspection next week (KY cares about headlights with high/low, tail light/brake lights, turn signals, mirrors, horn, and windshield). I will start a separate thread for the KY registration process, but I don't expect it to be anything too difficult. By design, KY would want to register a "partial kit car" (meaning with parts from a donor) with a rebuild title, and that's a no go with me. I had a great conversation with my county clerk and he was explaining that there is a process for a clean title if it's a "full kit car". He alluded that if I show receipts for the kit, I can call it a full kit and not have to call out specifically the engine/trans or other donor parts (minimal for my build -- engine, trans, subframe, bcm/ecm, dash cluster, parking brake tubes...that's it). My to-do list below is basically everything left to do to be on the road, but I'm focused on the items needed for my county sheriff roadworthy inspection first. I'm off work next week, so big plans.
View attachment 40115View attachment 40116View attachment 40117View attachment 40118View attachment 40119View attachment 40120View attachment 40121View attachment 40122View attachment 40123
To-Do:
- Fuel System
- Install filler neck vent line
- Engine
- Setup vacuum lines and boost control solenoid
Mount heat exchangerand plumb; 3/4" hose for loop, with a 1/2" Tee for line to expansion tank;make bracket and mount expansion tank- Body
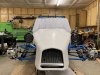
- Install footwell cover, hood, and extended windscreen
- Seating
Mount seat and harnesses- Electrical
- Install turn
signal mirrors, tail lights, head lights- Install license plate light mount kit
- Receive and mount button panel
- Other
- Alignment
- Install Tilton brake fluid reservoir;
- Plumb Tilton reservoir and bleed system
What diode are you guys using? I noticed my car ran for a little bit after I turned the key off with the heat exchanger fan hooked up. It wasn't 3 seconds, but still noticeable.PM me your address, I have a diode you can have.
Just using cheap bar clamp mounts.Where did you get these 3D printed brackets holding the aluminum bars for the Tilton Res? I am in the same situation and looking for a way to mount this thing.
He sent me 2, and I wired one up and it's working great. Happy to send you the last one I have, or I can get the number off it here in a bit and share that with you so you can order one.What diode are you guys using? I noticed my car ran for a little bit after I turned the key off with the heat exchanger fan hooked up. It wasn't 3 seconds, but still noticeable.