Deviant Goblin - Extended Track #373 | 07 SS/SC donor

devianteng

Well-Known Member
The purple wire is typically the fog light wire, but not sure where you got two of them. It isn't hot unless the trigger wire from the original switch is grounded. I think the DF supplied switches have that included if you got that option. Basically the fog light wires are only good for lights without doing some other relay grounding/jumping. The Red/white should be switched power I think.
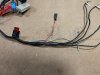
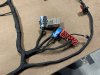
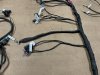
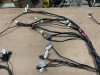
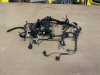
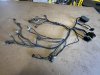
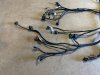
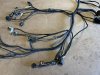
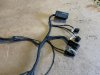
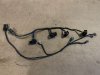
Yes, these purple wires were fog light wires. Video 7, around 1:50 into the video we extend 1 wire toward the BCM and the other stays near the fuse box. It's mentioned these can be used for accessories. So I guess they are switched power wires, from the fog light switch (but I guess I don't know where that switch is/will be in the Goblin). These would be good for the low power side of a relay, depending on what needed to be powered.
So that must mean the red w/ white wire is a key-on power wire. Makes sense to me.

You will have to decide the trade off of redrilled hubs for wheel choice and the availability of replacement hubs if you need them without getting them drilled.
I've had trouble deciding that for myself and hoping to get feedback. The redrilled hubs from DF, are these new hubs or refurb? if new, I'd expect there is a reasonably good chance they will last for at least 50k "reasonable" street miles but getting replacements redrilled could definitely present a challenge in the future. Worthwhile risk, IMO. Where I really need help is around optimal wheel size, ideal offset, and recommended tire width (square setup, or smaller upfront, etc). Things I definitely need to do more research into.
 

Gtstorey

Goblin Guru
Fog light power will cut off each time the ignition is turned off and will have to be turned back on each time.

Wheel selection is all over the place. Square will let you rotate the wheels for more even tire wear. Beyond that good luck getting an optimal setup. There are discussions that if you are racing, narrow might be better than wider so you can get more heat into the tires.
 

Ross

Goblin Guru
5x114.3 redrilled hubs from DF are new hubs. DF isn't the only one who will redrill hubs, but they are the best price that I have seen. I'm trying to kill my hubs before 50K miles, running wide sticky tires, racing, getting many smiles to the miles, but I doubt I will wear them out in my lifetime, and I'd be lucky to put 50K on my daily driven goblin, but I will try!
 

Lonny

Administrator
Staff member
The orange wire that goes to the button panels controls the purple fog lamp wires. When you momentarily touch the orange wire to ground it turns on the fog lamp circuit. When you touch it to ground again it turns the fog lamp circuit off.

The donor had a momentary contact switch on the dash to control the fog lamps.

The red and white wire is always hot.
 

Robinjo

Goblin Guru
I've had trouble deciding that for myself and hoping to get feedback. The re-drilled hubs from DF, are these new hubs or refurb? if new, I'd expect there is a reasonably good chance they will last for at least 50k "reasonable" street miles but getting replacements re-drilled could definitely present a challenge in the future. Worthwhile risk, IMO. Where I really need help is around optimal wheel size, ideal offset, and recommended tire width (square setup, or smaller upfront, etc.). Things I definitely need to do more research into.
One option, have the hubs drilled and then decide what set of holes to use when you make a wheel decision? I'm strongly considering this.....
We're running the stock wheels for a while, then upgrading later on. Most likely we'd go to the other hub bolt configuration at this point, so having it there already would be nice.
 

devianteng

Well-Known Member
The orange wire that goes to the button panels controls the purple fog lamp wires. When you momentarily touch the orange wire to ground it turns on the fog lamp circuit. When you touch it to ground again it turns the fog lamp circuit off.

The donor had a momentary contact switch on the dash to control the fog lamps.

The red and white wire is always hot.
Thanks for the info, Lonny!

One option, have the hubs drilled and then decide what set of holes to use when you make a wheel decision? I'm strongly considering this.....
We're running the stock wheels for a while, then upgrading later on. Most likely we'd go to the other hub bolt configuration at this point, so having it there already would be nice.
I've sold off my donor wheels, so I definitely have to buy something new. I think I'm going to go with the redrilled hubs just to make things easier when shopping for new wheels. Appreciate the feedback.
 

PaulPerger

Well-Known Member
**** that looks NICE! The look of the cloth tape over normal electric tape is most definitely worth the couple of dollars difference in cost!
 

devianteng

Well-Known Member
**** that looks NICE! The look of the cloth tape over normal electric tape is most definitely worth the couple of dollars difference in cost!
Thanks! Tesa harness tape is about $6/roll, and I think I used 3 rolls on this harness, and may use 1 more on the engine harness. Cost is so negligible that it's a no brainer to me. Also considering using a split wire loom, at least in the tunnel and a few other areas.
 

PaulPerger

Well-Known Member
Thanks! Tesa harness tape is about $6/roll, and I think I used 3 rolls on this harness, and may use 1 more on the engine harness. Cost is so negligible that it's a no brainer to me. Also considering using a split wire loom, at least in the tunnel and a few other areas.
Ditto. I am also thinking about using a wire "wrap" on wiring that will visible in the engine area.
 

devianteng

Well-Known Member
April 14, 2022
Engine harness, including injector and coil harnesses, have been cleaned up.
Time to turn my focus to my frame and get roof bars and trick tabs welded in, then prep all parts for powder coating. Has anyone made a list of all the small parts I should get coated/painted? Would be quicker than figuring out my own list. :D

Before:
78.jpg

After:
79.jpg80.jpg81.jpg82.jpg

Injector/Coil harnesses:
83.jpg
 

Robinjo

Goblin Guru
Has anyone made a list of all the small parts I should get coated/painted? Would be quicker than figuring out my own list. :D
I'd love to see this as well! I was really just waiting until my kit showed up to go through it all, but a check list would be #1.
 

Sluggonaut

Goblin Guru
It looks like you kept some connectors you don't need, like the radiator fan connectors. You'll want the light blue wire from one of the radiator fan connectors to connect to the extended light blue wire for the new radiator fan up front.

I cleaned up my harness after I installed the drivetrain as I wasn't sure if the MAF or other connectors needed to be moved from their stock location. I also thinned out the radiator fan, downstream O2, and EVAP wires/connectors.
 

Sluggonaut

Goblin Guru
Has anyone made a list of all the small parts I should get coated/painted? Would be quicker than figuring out my own list. :D
My list was broken down based on powder color, as I did 3 different finishes, but the list should break down what I did Powder vs. Paint:

Powder - Illusion Purple:
Frame
Subframe
Radiator Support
A Arms
Tunnel Cover
Windshield Mount
Passenger Kick Plate
Trans Mounts
Toe Link Rack
Valve cover

Powder - Matte Black:
Floor pans
Floor Support Strap
Firewalls
Bulkhead
Steering Bracket
Wing Uprights
Wing cross brace
Seat Brackets

Powder - Wrinkle Black:
A2W IC
IC Piping

Paint:
Rod End Brackets
Pedal Box
Fuel Pump Ring
Headlight Brackets
Horn/Bracket
Wing Brackets
Hood plate
A2W IC Mounts
 

devianteng

Well-Known Member
It looks like you kept some connectors you don't need, like the radiator fan connectors. You'll want the light blue wire from one of the radiator fan connectors to connect to the extended light blue wire for the new radiator fan up front.

I cleaned up my harness after I installed the drivetrain as I wasn't sure if the MAF or other connectors needed to be moved from their stock location. I also thinned out the radiator fan, downstream O2, and EVAP wires/connectors.
Yeah, unfortunately a lot of those connectors were disconnected my someone who was trying to "help me", which means I didn't get to label them. As I was taping things up I got to wondering about some of those things like Evap, MAF, etc and if those would need to be lengthened or shortened, and decided that I'll revisit that harness if/when the time comes. Not like it took that long to tape up or anything.

Also, really appreciate the list! I need to look through my stage 1 kit and see which of those parts I have, plus which come from the donor. I'm planning to do truck bed liner for the floor pans, firewall, etc as well. I guess I still need to figure out my seat setup, likely before I can get the frame powder coated. Top of my list right now are Kirkey 60 series 18.5" wide, which I need to order and test fit. Probably need to order the seat brackets too, and may just weld them into the frame so I don't have to worry about that. It's all these little details that are slowing me down when it comes to powder coating. Starting to realize that I probably won't my Goblin built and registered for the street before fall gets here, but that's okay.
 

devianteng

Well-Known Member
April 24, 2022
Unfortunately not much progress lately, other than welding in some roof bars. Was hoping to get my trick tabs welded on by now but didn't get the chance. (photo is just bars tacked in -- I'm not sharing photos of my welds, haha)
84.jpg

On another note, I finally got the chance to meet up with @MR.812 and go for my first Goblin ride! Unfortunately I didn't fit great in his standard frame, and my knee broke a tab of his gauge cluster that he has mounted below the dash cluster. (again, sorry!)

My immediate feedback about the Goblin platform is that 200hp in a 3200lb car is way different than 200hp in a sub 2000lb car. I definitely plan to still turbo swap mine once it's on the road, but even with the stock LSJ it's got more than enough power to walk just about anything on the street. Riding in his also confirmed that I want to do a square tire setup, oh and that I really liked his seats which fit me pretty good (I'm 6'2" and 280lb, so a big boy).
85.jpg

I've got some out of town travel coming up this weekend and next week, but once I'm back my focus will be getting this frame coated. Also hoping to meetup with a few other Goblin owners this weekend (@jaredthenav and/or @r3drckt) if their schedules allow. I promise not to break anything else!
 

neodied

Well-Known Member
M12 1.75 bolts. I used 2 that were 80mm in length for the top of the trans mounting area (these threaded right into the block), and I used 2 others that were 110mm in length through lower trans mount holes that are not threaded. Those 2 lower ones I used lock washers and nuts. Also grabbed 8 flat washers so i could stack those as needed.
Another question, finally got around to separating the trans and engine, went to put the engine stand mounting plate on the flywheel side and noticed that the clutch/PP/flywheel assembly sticks out far enough to make the "fingers" of the mounting plate not touch the engine block at the bolt holes, which I assume is desired/safer. Did you have to remove the clutch before attaching your engine stand mount plate?
 

Desert Sasqwatch

Goblin Guru
Stack some washers or add a spacer to move the engine out far enough on the mounting studs to keep the clutch Assy from touching the engine stand plate. Just make sure you are using graded (5 or better) bolts to attach the engine to the stand.
 

devianteng

Well-Known Member
Another question, finally got around to separating the trans and engine, went to put the engine stand mounting plate on the flywheel side and noticed that the clutch/PP/flywheel assembly sticks out far enough to make the "fingers" of the mounting plate not touch the engine block at the bolt holes, which I assume is desired/safer. Did you have to remove the clutch before attaching your engine stand mount plate?
My clutch was exploded so I had to take it off anyway. If it was fine, I probably would have left it on and just used longer bolts with more washers if needed.
 
Top