Lark's Track Goblin No. 40 - 2008 LT ***REGISTERED***
- Thread starter k.rollin
- Start date
k.rollin
Goblin Guru
Met up with @Pizzaman yesterday after work so he could check out a Goblin in person and get some questions answered. Took him out for a 12 mile rip as my car's first drive since last fall, and it sounded like it got him hooked. That, and seeing his Mustang account for the good news. The bad news is that my LR tire picked up a lath screw during yesterday's activities.
Pizzaman
Active Member
Thanks again I can’t wait to get mine ordered! I’m looking for donors right nowMet up with @Pizzaman yesterday after work so he could check out a Goblin in person and get some questions answered. Took him out for a 12 mile rip as my car's first drive since last fall, and it sounded like it got him hooked. That, and seeing his Mustang account for the good news. The bad news is that my LR tire picked up a lath screw during yesterday's activities.
k.rollin
Goblin Guru
Finally started working on the car again in earnest to get it ready for my first track day. Installed the HD lower rod end mounts, revised steering arms, steering rack limiters, and new front tie rod ends.
Still plenty of work on the list, but progress is better made!
Still plenty of work on the list, but progress is better made!
Last edited:
k.rollin
Goblin Guru
TIL that I suck at bending brake lines. On the plus side, I've plumbed in a proportioning valve so now the rear brakes can bite before the fronts lock up.
Unfortunately, the proportioning valve and bleeding the brakes wasn't on my written list (just the mental one) so I don't get the satisfaction of crossing it off
Unfortunately, the proportioning valve and bleeding the brakes wasn't on my written list (just the mental one) so I don't get the satisfaction of crossing it off
k.rollin
Goblin Guru
After much time, some broken parts, and spending more money than I really wanted to, I finally have installed the Moog spherical LCA bushings and the OTTP leading LCA bushing kit.
Apparently the replacement control arms I bought from Rock Auto had undersized leading bushing bores compared to the factory aluminum ones, which led to breaking the flange off of one of delrin sleeves.
After getting replacements for the two that I had damaged, I used my drill press as a less than ideal vertical lathe and removed about .035" from the OD and successfully installed the OTTP kit.
The loaner ball joint press from AutoZone was a little smaller than required to install the Moog CABs, so I finally broke down and bought the 20 ton shop press from Hazard Fraught Tools on Friday afternoon then spent all day Saturday cleaning out a spot for it in the garage and getting it assembled.
Desert Sasqwatch
Goblin Guru
Any excuse to buy new tools!
k.rollin
Goblin Guru
Added a floor panel to closeout the space from the radiator to forward bulkhead and mounted the nose wing.
k.rollin
Goblin Guru
Other recent mods that have kept me busy over the course of the last month when not working or helping my partner move/fix up their first house include:
• fabrication and installation of a temporary bolt in harness bar (temporary because it's only bolted in single shear at three points and I don't have funds available at the moment for a tubing bender so I can build a bolt in harness bar the right way)
• modification and installation of the Kirkey seat back braces (these have made the seats so much more rigid than only using the bottom mounts)
• installation of the parking brake kit
• finally wrapping the wiring harness (this is exceptionally more difficult when done in/on the vehicle)
• oil/filter change
• transmission fluid/filter change
• installation of the NLR diffuser
• alignment
Wednesday we'll be at Pacific Raceways in Kent for the Proformance Racing School's one day HPD course, so today and tomorrow afternoon work are/were for shakedown.
Desert Sasqwatch
Goblin Guru
Can you send me photo or two of the bolt in harness bar? I'm thinking of fabricating one myself - I have plates fabbed and am almost ready to cut tube.Other recent mods that have kept me busy over the course of the last month when not working or helping my partner move/fix up their first house include:
• fabrication and installation of a temporary bolt in harness bar (temporary because it's only bolted in single shear at three points and I don't have funds available at the moment for a tubing bender so I can build a bolt in harness bar the right way)
• modification and installation of the Kirkey seat back braces (these have made the seats so much more rigid than only using the bottom mounts)
• installation of the parking brake kit
• finally wrapping the wiring harness (this is exceptionally more difficult when done in/on the vehicle)
• oil/filter change
• transmission fluid/filter change
• installation of the NLR diffuser
• alignment
Wednesday we'll be at Pacific Raceways in Kent for the Proformance Racing School's one day HPD course, so today and tomorrow afternoon work are/were for shakedown.
Waterdriver
Goblin Guru
Have fun tomorrow on track! Weather should be perfect for you. Get some video to share too.Other recent mods that have kept me busy over the course of the last month when not working or helping my partner move/fix up their first house include:
• fabrication and installation of a temporary bolt in harness bar (temporary because it's only bolted in single shear at three points and I don't have funds available at the moment for a tubing bender so I can build a bolt in harness bar the right way)
• modification and installation of the Kirkey seat back braces (these have made the seats so much more rigid than only using the bottom mounts)
• installation of the parking brake kit
• finally wrapping the wiring harness (this is exceptionally more difficult when done in/on the vehicle)
• oil/filter change
• transmission fluid/filter change
• installation of the NLR diffuser
• alignment
Wednesday we'll be at Pacific Raceways in Kent for the Proformance Racing School's one day HPD course, so today and tomorrow afternoon work are/were for shakedown.
Interested to see how you did your seat back brace. Can you share a pic when you can?
k.rollin
Goblin Guru
Sure, I'll post some after work today. Like I said, it's temporary/not ideal. As your chassis is uncoated AFAIK, if I were in your position, I would mock up my seats to establish the necessary height then just cope a couple pieces of tube and weld them in such that they're in the same plane as the main hoop.Can you send me photo or two of the bolt in harness bar? I'm thinking of fabricating one myself - I have plates fabbed and am almost ready to cut tube.
My final solution is to use a couple of 1.5" OD tube clamps and bend a piece of tube at the ends such that the weldment can bolt in above the coolant surge tank and behind the main hoop.
k.rollin
Goblin Guru
I'll post some after work. I basically just notched the plate to fit around the brackets on the provided harness bar, secured them to the bar with coated U-bolts, and ran (4) M8 bolts through the back of the seat and into the brace. The driver's side brace was also trimmed shorter to eliminate interference between it and the coolant surge tank.Have fun tomorrow on track! Weather should be perfect for you. Get some video to share too.
Interested to see how you did your seat back brace. Can you share a pic when you can?
Desert Sasqwatch
Goblin Guru
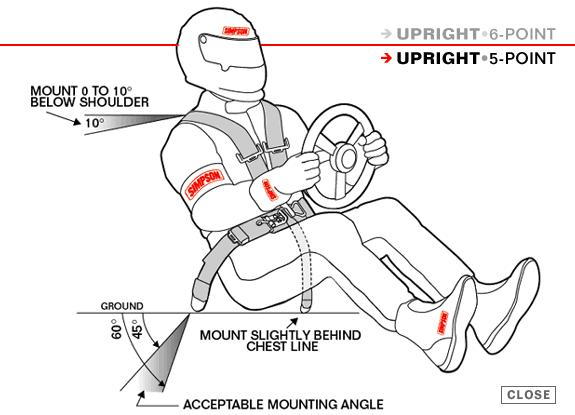
The Cobalt seat belt bolt hole mounts in the B-pillar/roll bar are by default the correct height and have necessary strength to bolt a harness bar into. One additional bolt hole - same as the stock mounts with a reinforcement tube welded in - in the diagonal bar behind the driver's seat is where I planned to mount the harness bar.

Mock up with a scrap piece.
I was planning a 1 inch DOM tube (0.083) for the bar with 3/16 plates for the stock seat belt bolt locations. The plates will be thru-drilled to have the tube thru the hole and exposed on both sides of the plate for a double weld. The center bolt in the crossbar will be a welded reinforcement tube like the other thru holes. Using all grade 10 bolts with large reinforcement washers.
I would have to believe this is plenty strong and if it were to bend you have far more serious problems and injuries.
k.rollin
Goblin Guru
My chassis didn't have bolt sleeves for the shoulder portion of the Cobalt's inertial reel belts, and even if it did, I get the feeling that they would be too high to mount a harness bar with my seats.The Cobalt seat belt bolt hole mounts in the B-pillar/roll bar are by default the correct height and have necessary strength to bolt a harness bar into. One additional bolt hole - same as the stock mounts with a reinforcement tube welded in - in the diagonal bar behind the driver's seat is where I planned to mount the harness bar.
View attachment 33994
Mock up with a scrap piece.
I was planning a 1 inch DOM tube (0.083) for the bar with 3/16 plates for the stock seat belt bolt locations. The plates will be thru-drilled to have the tube thru the hole and exposed on both sides of the plate for a double weld. The center bolt in the crossbar will be a welded reinforcement tube like the other thru holes. Using all grade 10 bolts with large reinforcement washers.
I would have to believe this is plenty strong and if it were to bend you have far more serious problems and injuries.
Mine is 1.5 OD x .095 W, with .50 OD x .120 W bolt sleeves that I later bored to 5/16 ID. It's mounted to the engine cover tabs, which have had the bolt holes reinforced with doublers on both sides. Grade 8 5/16-18 flange bolts secure the temporary bar to the chassis.
Fozda
Goblin Guru
I found the stock seatbelt mounting locations to be significantly too high to use for a harness bar.The Cobalt seat belt bolt hole mounts in the B-pillar/roll bar are by default the correct height and have necessary strength to bolt a harness bar into. One additional bolt hole - same as the stock mounts with a reinforcement tube welded in - in the diagonal bar behind the driver's seat is where I planned to mount the harness bar.
Desert Sasqwatch
Goblin Guru
Correct height for my seats, which are taller than most seats with the seat belt openings that are at my shoulder level and not at the bottom of my shoulder blades. Squatch-sized so the harness bar will be at the right height for my Goblin.
Edit:
Edit:
Last edited:
k.rollin
Goblin Guru
What did you end up doing?I found the stock seatbelt mounting locations to be significantly too high to use for a harness bar.
Fozda
Goblin Guru
k.rollin
Goblin Guru
That's about what I did too and it is definitely a bit sketchy. What size hardware are you using?I made this mildly sketchy setup.
View attachment 34001