LLBenJ
Active Member
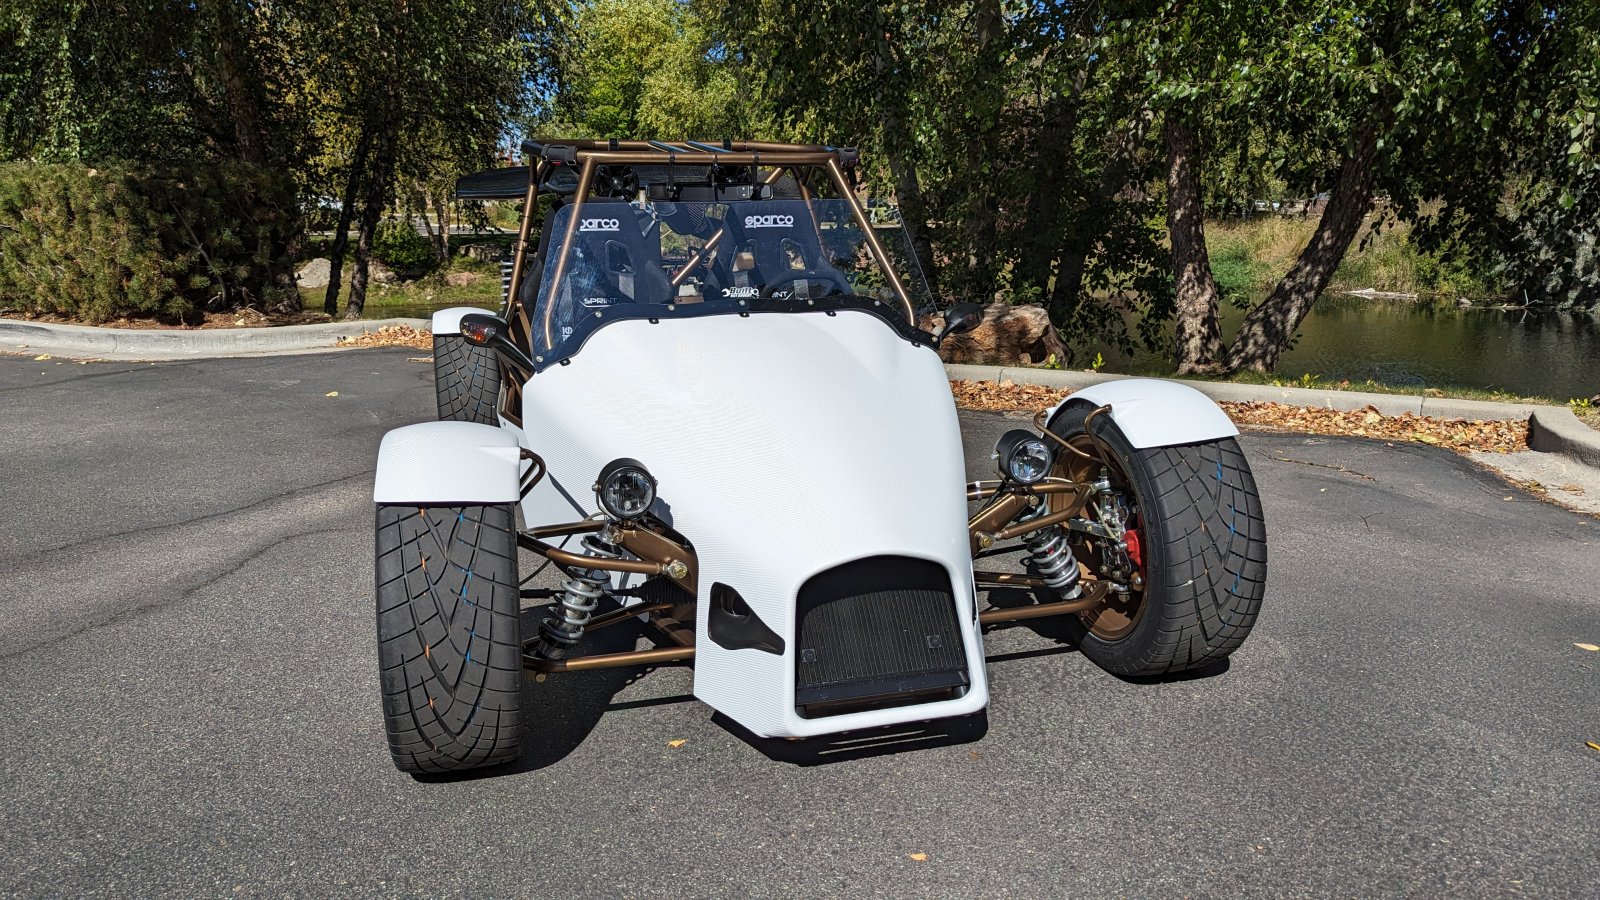
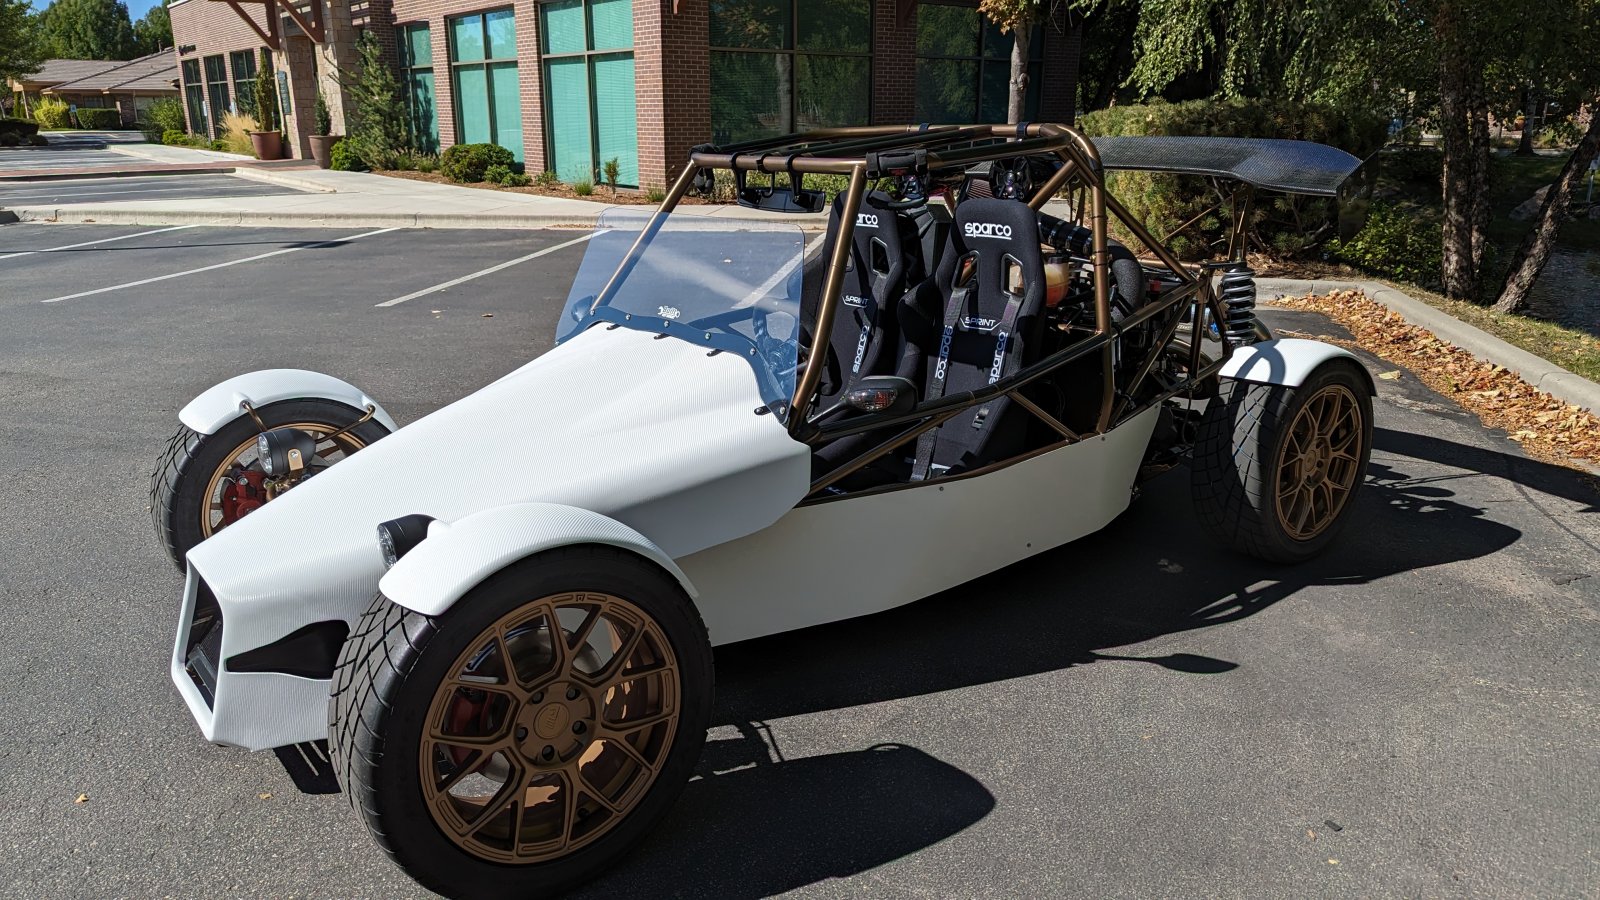
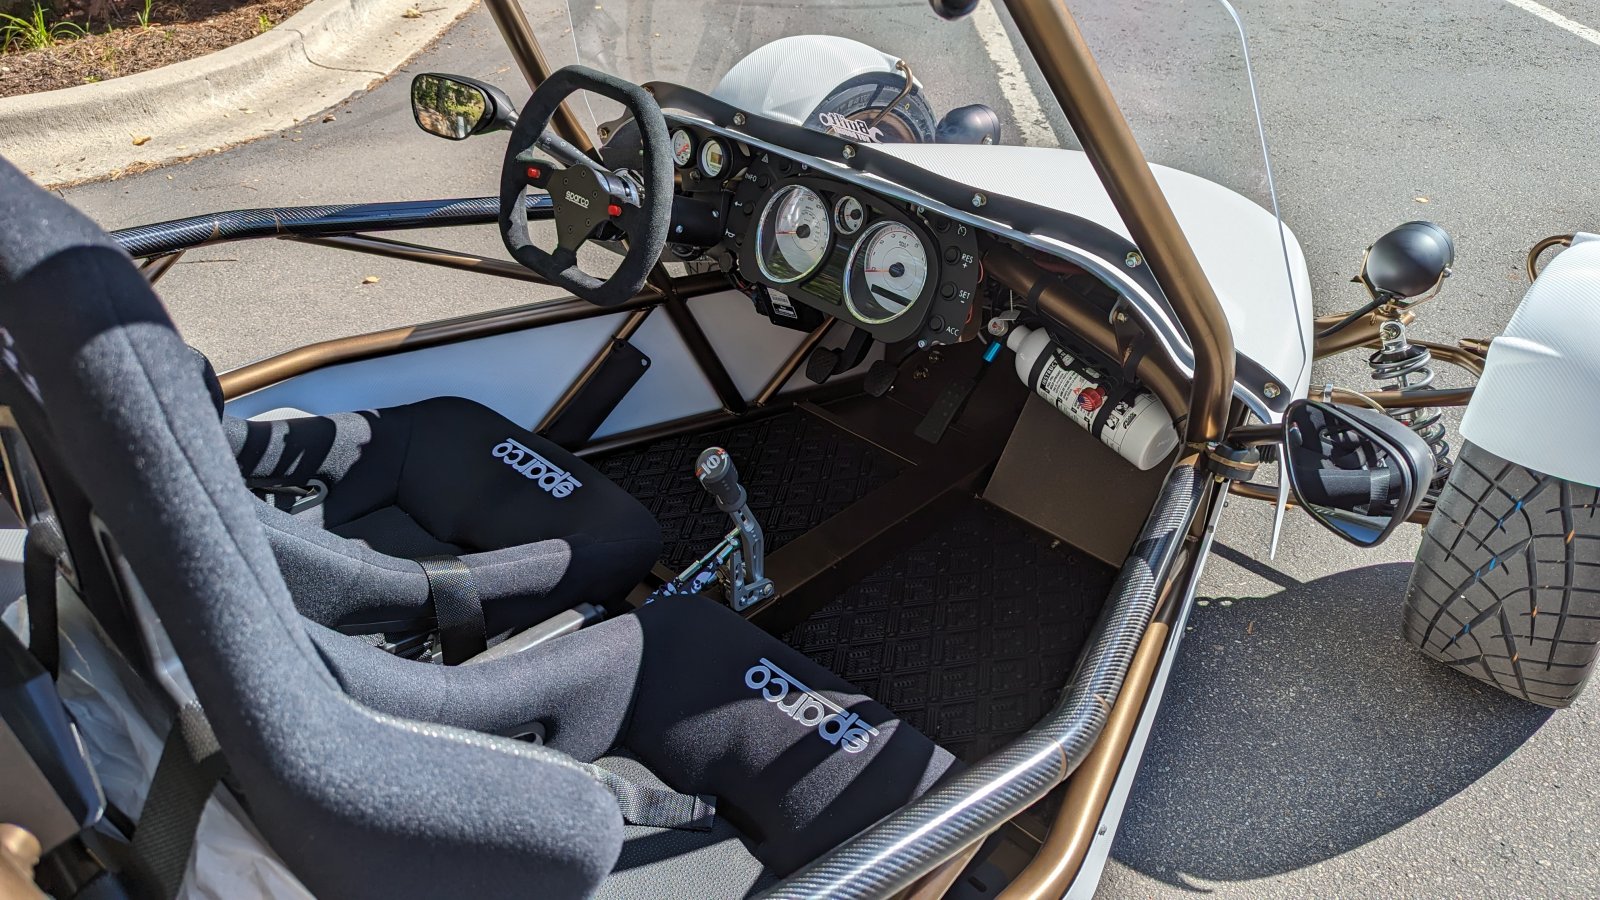
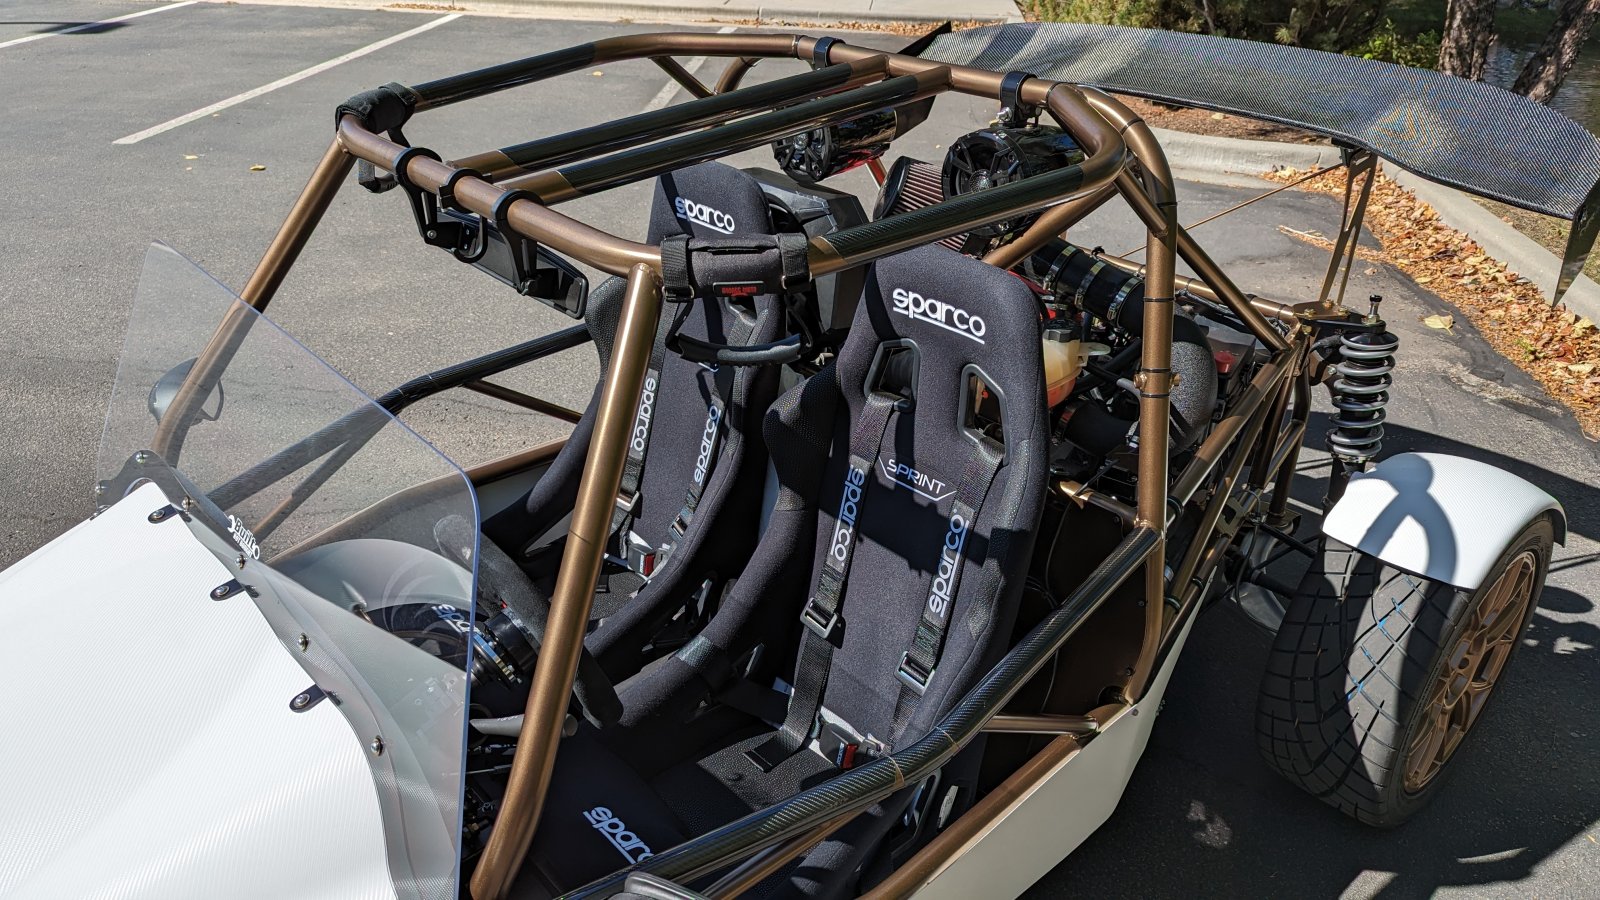
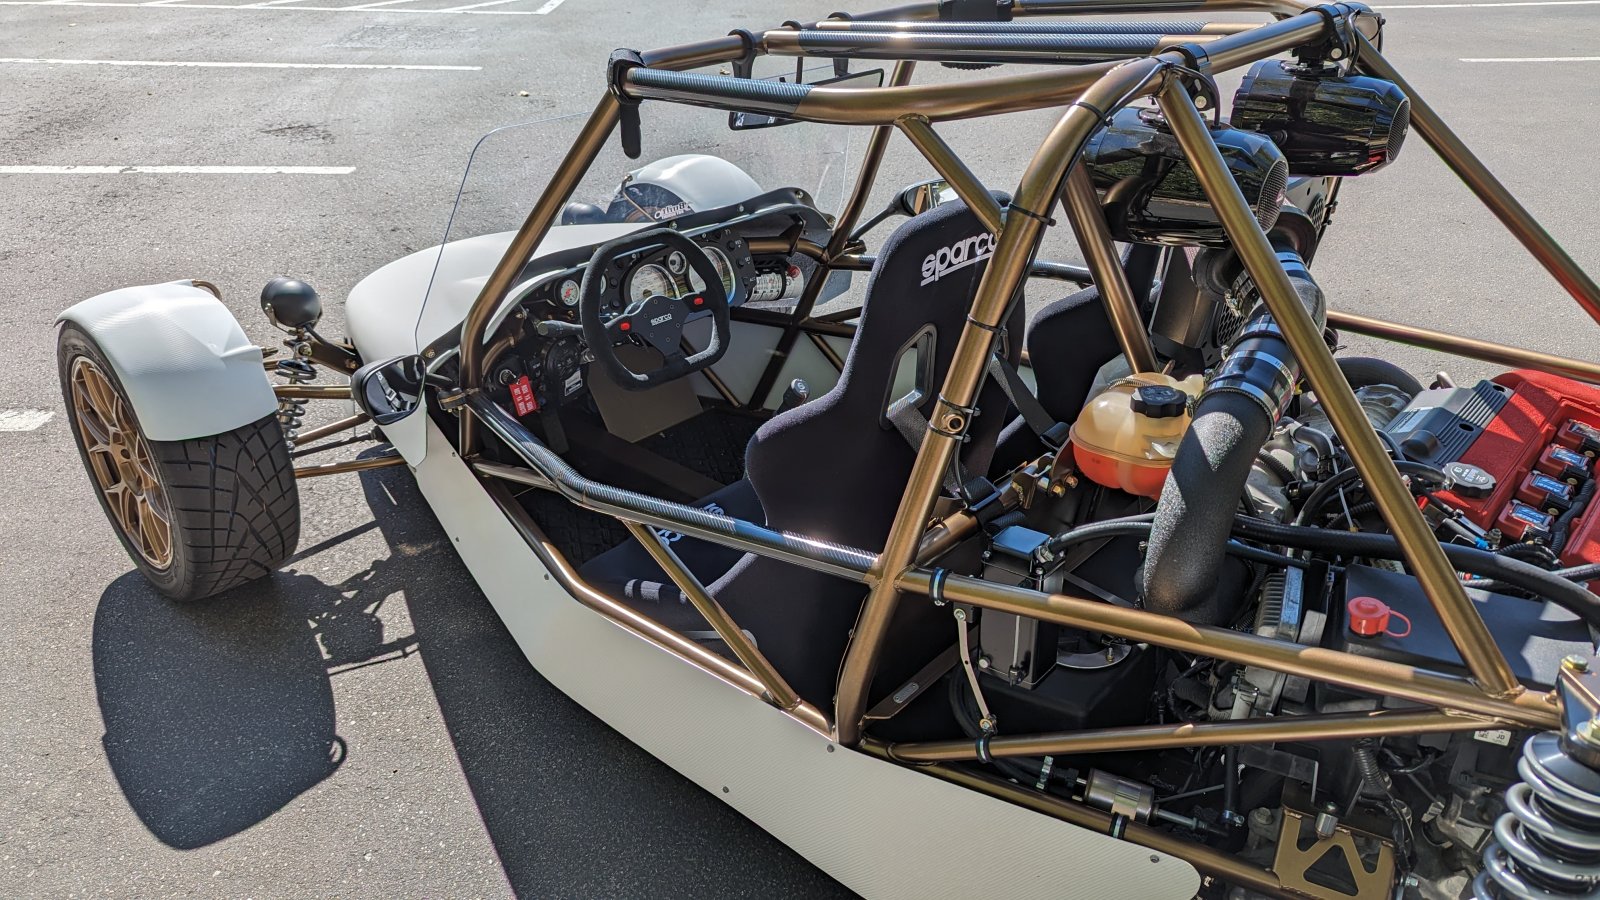
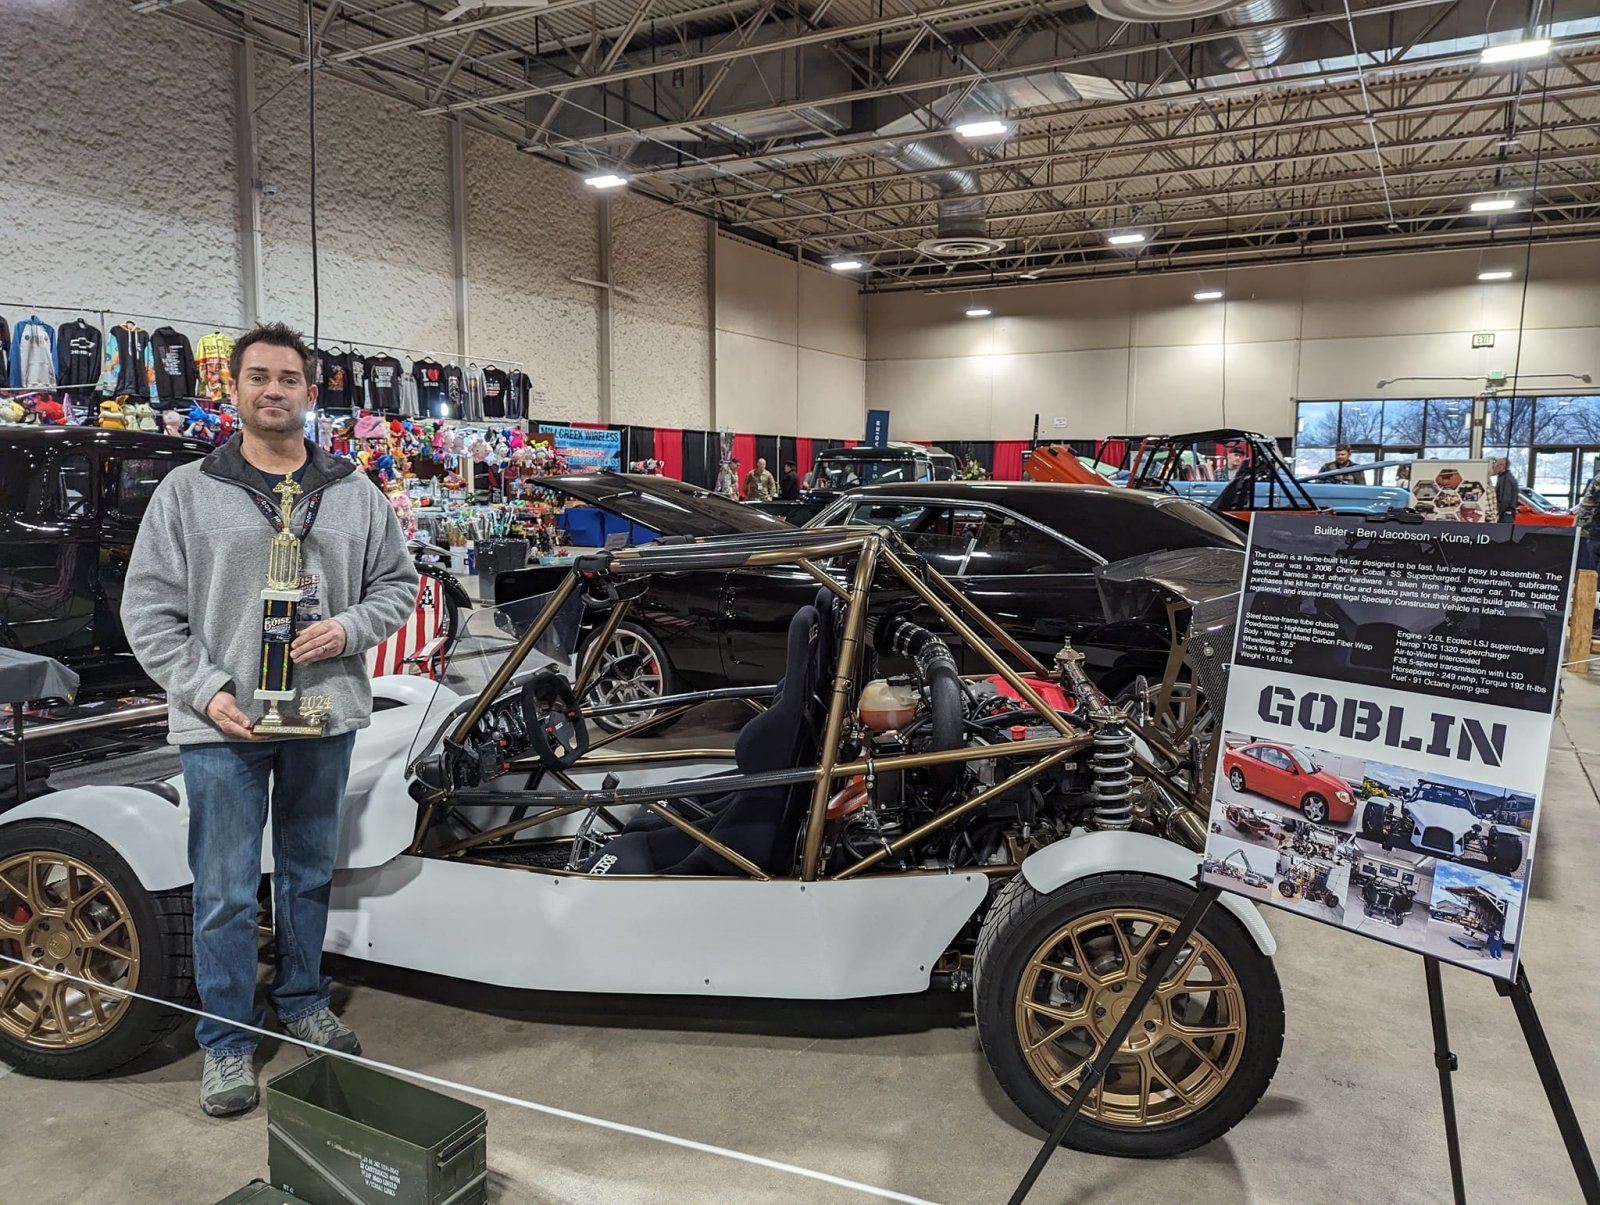
DF Kit Car - Goblin #403 - Completed 04 July 2023 - Titled, registered and insured in the state of Idaho

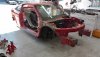
Donor
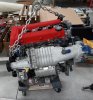
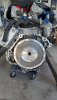
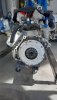
2006 Chevy Cobalt SS Supercharged - 123k on the clock - purchased and driven for 3 months prior to disassembly to work out any issues.
Cost of the donor, plus shipping to Idaho, was $4,750.

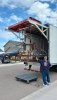
Kit - #403
The following full kit (all 3 stages) was ordered from DF on 09 December 2021. Full kit arrived by Stewart Transport on 05 July 2022.
- DF Goblin Stage 1
- Stage 1 SS/SC Upgrade
- Full Cage Option
- Roof Bars
- Billet Shifter Kit
- DF Goblin Stage 2
- Stage 2 SS/SC Upgrade
- Rear Coilover Kit
- DF Kit Car Steering Wheel Kit
- Hood Kit, Full Cage
- Duct Cut-Outs in Hood
- Windscreen Kit, Extended
- Footwell Cover Kit
- Side Panel Kit
- Engine Cover Kit, Non-TC
- Fender Package, Wide, with Coilovers
- Headlight Kit
- Mirror/Turn Signal Kit
- License Plate Mount Kit
- Taillight Kit
- Button Panel Set, Early Model
- Boost Gauge Mount
- Heat Exchanger Duct Kit
- Bumper Set, Street Version
- Wing Mount Kit Total: $14,790
- Stewart Transportation Total: $1,545
The following items/work were purchased, in addition to the kit, to complete the car. Some of this was preventative maintenance and much of it was personal preference to the get the performance, and aesthetics, I was shooting for with the build.
- Axle seals
- GM timing chain kit
- GM supercharger fluid
- GM steering shaft
- New battery
- Timing chain tensioner
- ECOTEC timing chain guide bolt
- ECOTEC water pump
- Fuel injector 0-rings
- ECOTEC fuel injector isolators
- MAP, MAF, TMAP and boost solenoid sensors
- Timing chain cover gasket
- Valve cover gasket
- Exhaust manifold hardware
- Starter
- Alternator
- LSJ harmonic balancer
- LSJ front main seal
- LSJ fuel filter
- LSJ oil pressure sensor
- LSJ supercharger bypass valve o-ring
- Clutch Masters stage 3 clutch
- Clutch clip
- Clutch pipe
- Hydraulic clutch elbow
- Fidanza aluminum flywheel
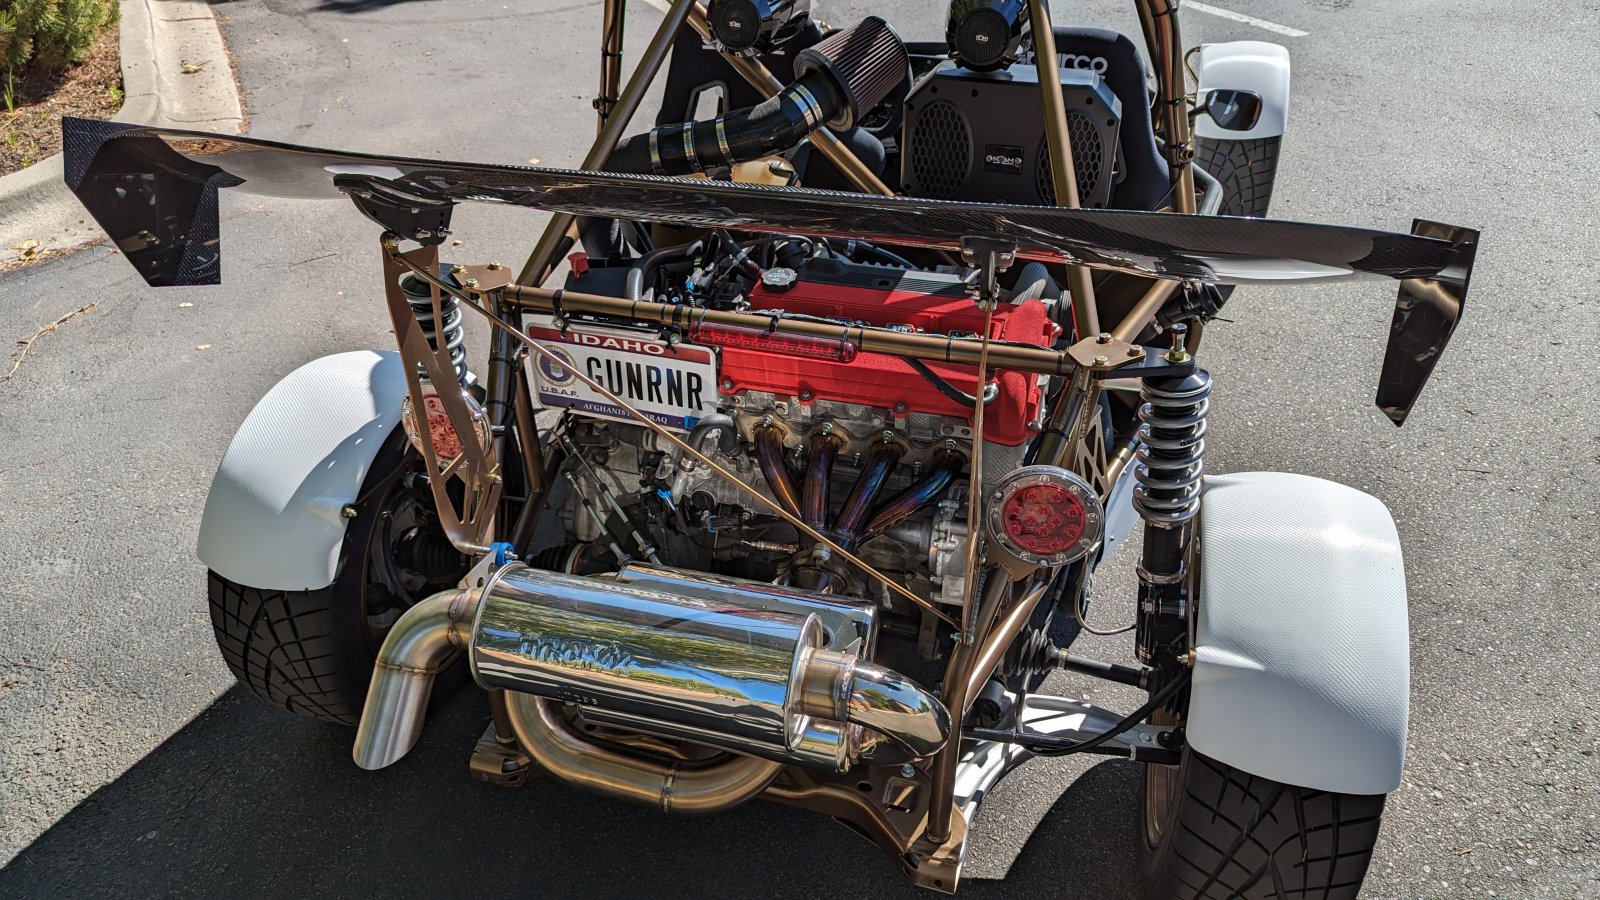
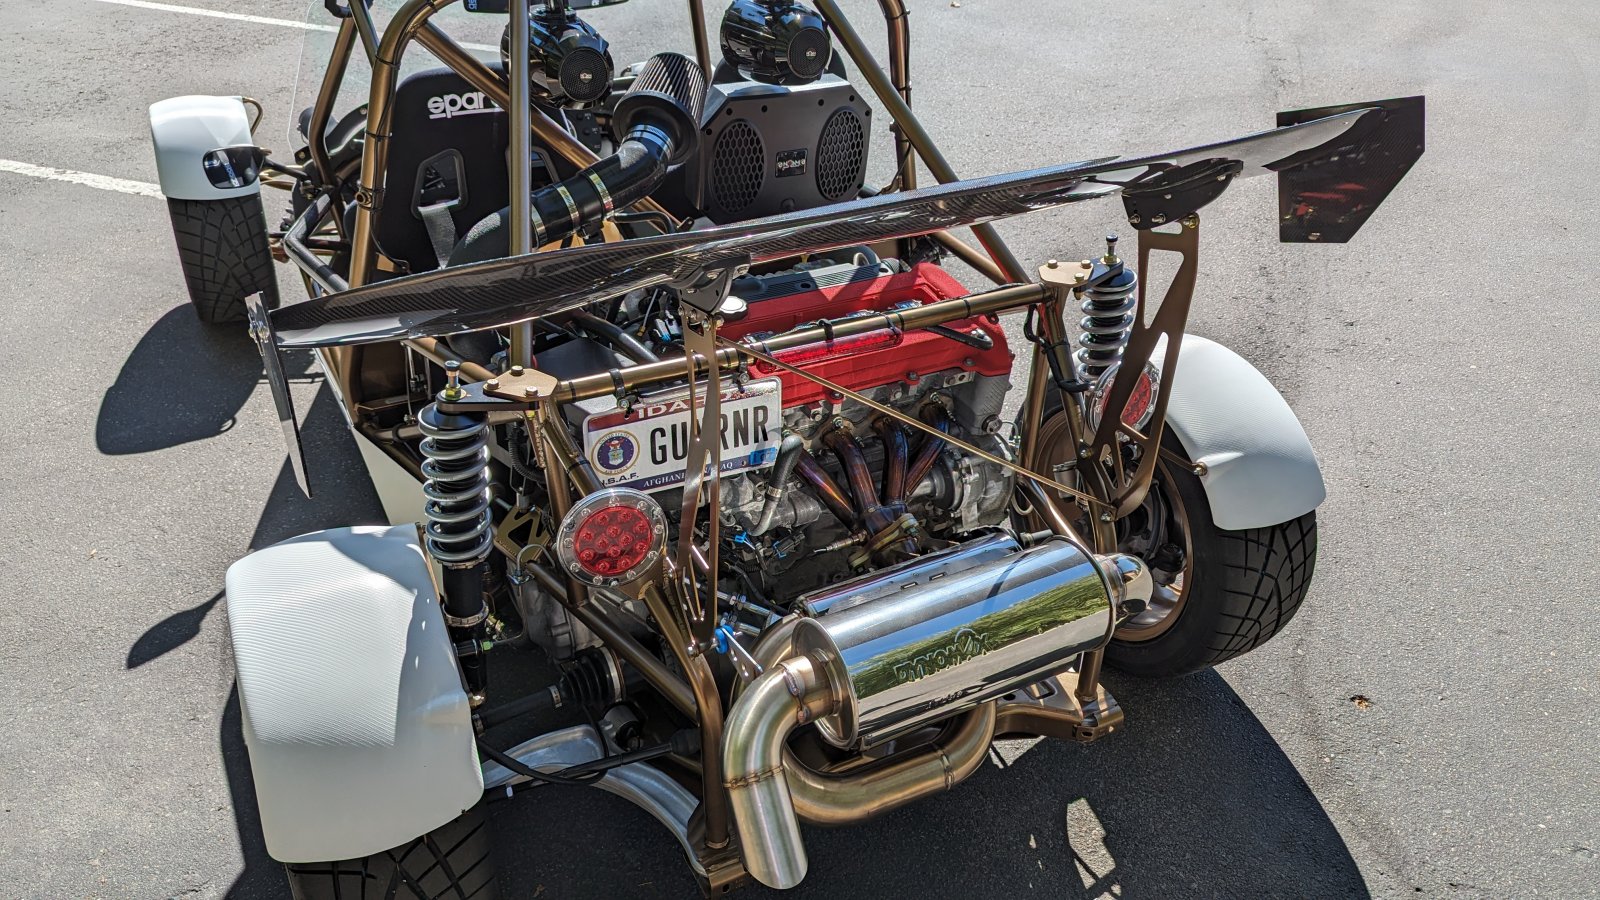
- Foreverfab V1 Goblin muffler with magnaflow resonator
- Edelbrock stainless steel braided brake lines
- Vibrant Performance AN to NPT brake adapter fittings
- New GM 5-100 front and rear hubs
- DF speed sensor caps
- DF SS/SC steering rack limiter kit
- DF SS/SC brake proportioning valve kit
- DF wiring service for main harness (fog lights, 12v acc plugs, side marker lights maintained)
- Badass Moto grab handles
- Autometer Phantom mechanical boost gauge
- Autometer Phantom Air/Fuel gauge
- 3D printed dual gauge pod w/light sensor mount
- Longacre steering wheel hook
- ZZP ECOTEC flywheel bolts
- ZZP ECOTEC pressure plate bolts
- ZZP LSJ bypass valve
- ZZP LSJ 1.0 PCM
- ZZP high output intercooler pump
- ZZP LSJ high voltage coil packs
- ZZP dual pass intercooler plate kit
- ZZP laminova core o-rings
- ZZP oil catch can
- ZZP shorty headers
- ZZP interference fit LSJ dipstick
- Highland Bronze powdercoat on steel/aluminum parts - JB Laser Boise, ID
- Motegi Racing MR147 17x8 bronze wheels
- Toyo Proxes R1R 235/45ZR-17 tires
- Black spline drive 5-lug wheel kit
- 3M White Carbon Fiber Wrap - hood, side panels and fenders - Wrap World Boise, ID
- NRG carbon fiber rear wing - 59in
- Planted technology seat mounts
- Fire exstinguisher
- Medical Kit
- Rear view mirror
- Suzuki GSX-R1000 mirrors with integrated marker/blinker
- LED headlight conversion
- Carbon fiber door seal protection film
- PefecTech third brake light
- MOOG control arms
- Lone Star Racing billet A-Arm brake line brackets
- Summit Racing 3 inch aluminum black textured air intake piping
- Summit Racing Stainless Works exhaust hangers
- K&N air filter
- Parking brake
- SPARCO seat sliders
- SPARCO universal seat mount hardware
- SPARCO 4-point seatbelts
- SPARCO Sprint seats
- SPARCO suede steering wheel with quick detach kit
- SPARCO shift knob
- NOAM NUT5-S V.2 sound system
TOTAL: ....a lot....
Build Log Video
UPDATES TO BUILD!
20 November 2023
- Winter project: pulled factory timing chain cover and replaced it with a new cover, oil pump, from ZZP
- Inspecting timing, timing chain, cams, guides, tensioner, valves, valve springs: looks good
- Considering Stage 3 upgrade for factory M62 supercharger or sourcing TVS 1320 supercharger
- Second compression test/check completed
-- Cylinder 1 - 210 psi
-- Cylinder 2 - 200 psi
-- Cylinder 3 - 210 psi
-- Cylinder 4 - 190 psi
19 February 2024
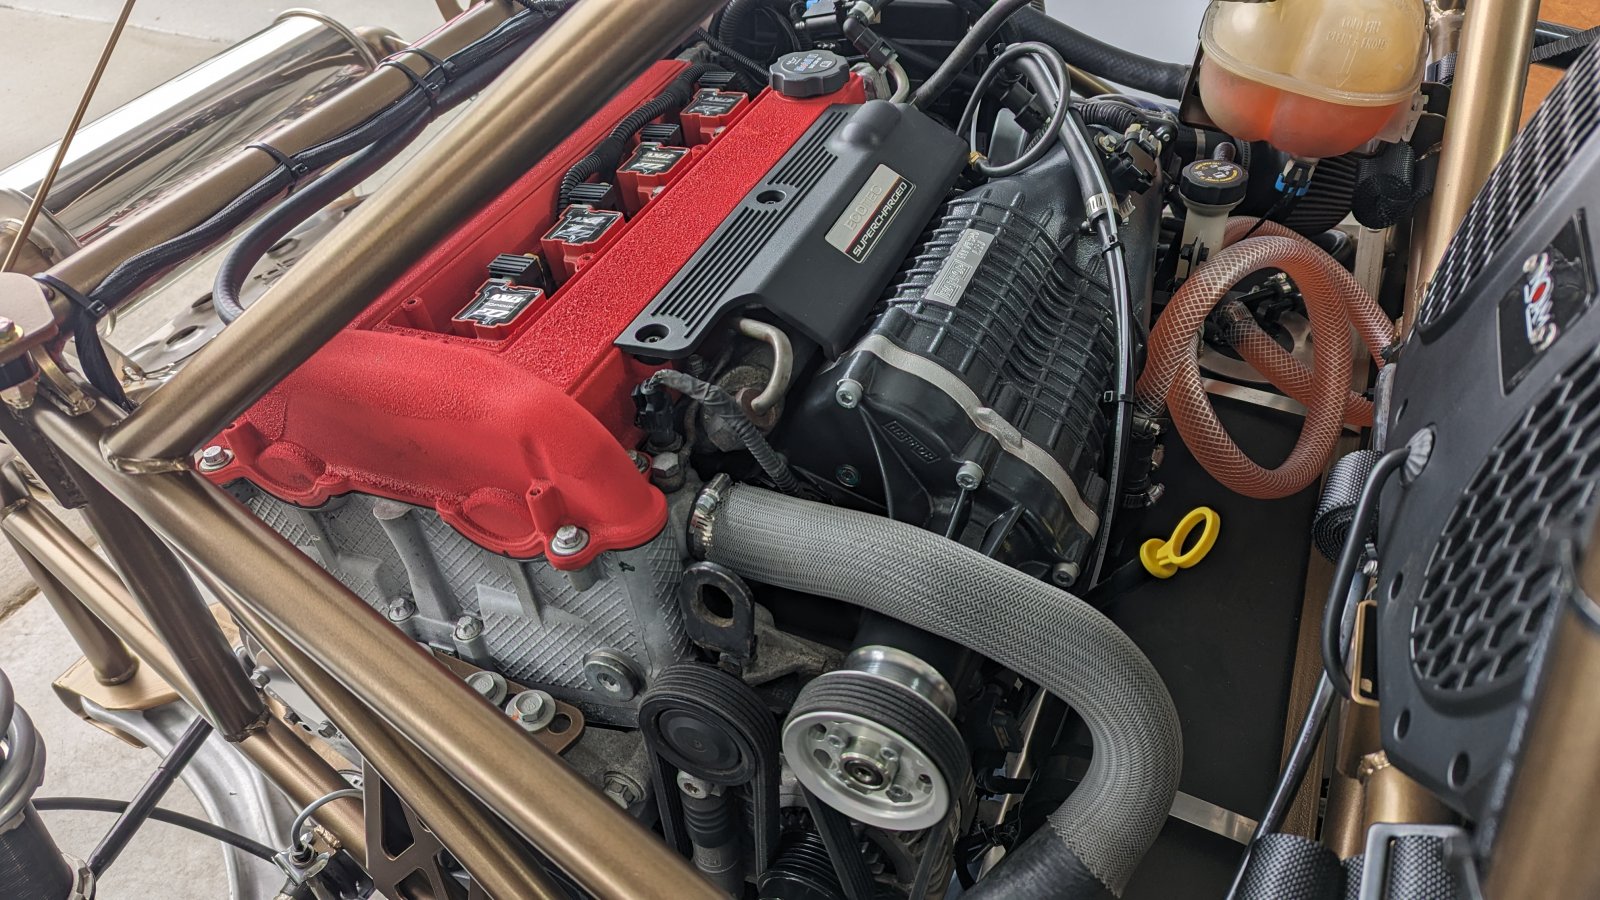
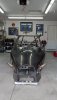
Harrop TVS 1320 supercharger installed.
- ZZP Stage 1 PCM update for new supercharger and fueling
- Siemens 60# injectors
- ZZP LSJ EV6 injector harness
23 February 2024 - Throttle Works, Boise ID
First dyno run for the car on a Mustang Dyno. 249 rwhp and 192 ft-lbs torque. Car is running lean and pulling timing on the initial ZZP 1.0 tune. Plan is to purchase HP Tuners and dial the car in. I'm not chasing horsepower, and still on stock internals, so I'm hoping I can get it tuned in close to 300 rwhp. 60# injectors should still have some room and I'm running the factory 3.1" pully on the TVS. Turbo swap is the best option for these cars, if you want real HP and TQ returns, but I like my supercharger whine!
Dyno Run - #403
08-10 March 2024 - Boise Roadster Show - 1st Place in Class
Donor
2006 Chevy Cobalt SS Supercharged - 123k on the clock - purchased and driven for 3 months prior to disassembly to work out any issues.
Cost of the donor, plus shipping to Idaho, was $4,750.
Kit - #403
The following full kit (all 3 stages) was ordered from DF on 09 December 2021. Full kit arrived by Stewart Transport on 05 July 2022.
- DF Goblin Stage 1
- Stage 1 SS/SC Upgrade
- Full Cage Option
- Roof Bars
- Billet Shifter Kit
- DF Goblin Stage 2
- Stage 2 SS/SC Upgrade
- Rear Coilover Kit
- DF Kit Car Steering Wheel Kit
- Hood Kit, Full Cage
- Duct Cut-Outs in Hood
- Windscreen Kit, Extended
- Footwell Cover Kit
- Side Panel Kit
- Engine Cover Kit, Non-TC
- Fender Package, Wide, with Coilovers
- Headlight Kit
- Mirror/Turn Signal Kit
- License Plate Mount Kit
- Taillight Kit
- Button Panel Set, Early Model
- Boost Gauge Mount
- Heat Exchanger Duct Kit
- Bumper Set, Street Version
- Wing Mount Kit Total: $14,790
- Stewart Transportation Total: $1,545
The following items/work were purchased, in addition to the kit, to complete the car. Some of this was preventative maintenance and much of it was personal preference to the get the performance, and aesthetics, I was shooting for with the build.
- Axle seals
- GM timing chain kit
- GM supercharger fluid
- GM steering shaft
- New battery
- Timing chain tensioner
- ECOTEC timing chain guide bolt
- ECOTEC water pump
- Fuel injector 0-rings
- ECOTEC fuel injector isolators
- MAP, MAF, TMAP and boost solenoid sensors
- Timing chain cover gasket
- Valve cover gasket
- Exhaust manifold hardware
- Starter
- Alternator
- LSJ harmonic balancer
- LSJ front main seal
- LSJ fuel filter
- LSJ oil pressure sensor
- LSJ supercharger bypass valve o-ring
- Clutch Masters stage 3 clutch
- Clutch clip
- Clutch pipe
- Hydraulic clutch elbow
- Fidanza aluminum flywheel
- Foreverfab V1 Goblin muffler with magnaflow resonator
- Edelbrock stainless steel braided brake lines
- Vibrant Performance AN to NPT brake adapter fittings
- New GM 5-100 front and rear hubs
- DF speed sensor caps
- DF SS/SC steering rack limiter kit
- DF SS/SC brake proportioning valve kit
- DF wiring service for main harness (fog lights, 12v acc plugs, side marker lights maintained)
- Badass Moto grab handles
- Autometer Phantom mechanical boost gauge
- Autometer Phantom Air/Fuel gauge
- 3D printed dual gauge pod w/light sensor mount
- Longacre steering wheel hook
- ZZP ECOTEC flywheel bolts
- ZZP ECOTEC pressure plate bolts
- ZZP LSJ bypass valve
- ZZP LSJ 1.0 PCM
- ZZP high output intercooler pump
- ZZP LSJ high voltage coil packs
- ZZP dual pass intercooler plate kit
- ZZP laminova core o-rings
- ZZP oil catch can
- ZZP shorty headers
- ZZP interference fit LSJ dipstick
- Highland Bronze powdercoat on steel/aluminum parts - JB Laser Boise, ID
- Motegi Racing MR147 17x8 bronze wheels
- Toyo Proxes R1R 235/45ZR-17 tires
- Black spline drive 5-lug wheel kit
- 3M White Carbon Fiber Wrap - hood, side panels and fenders - Wrap World Boise, ID
- NRG carbon fiber rear wing - 59in
- Planted technology seat mounts
- Fire exstinguisher
- Medical Kit
- Rear view mirror
- Suzuki GSX-R1000 mirrors with integrated marker/blinker
- LED headlight conversion
- Carbon fiber door seal protection film
- PefecTech third brake light
- MOOG control arms
- Lone Star Racing billet A-Arm brake line brackets
- Summit Racing 3 inch aluminum black textured air intake piping
- Summit Racing Stainless Works exhaust hangers
- K&N air filter
- Parking brake
- SPARCO seat sliders
- SPARCO universal seat mount hardware
- SPARCO 4-point seatbelts
- SPARCO Sprint seats
- SPARCO suede steering wheel with quick detach kit
- SPARCO shift knob
- NOAM NUT5-S V.2 sound system
TOTAL: ....a lot....
Build Log Video
UPDATES TO BUILD!
20 November 2023
- Winter project: pulled factory timing chain cover and replaced it with a new cover, oil pump, from ZZP
- Inspecting timing, timing chain, cams, guides, tensioner, valves, valve springs: looks good
- Considering Stage 3 upgrade for factory M62 supercharger or sourcing TVS 1320 supercharger
- Second compression test/check completed
-- Cylinder 1 - 210 psi
-- Cylinder 2 - 200 psi
-- Cylinder 3 - 210 psi
-- Cylinder 4 - 190 psi
19 February 2024
Harrop TVS 1320 supercharger installed.
- ZZP Stage 1 PCM update for new supercharger and fueling
- Siemens 60# injectors
- ZZP LSJ EV6 injector harness
23 February 2024 - Throttle Works, Boise ID
First dyno run for the car on a Mustang Dyno. 249 rwhp and 192 ft-lbs torque. Car is running lean and pulling timing on the initial ZZP 1.0 tune. Plan is to purchase HP Tuners and dial the car in. I'm not chasing horsepower, and still on stock internals, so I'm hoping I can get it tuned in close to 300 rwhp. 60# injectors should still have some room and I'm running the factory 3.1" pully on the TVS. Turbo swap is the best option for these cars, if you want real HP and TQ returns, but I like my supercharger whine!
Dyno Run - #403
08-10 March 2024 - Boise Roadster Show - 1st Place in Class
Attachments
-
 229.8 KB Views: 194
 -
 237.1 KB Views: 199
 -
 177.9 KB Views: 195
 -
 395.2 KB Views: 192
 -
 233.7 KB Views: 196
 -
 250 KB Views: 192
 -
 268.8 KB Views: 201
 -
 251.6 KB Views: 196
 -
 278.4 KB Views: 193
Last edited:
