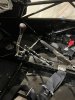
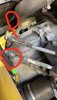
I'm wondering if anybody else has had the problem I'm having in the photo (try to do a video, but can't upload it), and what the solution was. Basically it seems like a rivet is being used as the stop for the reverse lockout. Mine however, created a very rounded edge where the rivet popped through. The rounded edge sort of serves as a ramp for the reverse lockout, and doesn't stop it in the same place every time. Sometimes it just blows right by the rivet, and doesn't stop at all. Then the spring-loaded metal tang gets caught in the middle of the lockout, and jams everything up.
Anyone have a solution to make the rivet larger? I thought about putting a little weld bead on it, but I'm not sure if it's aluminum or not.
")