Mayor West's 09 SS/TC Ext. Track Turbo #191 [South Carolina] [Registered] [Sold]
- Thread starter Mayor West
- Start date
Mayor West
Goblin Guru
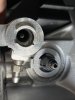
Yeah that's first on my list before removal because I'm fairly certain I tightened that slave side very well.Check the top real well. Mine looked like it was leaking from internal, but it was at that elbow from the line to the slave. That goofy oring can be a pain. The oring needs to be on the slave side, line. Then the elbow goes on (if it’s the same as my supercharged model).
Okay so I can juggle the top fitting and see brake fluid around it so I'm thinking that's it. Sucks though because now I likely have a boat load of brake fluid all in my clutch.
Can anyone tell me if I'm missing anything here?
Attachments
-
 280.7 KB Views: 210
Last edited:
Rttoys
Goblin Guru
.
Attachments
-
 289.8 KB Views: 177
Mayor West
Goblin Guru
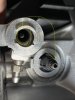
I grabbed the rubber fitting and it's still leaking out the bottom. I disconnected all the lines and am letting it all drip until it stops and I'll clean it then reattach and see if it begins leaking again or not.
Mayor West
Goblin Guru
Yeah I made sure I had that. It's hooked up and appears to be tight but it was leaking a lot prior to fixing it (I pressed the clutch a lot out of excitement too) so I'm sure it was full of fluid so I'm hoping the dripping is from residual fluid in there and not new fluid.Odd question: you do have the U looking clip for the elbow correct? And it’s in good shape? I had to “rework” mine to keep it all tight.
Mayor West
Goblin Guru
I haven't had a chance to review the clutch side, since I ran out of brake fluid from all the leaking. Speaking of leaks, my DF bracket for mating the brake fluid reservoir to the plastic lines is leaking like a sieve. I've seen a lot of people complain about this so I'm a little bummed that it's happening to me too.
Not sure what route I'm going to take to fix the leak, I'll try to make sure the seals are seated correctly but I've already gone through two large bottles of brake fluid only to have leaks all over my painted tunnel cap, not something I want to have repainted.
Other than replacing the DF bracket and OEM reservoir with a tilton-type reservoir, what else has anyone done to fix this leak? I'm going to make sure the little rubber o-rings are seated but that's about all I can think of.
Last edited:
Mayor West
Goblin Guru
I have rubber hose for my clutch line and will probably switch over to rubber for the brakes, too... something about those melted-on lines just doesn't give me warm and fuzzies.
Mayor West
Goblin Guru
Because I'm an idiot, I used fuel line as a temporary brake fluid hose and as we all (should) know, brake fluid and fuel line don't mix. I got a 10 foot roll of EPDM (chemical safe) hose and will be installing that soon. I'm still not 100% sold on using the DF supplied bracket given how much brake fluid my reservoir is leaking. It looks like both the hard plastic line and block itself aren't too happy. I'm probably to blame for the hard plastic line given how you have to heat it to install it... i may have gotten a little too happy with my heat gun. Either way, I'm also hoping this will resolve my clutch leak.
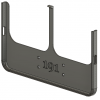
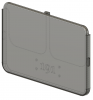
In other news, I've modeled up a tablet holder for my Samsung Galaxy Tab A to eventually use as a torquepro device. I'm printing my 4th test fit now and I expect this one to be the bee's knees. I'm glad plastic is cheap because I'm blowing through it printing full size tests, even at low quality. I'm not 100% sure where I'll mount it yet, but I've made a universal bracket attachment point to make it simple.
In other news, I've modeled up a tablet holder for my Samsung Galaxy Tab A to eventually use as a torquepro device. I'm printing my 4th test fit now and I expect this one to be the bee's knees. I'm glad plastic is cheap because I'm blowing through it printing full size tests, even at low quality. I'm not 100% sure where I'll mount it yet, but I've made a universal bracket attachment point to make it simple.
Attachments
-
 104.9 KB Views: 149
 -
 111.9 KB Views: 163
Mayor West
Goblin Guru
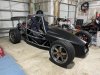
Maiden Voyage! Very happy to be at this point. I got into 2nd gear around the neighborhood. It's very loud in my garage but out in the open it's tame enough to not cause too much of a ruckus.
Very happy with it.
It's so small and intimate that close to the road. Can't wait to get it tuned, aligned, and running smooth.
Very happy with it.
It's so small and intimate that close to the road. Can't wait to get it tuned, aligned, and running smooth.
Attachments
-
 411 KB Views: 246
Last edited:
ctuinstra
Goblin Guru
Twice now I have sunglasses flew off my head and I had to turn around and go back to get them. Just drove up to them and reached over onto the ground to pick them up. Came in quite handy. It can be a bit intimidating at first.Very happy with it.
It's so small and intimate that close to the road. Can't wait to get it tuned, aligned, and running smooth.
When Kaleb took my dad (78 years old) out for the first ride, Kaleb came back complaining to me that "Grandpa kept tell me and motioning with his hand to slow down!" "I was doing 10MPH UNDER the speed limit!"

Kenny123
Well-Known Member
Dude those seats are bad ass!!! Is that denim???Maiden Voyage! Very happy to be at this point. I got into 2nd gear around the neighborhood. It's very loud in my garage but out in the open it's tame enough to not cause too much of a ruckus.
Very happy with it.
It's so small and intimate that close to the road. Can't wait to get it tuned, aligned, and running smooth.
- Radiator
Wire to black multiplug- Wire fan
- Wiring
Tidy up unused plugs- Put ambient air sensor somewhere
- Fully implement wideband wiring
- Wire headlights
- Wire mirrors
- Wire brake lights
- Alignment
- Do it
- Tune
- Do it
Install IntakeInstall Side MirrorsRear Brake Calipers
Install calipersInstall Parking Brake AdaptersParking Brake
Install on to shift tunnelBrake Hard Lines
Front lines from main to wheelsBrake Soft Lines
FrontRearBattery Hold Down Bracket
Install/Cut boltsBrake Booster Vacuum Hose
Install Front & RearPrint 2nd adapterFluids
Brake/ClutchRadiator (100% water for now)Bleed
BrakesClutchFuel Tank
Vent Hose NippleSandblast Fuel NeckPaint Fuel NeckInstallEngine Mounts
Paint new solid mountsInstallShift Cables
InstallShift Linkage
Install OTTP with custom made adapters for threaded rodSteering
Figure out adapters/mount for new manual steeringMount new manual steering adapterFind a nut to attach hub adapterTurbo
Install vacuum nipple in compressorHook up vacuum lines to BOV, Wastegate, and boost solenoidBCM
Install Kickplate
Mayor West
Goblin Guru
Yeah man, comy AF.
OptimizePrime
Goblin Guru
Kenny123
Well-Known Member
**** they look like it!Yeah man, comy AF.
Mayor West
Goblin Guru
Tonight wired my radiator and started working on my head/tail lights. I did my own wiring so there's always that bit of uncertainty in testing electrical stuff.
I edited this post to update that I figured out what was up with my wiring for the brake lights. I did my own wiring harness so after seeing OptimizePrime have issues with his directional lights (since the cobalt has a shared brake/turn flasher, there's no split signal for brakes and turn) so I ran additional leads from the side mirrors. When wrapping these up, I mixed the driver/passenger side so when I was testing the other night my driver side signal lead was technically the passenger side... so I just "de-loomed" about 3' or so of wires and swapped them... now my brake lights are all wired up and lookin good.
I'm having a difficult time getting in to 5th gear, as most other people are experiencing... so that's something I need to work on. I'd like to go the RSX shifter route but that's not on my immediate to-do list.
Last edited: