Organizing Main Harness Part 1

07 Cobalt NA 2.2L

Hey guys I'm new to the forum so I apologize if I don't have something posted correctly so please be patient with me. I'll try my best to learn as I go.

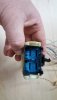
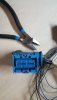
I did have a question about the section of organizing the main harness part 1 at 3:20 in the video he is showing taping the body-to-engine harness to the 2 connectors that are installed in the fuse box at the time. A few seconds later he states to take the light blue wire and fold it in the opposite direction so u don't tape it with the rest. This is where I'm confused.

I have at least 2 light blue wires in that area so I'm not sure which one he is wanting to have me fold back. Is it one that is attached to a separate connector? Is it supposed to be a wire that has been thinned and separated in previous videos? If so, I don't have a light blue that is separated (hopefully I didn't mess up...)

Any help or input is greatly appreciated! Thanks!
 

Jmar1622

Well-Known Member
Are you using the new videos only? I had YouTube bring up an ild video doing mine. I just finished mine and with the NA there are some wires we don't have. Makes it a like confusing.
 
Are you using the new videos only? I had YouTube bring up an ild video doing mine. I just finished mine and with the NA there are some wires we don't have. Makes it a like confusing.
Okay ill have to check those out. I think I found an earlier thread from a couple years ago that was mentioning something like that. Thanks!
 

Iwanttogofast

Well-Known Member
I have been working on my harness on and off over the past couple of months. I get started, get extremely irritated, and stop. The videos (yes, the NEW ones) do NOT seem to pertain to my SS/SC LSJ harness. My setup is very, very different - and I am very disappointed that there are no notes specifically for the LSJ Goblins.

There are steps that I've done that I am not 100% sure of, other steps that I could not have completed without the help if other LSJ builders, and times where I am completely stuck and cannot proceed. Like now.

I'm on harness video #4, and at this point my connectors don't look anything like what's in the video. What I "thought" was my ECM connector (all blue) does not seem to be correct. And what I "thought" was my body to engine connector might well be my ECM connector, as it has the tan twisted pair coming from it. I cannot find connector views that match what I've got, and the videos seem to confuse me more than help.

I've got 4 complete harnesses. Main harness, exterior lighting harness, dash harness, and a secondary harness with p/s connectors. Can anyone with SS/SC tell me with certainty which of the attached pictures shows my ECM connector, and which is my body to engine connector?
20220615_165611.jpg20220615_165557.jpg
 

Joebob

Goblin Guru
I know it is too late but this is why everyone says to label everything before removing it to avoid these issues. I have a 2.4L N/A so the videos were NOT exact for me either but I followed the philosophy. If I had door functions, seat heaters, sunroof, radio functions that were not used in the goblin, I knew I could remove them except the grounds. I did have to juggle a bit as I kept a lot of things, but having the labels allowed me to understand what I was doing because I understood the philosophy.

Now what might be more helpful than my past tense rant is find the other side of the plug to find out where it goes. you have 2 halves of the body to engine connector, and you have an ECM to plug the other into. Find them to understand what to do next.

I think the forst one is more like the body to dash or a door connector with the white latch and the second looks more like a computer module connector but the low pin count looks off but again I do not have a LSJ.

Joe
 

Iwanttogofast

Well-Known Member
Joe: I get where you're coming from, but not knowing what each connector is called while labeling (during disassembly) is where the problem lies. What I labeled it as is (usually from where I pulled it) is not what it is referred to in the videos. And the connectors in the videos look very different than what I have in my '07 SS/SC harness, with different wires and connector configurations. It makes it extremely confusing at times. I'm just crossing my fingers as I go, and not cutting wires too close to the connectors in case repair is required at a later date.

From what I can tell so far, you appear to be correct about the left pic being body to dash, and right being ECM C1. It's just weird that the tan twisted pair shown in the video is on ECM C1, while mine are on body to dash connector. ??

If it were not for this **** harness, I'd probably have my Goblin built by now. Frustrating as hell...
 

r3drckt

Goblin Guru
First is the body to dash connector (one in your hand). Second is the ECM connector. The twisted data pair I don’t remember going to the ECM connector, but it’s been well over a year.
 

Ross

Goblin Guru
R3drckt is right.
This is my PCM connector, with a gray handle to lock it onto the P12 PCM.
33752


and here is the main harness connector (Both sides) with a white handle to lock them together.
33753


You know you can use the 2006 SS SC alldatadiy wiring diagrams and connector views to help, and as always, use this forum. No point in getting too frustrated when someone here probably has an answer. If you click on any of my message signature lines, you can get to my build, which has these resources listed:

Electrical diagrams:
Color diagrams
AllDataDIY Login
AutoZone.com has repair guides. If you set up a free account, you can get electrical diagrams for your car.
Chilton Login
 
Last edited:

Iwanttogofast

Well-Known Member
Is the tan twisted pair in ECM C1 positions #1 and #2 [GM HS LAN (circuits 2500 & 2501)] really used for SS/SC?

For some reason, mine are cut pretty close to the connector. I thought that I followed the video instructions pretty closely. I think this was a leftover twisted pair that instructions said to remove. ? Also, video #4 shows taping up the first part of ECM C1 harness, and shows other twisted pairs as part of that harness that I don't have(?). Purple? Yellow? I'm pulling my hair out over here...
 

Joebob

Goblin Guru
This picture is for 2009+ cars but shows the twisted pair running through the various modules. In the end the loop needs to be continuous. In red was my path as I have an auto transmission. As you remove the ABS and Onstar modules (if you had), you would need to connect the tan twisted pair through the X101 (body/dash connector) to the ECM. You will eventually cut out that connector and join the twisted pair from the BCM plug to the ECM plug during the joining sections of the videos. The best advice at this stage is to watch the videos ahead so you can see what is coming rather than just follow the immediate step ahead. It helps develop the purpose of the actions so you can account and understand the differences between your wiring and the video.

Keep asking questions almost every problem has been encountered here before.

Joe

33758
 
Top