Robinjo
Goblin Guru
About Me
Born and raised in Huntsville, AL. Attended Auburn University for a Bachelor's of Science Chemistry and University of Alabama (Huntsville) for a Master's of Science in Chemical Engineering. Current profession is a Parts Quality Engineer for Mazda North America on the all new CX-50 CUV. I grew up around Honda's, mostly late 80's to mid 90's versions. I used to race autocross in a 1995 Integra GSR and won my ST class a couple times, but that not saying much. I had maybe 3 or 4 other competitors in my class. I also play soccer a lot when I wasn't racing. After the birth of our first child, my wife gave me an decision to make: Soccer or Racing but not both. I chose soccer (I play 2x weekly) and kept the GSR in the garage as a spare car until my company downsized and my services were not longer required (2012). During those time, fun things like spare cars go. Since that time, I haven't had a project car and I was constantly looked for old Honda's or BRZ's that I might have wanted to jump into. I watched a Donut Media YouTube about kit cars and saw the DF Goblin on there, then watched the Goonzquad Videos (legit/dang son insert here) about their build. With a $12k entry price (estimated) it sounded great. The wife had watched this with me and started asking question about how hard it would be and was I capable. Before I knew it she asked me if I wanted to build one with our now 13 year old son, which I would love to do. I couldn't believe she was onboard with this, so much so that she gave up remodeling our kitchen to do this. So, before the end of 2021 we made our down payment and the search began for a donor.
The Donor
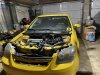
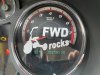
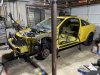
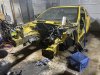
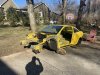
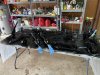
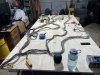
I began scouring the internets for a vehicle. I knew I didn't want an automatic but was really open to anything other than that. After searching for what seemed like eons (it was two weeks), I found a 2006 Yellow AF SS/SC with 150k miles only 3.5 short hours away. The interior and exterior weren't great but what it had everywhere else was perfect. The engine has the GM Stage 2 upgrades, 3.0" pulley, Dual Pass kit (that I didn't know about) and a huge heat exchange. Oh, and it also had a stupid "FWD Rocks' sticker over the tachometer. The vehicle was running and driving, the seller was open about everything 'wrong' with the vehicle so a deal was struck. Engine felt strong, made 15 psi on the boost gauge and the trans went into gears. My father and I got the vehicle loaded and home safely and the original plan was to wait until the title came through to rip it apart, but that didn't happen. We all know the story here, the following weekend the carnage began. The title actually came a couple days after I finished the bulk of the tear down. I didn't take a lot of photos of the car in 'new to me' status as I didn't care. An extra little bonus, while getting the Bill of Sale notarized the guys father showed up with a box which contained brand new wheel bearings for all 4 corners (score!). I know most wouldn't have gone for such a high mileage engine but if it blows, it blows. At that time my son will get an education in engine internals and disassembly/building the engine.
The Kit
We opted for the shortened version with high rise bars on the side. I'm 5'9" @ 175#, my wife not as tall (or fat) and my son about her size (for now). We did option for all the easy stuff: hood, side panels, lights kit, etc. For now, we're trying to keep everything lower end of the budget. Re-using the stock wheels but buying better tires, stock seat and belts. These things can be changed out later on in pieces. Currently, we're waiting on #405 to get welded and shipped. Tentatively, looking at the end of June to ship out.
The main purpose of this build is to-fold. The first is to spend time with my kid, in less than 5 years he'll be gone to college and we'll lose him to girls much sooner than that. The second is to foster his engineering mindset. He loves building small models, so this is just the next step. It'll also teach him the basics of how automobiles work and how all the parts interact. I know these things but would love learning a different aspect of it.
Even before placing the order I began scouring the Forum reading as much as I could. I also began watching and re-watching the YouTube (YT) video, old and new. I've watched each of these at least twice, the wiring video 4 times each before even beginning to follow along with the videos (making 5 times). I'll say this a lot over the course of the build but a huge thank you to the DF Goblin team and forum members. The helper videos are fantastic. Also, the support of everyone thus far has been nothing short of awe inspiring.
NOTE: I'm trying to detail and photograph as much from the end of the videos to the completion. Since there is information scattered everywhere, I'm trying my best to include photos and links to issues I have that get resolved. It will, by no means, be complete but it'll be something. My pain can be your success.
Future Plans
Drive a lot (Like A LOT, a lot)
Install racing seats and harnesses
Get better a wheel size
Quick release steering wheel
Jump to a Stage 3 SC kit and tune, Mo Powa Baby!
Born and raised in Huntsville, AL. Attended Auburn University for a Bachelor's of Science Chemistry and University of Alabama (Huntsville) for a Master's of Science in Chemical Engineering. Current profession is a Parts Quality Engineer for Mazda North America on the all new CX-50 CUV. I grew up around Honda's, mostly late 80's to mid 90's versions. I used to race autocross in a 1995 Integra GSR and won my ST class a couple times, but that not saying much. I had maybe 3 or 4 other competitors in my class. I also play soccer a lot when I wasn't racing. After the birth of our first child, my wife gave me an decision to make: Soccer or Racing but not both. I chose soccer (I play 2x weekly) and kept the GSR in the garage as a spare car until my company downsized and my services were not longer required (2012). During those time, fun things like spare cars go. Since that time, I haven't had a project car and I was constantly looked for old Honda's or BRZ's that I might have wanted to jump into. I watched a Donut Media YouTube about kit cars and saw the DF Goblin on there, then watched the Goonzquad Videos (legit/dang son insert here) about their build. With a $12k entry price (estimated) it sounded great. The wife had watched this with me and started asking question about how hard it would be and was I capable. Before I knew it she asked me if I wanted to build one with our now 13 year old son, which I would love to do. I couldn't believe she was onboard with this, so much so that she gave up remodeling our kitchen to do this. So, before the end of 2021 we made our down payment and the search began for a donor.
The Donor
I began scouring the internets for a vehicle. I knew I didn't want an automatic but was really open to anything other than that. After searching for what seemed like eons (it was two weeks), I found a 2006 Yellow AF SS/SC with 150k miles only 3.5 short hours away. The interior and exterior weren't great but what it had everywhere else was perfect. The engine has the GM Stage 2 upgrades, 3.0" pulley, Dual Pass kit (that I didn't know about) and a huge heat exchange. Oh, and it also had a stupid "FWD Rocks' sticker over the tachometer. The vehicle was running and driving, the seller was open about everything 'wrong' with the vehicle so a deal was struck. Engine felt strong, made 15 psi on the boost gauge and the trans went into gears. My father and I got the vehicle loaded and home safely and the original plan was to wait until the title came through to rip it apart, but that didn't happen. We all know the story here, the following weekend the carnage began. The title actually came a couple days after I finished the bulk of the tear down. I didn't take a lot of photos of the car in 'new to me' status as I didn't care. An extra little bonus, while getting the Bill of Sale notarized the guys father showed up with a box which contained brand new wheel bearings for all 4 corners (score!). I know most wouldn't have gone for such a high mileage engine but if it blows, it blows. At that time my son will get an education in engine internals and disassembly/building the engine.
The Kit
We opted for the shortened version with high rise bars on the side. I'm 5'9" @ 175#, my wife not as tall (or fat) and my son about her size (for now). We did option for all the easy stuff: hood, side panels, lights kit, etc. For now, we're trying to keep everything lower end of the budget. Re-using the stock wheels but buying better tires, stock seat and belts. These things can be changed out later on in pieces. Currently, we're waiting on #405 to get welded and shipped. Tentatively, looking at the end of June to ship out.
The main purpose of this build is to-fold. The first is to spend time with my kid, in less than 5 years he'll be gone to college and we'll lose him to girls much sooner than that. The second is to foster his engineering mindset. He loves building small models, so this is just the next step. It'll also teach him the basics of how automobiles work and how all the parts interact. I know these things but would love learning a different aspect of it.
Even before placing the order I began scouring the Forum reading as much as I could. I also began watching and re-watching the YouTube (YT) video, old and new. I've watched each of these at least twice, the wiring video 4 times each before even beginning to follow along with the videos (making 5 times). I'll say this a lot over the course of the build but a huge thank you to the DF Goblin team and forum members. The helper videos are fantastic. Also, the support of everyone thus far has been nothing short of awe inspiring.
NOTE: I'm trying to detail and photograph as much from the end of the videos to the completion. Since there is information scattered everywhere, I'm trying my best to include photos and links to issues I have that get resolved. It will, by no means, be complete but it'll be something. My pain can be your success.
Future Plans
Drive a lot (Like A LOT, a lot)
Install racing seats and harnesses
Get better a wheel size
Quick release steering wheel
Jump to a Stage 3 SC kit and tune, Mo Powa Baby!
Last edited:


")