1. You can ditch the evap parts. For the crankcase vent tube, you can either run that rig over to the intake (DF supplies a barb fitting to connect to the crankcase vent), run your own hose for crankcase vent, or throw a breather filter on the valve cover barb. I went with a breather filter and capped the barb on the intake without issues. I don't think that vent tube rig will get you 100% of the way to the barb on the intake tube, but it's been a while since I looked at it.
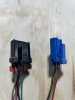
2. Remove the second O2 sensor plug from the harness (make sure you're removing it and not the first O2 sensor plug)
3. Remove the evap plug from the harness.
Bonus #4, if you want to do any tuning, leave your AC pressure sensor wire in the engine harness to connect to a wideband O2 sensor, according to Option #3 under the Bringing in Sensor Data section from
this thread.