SkyRay's Extended Track Goblin #314 - 09 SS/TC

SkyRay

Active Member
Thanks for all the responses. I guess one of the benefits of doing the wire harness yourself is having the extra connectors afterwards. Since I didn't do mine, I didn't have the extra connectors. I did find a pigtail on Amazon for under $20, so I went that route. I might have been able to solder it, or use a solder sleeve, but it was really short (1/8") so I didn't want to chance it. I really want to get the car completed and be able to use it vs trying to make it work and then potentially troubleshoot issues down the road.

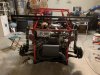
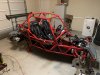
Now for some thoughts on the installation of the solid transmission mounts.
- I wish I had installed the solid transmission mounts before I completely torqued down the subframe connections.
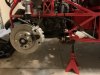
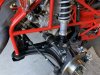
- I placed a floor jack under the transmission, right under the front mount.
- I loosened all 4 subframe connections and the 4 bolts holding the control arms to the subframe
IMG_3435.JPEG
- I loosened the 6 bolts holding the engine to the chassis. These steps maximized the tolerance (slop) between the transmission and the subframe.
IMG_3433.JPEG IMG_3434.JPEG
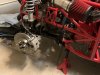
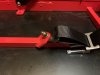
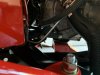
- I installed the rear transmission mount, starting (but not torqueing) the three bolts going from it to the transmission.
- I installed the front transmission mount, starting (but not torqueing) the lower bolt going from it to the transmission.
- I used a rubber mallet to force the front transmission mount between the plates in the subframe. Maybe you have enough of a gap that yours went in easily... mine did not. I got the hole in the mount as close to lined up with the holes in the subframe as I possibly could.

At this point, all of the mount holes to the subframe were forward of where the subframe needed them to be.

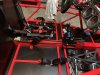
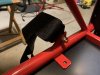
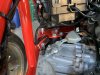
- I got my quick clamp, and reversed it so that it was pushing the ends away rather than clamping them.
- I installed it between the subframe and the transmission/engine, at the front of the subframe.
IMG_3437.JPEG
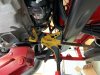
- I used the clamp to push the engine away from the front of the subframe. I was pretty quickly able to drop the three screws through the rear transmission mount and subframe.
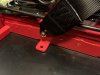
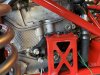
- I had to do more work to get the front transmission mount hole lined up with the subframe holes. There wasn't much around there for me to lever against, so I did end up using the rubber mallet again. Once lined up I installed (but again didn't torque) the bolt down.
- This left the top bolt on the front transmission mount that needed to be installed. This took a combination of lifting the engine with the floor jack (remember it was right under the mount) and prying between the mount and transmission right beside the hole. Eventually the hole lined up and I was able to start the screw.
IMG_3436.JPEG
With all the screws started, I then went to torque down the screws... I went in this order:
- Transmission mount to transmission (5 bolts)
- Transmission to subframe (4 bolts)
- Engine to chassis (6 bolts)
- Front Subframe to chassis (2 bolts)
- Rear subframe to chassis (2 bolts) through the control arms
- control arms to subframe

Not sure if this is the best way, but it worked for me. Sorry I didn't take pics of every step... hopefully you can follow what I did.
 
Last edited:

SkyRay

Active Member
I had said I would get the brakes corrected on Sunday... I didn't get to that. I did fill the intercooler with fluid (and found leaks where the elbows go into the heat exchanger. I see in SmsDetroit's log where he used teflon tape there to seal them up... that will be another project for this week.

I did take some clamps to squeeze the tunnel together, which allowed me to get the tunnel cap started. I was then able to get it on the tunnel. Of course, I need to pull it back off again to finish everything going through the tunnel. But it is progress.

Finally, I did a lot to clean up the garage. Amazing how many empty DF baggies and boxes I have.

Also, while I agree with what Rttoys said, I got all four wheels on and installed the driver's seat. It was encouraging to my family and I to see it look like a... well, big go-cart. There is still a lot of assembly to do, then the tweaking to make it drivable, then the work to make it run well. But the process continues...
 

Attachments

SkyRay

Active Member
It has been a while since I posted... Life has been busy, and when I've had opportunities to work on the Goblin I didn't do a great job of getting pics and posting. But I'll try to catch up this weekend.

To Rttoys point, I need to figure out the long term tire situation. I haven't investigated at all... wanted to get the car running and driving before I invest in wheels and tires. It will require more rework since I'll either need to get adapters or have the hubs re-drilled... but that is a problem for another day.

Picking up from Nov 8, I added teflon tape to the 90 degree joints going into the heat exchanger. I was able to get the intake installed after some consultation with Lonny and JBINTX, so on 13 Nov we put the wheels back on and decided to push it outside to see if we could get first start. Of course, the battery was dead so I threw it on the charger for a while. Then this happened.


After a few minutes I took a "walk around" video.


Obviously there was another coolant leak, again from the intercooler. This time it was from the back of the car but it was over the tunnel so some of the fluid got into the tunnel and ran out the front of the car making it look like two leaks. Other than that it seemed to work well. After letting it warm up we pushed it back into the garage.

When I was able to troubleshoot the leak at the back of the car I learned that there was still a very small leak at the 90 degree angles into the heat exchanger. So I took it apart again and added more teflon. That got me to around Sunday Nov 14.
 

SkyRay

Active Member
Between Sun, 14 Nov, and today 25 Nov, I had a number of things to do to get the car to drive.

Install the firewall: I followed JBINTX's lead and added a little more clearance above the tunnel before installing it for good.

Get everything to come out of the tunnel in an orderly fashion: I think from the old videos I had it in my head that the electrical lines would go down the passenger side of the tunnel and the intercooler lines would go down the driver side of the tunnel, one on top of the other. This made for a mess when there were two hoses trying to squeeze between the fuel tank and the subframe, all while the electrical lines were trying to go from the passenger side of the car to the driver side of the car. I finally decided that I could put the coolant lines on the bottom and the electrical bundle on top in the tunnel.

Install the parking brake to the tunnel cap: Not too hard to do given the Helpful Photos provided by DF.

Get the tunnel cap on the tunnel: As I had stated earlier, there was so much paint buildup I had a real hard time getting the tunnel cap on. I ended up getting some clamps to pinch the tunnel together so the cap could slip on top. Not desirable, but was what it took. From reading other's logs I decided I wanted threaded fasteners to hold the cap to the tunnel, so I used the M4 drill/tap tool to put threaded holes in the tunnel. Of course, the bit broke with two holes left, but I'll figure that out later. When I went to install the cap on the tunnel and fasten it down, I determined that the holes didn't perfectly line up... I could see all the holes, but could only thread in hardware for one pair of holes at a time. I gave up and kept the two screwed connections and then riveted the rest that I could get to.

Install the shifter and cables: Not too hard. Followed Lonny's instructions and it worked like a champ. The only deviation I had was that before I realized there were spacers to mount the shifter above the tunnel I thought I had to cut out the area between the two from screw mounts. So my shifter isn't as stiff side to side, and I tried to cut off my finger doing this process with the hacksaw.

Install the parking brake cables: Tried to follow the pictures, but either I mounted the handle too far forward or something was off, because I couldn't get the aluminum guides to go into the holes in the handle and mount to the subframe at the same time. I kept digging through build logs and observed the JBINTX appeared to have the same issue. I followed his lead and zip-tied the cables at several points.

IMG_3475.JPEG IMG_3476.JPEG

Installed the license plate light (with old plate) and the rear wing: Ok, the rear wing was all about keeping my 8 year old Adam engaged. It was easy enough to do.

IMG_3486.JPEG

Installed the harness and seats: This was a challenge... not certain I did the harnesses exactly as intended. Would love some feedback here. I still have to get some longer zip ties to capture the loose ends of the harnesses per discussion on other logs.
IMG_3477.JPEG IMG_3474.JPEG IMG_3472.JPEG IMG_3473.JPEG

At that point most of the car was together.

IMG_3480.JPEG IMG_3483.JPEG

Still had to add fluid for clutch and brakes. This was end of day on 23 November.
 

SkyRay

Active Member
With it being Thanksgiving week, I took the week off of work and the college age daughters were both coming in. On the 24th the older daughter brought an engineering student from another country home to experience a traditional Thanksgiving. She expressed experience bleeding brakes so we set off to do it. Got the brakes and clutch done (I think they can be done better) and decided to see if it would move under its own power. Because our driveway has a pretty good incline to it, I started by backing it out of the garage, then pulling it back in, etc, a couple times to make sure it would go and stop on its own. After a couple times with success and no observed leaks, I backed it down the driveway and took a quick trip to the end of the street and back. At this point we decided to go for the "first drive" and I got Adam, my 8 year old helper, to ride along. Here's a video of us leaving... the better video would have been of us on the road and his excitement because of the event!


Then it was Lindsey's turn for a ride. We went a little further... probably 1.5 miles. She was the saint who put up with me being in the garage the most (and her van being out of the garage).


I then took older daughter Bethany for a ride, followed by a ride with Bethany's friend. Daughter #2 Caroline, who was also very helpful during the process, didn't get a ride because she had a school activity. But I'll get her a ride very soon.


There's still a lot left to do, but it was exciting to get it on the road. More to come soon.
 

Rttoys

Goblin Guru
Cool deal. Glad it’s all came along just right.

I know it’s down the road, but it’s fresh on my mind because I’m doing stuff with wheels and tires right now, again.

For one, the stock wheels look good on there, but if you change, I would find the correct bolt pattern or use an adaptor. I’m not big on spacers, but I rather be able to buy a hub at anytime, than wait on a custom hub to me drilled.

and use good tires. ;)
 

SmsDetroit

Goblin Guru
Between Sun, 14 Nov, and today 25 Nov, I had a number of things to do to get the car to drive.

Install the firewall: I followed JBINTX's lead and added a little more clearance above the tunnel before installing it for good.

Get everything to come out of the tunnel in an orderly fashion: I think from the old videos I had it in my head that the electrical lines would go down the passenger side of the tunnel and the intercooler lines would go down the driver side of the tunnel, one on top of the other. This made for a mess when there were two hoses trying to squeeze between the fuel tank and the subframe, all while the electrical lines were trying to go from the passenger side of the car to the driver side of the car. I finally decided that I could put the coolant lines on the bottom and the electrical bundle on top in the tunnel.

Install the parking brake to the tunnel cap: Not too hard to do given the Helpful Photos provided by DF.

Get the tunnel cap on the tunnel: As I had stated earlier, there was so much paint buildup I had a real hard time getting the tunnel cap on. I ended up getting some clamps to pinch the tunnel together so the cap could slip on top. Not desirable, but was what it took. From reading other's logs I decided I wanted threaded fasteners to hold the cap to the tunnel, so I used the M4 drill/tap tool to put threaded holes in the tunnel. Of course, the bit broke with two holes left, but I'll figure that out later. When I went to install the cap on the tunnel and fasten it down, I determined that the holes didn't perfectly line up... I could see all the holes, but could only thread in hardware for one pair of holes at a time. I gave up and kept the two screwed connections and then riveted the rest that I could get to.

Install the shifter and cables: Not too hard. Followed Lonny's instructions and it worked like a champ. The only deviation I had was that before I realized there were spacers to mount the shifter above the tunnel I thought I had to cut out the area between the two from screw mounts. So my shifter isn't as stiff side to side, and I tried to cut off my finger doing this process with the hacksaw.

Install the parking brake cables: Tried to follow the pictures, but either I mounted the handle too far forward or something was off, because I couldn't get the aluminum guides to go into the holes in the handle and mount to the subframe at the same time. I kept digging through build logs and observed the JBINTX appeared to have the same issue. I followed his lead and zip-tied the cables at several points.

View attachment 28965 View attachment 28966

Installed the license plate light (with old plate) and the rear wing: Ok, the rear wing was all about keeping my 8 year old Adam engaged. It was easy enough to do.

View attachment 28970

Installed the harness and seats: This was a challenge... not certain I did the harnesses exactly as intended. Would love some feedback here. I still have to get some longer zip ties to capture the loose ends of the harnesses per discussion on other logs.
View attachment 28967 View attachment 28964 View attachment 28962 View attachment 28963

At that point most of the car was together.

View attachment 28968 View attachment 28969

Still had to add fluid for clutch and brakes. This was end of day on 23 November.
If you are installing side panels you may want to revers to bolts on the lower bolts just in case you need to remove the belts.
 

SkyRay

Active Member
Dec 12 update. I've gotten the car out a couple times when the weather has been warmer. I also installed the windshield to help protect from windburn. So far have about 40 miles on it driving around the neighborhood. I left the neighborhood twice... once to get gas, the other time to get the Texas ASE Master Mechanic inspection and State Safety Inspection. Both passed successfully. The master mechanic, and the rest of the mechanics, were very intrigued. The master mechanic wanted a ride, and even said "I bet that is faster than my race car." Fun times.

I also took Adam to school on Friday. He was beaming as we went along.

I need to get it officially weighed so I can proceed with the registration process. I'm also trying to get the wrap identified and ordered.
 

Joebob

Goblin Guru
Dec 12 update. I've gotten the car out a couple times when the weather has been warmer. I also installed the windshield to help protect from windburn. So far have about 40 miles on it driving around the neighborhood. I left the neighborhood twice... once to get gas, the other time to get the Texas ASE Master Mechanic inspection and State Safety Inspection. Both passed successfully. The master mechanic, and the rest of the mechanics, were very intrigued. The master mechanic wanted a ride, and even said "I bet that is faster than my race car." Fun times.

I also took Adam to school on Friday. He was beaming as we went along.

I need to get it officially weighed so I can proceed with the registration process. I'm also trying to get the wrap identified and ordered.
Did you have to pass emissions? My last step is to get the safety inspection but having a hard time getting the cat and EVAP monitors to run. Good luck on the paperwork filing.

Joe
 

Ark :D

Goblin Guru
Makes me wish my daughter gave a crap about the Goblin. Last I heard from her, it was "too loud and very meh". Haven't offered her a ride since then. :confused:
 

Rttoys

Goblin Guru
Makes me wish my daughter gave a crap about the Goblin. Last I heard from her, it was "too loud and very meh". Haven't offered her a ride since then. :confused:
meh. I know the feeling. None of my family even cares. All I get is “why did you do that?” :( they haven’t approved of motorcycles for the last 20something years, much less my racing the last 5 years. Not sure why i thought it would be different with the goblin.
 

SkyRay

Active Member
Did you have to pass emissions? My last step is to get the safety inspection but having a hard time getting the cat and EVAP monitors to run. Good luck on the paperwork filing.

Joe
I'm not sure if I had to pass emissions or not... but I passed the safety inspection. Emissions is required for Collin County (where I'm at), so I guess I passed it or something special about the vehicle type meant I didn't need it. I was concerned because it is throwing error codes, but it didn't bother the inspector.

The latest challenge is getting the Certified Weight as required by Texas for registration of an assembled vehicle. I went to two truck stops on Friday... each had a CAT truck scale. I called one in advance and they said they could weigh cars if they weigh "enough." I thought to myself if there is a car that doesn't weigh enough, this is it. But I asked what "enough" is in lbs and they said 1500lbs. I figured I was good for 1500lbs, so off I went. However, the Goblin didn't register. I went to another truck stop and was told there that the minimum for CAT scales is 2000lbs. Looking on Penske Certified Public Scale Locator, I'm not sure where to find a CPS that isn't a truck stop which will most likely be a CAT scale. Certainly a lot farther from home than I'd like to go before it is registered. I've called around to local grain and feed stores, and they don't have a scale. The local scrap yards have scales but they aren't "certified." So I'm stuck. I'm hoping I can get another plan to try again later this week when the weather warms some. If anyone has thoughts on where a certified scale might be that is less than 2000 lbs, please let me know. Thanks!

I did have some nice rides when out trying to get it weighed. The asphalt roads where the passenger side of the lane is falling away leads to high-centering side to side. I bottomed out once like this... On Christmas Eve the weather will be nice so I'm looking forward to driving it to church for Christmas Eve services! I need to find some Christmas decor to put on it!
 

Ark :D

Goblin Guru
meh. I know the feeling. None of my family even cares. All I get is “why did you do that?” :( they haven’t approved of motorcycles for the last 20something years, much less my racing the last 5 years. Not sure why i thought it would be different with the goblin.
One nice thing at least, my wife seems more turned on to the Goblin now than before. It was just starting to get colder out, I want to say in October, and I forced her to ride with me to take something over to her friend's place. I told her, "You're making me drive, so we're taking the car *I* pick." Lo and behold, she enjoyed it enough to actually say later, "That ride was fun ... I wish it wasn't getting cold out."

I'm not sure if I had to pass emissions or not... but I passed the safety inspection. Emissions is required for Collin County (where I'm at), so I guess I passed it or something special about the vehicle type meant I didn't need it. I was concerned because it is throwing error codes, but it didn't bother the inspector.

The latest challenge is getting the Certified Weight as required by Texas for registration of an assembled vehicle. I went to two truck stops on Friday... each had a CAT truck scale. I called one in advance and they said they could weigh cars if they weigh "enough." I thought to myself if there is a car that doesn't weigh enough, this is it. But I asked what "enough" is in lbs and they said 1500lbs. I figured I was good for 1500lbs, so off I went. However, the Goblin didn't register. I went to another truck stop and was told there that the minimum for CAT scales is 2000lbs. Looking on Penske Certified Public Scale Locator, I'm not sure where to find a CPS that isn't a truck stop which will most likely be a CAT scale. Certainly a lot farther from home than I'd like to go before it is registered. I've called around to local grain and feed stores, and they don't have a scale. The local scrap yards have scales but they aren't "certified." So I'm stuck. I'm hoping I can get another plan to try again later this week when the weather warms some. If anyone has thoughts on where a certified scale might be that is less than 2000 lbs, please let me know. Thanks!

I did have some nice rides when out trying to get it weighed. The asphalt roads where the passenger side of the lane is falling away leads to high-centering side to side. I bottomed out once like this... On Christmas Eve the weather will be nice so I'm looking forward to driving it to church for Christmas Eve services! I need to find some Christmas decor to put on it!
I got mine weighed at a scrap yard. You know, one of those scales where they weigh you going in, then again coming back out, to charge you for the junk you dropped off. Cost me $5 for a weight slip.
 

k.rollin

Goblin Guru
I got mine weighed at an aggregate sales yard. Maybe find a place that sells crushed rock, sand, gravel, etc? Also, WA DOL has a list of certified scale houses on their website; maybe your state has something similar?
 

SmsDetroit

Goblin Guru
Try taking it there on a trailer. Weigh it all together. Then pull the goblin off the trailer and re weigh the truck and trailer. The difference is the car.
 

Joebob

Goblin Guru
Try taking it there on a trailer. Weigh it all together. Then pull the goblin off the trailer and re weigh the truck and trailer. The difference is the car.
I had mine done on a CAT scale nearby. I parked completely on the fist pad and not split on the axles. I also stayed on the pad to get my weight as well. Came in at 1700 lbs even. bring a buddy to stand with you. Texas needs a certified weight but does not matter what the weight is and a higher weight could be ammo do deny that the Goblin is a sandrail. For Texas a sandrail has to have it's GROSS vehicle weight between 700 and 2000 lbs. Mine is listed as 2100 lbs on my paperwork. Still trying to clear emission monitors for inspection. What did you have them inspect the Goblin as to not check?

Joe
 

Rttoys

Goblin Guru
After a couple of cat scales that couldn’t weigh it, I ended up at the local feed store and got mine. Scrap yards would work fine too.

Don’t be surprised if they ask for you to go back and get a emission test, if you are in an emission county. It’s really tricky how it’s all written up and gets confusing. Submit what you have and go from there.
 
Top