SkyRay's Extended Track Goblin #314 - 09 SS/TC
- Thread starter SkyRay
- Start date
Ross
Goblin Guru
I haven't seen that before. The ball has a tapered shaft that is suppose to have a matched taper inside the new DF billet arm. The nut should pull the tapered shaft in tight, then stop when tight. Maybe take it apart, and inspect & measure both of the tapers, compare to the old DF parts.
SkyRay
Active Member
It has been quite a while since I posted. In the meantime:
- I trailered the Goblin to DF and talked to Adam
> He looked it over and noticed that the clamp holding the coolant line away from the belt had shifted slightly and the hose was touching the belt. I was able to easily fix it by tightening the screw more, but I'll have to keep an eye on it since it is dependent upon the screw being tight to hold the clamp at an angle to keep the hose off the belt.
> He too was surprised at the ball joint/steering arm issue. He gave me a new steering arm and ball joint to try...
> He helped adjust some settings using HP Tuners.
> He helped review the paperwork for getting it registered. I keep saying I'm going to get that finished... hopefully some day I will.
> He pointed me to the outfit that has wrapped their cars. I since then contacted them and... more later.
- One of the springs onto which the hood's quarter turn fasteners grabs broke on me. They had paint on them from the powder coat process, and I think it bound up. Here's how I dealt with it...
> I ordered these as replacements from Speedway Motors.
> I had to bend the bracket away from the radiator to be able to get to the rivets. It seemed to bend back ok.
> The replacement springs seem to be a little bit taller than the originals... I used some channel locks to make them a little shorter.
> So far I've had no issues.
- I put down grip tape on the floor. It took Qty 2 rolls, 9" wide by 33" long, to do the floors. I purchased these from Amazon. I have a paper cutter which made getting a nice angled cut very simple.
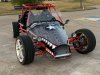
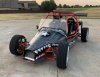
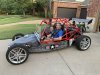
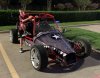
- As mentioned before, I finally got the wrap completed. I went with an Air Force theme with the tiger shark teeth at the front.
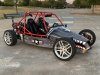
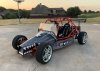
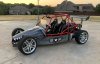
My son, Adam, wishing he could drive it, and us heading out for our first spin with the wrap on...
- Because my chassis is number 314 (pi), I considered a "pi" theme. However, in spite of the fact that my family is very much a math family, I didn't want the car to be focused on the numbers. So to include a nod to pi, I added some more grip tape to the kickplate in the cabin with a pi cutout. I'll have to explain to people why there is a "pi" in the car, but it will be a nice conversation piece.

- I trailered the Goblin to DF and talked to Adam
> He looked it over and noticed that the clamp holding the coolant line away from the belt had shifted slightly and the hose was touching the belt. I was able to easily fix it by tightening the screw more, but I'll have to keep an eye on it since it is dependent upon the screw being tight to hold the clamp at an angle to keep the hose off the belt.
> He too was surprised at the ball joint/steering arm issue. He gave me a new steering arm and ball joint to try...
> He helped adjust some settings using HP Tuners.
> He helped review the paperwork for getting it registered. I keep saying I'm going to get that finished... hopefully some day I will.
> He pointed me to the outfit that has wrapped their cars. I since then contacted them and... more later.
- One of the springs onto which the hood's quarter turn fasteners grabs broke on me. They had paint on them from the powder coat process, and I think it bound up. Here's how I dealt with it...
> I ordered these as replacements from Speedway Motors.
> I had to bend the bracket away from the radiator to be able to get to the rivets. It seemed to bend back ok.
> The replacement springs seem to be a little bit taller than the originals... I used some channel locks to make them a little shorter.
> So far I've had no issues.
- I put down grip tape on the floor. It took Qty 2 rolls, 9" wide by 33" long, to do the floors. I purchased these from Amazon. I have a paper cutter which made getting a nice angled cut very simple.
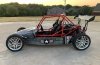
- As mentioned before, I finally got the wrap completed. I went with an Air Force theme with the tiger shark teeth at the front.
My son, Adam, wishing he could drive it, and us heading out for our first spin with the wrap on...
- Because my chassis is number 314 (pi), I considered a "pi" theme. However, in spite of the fact that my family is very much a math family, I didn't want the car to be focused on the numbers. So to include a nod to pi, I added some more grip tape to the kickplate in the cabin with a pi cutout. I'll have to explain to people why there is a "pi" in the car, but it will be a nice conversation piece.
JBINTX
Goblin Guru
awesome job!!!!!!It has been quite a while since I posted. In the meantime:
- I trailered the Goblin to DF and talked to Adam
> He looked it over and noticed that the clamp holding the coolant line away from the belt had shifted slightly and the hose was touching the belt. I was able to easily fix it by tightening the screw more, but I'll have to keep an eye on it since it is dependent upon the screw being tight to hold the clamp at an angle to keep the hose off the belt.
> He too was surprised at the ball joint/steering arm issue. He gave me a new steering arm and ball joint to try...
> He helped adjust some settings using HP Tuners.
> He helped review the paperwork for getting it registered. I keep saying I'm going to get that finished... hopefully some day I will.
> He pointed me to the outfit that has wrapped their cars. I since then contacted them and... more later.
- One of the springs onto which the hood's quarter turn fasteners grabs broke on me. They had paint on them from the powder coat process, and I think it bound up. Here's how I dealt with it...
> I ordered these as replacements from Speedway Motors.
> I had to bend the bracket away from the radiator to be able to get to the rivets. It seemed to bend back ok.
> The replacement springs seem to be a little bit taller than the originals... I used some channel locks to make them a little shorter.
> So far I've had no issues.
- I put down grip tape on the floor. It took Qty 2 rolls, 9" wide by 33" long, to do the floors. I purchased these from Amazon. I have a paper cutter which made getting a nice angled cut very simple.
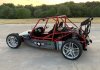
- As mentioned before, I finally got the wrap completed. I went with an Air Force theme with the tiger shark teeth at the front.
View attachment 34975 View attachment 34974 View attachment 34968 View attachment 34969 View attachment 34970 View attachment 34971 View attachment 34972
My son, Adam, wishing he could drive it, and us heading out for our first spin with the wrap on...
View attachment 34973 View attachment 34967
- Because my chassis is number 314 (pi), I considered a "pi" theme. However, in spite of the fact that my family is very much a math family, I didn't want the car to be focused on the numbers. So to include a nod to pi, I added some more grip tape to the kickplate in the cabin with a pi cutout. I'll have to explain to people why there is a "pi" in the car, but it will be a nice conversation piece.
View attachment 34976
escapepilot
Goblin Guru
I like the wrap! I also love working pi into the theme.
That looks absolutely fantastic! I love the Air Force/teeth theme. Very appropriate for these low-altitude flying machines.It has been quite a while since I posted. In the meantime:
- I trailered the Goblin to DF and talked to Adam
> He looked it over and noticed that the clamp holding the coolant line away from the belt had shifted slightly and the hose was touching the belt. I was able to easily fix it by tightening the screw more, but I'll have to keep an eye on it since it is dependent upon the screw being tight to hold the clamp at an angle to keep the hose off the belt.
> He too was surprised at the ball joint/steering arm issue. He gave me a new steering arm and ball joint to try...
> He helped adjust some settings using HP Tuners.
> He helped review the paperwork for getting it registered. I keep saying I'm going to get that finished... hopefully some day I will.
> He pointed me to the outfit that has wrapped their cars. I since then contacted them and... more later.
- One of the springs onto which the hood's quarter turn fasteners grabs broke on me. They had paint on them from the powder coat process, and I think it bound up. Here's how I dealt with it...
> I ordered these as replacements from Speedway Motors.
> I had to bend the bracket away from the radiator to be able to get to the rivets. It seemed to bend back ok.
> The replacement springs seem to be a little bit taller than the originals... I used some channel locks to make them a little shorter.
> So far I've had no issues.
- I put down grip tape on the floor. It took Qty 2 rolls, 9" wide by 33" long, to do the floors. I purchased these from Amazon. I have a paper cutter which made getting a nice angled cut very simple.
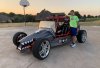
- As mentioned before, I finally got the wrap completed. I went with an Air Force theme with the tiger shark teeth at the front.
View attachment 34975 View attachment 34974 View attachment 34968 View attachment 34969 View attachment 34970 View attachment 34971 View attachment 34972
My son, Adam, wishing he could drive it, and us heading out for our first spin with the wrap on...
View attachment 34973 View attachment 34967
- Because my chassis is number 314 (pi), I considered a "pi" theme. However, in spite of the fact that my family is very much a math family, I didn't want the car to be focused on the numbers. So to include a nod to pi, I added some more grip tape to the kickplate in the cabin with a pi cutout. I'll have to explain to people why there is a "pi" in the car, but it will be a nice conversation piece.
View attachment 34976
SkyRay
Active Member
Last weekend was Labor Day, so I took the opportunity to work on some upgrades to the Goblin. If you're on Facebook (I'm not), I had my bride ask for recommendations for third brake lights. After looking at some of the suggestions, I decided to get two of the Morimoto 5Stop lights. I was going to mount them on the top of the rollbar, but wasn't thrilled with running the wires all the way up there. After brainstorming for a bit, I was inspired by F1 cars and decided to put the lights on either end of the wing. Since the wing was extruded aluminum, it was pretty easy to run the wires inside the wing. I used the tail light signal for a lower brightness, and then the third brake light signal for the higher brightness. I thought about using the right/left turn signals, but was also wanting to get the cruise control to work, so I stayed with the third brake light. I'll add more pics, but here's the finished result at night.

I also painted the radiator black and added a grill to attempt to protect it. Again, a not-so-great photo, but I'm happy with the result.
This weekend I was inspired to get the car inspected since I've been driving it around town for quite a while and the check engine light hasn't returned. As I was preparing to go, I noticed the horn didn't work, which would leave it to fail inspection. Great.
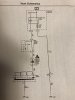
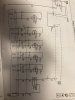
I found that the fuse was blown. Awesome... that's an easy fix. So I replaced with a 15A fuse and gave it a try. No horn and I could hear arcing toward the back of the car, blowing the 15A fuse. Awesome. I've tried troubleshooting a bit... In particular, I noticed that the one side of the fuse ties directly to ground. Should it do that? My assumption is that one side of the fuse would come in from the horn relay and the other side would go out to the horn. Anyone have a wiring diagram that shows the horn circuit? Or have suggestions on how to find where it is shorting? (I looked all over but couldn't find anything.) I can't imagine adding the third (and fourth) tail lights would cause this, but I have no idea how long the horn hasn't worked. Any thoughts/suggestions y'all have are greatly appreciated!
I also painted the radiator black and added a grill to attempt to protect it. Again, a not-so-great photo, but I'm happy with the result.
This weekend I was inspired to get the car inspected since I've been driving it around town for quite a while and the check engine light hasn't returned. As I was preparing to go, I noticed the horn didn't work, which would leave it to fail inspection. Great.
I found that the fuse was blown. Awesome... that's an easy fix. So I replaced with a 15A fuse and gave it a try. No horn and I could hear arcing toward the back of the car, blowing the 15A fuse. Awesome. I've tried troubleshooting a bit... In particular, I noticed that the one side of the fuse ties directly to ground. Should it do that? My assumption is that one side of the fuse would come in from the horn relay and the other side would go out to the horn. Anyone have a wiring diagram that shows the horn circuit? Or have suggestions on how to find where it is shorting? (I looked all over but couldn't find anything.) I can't imagine adding the third (and fourth) tail lights would cause this, but I have no idea how long the horn hasn't worked. Any thoughts/suggestions y'all have are greatly appreciated!
How are checking the ground at the fuse? I think a horn has a coil in it that will pass current to ground if you are just checking continuity although the resistance should be higher than straight to ground. Unplug the horn to check to ground, however if it’s shooting a 15 amp it’s shorted to ground somewhere. I’ve attached the later model horn wiring diagram.
make sure you go back to a 10a fuse when the problem is fixed. I’ve smoked a wiring harness up sizing a fuse and it isn’t pretty.
make sure you go back to a 10a fuse when the problem is fixed. I’ve smoked a wiring harness up sizing a fuse and it isn’t pretty.
Attachments
-
 269.2 KB Views: 73
Desert Sasqwatch
Goblin Guru
Hmm, you painted your radiator. What kind of paint did you use? Regular spray paint would insulate it and not allow the radiator to dissipate heat very well. Hope you used a specific radiator spray paint. 
Rttoys
Goblin Guru
Meh. It’ll still work. 100* running autocross or the track, still won’t get anywhere in a “hot zone”. The highest temps I have seen would be 206? when I was stock? Maybe. with tuning to get the fans on earlier, I rarely see 198-200. On the track, I stayed about 198 all day.
yes, there is correct paint, but I haven’t seen a problem with high temp stuff.
yes, there is correct paint, but I haven’t seen a problem with high temp stuff.
SkyRay
Active Member
Thanks for the responses. Thanks to Gtstorey for the schematic diagram and suggestions. The schematic is more or less what I expected. I need to confirm the dark green wire I see at the horn is the same as the dark green wire I see coming out of the block connector under the fuse block PCB. Great point on the coil of the horn being a path to ground even though the horn isn't honking. I disconnected the connector from the horn and found that there was no longer a complete short between the fuse and ground, but it isn't a complete open either. Makes sense because of the arcing I heard. I think at this point I'll watch the videos for modifying the chassis wire harness to try to see if that dark green line gets cut into anywhere, as it wasn't apparent that overall harness had been chafing against anything to create the short. I was trying to avoid messing with the harness (why I had DF do it in the first place), but I guess it will be good for me to learn about it. Will be more challenging doing it within the chassis, though. I'll follow up with what I figure out.
Regarding the paint, yeah, I went with high temp paint I had used on the muffler, though it isn't necessarily radiator paint. The main area I wanted to cover was the bottom and sides of the radiator which was more visible through the grill. I hit the surface of the radiator, but was trying not to get much into the radiator fins themselves since that is where the majority of the heat transfer occurs.
Thanks all!
SkyRay
Active Member
Guess it has been a while since I've posted. I confirmed that the problem was not the horn by wiring it direct to the battery and confirmed that the horn blows. I didn't really want to dig into the wiring, so I bought an air horn that came with a relay assembly and wired it into the system, bypassing the wiring to the fuse box entirely. But now...
Around Halloween my 8 year old and I were headed to a fall festival at church. The Goblin was low on gas, and as I was changing lanes preparing for a turn the car died. I tried restarting the car while still coasting, and it would crank but not start. I started to call for a recovery team, and tried it again and the car came to life. We made it to church, where we hypothesized that it was a fluke that, while on a winding road and then changing lanes while decelerating caused the fuel to slosh away from the pump, I got some air in the line, and that caused the car to stall. And then after filling the tank, I didn't seem to have the problem for a couple weeks... until two weeks ago I was driving the car full of gas in sub-40 degree weather (to go help another builder, or all things). I was cruising down the road when I hit a small bump and the engine hesitated. I told myself that the bump caused my foot to come off the gas, causing the hesitation. About a mile later the engine died altogether. I was able to coast off the road, but the car would not start again. A buddy came and towed me home.
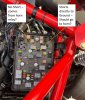
Today I got it into a shop. (The tow bar is an awesome accessory, by the way.) They checked codes and found P2149 and P2155, Injector B supply voltage and Injector D supply voltage failures. We (they let me hang out in the shop while the mechanic worked on it) probed the connector leading to the injectors and found that there was voltage to injectors 1 and 3, but no voltage going to 2 and 4. We disconnected the engine harness from the ECM and probed the engine harness for continuity. After some test equipment glitches, we concluded there was continuity across the engine harness. So the tech's conclusion was that, since there was voltage to 1 and 3 but not to 2 and 4, and since there was continuity across the harness, the problem must be in the ECM.
The conclusion given the evidence seems logical to me, but I'd like the forum experts to weigh in...
- Does it seem plausible that the ECM would be intermittent and then fail completely?
- Does it seem plausible that the voltage to injectors 2 and 4 from the ECM would go out at the same time?
- Is there somewhere else that the wire harness could be causing this problem? (I'm spooked about the harness because of the horn shorting on its own)
- The other local Goblin builder suggested maybe a short in the harness could cause the problem... I'll try to check that out...
- Any other suggestions before I set off to order a new ECM?
- If I were to order a new ECM, recommendations as to where to go? ZZ Performance? A dealer? Pick-a-part scrap yard? Flagship One (fs1inc.com)?
Thanks for your help...
Around Halloween my 8 year old and I were headed to a fall festival at church. The Goblin was low on gas, and as I was changing lanes preparing for a turn the car died. I tried restarting the car while still coasting, and it would crank but not start. I started to call for a recovery team, and tried it again and the car came to life. We made it to church, where we hypothesized that it was a fluke that, while on a winding road and then changing lanes while decelerating caused the fuel to slosh away from the pump, I got some air in the line, and that caused the car to stall. And then after filling the tank, I didn't seem to have the problem for a couple weeks... until two weeks ago I was driving the car full of gas in sub-40 degree weather (to go help another builder, or all things). I was cruising down the road when I hit a small bump and the engine hesitated. I told myself that the bump caused my foot to come off the gas, causing the hesitation. About a mile later the engine died altogether. I was able to coast off the road, but the car would not start again. A buddy came and towed me home.
Today I got it into a shop. (The tow bar is an awesome accessory, by the way.) They checked codes and found P2149 and P2155, Injector B supply voltage and Injector D supply voltage failures. We (they let me hang out in the shop while the mechanic worked on it) probed the connector leading to the injectors and found that there was voltage to injectors 1 and 3, but no voltage going to 2 and 4. We disconnected the engine harness from the ECM and probed the engine harness for continuity. After some test equipment glitches, we concluded there was continuity across the engine harness. So the tech's conclusion was that, since there was voltage to 1 and 3 but not to 2 and 4, and since there was continuity across the harness, the problem must be in the ECM.
The conclusion given the evidence seems logical to me, but I'd like the forum experts to weigh in...
- Does it seem plausible that the ECM would be intermittent and then fail completely?
- Does it seem plausible that the voltage to injectors 2 and 4 from the ECM would go out at the same time?
- Is there somewhere else that the wire harness could be causing this problem? (I'm spooked about the harness because of the horn shorting on its own)
- The other local Goblin builder suggested maybe a short in the harness could cause the problem... I'll try to check that out...
- Any other suggestions before I set off to order a new ECM?
- If I were to order a new ECM, recommendations as to where to go? ZZ Performance? A dealer? Pick-a-part scrap yard? Flagship One (fs1inc.com)?
Thanks for your help...
Last edited:
Each injector has its own circuit. Nothing in common as far as wiring. I don’t know how likely they are to fail at the same time. I would expect a bad connection at the ECM before two dying at once, but that is a guess. I would check for voltage with a test light at the ECM first but that isn’t real easy. You will have to probe the back side of the connector and use a test light more than likely. And always check your grounds since that can make weird things happen.
Attachments
-
 252 KB Views: 61
Rttoys
Goblin Guru
That’s a tough one. With one electrical glitch already, a second one would make more sense. I would loosen all grounds, wiggle them and tighten them back. Unplug the ecm and reseat the connectors, do the same with the engine harness and such.
When you remove them, check the pins for any damage. grab some of your wires connectors from your scrap bin and use a matching terminal as a “drag tester”. Look at the male connector and match it up to one you cut off in the wire harness during the thinning process. Use that terminal to push into each terminal on the ecm and such. When you push the terminal in and pull it out, they should all “drag” equally. If one feels loose, then try to tighten that terminal. (Hope this makes sense).
wiggle wires and such. You may make it “work”. Then you know where to look further.
if it is the ecm, there are companies that fix them and there’s always the zzp option. I would clear all wiring possibilities first though.