Sluggonaut's Extended Track #364 - 2007 SS/SC (Turbo) Donor

Sluggonaut

Goblin Guru
I can't find any diagrams of the multiplugs in the images and PDFs I've found/saved so far.

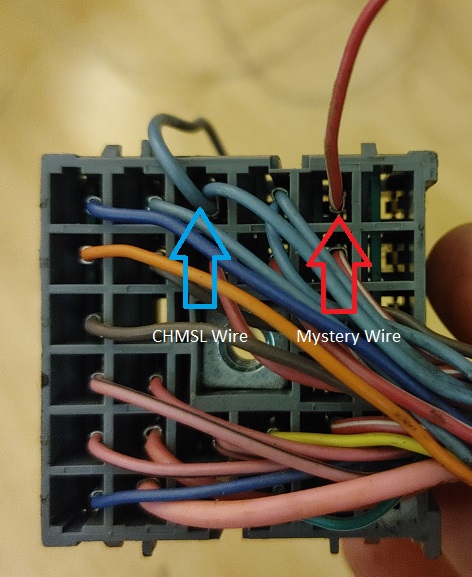
I am curious as to what this red w/white strip wire is before cutting it out. It is 2 spots over from the CHMSL/3rd Brake Light wire on the small gray multi-plug:
28844


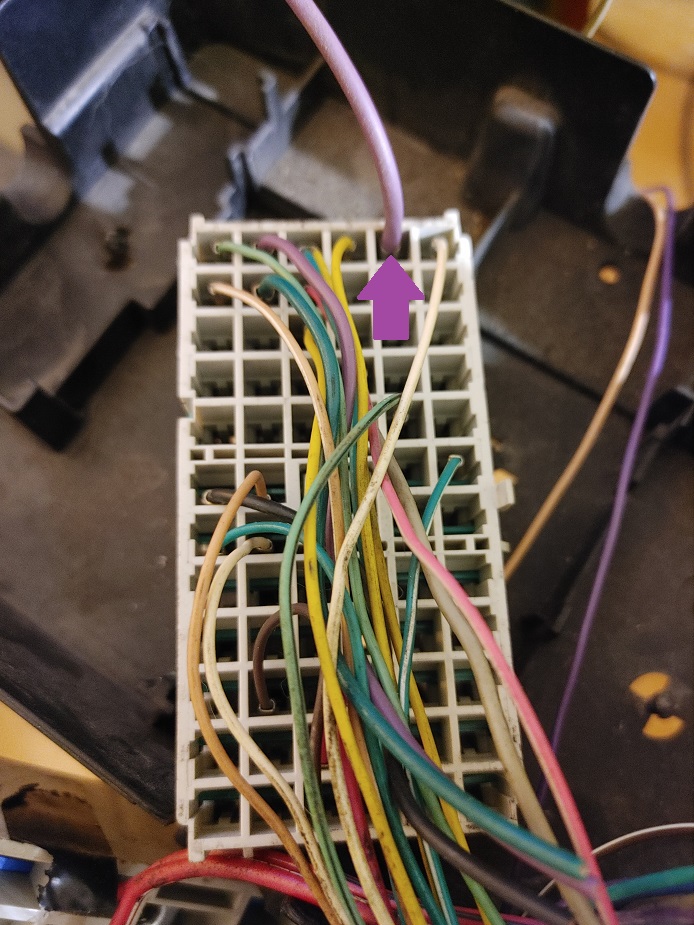
I also traced the 3 sunroof wires, with the 2 small ones going to the red BCM multi-plug and the thick purple wire running to the large white multi-plug. I am curious if the larger purple wire is power for the sunroof, as I've read conflicting information as to whether that is a RAP circuit or not. If the sunroof circuit is RAP, I would consider keeping whichever is the power wire for a RAP accessory connection:
28845


Appreciate it if anyone can locate wiring diagrams for either plug so I know what I am cutting in the first instance and whether to keep or remove in the second instance. Thanks in advance!
 
Last edited:

Sluggonaut

Goblin Guru
I lied, I have a 2nd mystery wire. I found one more while straightening up my remaining wires. It looks like I bundled this blue w/white strip wire with some grounds.

It was from the side opposite of the main wires just like the red w/white stripe mystery wire, except this one traces back to the red BCM multi-plug:
28847


I was watching ahead to see what is in store for the next video and I noticed the accessory plug is removed in Part 4. Is this the one everyone keeps to power an accessory/USB port? I figured it would be kept and extended up to the dash area at some point and was surprised to see it removed in this video.
 
Last edited:

Rttoys

Goblin Guru
I lied, I have a 2nd mystery wire. I found one more while straightening up my remaining wires. It looks like I bundled this blue w/white strip wire with some grounds.

It was from the side opposite of the main wires just like the red w/white stripe mystery wire, except this one traces back to the red BCM multi-plug:
View attachment 28847

I was watching ahead to see what is in store for the next video and I noticed the accessory plug is removed in Part 4. Is this the one everyone keeps to power an accessory/USB port? I figured it would be kept and extended up to the dash area at some point and was surprised to see it removed in this video.
I can’t help with that specific wire, but watching the videos ahead of time may show where it goes. As a fail safe, cut it a little long, so you can reattach if need be. Cap it with electrical tape in case it’s not needed, so it won’t short out anything else And mark it somehow to be referenced later.

I kept a few of the accessory wires and ran them towards the dash, so I have plenty of options later down the road. I marked them with phasing tape (different color electrical tape), so I could find them when needed.
 

Lonny

Administrator
Staff member
Screenshot_20211121-091215_Chrome.jpg

The large wire is for the rear window defrost. It is black in later models.
The other three are for the word motor. There is a yellow wire that runs from the wiper motor connector to a BCM connector.


Screenshot_20211121-091307_Chrome.jpg


The blue with white stripe can be removed.
 

Sluggonaut

Goblin Guru
Thanks, everyone!

It looks like the 1st mystery wire is from Underhood C5 in the F5 pin. The diagram tells me it's circuit # 1340 and is for Battery Positive Voltage (UE1/ASF). How do I determine what that is exactly?


28854
 

Sluggonaut

Goblin Guru
I think I found it. Randomly looking through wiring diagrams I see 1340 on a Power Distribution diagram. Circuit 1340 off of F5 shows it going to the VCIM and Digital Radio Receiver. Based on where this wire was on my table, it likely came from the XM plug. If the VCIM is for OnStar that explains why I didn't have the connectors, as my car didn't have an OnStar module. The bottom line is I'm 99% certain I don't need Mystery Wire #1. lol

28856
 
Last edited:

Sluggonaut

Goblin Guru
Day 11
Work Time: 3 hours
Completed: Wiring Harness Guide Part 4 & Most of 5 (Organizing 1 & 2)


Made it as far as I can with wiring without finishing the last teardown video - Video 8 Stripping the Rear.

I need to swing by the shed to finish the last of the teardown and get the fuel pump out, as I am at the point of adding the fuel pump harness in the wiring video. The wiring is about as tedious as I expected but not nearly as difficult. The only unsettling part is running across something that is different from the video. However, a little help from the forum and you're back on track in no time.

I can't believe I'm saying this, but the wiring has been the most enjoyable part for me so far. It could be that I am inside out of the cold and have my wife and dogs to keep me company while I work, but I also haven't bashed a knuckle, dropped a door on my toe, or spilled any fluid on myself while working on the wiring.
 

Sluggonaut

Goblin Guru
When I was digging in my wiring harness box for my headlight harness, I noticed this casualty. It had to have broken sometime during disassembly of another component or transportation because none of the connectors were damaged when they were removed.

I'm sure it will still lock into place because the lever seems undamaged, is this anything to worry about?

28897
 
Last edited:

Sluggonaut

Goblin Guru
I don't need any of my donor brake parts, correct?

Trying to clear out stuff I don't need or will be selling and I keep tripping over calipers. lol
 

Rauq

Goblin Guru
You don't need the calipers. I assume others will correct me if I'm wrong but I believe kits now come with all new brake lines so you don't need to keep the donor soft lines. I'm also assuming you're not talking about the donor brake master and booster and those types of parts, which yes, you will reuse.
 

Scott #321

Well-Known Member
You will need the donor banjo bolts to attach the brake lines to the calipers. You will also need the donor e-brake cables and tube including the handle.
 

Sluggonaut

Goblin Guru
You will need the donor banjo bolts to attach the brake lines to the calipers. You will also need the donor e-brake cables and tube including the handle.
Thanks Rauq and Scott.

Yes, I was referring to the wheel end of the system and I'm glad you mentioned the banjo bolts. Now I need to make sure I know where those are at.

I already have the MC, booster, and brake handle set aside - I will be pulling the tubes tonight or tomorrow when I strip the rear end.
 

Sluggonaut

Goblin Guru
In the Organizing the Main Harness Part 3 at 1:21, it says to solder the 4 ground wires together.

I have the ground lug I added, the fuel pump ground, and the coolant tank ground, but I do not see where the fuse box ground wire is supposed to come from. I do not have any black wires coming from the fuse box that are not currently attached to something.

Where exactly does the fuse box ground wire originate? It has to be one of the multiplugs but which one?
 

Gtstorey

Goblin Guru
2 corrections on my last statements
Some of the grounds are black with a white stripe.
One of the black wires leaving the fuse box is the supply voltage to the rear defrost.
 

Lonny

Administrator
Staff member
Grounds vary from model to model. The main objective is to make sure any black or black with a white stripe get grounded.
 

Sluggonaut

Goblin Guru
Grounds vary from model to model. The main objective is to make sure any black or black with a white stripe get grounded.
So as long as any non-connected black or black w/white stripe wires are accounted for I should be good?
 
Top