Dsteinhorst's WI city build 09 2.2 #182 MT Registered Now with boost

JeffsGoblin

Goblin Guru
Use lots of lube.... lots and lots of lube. I poured it directly into the tube and soaked the whole inside before putting it in. (No "The Office" remarks.)
 

Dsteinhorst

Well-Known Member
Had success today. Each one snapped again once before making it through. Somehow I had enough to do both and a foot left over. Big thanks to DF for including plenty of extra hose. Also, big thanks to my wife for being positive and encouraging through the ordeal.

Copy this setup for an easy way to tug the hoses through:
20200329_111818.jpg


Started mounting radiator, steering, etc. I sat on my hands about what to do with the fuel tank and aluminum sheets, so they'll go to powder coating tomorrow.
20200329_111703.jpg
20200329_111712.jpg
 

Desert Sasqwatch

Goblin Guru
Glad you put that behind you I'm sure. Strange how some times the hoses seem to pull through with nominal effort and other times it takes too many ties with brute force - as in your case. Can't say what the major variable(s) are that create success from frustration, but hopefully this is only the most difficult physical thing you will have to experience, everything else will be smooth sailing. :D
 

Dsteinhorst

Well-Known Member
Got the harness done today! The new videos are great! Should get fuel tank and aluminum sheets back early this week. Going to push hard to finish by the end of May/early June.

I put my daily back in the garage in prep for the cold weather this week. As you guys can see, I'm more about speed of build than perfect cleanliness and precision. I respect all builds, but I need to fast forward to the driving part!
20200412_134933.jpg

20200412_165338.jpg
 

Dsteinhorst

Well-Known Member
IT RUNS! I got my motor in and prepped for run, and after a missing ground and loose connector, it started up and ran great! All aluminum is in and I'm starting on the subframe. Had to cut the clutch line and union it because I forgot to put it in, but that worked fine.

Few more weeks and I should be on the road.
20200425_175025.jpg
 

Dsteinhorst

Well-Known Member
I don't know about the pink panther... I generally don't name my cars. :cool:

I got the rear suspension mostly together tonight. Also, 3/4 of my wheel/tire combo showed up. 15" RPF1 with 205/50 Continental extreme contacts. I spent a lot of time looking at wheels, but weight, affordability, and diameter were on my mind because I have an XFE car with the taller final drive. This was a bit of a no-brainer on the end.
20200428_200709.jpg

20200428_155958.jpg
1
 

Karter2026

Goblin Guru
Looks great! If you keep the tire at the same height with the rear gears you wont loose anything with those gears. Here is a great tool to figure size differences from stock. Use the compare tab on the Tire Size Calculator

Now for the bad part. As I looked at your pictures things flash back to me. The bottom of the shift arm counterweight needs to be cut off It will not clear the frame rail when you put it in reverse. Before you get anything else in the way now is the time to do it ( well actually a lot earlier was the time) Tape up the frame rails beforehand. Here is an idea of how much you will have to cut off.
IMG_20200429_070812.jpg IMG_20200429_070832.jpg
 
Last edited:

Dsteinhorst

Well-Known Member
Now for the bad part. As I looked at your pictures things flash back to me. The bottom of the shift arm counterweight needs to be cut off It will not clear the frame rail when you put it in reverse. Before you get anything else in the way now is the time to do it ( well actually a lot earlier was the time) Tape up the frame rails beforehand. Here is an idea of how much you will have to cut off.
View attachment 13429 View attachment 13430
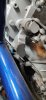
Thanks for the heads up and the pics! I'm a little disappointed I didnt know this. I'll try to knock that out tonight. I have a couple different tools to try.
 
Last edited:

Dsteinhorst

Well-Known Member
Been buttoning up small stuff all week. Shifter was easy with a couple completed pictures. Got the brakes mounted and bled today. I got toe-in somewhat close. I'm shooting for a test drive tomorrow if everything goes well and the weather holds out.
20200509_104617.jpg


Question for the group, did you run your shifter cables over the front subframe member or under? Trying to decide how I want to secure them up. I went under, and I think I might swap around.
 

Rttoys

Goblin Guru
I haven’t done mine yet, but I would go over the subframe, so the subframe protects the cables.
 

Karter2026

Goblin Guru
Question for the group, did you run your shifter cables over the front subframe member or under? Trying to decide how I want to secure them up. I went under, and I think I might swap around.
Everything on mine went over the top except for the heat exchanger tubes I just added. Just not enough room. If you look at top left of picture those are the shift cables.
IMG_20200430_081828.jpg
 

Dsteinhorst

Well-Known Member
Thanks for the picture Karter. I moved mine over and it makes way more sense.

Had a big setback today that I should have researched a bit more. The RPF1s hit the front calipers. Going to take the calipers to work and try to machine or grind them down.

Wish I would have found this two weeks earlier: http://dfkitcar.com/forum/index.php?threads/canyons-trackframe-lsj-t-htown.225/post-5647

On the upside, I got the drivers seat modified to fit. Still gotta weld the height adjustment, so it's springy now.

I have a USB charger that I'm going to mount in the tunnel cap somewhere like others have done. Found out the red wire I left in the tunnel isn't switched, so I'll have to add a switch or wire into the gauge panel switches. It's these final bits that take up all the time. I am dying to get it on the road!
 

JBINTX

Goblin Guru
Thanks for the picture Karter. I moved mine over and it makes way more sense.

Had a big setback today that I should have researched a bit more. The RPF1s hit the front calipers. Going to take the calipers to work and try to machine or grind them down.

Wish I would have found this two weeks earlier: http://dfkitcar.com/forum/index.php?threads/canyons-trackframe-lsj-t-htown.225/post-5647

On the upside, I got the drivers seat modified to fit. Still gotta weld the height adjustment, so it's springy now.

I have a USB charger that I'm going to mount in the tunnel cap somewhere like others have done. Found out the red wire I left in the tunnel isn't switched, so I'll have to add a switch or wire into the gauge panel switches. It's these final bits that take up all the time. I am dying to get it on the road!
Where did you source your USB charger? Part #?
 

Ark :D

Goblin Guru
Where did you source your USB charger? Part #?
You could do it how I'm doing it.

Variable to 5v buck converter with a USB port:

Faceplate and USB endpoint:

I'd also put a large heat-shrink tube around the buck converter and throw it in a small project box, then attach that to the Goblin somewhere.
 
Top