TravMac's Extended Track Goblin (#253) - 2007 SS/SC Doner

TravMac

Well-Known Member
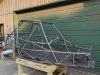
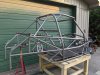
Another good weekend in the books! A few setbacks along the way too. Could use some input from the group too. Here are the highlights:

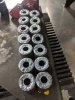
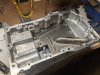
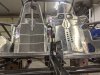
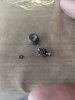
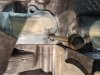
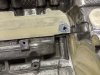
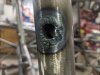
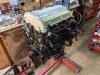
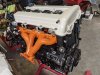
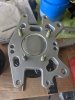
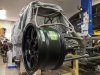
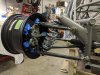
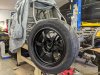
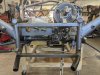
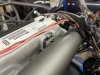
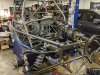
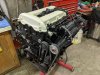
1) Engine torn down for cleaning, painting, and timing chain replacement (turns out, it needed to be done). Had to order the one sprocket my kit didn't come with for the chain. Should be here soon. Also broke off the dipstick tube in the oil pan and can't seem to find a new one anywhere. Has anyone replaced theirs or got a new one? Lokar seems to have aftermarket ones, but not sure on that route yet.

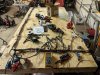
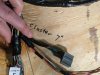
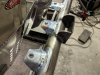
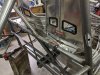
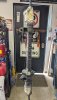
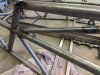
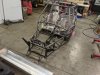
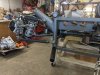
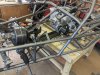
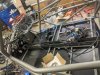
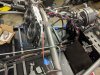
2) Wiring harness up to the the point of doing the dash harness is complete. Maybe finish that this coming weekend. Everything seems a bit tight to shape, so fingers crossed it all fits!

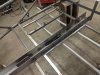
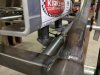
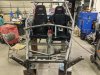
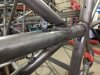
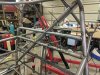
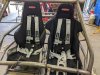
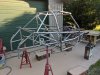
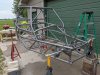
3) Seat mounting strategy more thought out. Have my fasteners and tabs all in hand. Now to strike the arc with the tig. Has anyone had issues with tech inspections and their seat mounting?

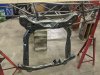
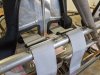
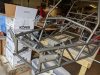
4) Bought some poster board to mock up my panel ideas. Planning on cutting aluminum ones first, and then carbon in the future. Thinking of my hood designs now too.

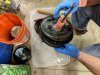
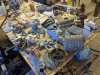
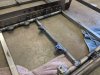
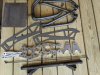
5) Got some media for blasting the small parts for painting. Will be a fun project when the weather warms up. Getting antsy to use this case of Steel-it.
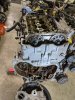
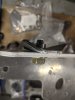
PXL_20210325_044037742.jpgPXL_20210325_204250031.jpgPXL_20210326_000931328.jpg
 

TravMac

Well-Known Member
A longer weekend for Easter lead to some extra work getting done.

I completed the wiring portion of my harness, but had just one connector that refused to be the 7 inch length called out in the videos (dash cluster connector). I was restricted by the wires running to the BCM, so made it as long as I could (~4 inches). Does anyone have an issue with this connector being too short? I left large sections un-taped just to go back in if something isn't working appropriately. Figure better be safe than sorry!

Friend and I took apart the brake booster. The master cylinder was leaking brake fluid into it (bad seal). Nothing appears to be severely damaged, so going to piece back together and try it out. Also, the master cylinder piston was purple... an odd place to find something with that neat detail. I didn't grab a pic, but I will next time I'm out.

Welded up some more seat mounting parts for my Kirkey seats. Still getting the hang of the TIG, but I think it's coming along alright. It's good practice for when I start on the frame for the seat rails and body mounting tabs I have planned.

Finally, more parts off engine to continue cleaning. Oil pan came off to get the broken tube out of it. Going to use the current tube rather than an aftermarket one for now. Supercharger came off to inspect the rotors and clean the intake. Some of the factory coating came off the rotors and was in caught in the laminova coolers, so had to clean those out. Recoating the supercharger is a rather pricy endeavor, and may not be worth the cost/benefit to me for the moment. I still have hopes of a turbo in the next year or so. Had the final timing gear show up, so this thing can start getting bolted back together!

As always, a few pictures of the adventure.

PXL_20210404_222055440.jpgPXL_20210404_232048414.jpgPXL_20210402_142948769.jpgPXL_20210405_194058110.jpgPXL_20210404_140249159.jpg
 

Rttoys

Goblin Guru
There’s a lot of parts that are oddly painted on a vehicle, this is so you know it’s a factory part vs a replacement. When you work at a dealer, this is key when replacing parts under warranty and something doesn’t seem right.
 

Rauq

Goblin Guru
Friend and I took apart the brake booster. The master cylinder was leaking brake fluid into it (bad seal). Nothing appears to be severely damaged, so going to piece back together and try it out. Also, the master cylinder piston was purple... an odd place to find something with that neat detail. I didn't grab a pic, but I will next time I'm out.
My master cylinder piston was purple as well, I suspect it's similar to the information linked below. Basically, the part has to be anodized, so why not anodize it in a color, particularly when the color indicates that the part has been anodized versus a non-colored application where it's not visually apparent whether or not the part has been anodized.
Jalopnik
 

TravMac

Well-Known Member
That's so odd, but so cool. Neat I'm not the only one who noticed too ha! I can see it being a service indication and/or a manufacturing one. I am just continually surprised at some of the things I come across in tearing this car apart.
 

TravMac

Well-Known Member
Update from the weekend! Lots more progress and coming along well.

Sandblasted a lot of components to clean up for painting. Amazon basics tent was a real trooper keeping everything contained. Anything that didn't need blasting was cleaned and masked off well for spraying. Did spray the cradle as one of the few blasted steel components. I love the steel-it look on it. Makes the part look brand new! Weather didn't cooperate for all of the painting itself, but it will be in due time.

The engine is still pretty open right now in order to fix a bolt on the back side of the exhaust manifold. Essentially going to take a threaded insert and make it fit. It's in a really tough spot near the water pump housing, so hopefully it goes smoothly. Once it's in, then its time to bolt everything (hopefully painted) up again.

Cut and mocked up new seat mounting tubes. Had to get rid of a few tabs on the body itself as well. Hoping to get them welded up in the next few weeks along with all my body panel tabs. Should be a fun few days of work. After that's done, and with the weather being much more consistent, the frame will be ready to paint. After seeing the cradle, I can't wait to see the whole thing in steel-it.

Speaking of how things look, I got my order in for body panel wrap from racinggraphics.com. I'm really excited to get the order in to show you all what the look is. Now I just need to find enough aluminum to cut up and bolt on.

Last but not least, had a nice conversation with the people at nine lives racing. I'm thinking my big "wang" will be ordered here in the next few weeks. I have a better understanding how they approach their exocet mounting, and have a few of my own ideas for added function. Of course, there is lots of testing to do on this type of setup, but it will look great in the meantime!

PXL_20210412_002028831.jpgPXL_20210412_002002232.jpgPXL_20210412_204928647.jpgPXL_20210412_002022344.jpgPXL_20210412_214110954.jpgPXL_20210412_220519447.jpg
 

TravMac

Well-Known Member
Had a chance to work on the car after a few days of pretty non stop work. It may look like very little was accomplished, but the project is coming along really well. All the little welding work so far has been well worth the effort. A big thanks to my buddy who helped a ton, and makes much prettier welds than I can (for now!).

Welded in seat brackets for the driver/passenger seats. Had it all fit up to where I am comfortable, so it should be a pretty good setup. The base is quite stable and easily removeable for any future modification/maintenance. Now with the seat bottom in place, the back rest portion needs to be welded and fixed into the appropriate spot. These seats will be very well attached. I do need to get myself some harnesses and the appropriate tabs/eyelets for the next placement/fitment. Once those are in, the majority of the welding will be taken care of.

The exhaust stud hole that was a major issue in the head. The end of the hole actually still had a broken off tap and the end of the original exhaust stud stuck in the aluminum. I'm just happy they came out in mostly one piece! I'm sure there are some stories here, but hopefully I can bring an end to it. Ended up using a metal type epoxy similar to Devcon in order to "glue" in a threaded insert. Since some original hole threads were still in the head, I was able to bolt everything in line to hold true in the original location for the epoxy to cure. Now, just a bit of material cleanup and it will be good as new.

I got my graphics package in, but still have yet to cut my panels. I don't want to unpack it all to try and keep everything clean. I hope to get the aluminum I need in the next week or so. My buddy is also getting more into carbon work, and ordered some material to make test panels with. This car may have a few different outfits.

Weather hasn't cooperated enough for paint yet, so that will be the next big step. Got all the parts prepped and hanging, ready for spray. Hoping to have all the bolt on components painted first and then the frame once welding is complete. This car should go together quite quickly after that point.

PXL_20210425_222101307.jpgPXL_20210426_201518741.jpgPXL_20210426_210228358.jpgPXL_20210424_191115635.jpgPXL_20210424_191140979.jpgPXL_20210425_120515954.jpg
 

TravMac

Well-Known Member
Hey, does anyone by chance know what alloy of aluminum the belly pans are for the goblin? I was looking to buy a bit extra and want to try and keep things the same.
 

TravMac

Well-Known Member
Good mornin everyone! Another good weekend of work and orders out for some more parts.

Completed welding in my seats, which are basically now a part of the chassis. After getting to sit in both passenger and drivers sides, the connections feel solid as a rock. I can't wait to see how they feel in an autocross event. Since I'm not using the stock d-ring seat attachment in the roll hoop, the welded in tubes were cut down and welded flush to the roll cage. I think they may still make for a good go-pro mount of some sort.

I also started welding in mounting tabs for my body panels. I thought my plan was pretty original, but then saw DCMoney and I think on a similar wavelength... ha! I'm excited to see the finished product, but for now, I'm loving how the tabs are welding in and fastener pieces are fitting together.

Had a few parts painted that didn't require as high of a temp outside. Still been hovering in the high 40s low 50s around here. The pics below are for the pedal box parts that I'm doing in a matte black hammertone rustolium. Should look nice as a little contrast to the frame steel-it grey color. Thinking a few other parts are going to be made this color as well.

My Nine Lives Racing wings are ordered and should be shipped by the end of the month. After hearing how much of a difference it's been making for other users, I had to get the front wing to play around with. I can't wait to test it for myself. I also got my harnesses ordered from Teamtech that should be done in a few weeks. Nice silver belts with black stitching and black pull loops!

Next step (as I keep saying...) paint.

PXL_20210501_230355922.jpgPXL_20210502_020032337.jpgPXL_20210508_022619466 (1).jpgPXL_20210509_203312362.jpgPXL_20210510_013926276.jpgPXL_20210510_014832642.jpg
 

TravMac

Well-Known Member
Are you going to weld in a new harness bar too before paint?
Good catch, I forgot one part to the update! The harness bar material is on order and should be in this week. The local metal distributer didn't have much on hand for what I needed. Material seems hard to come by these days. I also got some nice body side tabs for bolting the harness in on the floor. Hopefully I'll have both of those done in my next update... with paint!
 

TravMac

Well-Known Member
Hopefully everyone had a nice memorial day weekend! I got a bunch of welding things done and made the final list before chassis paint. I feel like I keep talking about paint, but this should show some progress on a lot of parts. Although I do have to thank my buddy who is very much more skilled with a rattle can than I ever will be. But I can prep parts with the best of them!

Engine is mostly together again after being cleaned, timing set installed... and painted! I think this will fit in the future color scheme(s) quite well. I can't wait to see it in with all the other parts.

Most things have either been painted black or a hammertone color that comes out gunmetal grey. Darker than the steel-it, but lighter than the black. The picture below of the steering rack really shows the color well. I showed it on my pedal box in an earlier post as well.

All welding is DONE. At least, any of it that I can plan for prior to paint. All harness mounting hardware is in place, body panel tabs are fitted, and tail light provisions are accounted for. I was sure to mount in the seats and harness to make sure everything fit to how I intended. I wonder what you all think of the mounting. Might be a bit overkill, but things are sturdy and as close to SFI spec as I could make it with the constraints that were there.

The list before paint is essentially cleaning up some of the tabs that are no longer needed on the body. Lots of grinding, then lots of sanding, then get this thing coated!
PXL_20210529_004244668.jpgImage_20210514_1554036193596087607861827.jpgPXL_20210514_213807647.jpgPXL_20210529_171027108.jpgPXL_20210530_205656578.jpgPXL_20210529_171033414.jpgPXL_20210530_205714047.jpgPXL_20210531_215722316.jpgPXL_20210531_215739281.jpgPXL_20210530_205528724.jpg
 

TravMac

Well-Known Member
Ladies and Gentlemen... WE HAVE PAINT!

(and a few other goodies as well)

PXL_20210619_235931975.jpgPXL_20210620_213221166.jpgPXL_20210621_205801023.jpgPXL_20210621_210217504.jpgPXL_20210621_210233563.jpgPXL_20210612_043629301.jpgPXL_20210621_215714792.jpg

On a side note, weather impacted painting a bit, so there is a need for another coat next week. However, it's looking really good! R888R's are in the mail too!
 

TravMac

Well-Known Member
Two of the four tires showed up today! These things are incredibly sticky. Can't wait to get them mounted and rolling.

PXL_20210623_225123539.jpg

Following up to the other day's post, it was a long weekend of prep work and paint. Hand sanded everything and then followed up with sand blasting around all the welds. The steel-it got a good first coat on and looks great! Unfortunately, unpredictable bad weather rolled in a day earlier than forecast said. So, I'll be waiting until the next apply window for the second coat. Had to order some more paint too, so that will need a few days to ship. Went through about 6 cans so far and I'm really impressed with the look.

That said, I do have a few parts I've been debating on either getting powder coated or paint them. I've been trying to contact a local shop, but haven't had a response in 2 weeks. Does anyone have a go to place in southeast or mid Michigan for it? If not, these might just end up grey like everything else (which honestly I'm starting to like more and more on this color scheme).

PXL_20210613_211208114.jpg
 

TravMac

Well-Known Member
Goblin update after a good week of work. Mostly paint related, but there is some assembly that was completed as well.

The weather in the last week was all over the place. A few days were over 100 in the shade, others were cold and raining. Somewhere in between there was time to get final coats of paint on the frame, transmission, and most all the remaining small components. Unfortunately, I wasn't able to get in contact with nearly any local powder coating shop. I decided a greyscale paint scheme was the next best choice - and I love the outcome! There are a few here and there that are missing paint still, but they will be quick to finish up. Ended up using nearly 20 cans of steel-it which seems appropriate for the coverage I got in the spray cans. Having a spray gun could definitely use less product with more control and less overspray. Either way, turned out to have a great finish.

Did the modifications to remove the abs sensors from the front and rear bearings. Found out that a slightly sanded down cam/freeze plug fits nicely as a close out for the back side of the front hub. I'm going to silicone the back side to completely seal the bearing, but it should work great. Also had to sand the rotor spacers and steering components to fit in their respective assemblies. Took forever, but has a pretty perfect fit now.

Installed a front corner to check my new wheel clearance. The wheels are Konig Hexaform in 15x8 with +25mm offset and 4x100 bolt pattern. They fit beautifully. I did find that when steering, the stop is between the lower rod end lock nut and the L-bracket mount to the upright. Is there any other steering stop that gets installed? Once the fit was checked, the Toyo R888R's were mounted up (225/45 r15). I'm getting excited to see them on all 4 corners.

Next step will be start to final assembly and start up. Should be back at it in a few weeks.

PXL_20210704_001120262.jpgPXL_20210704_001131092.jpgPXL_20210708_173134973.jpgPXL_20210708_173138602.jpgPXL_20210709_110434766.jpgPXL_20210709_110420471.jpgPXL_20210709_110501508.jpgPXL_20210709_124526379.jpg
 

TravMac

Well-Known Member
Another update from the last few eventful days of working on the kit. Things slowed down with work and such the last few weeks, but getting a few steps closer!

Belly pans and coolant hoses have been installed/pulled. 2 people were handy for doing the work on the hoses. One spraying to keep things lubricated, one pulling with a come-along. Belly pan install with 2 people was nice too, just to quickly pop rivets before the silicone set up. The floor pan strap hardware seemed quite short for the application. I got a thread into the nylock nut, but it still seemed like little engagement. I'll keep an eye on those in case anything backs out.

Started bolting up many of the subsystems in the front end. I believe according to the videos I'm officially through #18, but I do have a bit of cleaning up to do. Clutch pedal doesn't quite fit with the steering shaft, so some trimming is in order. I also did trim out the front bulkhead to fit the steering joint for free rotation. Installing the BCM also had an issue when figuring out where the spacers went. I believe my stack-up is correct shown below. Everything seems to fit for now!

A few wires are pulled tighter in their assembled position than I anticipated. The gauge cluster wires may need to be extended slightly as I wasn't able to make the full length during the harness build (wire length constraint). The wire on this white box (vats?) is also a bit short, but creative routing should make up for that. Everything else seems to fit well.

Just going to keep plugging along with the videos. Engine has most everything bolted up and ready to go in. Transmission assembly is next. Shouldn't be long now!

PXL_20210801_222536073.jpgPXL_20210801_222538966.jpgPXL_20210801_222544332.jpgPXL_20210808_192948864.jpgPXL_20210808_193008223.jpgPXL_20210808_193029290.jpgPXL_20210808_193019541.jpgPXL_20210808_193025068.jpgPXL_20210808_204803528.jpgPXL_20210808_203222982.jpg
 
Last edited:
Top