PHerder's Track Frame with lower entry bars

Karter2026

Goblin Guru
This is the Atom's version. Notice it gets rid of the A/C compressor but using a different tensioner system! Also a much shorter belt that has the ribs only on one side. Not only is the tensioner different but the idle pulley is positioned outboard of the alternator.

View attachment 1872

I'll see if there is any GM part numbers on those parts. It is a neat way to do away with the A/C compressor! (Once I figured out how the belt was actually ran!) :eek: Sorry, no parts numbers visible and the bracket for the idle pulley was custom.

One thing I just checked on, the alternator is being driven counterclockwise as opposed to clockwise on the stock setup. I don't think it matters.
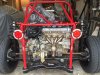
That tensioner on the Atom is a standard Gm part. It is the same one that my 09 NA has on it. They made up that idler bracket above the alternator to get rid of the A/C compressor.
From what I can tell by following the belt it should still be turning the alternator clockwise.
 

PHerder

Well-Known Member
I just looked at the routing and it is the stock setup that is running the alternator counterclockwise but the Atom version is running the alternator clockwise as you pointed out, Karter2026.
 

PHerder

Well-Known Member
While attempting to install my newly arrived ZZP belt tensioner and stock replacement belt, I found that the belt was WAY too long and couldn't figure out how the tensioner from ZZP was supposed to work. Their instructions stated that the stock tensioner had to be removed and that required the SC to be removed.

I looked at this Atom modified LSJ engine and thought WTF??? I can remove the tensioner with one bolt and it is nowhere near the SC... I decided to take a look at my donor and D'oh! There was all the parts that ZZP wrote about! I then went back to my Atom LSJ and figured out how they ran the belt and decided I liked that a whole bunch better!

Anyone with a SC engine car want to buy a ZZP tensioner that can be used with any size SC pulley (stock @ 3.3 down to 2.5, I believe)? I have it and a BFN stock belt I JUST got in that I am not going to use now. Paid $171.63 shipped to my house, will sell for $150 shipped to yours!
 

ctuinstra

Goblin Guru
Anyone with a SC engine car want to buy a ZZP tensioner that can be used with any size SC pulley (stock @ 3.3 down to 2.5, I believe)? I have it and a BFN stock belt I JUST got in that I am not going to use now. Paid $171.63 shipped to my house, will sell for $150 shipped to yours!
I JUST BOUGHT ONE! Ugh.
 

ctuinstra

Goblin Guru
That tensioner on the Atom is a standard Gm part. It is the same one that my 09 NA has on it.
This is true for the NA as you pointed out. The SC version is solid and is not a tensioner but just an idler. For what it's worth. I just found it interesting.
 

PHerder

Well-Known Member
This is true for the NA as you pointed out. The SC version is solid and is not a tensioner but just an idler. For what it's worth. I just found it interesting.
Just looked it up on Rockauto...

GATES 38177 {#24430296, 90537585} DriveAlign Premium OE Automatic Belt Tensioner
If wanting to use this tensioner then the idler pulley bracket would have to be fabbed up.
 

PHerder

Well-Known Member
Thanks to SliderR1, I picked up a seam ripper to deal with the tape on the wiring harness.

I couldn't just get any colored seam ripper, it had to be green to match my frame!

IMG_20170926_161402.jpg


Okay, it doesn't really match, I am not that anal... most of the time. I just couldn't deal with one that was pink or purple! ;)

And being married for over 43 years, I didn't even THINK about using the wife's. :eek:
 

Chris Eggert

Active Member
Well, I ordered another bracket to replace this one JUST IN CASE I totally mess this one up. Yup, I cut it up to fit it.

View attachment 1870
A little more grinding to make it look good and I believe it will work! If not, I do have another replacement bracket coming. Cheap insurance!

And now for something interesting from the Atom modified motor. This is the stock front belt and pulley system.

View attachment 1871

This is the Atom's version. Notice it gets rid of the A/C compressor but using a different tensioner system! Also a much shorter belt that has the ribs only on one side. Not only is the tensioner different but the idle pulley is positioned outboard of the alternator.

View attachment 1872

I'll see if there is any GM part numbers on those parts. It is a neat way to do away with the A/C compressor! (Once I figured out how the belt was actually ran!) :eek: Sorry, no parts numbers visible and the bracket for the idle pulley was custom.

One thing I just checked on, the alternator is being driven counterclockwise as opposed to clockwise on the stock setup. I don't think it matters.
That Atom idler placement is pretty nice. Hopefully you can get measurements off of the bracket and a diagram of that bracket. I kind of enjoy a little fabrication every now and then. I do like the routing of the Atom setup, it has a nice clean look to it.
 

PHerder

Well-Known Member
That Atom idler placement is pretty nice. Hopefully you can get measurements off of the bracket and a diagram of that bracket. I kind of enjoy a little fabrication every now and then. I do like the routing of the Atom setup, it has a nice clean look to it.
Here are some pictures of the custom bracket for the new idler used when the Ariel Atom reconfigures the LSJ SC engine to work in their car.

Note: Ariel does away with all the brackets that are under the alternator so different length bolts are also required. I.e. the alternator is now closer to the engine block by ~ 1 inch.

IMG_20170927_135941.jpg

IMG_20170927_140007.jpg

IMG_20170927_140012.jpg

IMG_20170927_140023.jpg

IMG_20170927_140037.jpg


Also I found some plastic inserts in the alternator where this bracket is added. I am guessing they are there to help align the pulley(?) The second picture of the bracket has some machined areas where these plastic inserts end up fitting. Thus the bracket is held in place and aligned for the belt to run smoothly.
 

PHerder

Well-Known Member
Received a bunch of Stage 2 parts and with them came this:

UnknownPart.jpg


Without looking at a bunch of videos, again, can anyone tell me what this is / where it goes? It is threaded at each end with thru holes/spacers showing in this picture at the top.

Once I know what it is used for, I can get it painted the proper (for my color scheme) color.

Thanks!
 

JSATX

Goblin Guru
Received a bunch of Stage 2 parts and with them came this:

View attachment 1956

Without looking at a bunch of videos, again, can anyone tell me what this is / where it goes? It is threaded at each end with thru holes/spacers showing in this picture at the top.

Once I know what it is used for, I can get it painted the proper (for my color scheme) color.

Thanks!
That replaces what was the steering rack. Now on the back. Should get two adjustable toe bars that screw into it and then hook into rear axle/knuckle/whateveryouwannacallit.

0B93ABE7-CB65-4123-882F-49FFC07D2EFB.jpeg
 

PHerder

Well-Known Member
That replaces what was the steering rack. Now on the back. Should get two adjustable toe bars that screw into it and then hook into rear axle/knuckle/whateveryouwannacallit.
Thanks JSATX! On the Pontiac Fiero's frame there was two brackets, one on either side, that did the same thing. Prior experience with Fieros was the reason I didn't recognize this piece.
 

theeulogy

Well-Known Member
Here are some pictures of the custom bracket for the new idler used when the Ariel Atom reconfigures the LSJ SC engine to work in their car.

Note: Ariel does away with all the brackets that are under the alternator so different length bolts are also required. I.e. the alternator is now closer to the engine block by ~ 1 inch.

View attachment 1904
View attachment 1905
View attachment 1906
View attachment 1907
View attachment 1908

Also I found some plastic inserts in the alternator where this bracket is added. I am guessing they are there to help align the pulley(?) The second picture of the bracket has some machined areas where these plastic inserts end up fitting. Thus the bracket is held in place and aligned for the belt to run smoothly.
Do you have a part number for the Atom bracket?
 

theeulogy

Well-Known Member
Found the stock one in a picture, but have yet to locate a part number. Might have to get ahold of Ariel on this. I found one post that suggested to just omit it and run the belt straight down to the crank pulley, but I wonder if that would be enough tension on the alternator.
 

PHerder

Well-Known Member
Feeling better, almost human again so I started in on the front bulkhead. Cleaned the tubing and the bulkhead and put a bead of silicone where the panel would touch and then using the supplied pop-rivets, attached the panel permanently. After getting the first pop-rivet to "pop", I decided to try and find my hydraulic/air riveter since I do not have the strength in my hands to do all the rivets. I found it but it only has the small nose in it and I have NO idea where the other noses are. o_O

So I went on line and find a company I have dealt with in the past who ships quickly and purchased another one, :oops: with all the correct noses and will figure out a location to store it so I can find it again in the future. Moving really messes up finding things. :confused:

So I did get the four rivets in the front bulkhead. I then dosed up my arthritic thumbs with pain meds and called it good until my purchase arrives (hopefully Monday!)
 

PHerder

Well-Known Member
Looks like I got all the steps done in Video #16. Yea!

Will watch and start on the steps in Video #17.
 

PHerder

Well-Known Member
Yes but with a SC 5 speed things are not the same... Example: I was wondering why I had two long brake lines and had actually installed the wrong one to begin with, that was listed in Video #16. I took it back out. Now I did a head slap and will have to put it back in since it is the clutch line!

Do'h. o_O

When I built my Stalker, there were no instructions, videos or many other builders (I had chassis #12) to correspond with and I don't do telephone conversations very well (forget most of what I wanted to ask usually so a wasted call ...) and the manufacturer didn't do email very well. There was a builder's forum on YahooGroups but with so little builders when I was working on mine, it was interesting to say the least. Not to mention all the other builders at that time were using a carb whereas I had to have fuel injection. Never did get the FI working correctly so I too, had to install a carb. Thinking back on it, the engine never ran that great and may have been the root of the problems I was having getting it to run with the FI.

So Nuker, you were at the same level I was back in my Stalker days. :cool: I was much younger then (~14 years ago) and much better shape! :eek:
 

TheNuker

Goblin Guru
Hahahah Man, I bet that was pretty rough back then. I could not even drive 14 years ago!

Super excited to see you get yours going. The SC is ear piercing on a full redline pull in 3rd.
Also, If it makes you feel better I had the engine totally in and close to starting when I remembered to put the clutch line in. Boy that was fun.

Nuker-
 
Top