Riley's Full Cage Goblin -07 SS/TC F23 #457

newbtrying

Active Member
Hey all, my name is Riley and I'm a 27 YO in KY (Montana as of next month). I'm a perfusionist by occupation, which means I start and stop hearts in the operating room so the cardiac surgeon can operate. You should note that my education is far from any of the inner workings of vehicles, so I'm learning a lot on the go. My dad is a diesel mechanic, so I've picked up just enough knowledge from him to turn some wrenches and successfully complete projects as long as there is a youtube guide ;)

Anyway, many of you have answered my questions in other forum threads, but I've not posted a build log yet. It's finally time even though I have missed A LOT of the developments. I bought my 2007 SS donor car, received the first stage, completed tear down of the donor, and rewired my harness all within a month or so, but I hit a HUGE speedbump when, on a suspicion, I tore into the block and found blown pistons and cylinder damage that required a sleeve change. At that point, I chose to upgrade a lot of things *while I am in there*. A few items included new sodium-filled valves, titanium keepers and caps, heavier valve springs, ZZP stage 2 cams, ZZP Zero balance shafts, Cloyes timing chain kit, ZZP timing chain guide, K1 con rods, Racetech 10.5:1 pistons, AEM high flow fuel pump, ZZP basic turbo kit w/ Z57 turbo, F23 swap, and more that I'm forgetting since I made this list off memory.

Because It took over a year for my block to get resleeved (ridiculous, I know), I've forgotten the details of what I did early on. Exhibit A of why I am writing here and now. I have a lot of updates and questions, which I'll number to aid in organization for answering them.

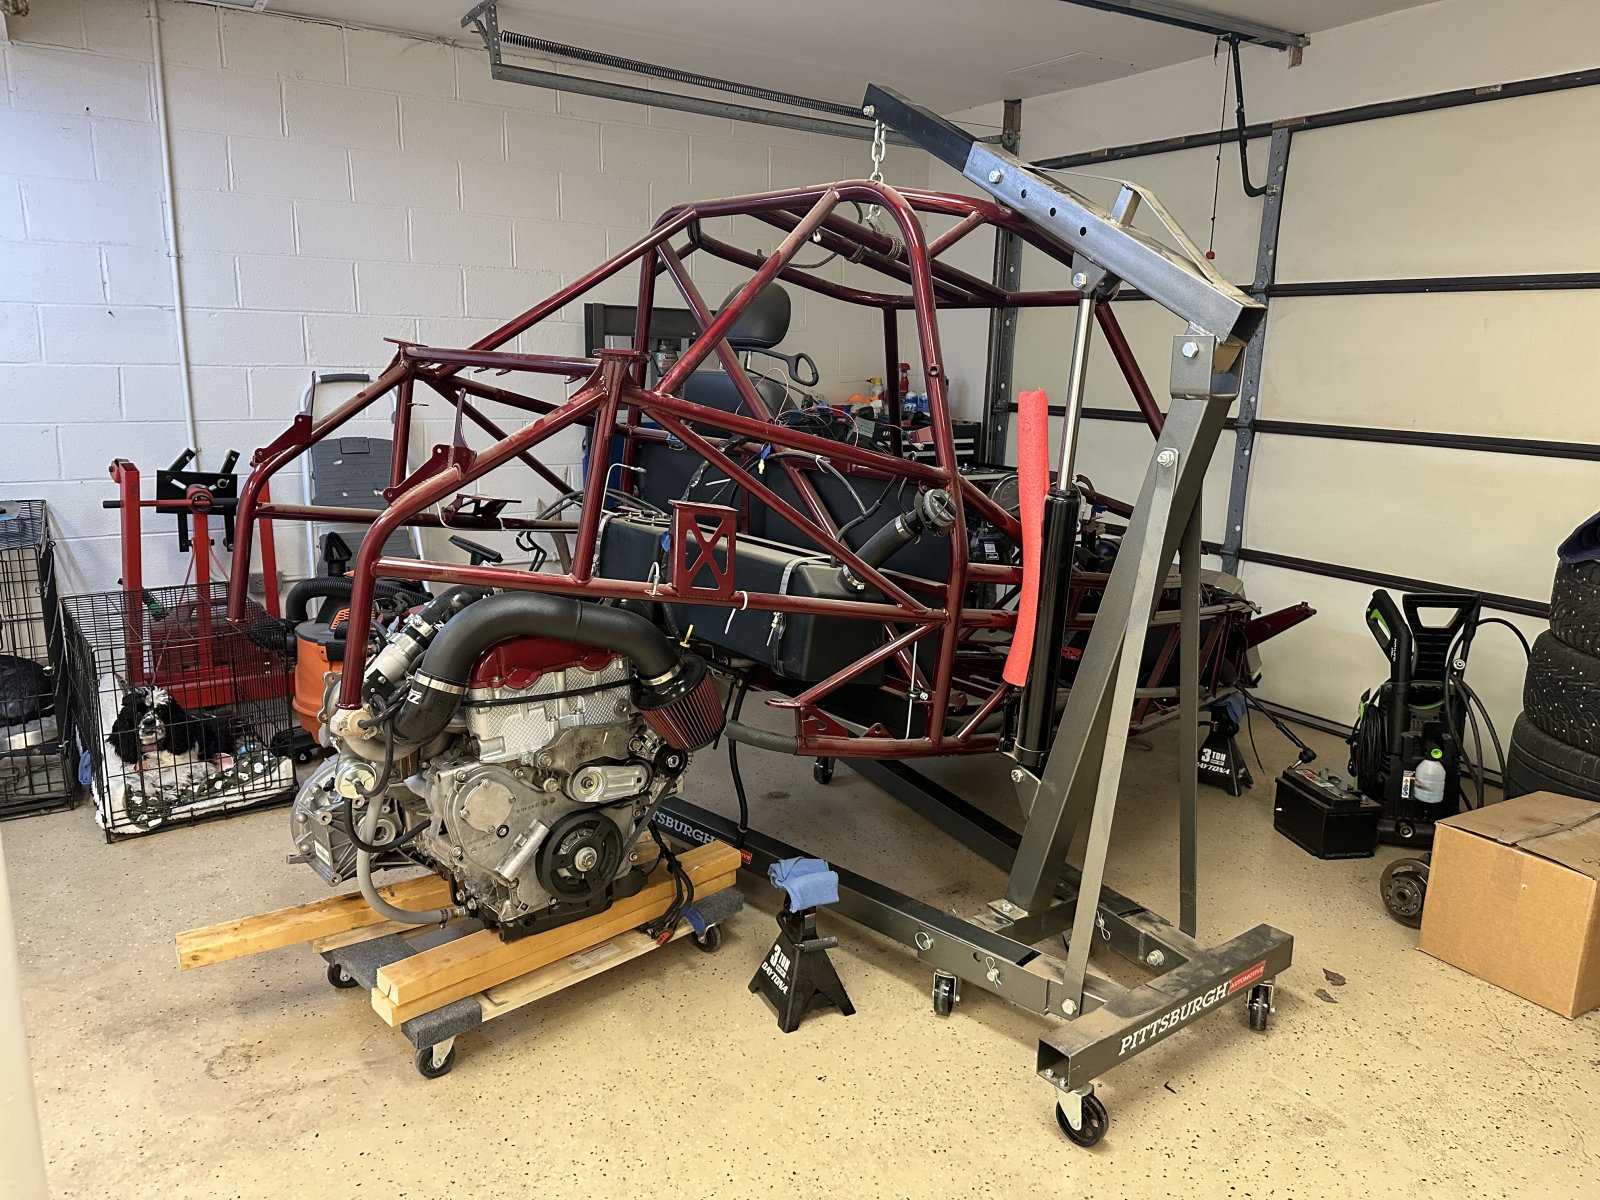
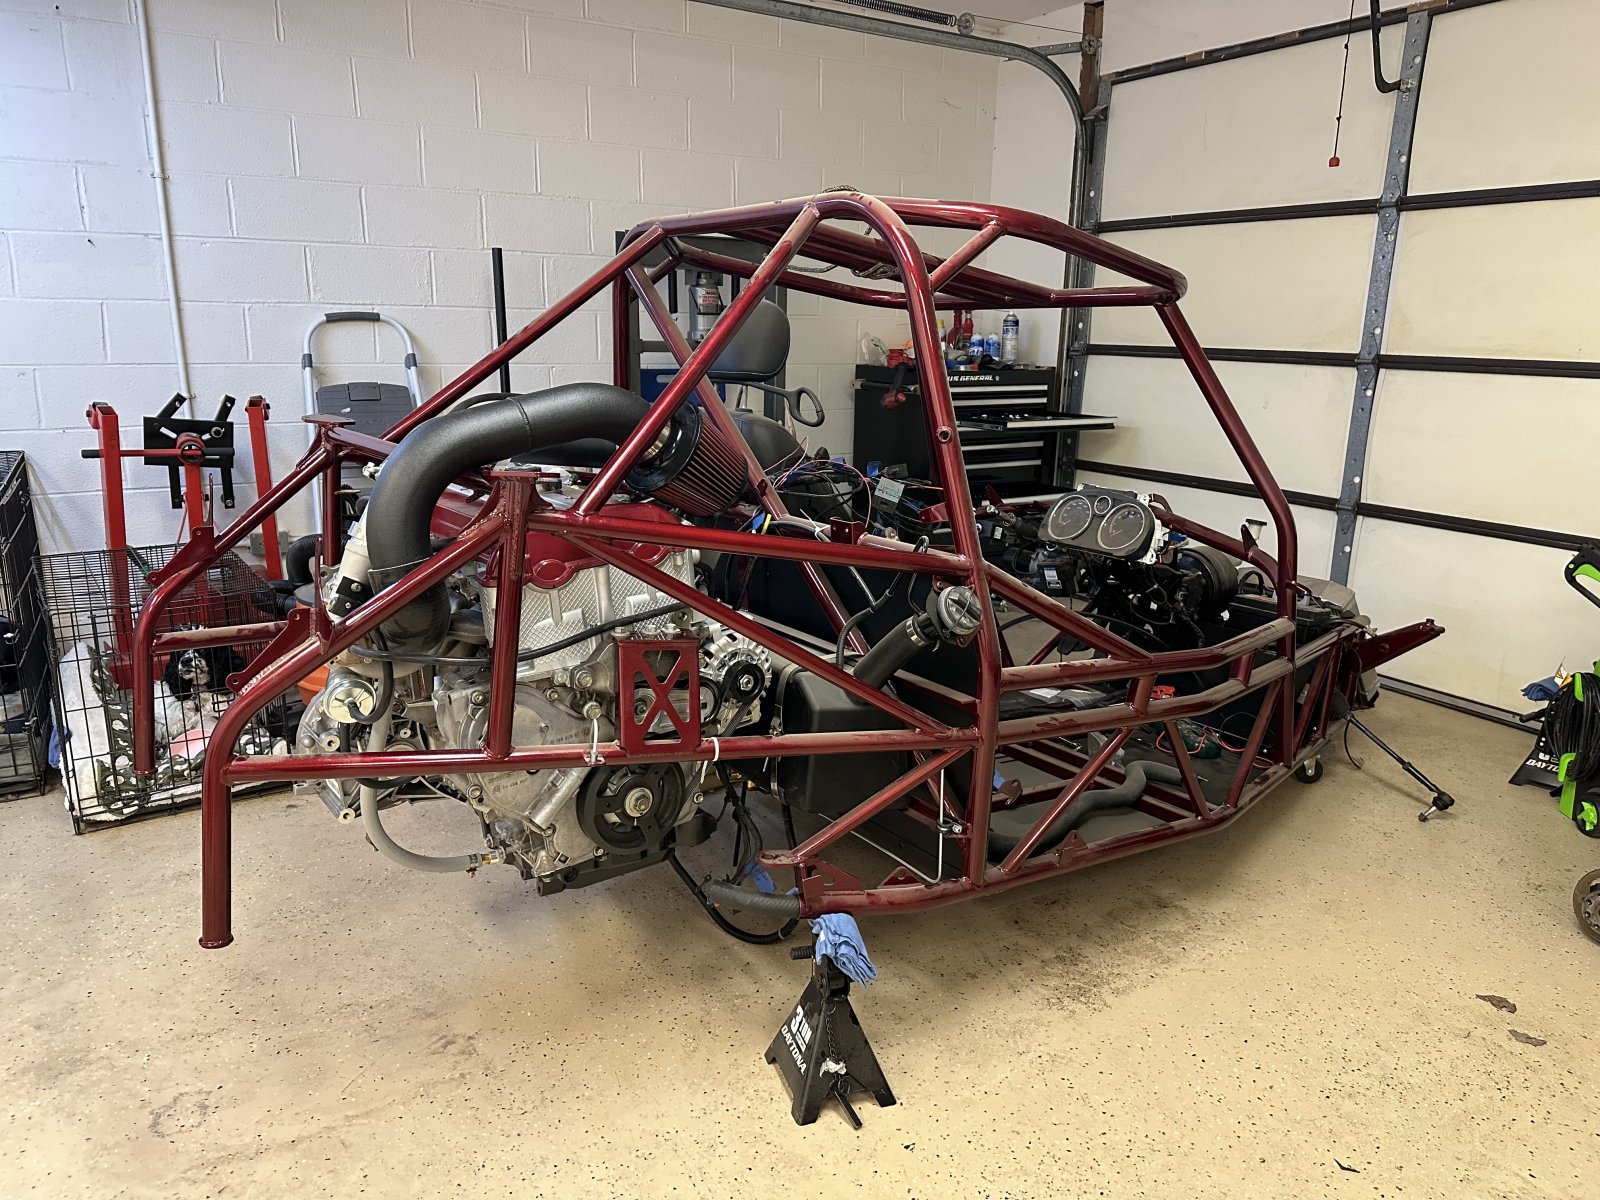
A few days ago, I finally got my engine assembled with all of the upgrades after receiving the newly sleeved block and last night I got the engine mounted in my chassis. I did this in a less conventional way because it was 4 AM, my pregnant wife couldn't be lifting weight, and I had an engine hoist. It worked well! (pics below) I had to take off my ZZP air intake and rotate the compressor housing on the turbo to get the piping over the bar in the rear, but I like how that turned out.
45996

45997


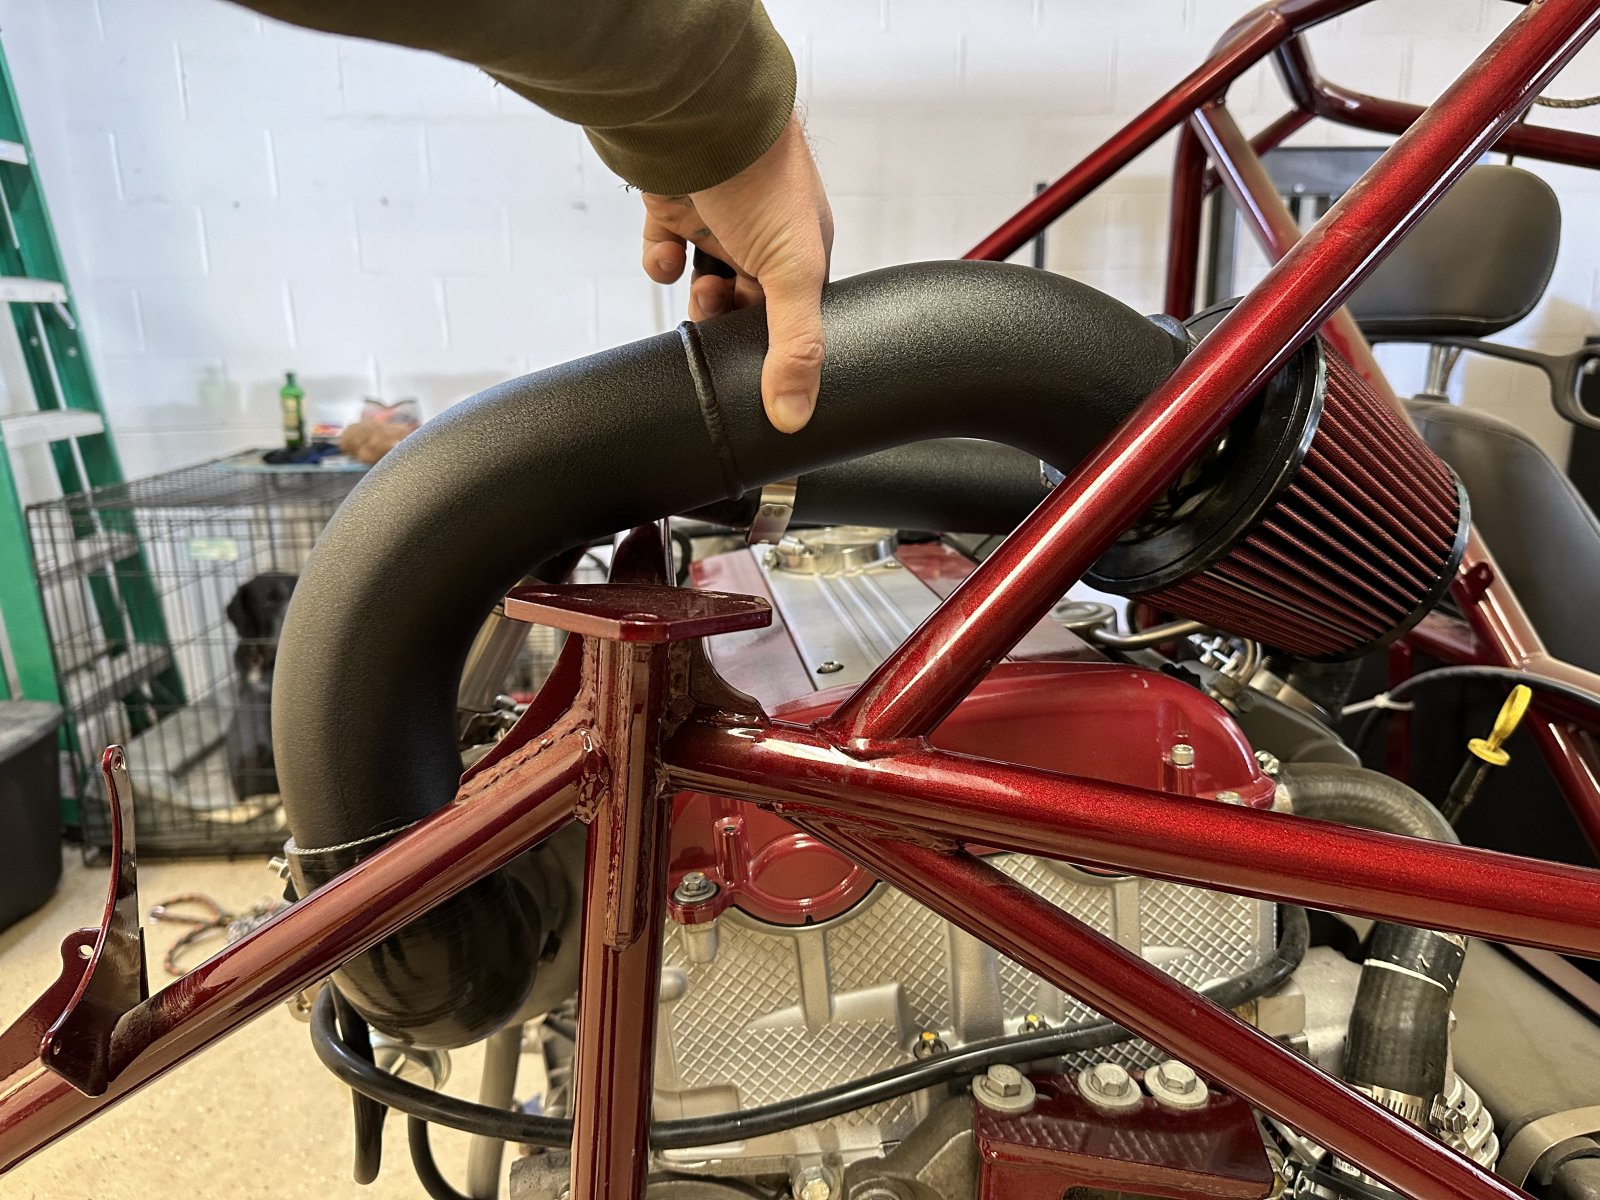
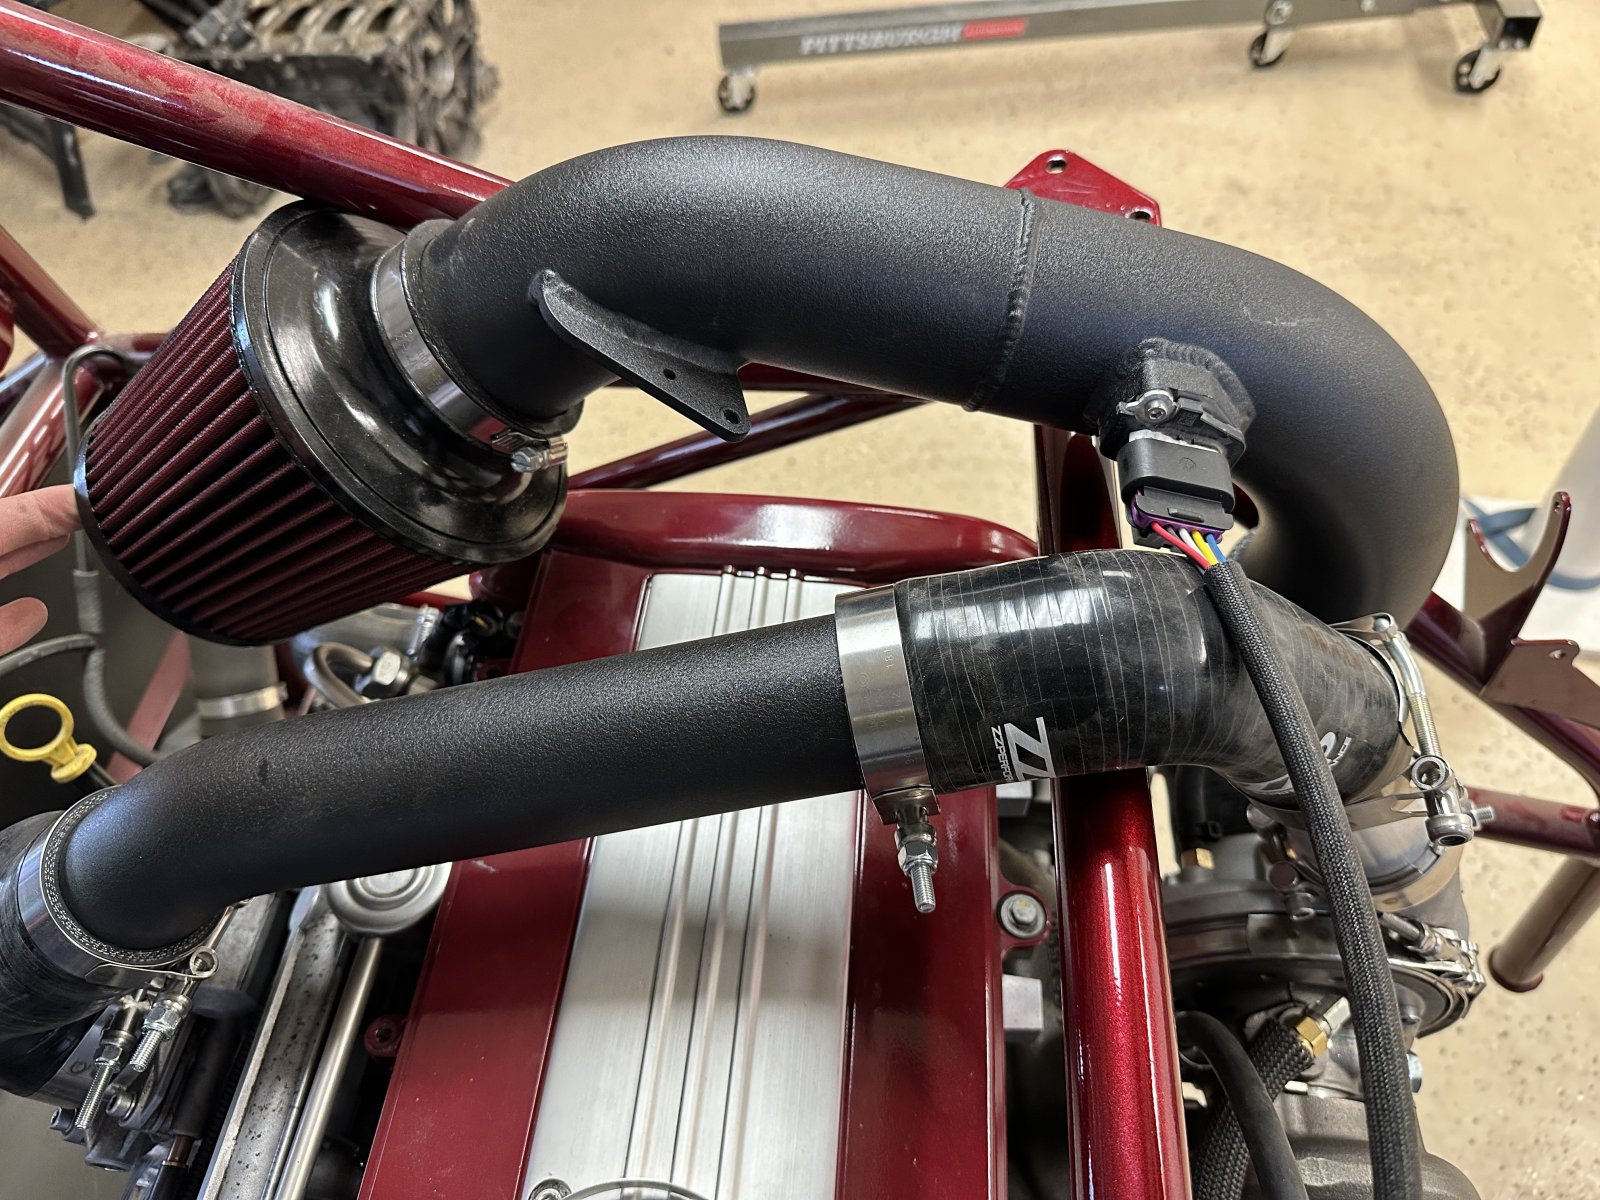
1) I'd like to keep this air intake, but need help brainstorming on ways to secure it so that it does not flop around. (pics below)
45998

45999


I also chose to use AN6 hose as a fuel line, so I got that installed today. easy peasy. (below)
46000


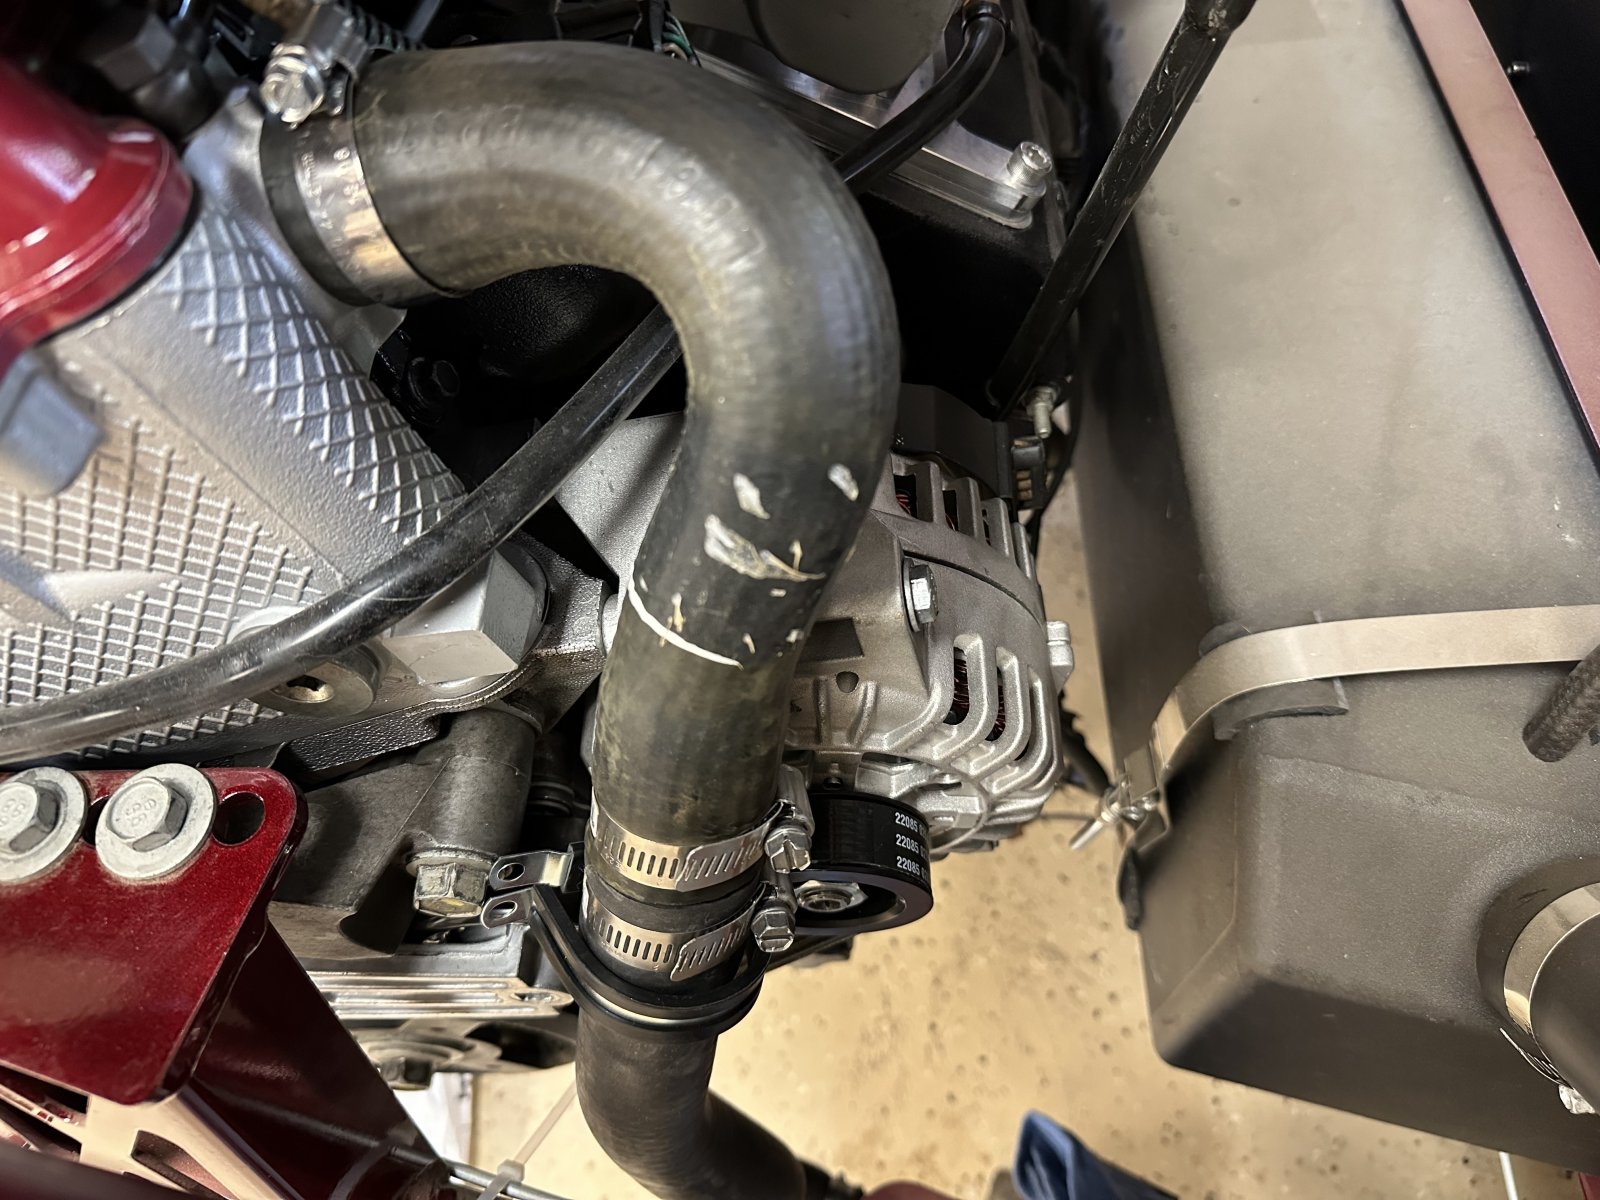
2) the coolant plumbing on the passenger side, I did a bit differently than intended, I think. In the 7 year old assembly video, It shows the 17" piece of hose being spliced in to the hose that goes through the chassis and again spliced into the bottom of the 60-degree hose that attaches to the head. I did this, but I did not have another aluminum splice that came in the kit, or enough hose clamps to make these splices. I checked the kit list and saw that I received the proper number of clamps and splices, so I assume DF intended me to do this in a different manner, but I can't figure out what that was and this works fine. In the end, I went to the hardware store and picked up a 1-1/4" steel barbed fitting and 2 hose clamps and made the splice to the 60-degree elbow. Here's the question though: How do I secure the hose so that it doesn't rub against the alternator pully? The coated clamp in the baggy with the clamps (in pic) has a tiny hole through it that I know the engine mount bolt will not go through, as the video guide showed. Do I need to buy a different clamp? (2)
46001


And now for some wiring questions: If you don't know what I've got going on (most likely), please give me ideas/instruction on how to diagnose/track down potential issues.

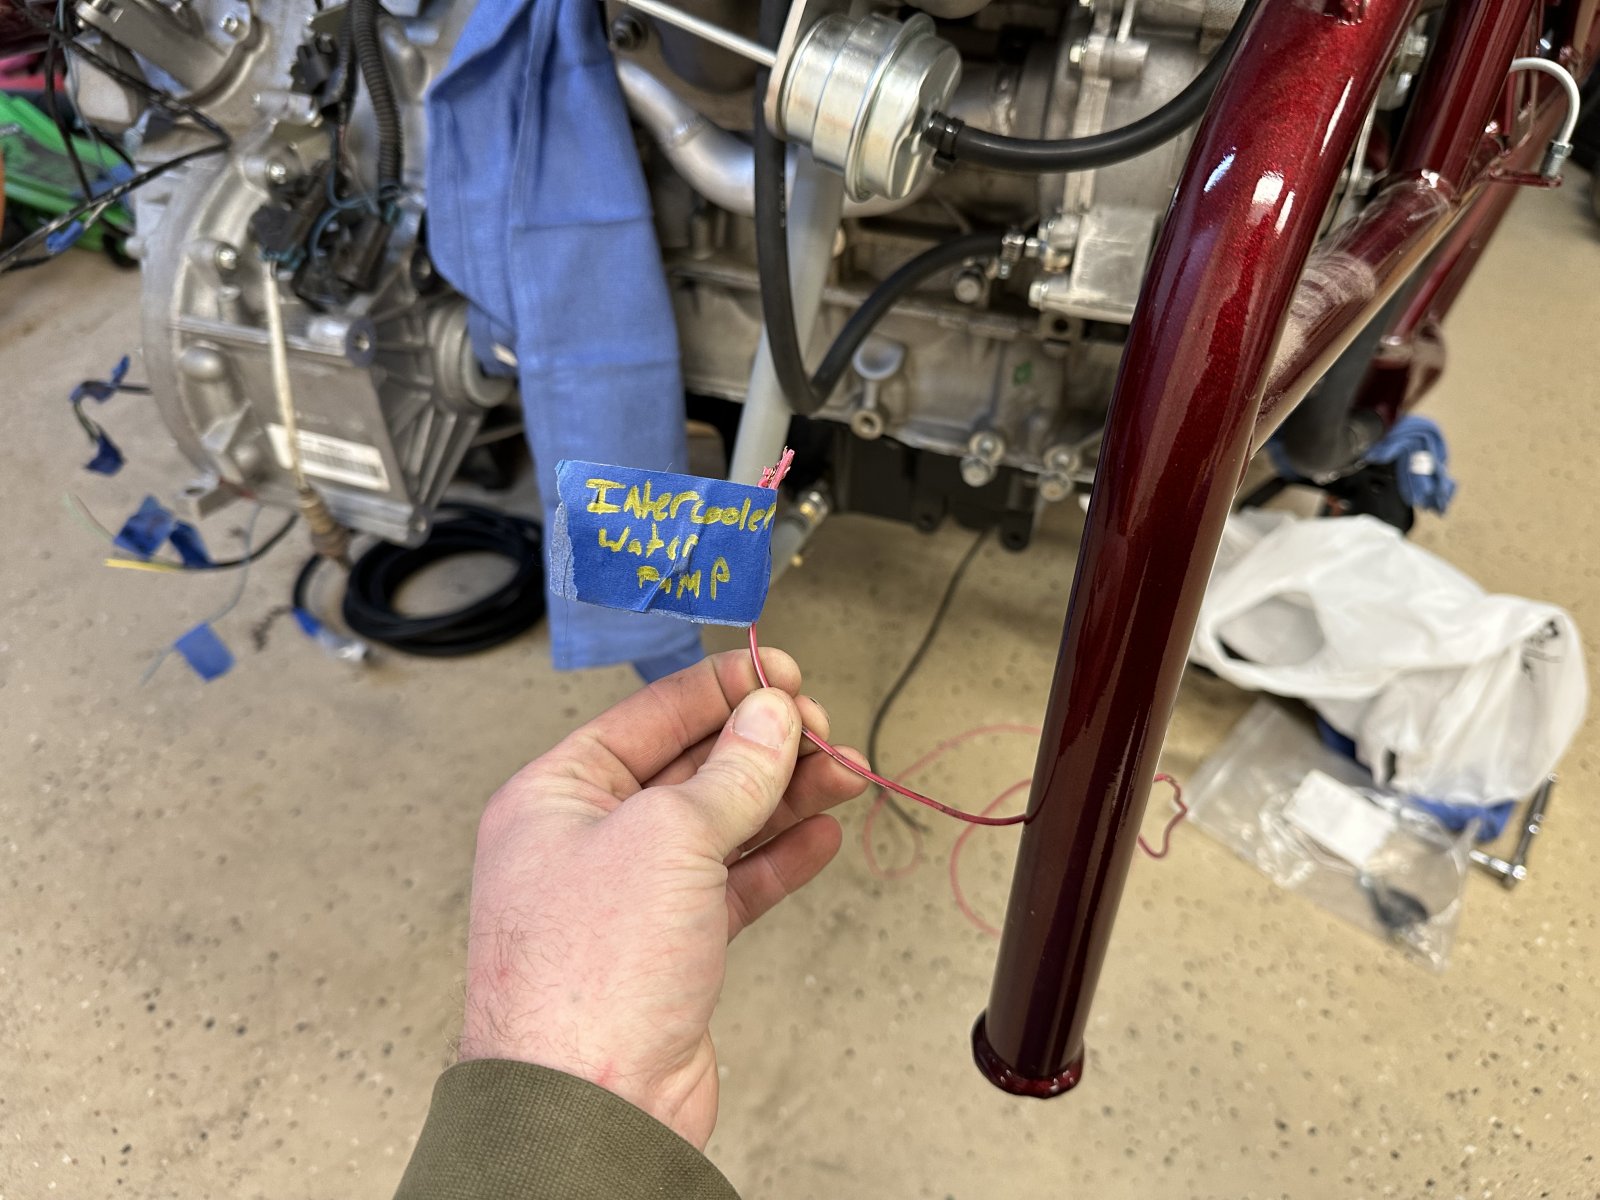
3) On the main harness, I have a pink/white stripe wire bundled with a black (ground?) wire that is labeled intercooler water pump. This branches off near the intercooler pump, but my SS already has the proper connections for this. Do I bundle up these wires and forget about them, or do I need to actually use these? (pic below)
46002


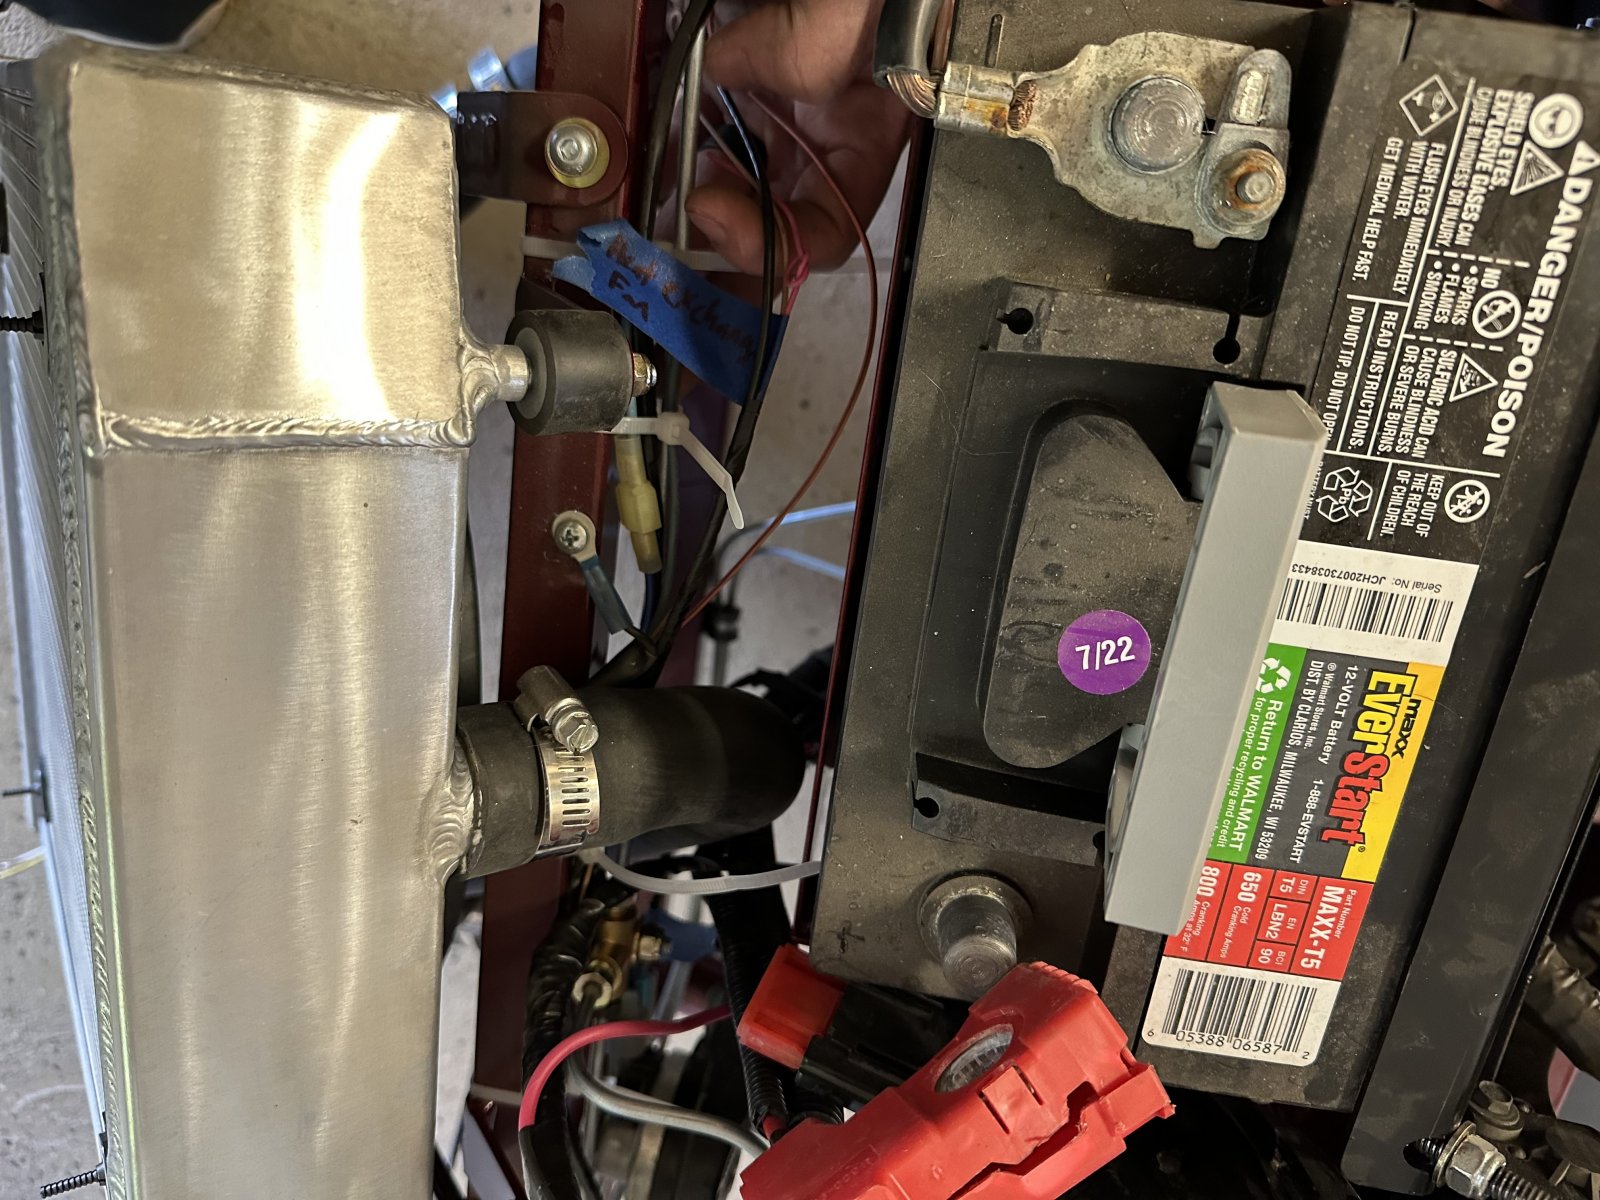
4) there's a bundle of wires that come off of the main harness near my battery box (see pic below) one of these is pink and labeled, "heat exchanger fan", which I think I'll be using to power DF's intercooler heat exchanger fan that mounts near here (I don't have this heat exchanger, but I assume it comes in stage 2 or 3). Is this right? (Pic below)
46003


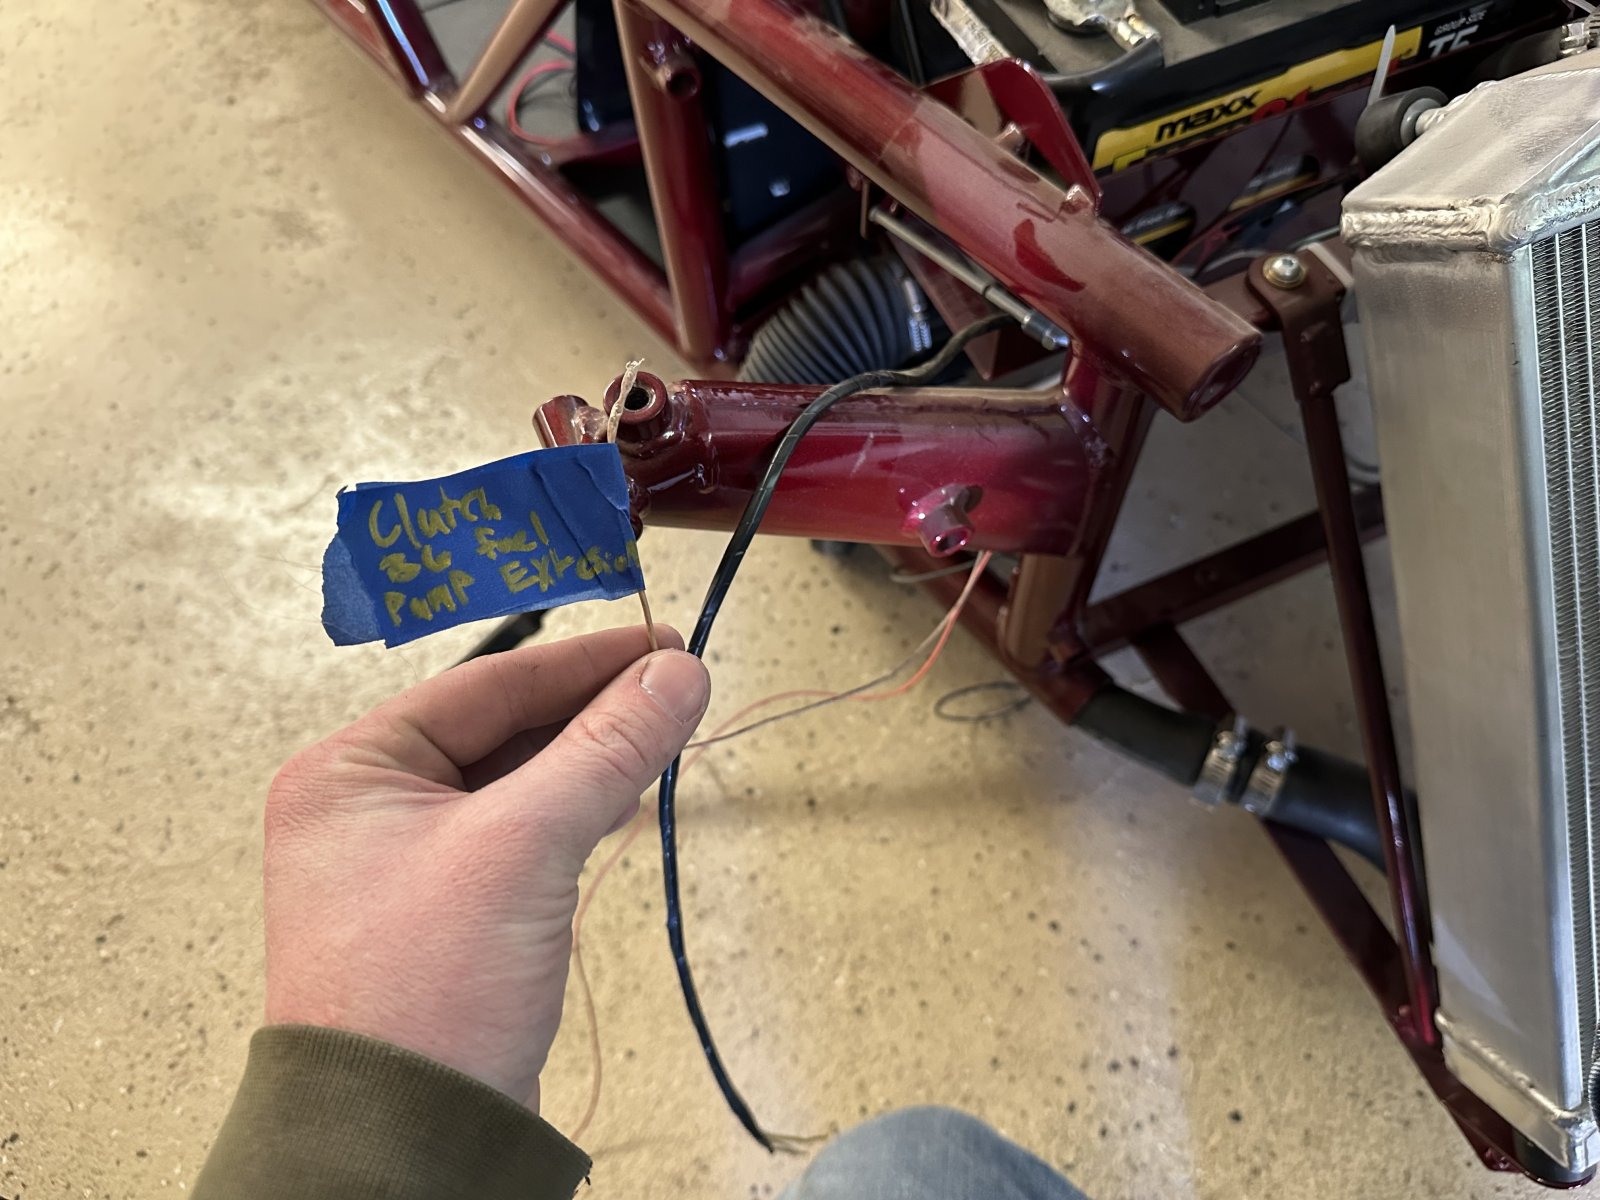
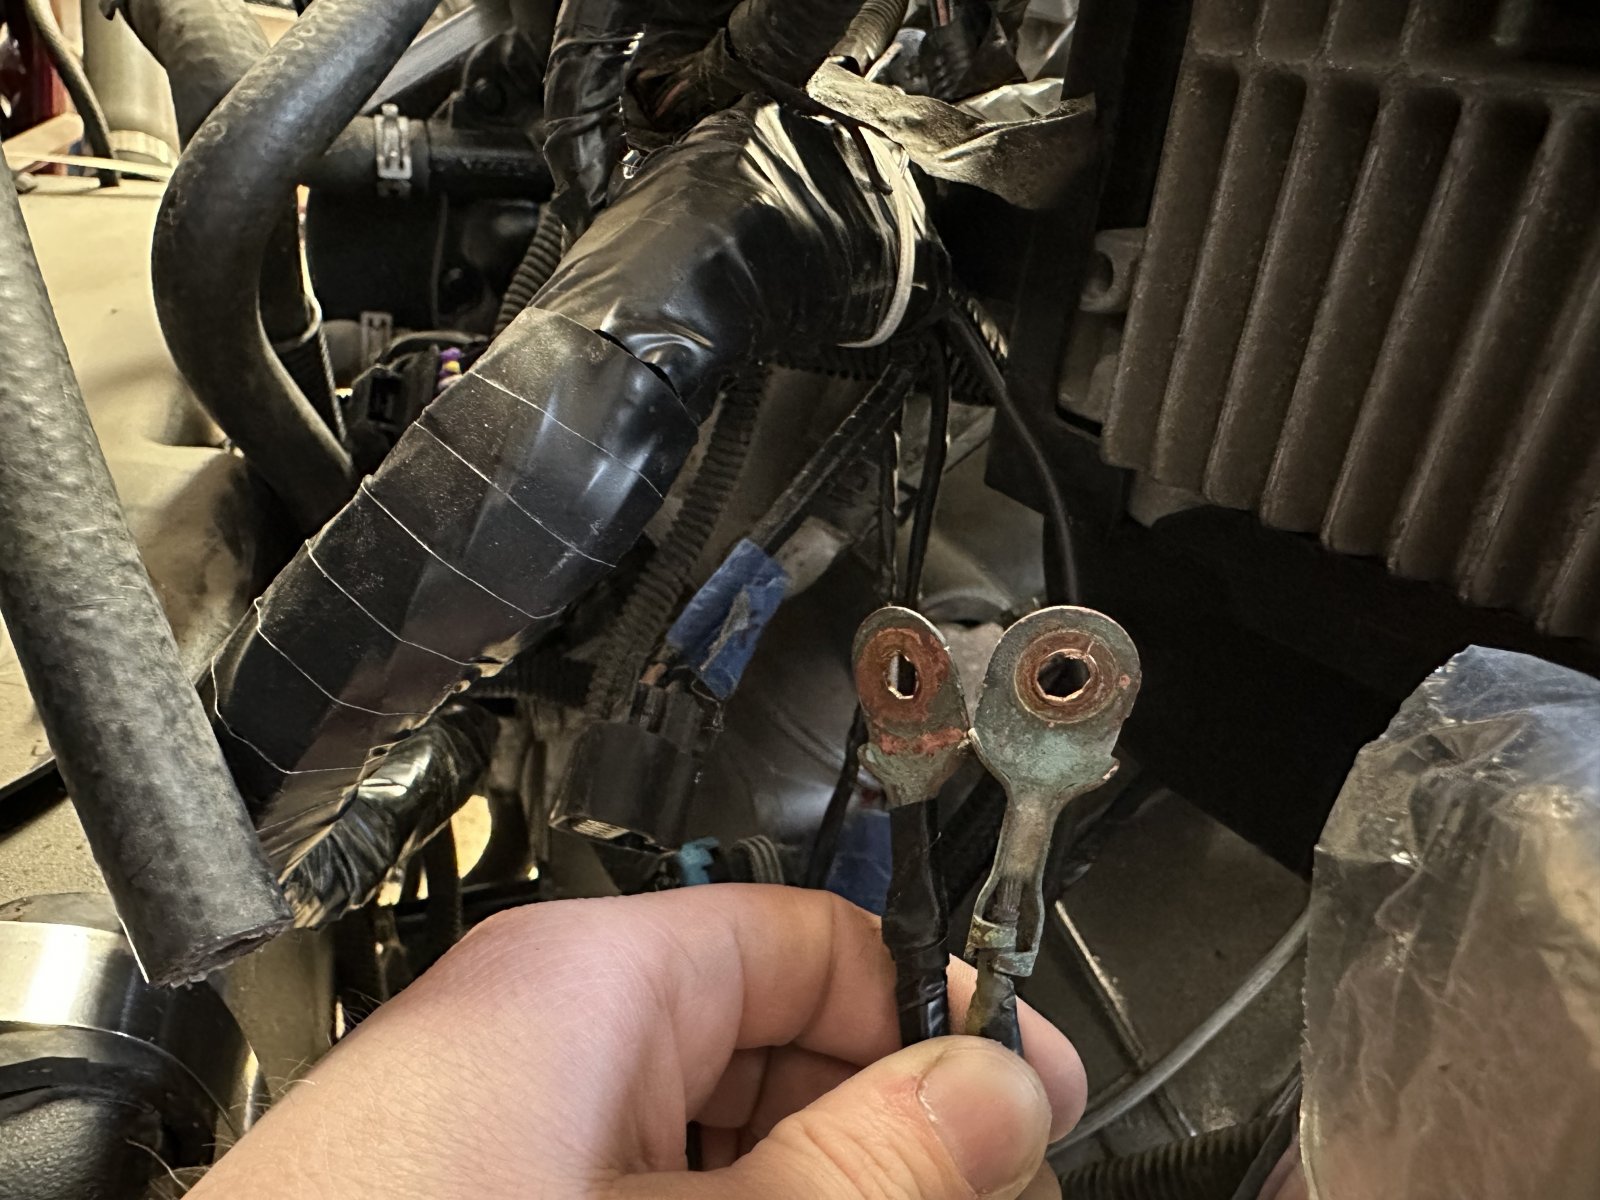
5) from the bundle just mentioned, I also have a tan wire labeled "Clutch B6 Fuel Pump Extension". This is something I'm very sure/concerned I messed up... If my 1-year recall is working correctly, I followed the video instructions word-for-word and bundled the necessary tan wires and soldered them together, but I think I only had 2 tan wires of the 3 mentioned, so I soldered a long tan extension in as well and you are looking at the end of it in the pic below. I could be way way off base on what I did, but question number 5 is two parts: Am I supposed to have this wire chilling like this, and IF I didn't bridge the intended connection during the harness rework, how do I diagnose the mistake, what wouldn't have power/be hooked up, and will this effect my first start up? (5) (pic below)
46004


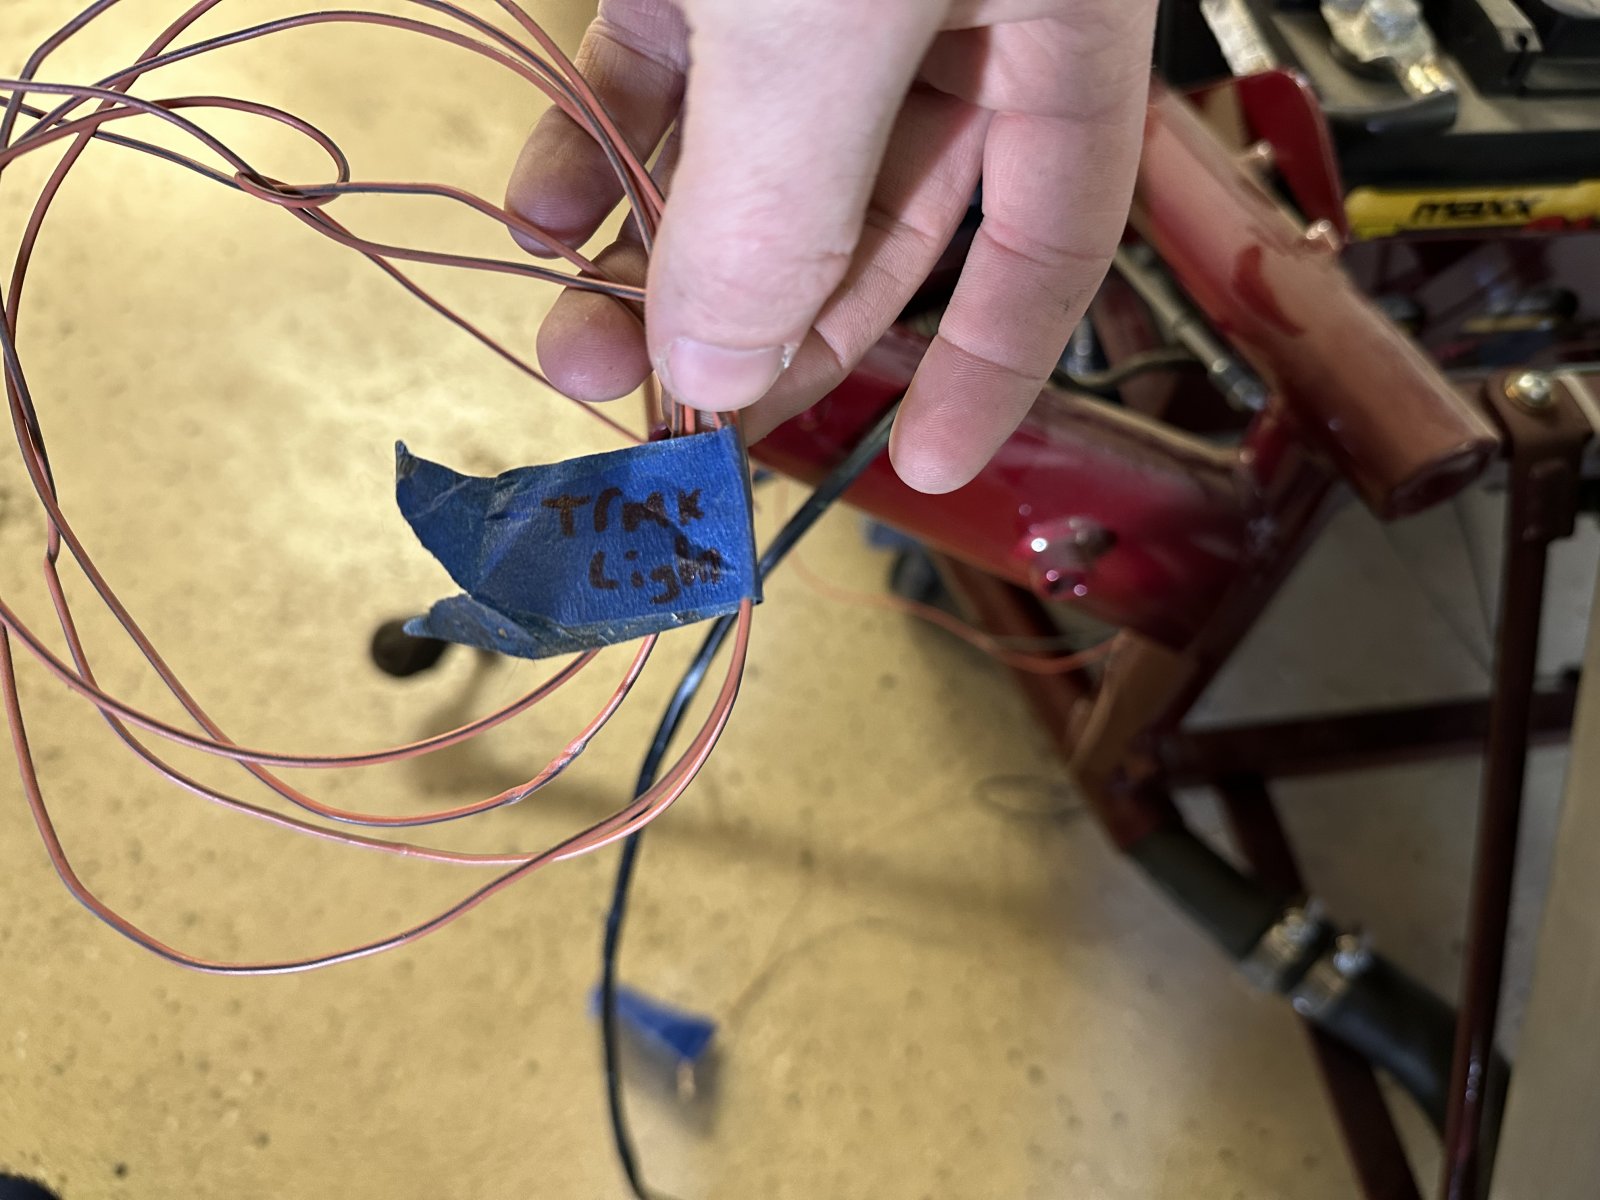
6) still on the same bundle of wires as 4 and 5, I also have a wire labeled, "Trunk light". What do I do with this? (see pic)
46005


7) in the pic below, I have 2 ground wires that branch off near the fuse box housing. one is long enough to attach to the ground stud on the chassis of the goblin that is located below the fuse box. The other is just short of being able to attach it there. Does the long one go to the chassis and other one go to another location? Or do I need to extend the short one and ground it on the chassis? (7)
46006
In the pic above, you can also see my fuel pump connector, which I somehow made about 3" too short... I'll be extending that in the near future.

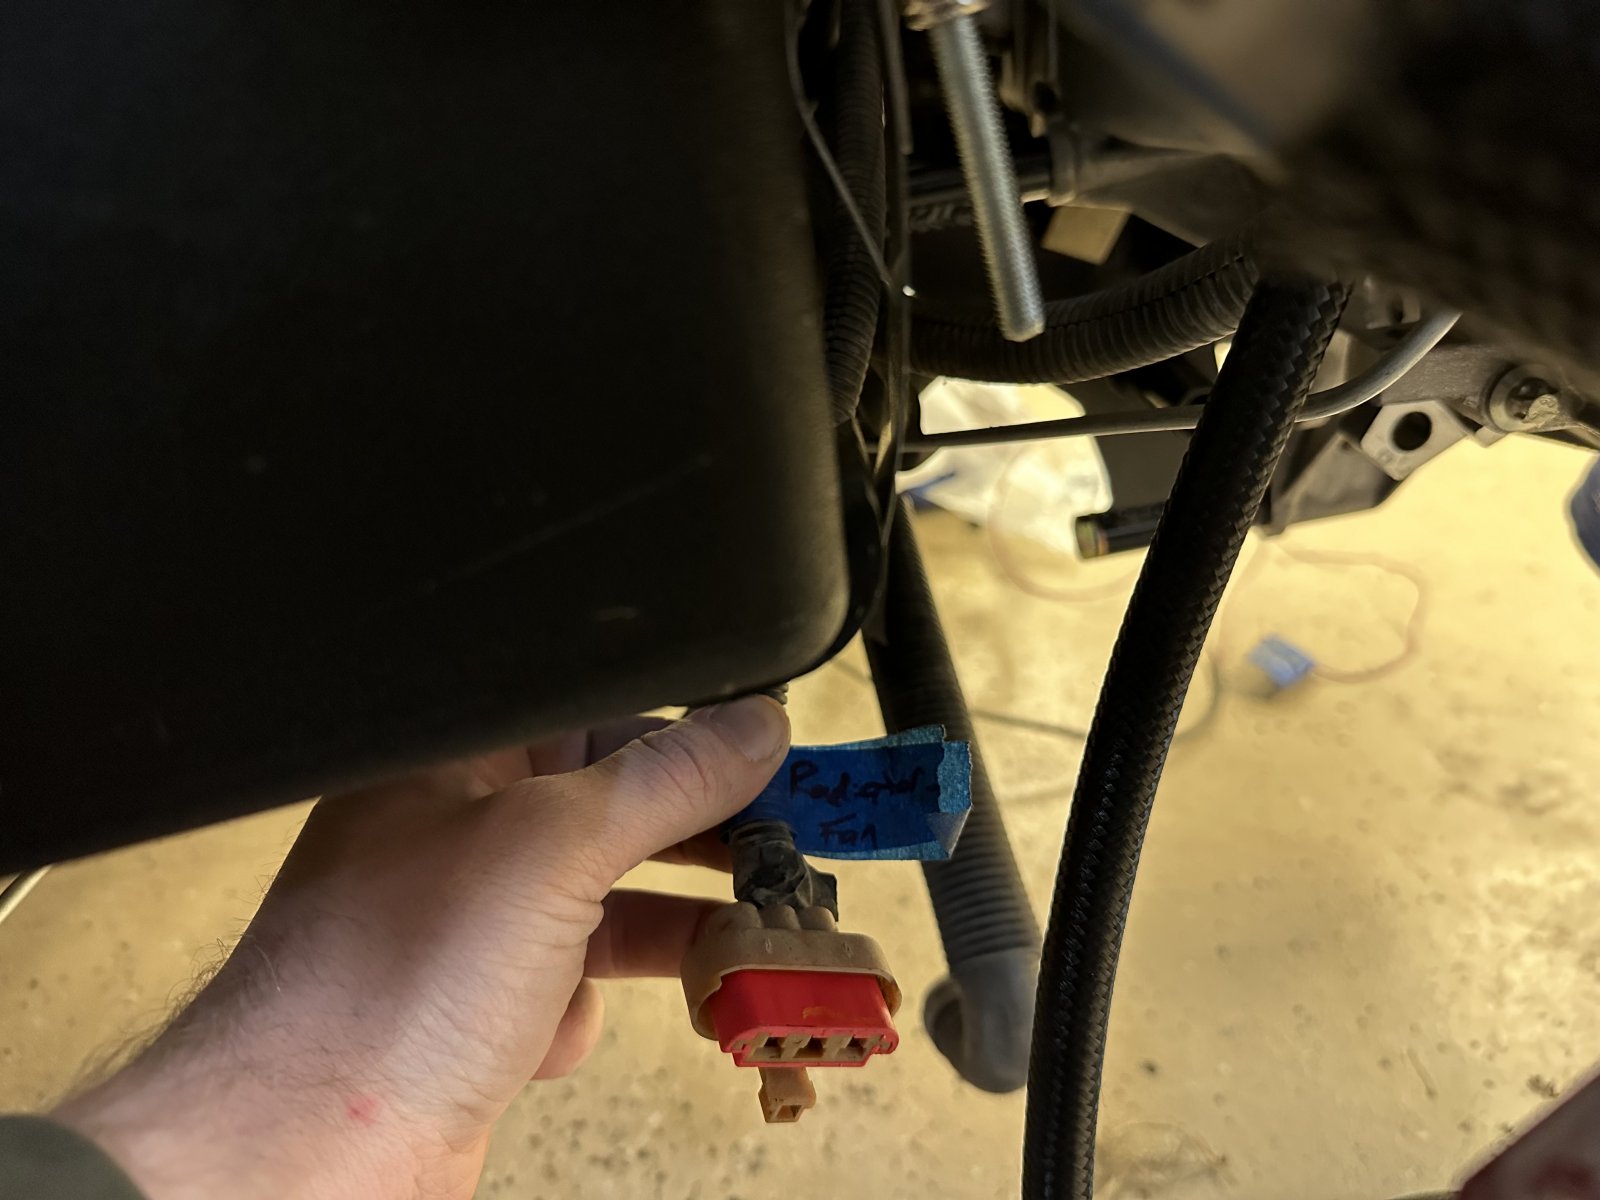
8) On the engine harness, I have a red/tan plug I labeled "radiator fan" over a year ago. Do I just lop this off since I won't be using it, or should I keep it? Or am I totally off base and is it used for something else? (pic below)
46007


So that's my introduction on the build logs, I'll be posting more routinely now. And thanks to anyone who helps me out. I could not do this without you guys, seriously.
 

Desert Sasqwatch

Goblin Guru
#3 - wrap up the pink wire and save it for a rainy day - actually it may be good to have a hot (with the key on) wire for a future upgrade.

#4 - correct, the heat exchanger and mount is in stage 2, along with the fan.

#6 - trunk light can be used for an accessory that needs a hot (with the key off) wire.

#8 - correct, the radiator fan is hardwired in, you can lose the plug.
 

Ross

Goblin Guru
1. I would make a cardboard mock up with a few folds, and then cut it out of steel or aluminum plate. Drill 3 bolt holes to mount it to the shock tower. The green lines are dotted, to show them as hidden lines, which I would route behind the air intake tube.
46013


2. I zip tied my coolant hose to the DF frame, pulling it away from the belt and pulleys.

3. A Z57 turbo is going to create heat in the intake... I would be adding an intercooler, heat exchanger, and a LSJ supercharger coolant pump, and using those wires to power the coolant pump.

4. Ah, good, the intercooler was already in the plan. I am not sure what stage those parts come in.

5. Well this "Clutch B6 Fuel Pump Extension" wire is going to take some research, but it can be done.
The LSJ clutch doesn't have any wires associated with it. "B6" sounds to me like a wire position in one of the big connectors under the fusebox, the PCM or in the BCM. "Fuel pump extension"... maybe... are you any good at following wiring diagrams, and using an electrical meter to check your wires? The wiring diagrams for a 2007 LSJ are here. You will need to dig around in "Repair and Diagnosis", Diagrams, then Electrical diagrams.

6. Trunk light could be used as a spare power source, or cut out. It might be part of the electrical circuit that stays on for 15 minutes after you turn off the key... things like the radio, power windows, etc.

7. A ground just needs to be grounded to the chassis. I would extend it. On my goblin, there are 3 ground spots on the DF chassis. 1. under the rear fusebox, 2. under the dash by the pedal box, or 3. beside the battery.

8. I believe the DF kit uses the big radiator fan circuit, and the smaller AC fan connector isn't used.
 

newbtrying

Active Member
Oh man, all of that is great! I especially love the idea about making the intake bracket like you've drawn. I think I can have that made relatively quickly if work doesn't get busy.

And thank you for the wiring diagram links. My plan (since 1 year ago "me" thought he figured it out) is to mentally catalog this potential issue and continue onward as planned. If I run into issues, this will be my prime suspect and I'll then devote all my time into figuring it out. I'm glad you mentioned the LSJ clutch doesn't have any wires associated with it because, like I already mentioned, I think I remember connecting B6 to the fuel pump wire but was stumped by the lack of that third wire that the video mentioned. maybe, just maybe, I've soldered in that extension in the photo unnecessarily and can just trim and bury it down the line. To answer your question about wiring, I'm capable of reading wiring diagrams, but i would feel like a 1st grader reading a chapter book.

Great, I'll just extend that ground and keep things tidy. I just finished extending the VSS and reverse light connections for my F23. tomorrow, I'll extend the fuel pump connector and at that point, I think I have everything that should be plugged in, plugged in.
 

newbtrying

Active Member
Another full day of work and some parts being delivered have brought me to the point of being ready to start my goblin tomorrow. The only reason I didn't start the car today was because I am waiting on the dearest mailman to drop off a fuel filter to AN6 adapter.

Today I blasted through a bunch of smallish things:
1) Removed LSJ thermostat housing and installed a base model's thermostat housing.
2) plumbed the oil cooler using the fittings that @Rauq mentioned in this thread.
3) extended my fuel pump connector, coolant reservoir connector, VSS and reverse light sensor on my F23, 2 ground wires (that I attached below the fuse box. Here, I have three small ground wires and 1 large ground wire attached)
4) installed coolant tank
5) filled the system with coolant (took just less than 2 gallons, but I'm sure I'll add more as air bubbles get worked out after the first start.)
6) connected the battery. I turned the key on briefly and heard the fuel pump kick on, so that makes me feel good.
7) installed the exhaust pipe that I cut out of the ZZP downpipe that came with my turbo kit. Yes, this was an expensive-ish option, but I'll clean up that cut on a chop saw one day and make it look good. I figure since I didn't have enough forethought to have them not send that downpipe in my kit, and I purchased it a year ago, I'll just make the most use of it and I think It looks good. I hope it's not too loud and the turbo muffles things down to tolerable levels.

Now a question for the crowd: I didn't trim the counterweight on my F23, but it rotates into three lower positions unhindered. Is the middle position here neutral? Eventually, I'll have to trim this counterweight to access all gears.

Oh, and I need to go find a Bluetooth OBDII reader locally so I have that for the first start tomorrow.

The only things left (currently) on my to-do list for stage 1 is to make a bracket for my air intake and install the subframe, trans mounts, and shift cables. At that point, I'll load the car onto my cargo trailer and move to Montana.

Here's some pictures from today:

Base model thermostat housing and tees:
46049


out with the old and in with the new:
46050


extending wires with helper:
46051


coolant tank installed, oil cooler plumbed:
46052


contemporary art:
46053


straight pipe and O2 sensor installed:
46054


End of the night before first start: (AN6 fuel line on the ground while waiting for a connector.)
46055
 

newbtrying

Active Member
I decided to prime the oil pump tonight by unplugging the fuel pump and cycling the ignition a few times until the oil pressure light turned off on the dash. This is the first start after a total rebuild and upgrade of the engine, so it was necessary.

I also rounded up a fire extinguisher for tomorrow… to ward off bad spirits, I guess.
And I wanted to make sure the throttle body responded to the foot pedal, so I broke out the stethoscope. Remember, I have a medical background so I just have and use things like this. And it worked!! Immediately after taking the stethoscope out of my ears, I heard the butterfly shut, and realized I didn’t even need the stethoscope to begin with.

46063
 

Robinjo

Goblin Guru
Good luck, triple check your ground wires and make sure there is not paint on the stud. The nut can have it but the stud needs to be clean.
 

newbtrying

Active Member
Ok, so a few moments ago, I fired up the Goblin. Because this was the first start after an engine rebuild, before I installed the fuel hose, I disconnected the fuel pump and turned the engine over using the starter for a few rounds that each lasted about 5 seconds. Once I found oil in the oil filter housing, I decided the oil pump was primed and it was time.

I connected the fuel rail and fuel filter with a short stretch of AN6 hose and threw on the Bluetooth OBD2 reader to immediately find that the power light on it did not turn on... Ok, problems already... A quick fix with a spare piece of wire from the battery terminal to the power pin (pin 16 red/white stripe) solved that Issue and I got my phone connected. Everything that I could read live seemed to be showing real data, so I hope that this was the only wiring mistake I made. I think I'll route that jumper wire in a clean way and make it a permanent feature unless you guys have a better idea.
46149


Once I got my reader running, I turned the key, heard the fuel pump prime, and started the car. The engine only turned over about 3 times and roared to life, albeit, roughly. After some coughs and sputters and a bit of help from the throttle, the car idled strongly around 1000 RPM. I saw the temperature reach about 140 degrees after a few minutes of observing at Idle... **see note below** and then held the throttle to produce about 2000 RPM until the engine coolant temp hit 170-180. Here, at the 9 minute 30 second mark, I let off the throttle to again take a look around the car, but when I let my foot off the throttle, the engine sputtered out. I tried to restart it and it didn't want to fire up unless I gave it some throttle. At this point, I didn't push things further and am letting it cool while I make this update. I'm not too concerned because I made so many big changes that it needs tuned BADLY, but I can't say I'm not concerned. Total run time was around 9.5 minutes and I've got the data log to share:

click on the Reddit links to see first start idle and data log in real time.

https://www.reddit.com/r/dfgoblin/comments/1be83nw https://www.reddit.com/r/dfgoblin/comments/1be89iq
Pics of different point at first startup. time correlates with time ran:

46115

46116

46117


Also, I noticed the coolant level didn't drop much while running. I did follow the video procedure on YouTube for filling coolant so wasn't concerned much. After things cooled off, I popped the coolant hose off the passenger side and the head was bone dry. I added about 3/4 gallon of water using a piece of spare hose to the head... which I didn't find too amusing. *edit* I’m showing my inexperience… of course the YouTube didn’t show filling the engine with coolant because they didn’t do a full tear down and rebuild.* So, could this have caused damage?? Give it to me straight, although I fear your answers. I feel sick that I put faith in the coolant temp number in front of my face, to find out that there's basically no coolant in my engine. ugh.


*** note *** ...at which point I saw a small puddle under the bell housing/flywheel area of clean engine oil on my floor. this had to have leaked out pretty quickly and then abated because I wiped it up and only saw a couple drops on the wiped floor after 8 minutes-ish more of idle/ 2000 RPM (9 min 30 sec mark in vid). Thoughts? blowby around rings pushing oil around rear main seal until things seated right? I'm stumped and mildly concerned. I reused the original flywheel bolts, so could oil leak around those threads? is that even a thing? any input welcome.
 
Last edited:

Ross

Goblin Guru
Congrats on the first start.
The rear main seal should stop the engine oil from getting out. I doubt the flywheel bolts matter.
Was it tan colored engine oil, or was it red colored transmission oil?
The flywheel and clutch are suppose to be dry in the bell housing, and a transmission seal also needs to work to keep oil out.
Actually, clutch/brake fluid could also be leaking in there.
 
Last edited:

newbtrying

Active Member
Congrats on the first start.
The rear main seal should stop the engine oil from getting out. I doubt the flywheel bolts matter.
Was it tan colored engine oil, or was it red colored transmission oil?
Definitely the brand new, tan engine oil.
 

Rttoys

Goblin Guru
Coolant.
Don’t worry too much. engines in general are pretty resilient. purging these can be difficult. Since it’s cool. Pull the hoses at the engine and pour coolant down them to help fill the rad and such. Then, as the runs, “pump” the hoses to get coolant to go here and there. It’s tricky, but it’ll all work out.
 

Rauq

Goblin Guru
Refresh my memory on your fuel setup? AEM E85 compatible 340lph pump, do you have an external fuel pressure regulator? What injectors?
 

Gtstorey

Goblin Guru
I don't remember if the Ecotec required sealant on the threads of the flywheel bolts, but a lot of newer stuff does.
 

newbtrying

Active Member
Ok, some updates:

1) I haven't removed the engine to do some digging, and frankly, I don't have time to before I move to Montana. However, I've decided that the oil leak is from the oil cooler that I mounted with Orings (detailed here) based on where I'm seeing oil on the block.

2) after doing some compression testing, borescoping, and calming breathing techniques, I've decided that the engine itself is undamaged. After filling up the engine with coolant, I've since started the car and it will idle just fine, albeit extremely rich. Also, I'm getting a code for misfires, but I imagine this is because of it running so rich and I think this will be resolved with a tune. The next course of action is to get a tune, which I knew I would have to do because of the 80# injector switch, in the least. I have HP tuners and will have to figure out (later) how to record some data and send it in to ZZP for a tune. At that point, I expect the engine to run like a top. @Rauq yes, the fuel pump is the AEM E85 compatible 340 LPH pump. The injectors are Siemens 80# and I do not have an external fuel pressure regulator.

3) The OBD2 power issue I detailed in my last entry was solved with a simple fuse changeout. The OBD2 port is in the lighter circuit (as in cigarette lighter). This is a 15 amp fuse and now I don't need the jumper wire from the battery. Hooray!
46148


4) I installed the subframe just to have something solid for the car to be blocked up on in the trailer. However, I could not figure out how the transmission mounts worked. I see on the item list from DF that they sent me a F23 front trans mount, but not an F23 rear mount. Which is considered "front" and rear"? Also, I have trans spacers and I don't know where they go, or if they are for the F23 or not. And in the other hardware baggie, the bolts that are for the transmission mount that is on the rear of the goblin do not thread into the transmission: they are too big in diameter. Could I have received some wrong hardware/mounts, or is this just me doing things wrong (very likely)? here are some pictures of what i'm looking at:

Which mount is this? and why does it not align with my subframe? the spacers I have don't appear to kick this out far enough for the mount to align with the subframe, and I can't believe that this would use the spacers instead of different mount dimensions.
46146


46147


I have an extra trans mount, which I assume is for the F35 (left). and the hardware in baggie N23C doesn't seem to be the right size bolts for mounting to the F23. Also, I'm missing 2 M10 washers which is crappy, but I can go pick some up locally I guess. and again, where do these spacers go? Are they even for the F23 I have? The mount on the right appears to be the right mount for my needs, but again, I can't mount it with the bolts I have.


Unfortunately, this may be my last post/progress for a while. I have to move across the country now and I'm having a baby girl next week (my first child). Money won't be why, but time will be an issue. I hope I can get this on the road within a year, and I think I should be able to once I get settled at the new hospital I'll be working at.
 

Desert Sasqwatch

Goblin Guru
Congratulations Dad! Focus on your new child and Mom - they are going to need all of your attention. The Goblin can wait. It will still be here when you're ready. :D
 

Rauq

Goblin Guru
Green is the F35 front trans mount, blue is the rear mount which is common to both the F23 and F35. If I recall correctly, the K21E baggie is for the F35 side trans mount which you won't need. I don't think the F23 side trans mount requires spacers, but I could be wrong there. I don't remember and can't guess what the N23C baggie would have been for with two M1x1.5x80+nuts and five M12x1.75x35. I used donor hardware for the side trans and engine mounts.
46153


On one F35 install and two F23 installs, my front trans mount was off, but not by that much. It took some creative loosening and jacking and twisting and tightening to get all of my mounts to line up, but that might be a bit much. This might sound dumb, but are you sure you have the mount in the right orientation? I seem to remember a dumb aha moment when I realized you could flip it around somehow and get things a bit closer. Do you not have the rear trans mount installed, since it's also pictured? I'm not sure how much closer that would get the front trans mount. Also, I believe there's a couple different combinations of side trans mount bolt patterns, make sure you're using the right ones. There should be three bolts in the drivers side mount, and I think you could manage to get only two of them if you're lined up wrong. Then again, maybe you can get three in wrong holes, I'm not sure.
46152


edit: found this in one of the build videos, not sure if helps to make sure you got the drivers side trans mount together correctly
46154


edit edit: forgot to address the fuel situation too, yes, the fuel pump and injectors without the tune are the reason the computer can't pull enough fuel out to idle. To be honest I'm not sure you can idle smoothly below 1000rpms with those injectors at the stock 58psi fuel pressure, no matter the tune. My base fuel pressure is at 42psi on an adjustable external boost reference fuel pressure regulator and 80# injectors. On top of that, the switch to a 340lph pump put my base fuel pressure about 10% higher; not sure if yours will do the same on a stock regulator setup, but higher fuel pressures won't help. If you're running E85, that would help, but transitions from outside my experience and into my speculation. I'll stay tuned to hear about ZZP's input (I might double check my injector data against anything they provide, too, if you're willing to share). And I'll be happy to provide any other input from my experience that you're willing/interested to take.
 
Last edited:

Robinjo

Goblin Guru
Blue is the F35 front trans mount, green is the rear mount which is common to both the F23 and F35. If I recall correctly, the K21E baggie is for the F35 side trans mount which you won't need. I don't think the F23 side trans mount requires spacers, but I could be wrong there. I don't remember and can't guess what the N23C baggie would have been for with two M1x1.5x80+nuts and five M12x1.75x35. I used donor hardware for the side trans and engine mounts.
View attachment 46153
Green is the front mount, closest to the fuel tank.
Blue is the rear mount, around the muffler area.
 

Rauq

Goblin Guru
Green is the front mount, closest to the fuel tank.
Blue is the rear mount, around the muffler area.
lol good catch, my first image upload failed so I had to go and re-paint my sketch... and inevitably swapped colors. I edited my post now.
 
Top