Nate
Member
Good Afternoon,
My name is Nathan Riexinger and I am a Biology Major (Pre-Dental Track) at Canisius College just finishing up my Junior year. With the very competitive nature of college and selective process for acceptance into dental school I needed a creative outlet. Shooting trap works until it gets cold out.... building cars works plus I have access to a heated garage.
So here is what I have going on. My dad (Bruce) and I have been talking with Adam for a while trying to do a complete "Goblin" build at one of the car shows. That is why I have not posted anything to this point, but after my latest conversation with Adam it doesn't look like our schedules are going to work for actually doing the build at a show. Disappointed but that being said this is the progress and what I have been working on.
The donor is a original 2008 Cobalt with a broken timing chain which was picked up for $500.00.
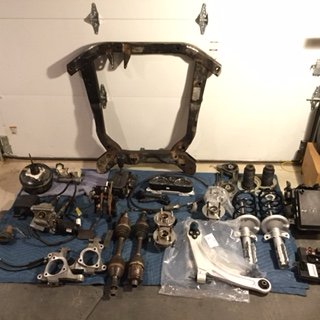
All the donor parts stripped down waiting to be cleaned. (Note... also trimmed the radiator ears off the cradle before having them powder coated)
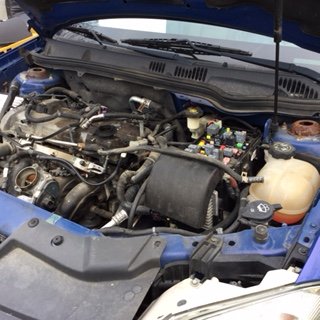
I also came across a 2009 Cobalt engine VVT 2.2 Ecotec with only 7000 miles. For only $700.00. But here is the really good part; I was able to get the transmission, an extra cradle and the engine wiring harness for that price. In addition, seeing my donor was not wrecked he took all my spare parts and let me remove the dash and body wiring harness out of a wrecked 2009 Cobalt.
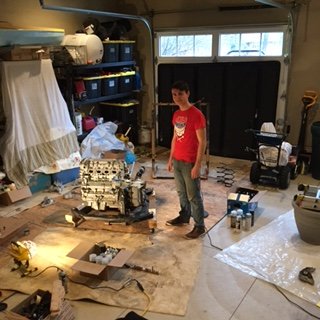
Here I am during spring break with the extra cradle used as a engine dolly. Needless to say I had to go all out if I was going to do this build at a show. So power washed repeatedly cleaned painted and then clear coated with hi temp paint.
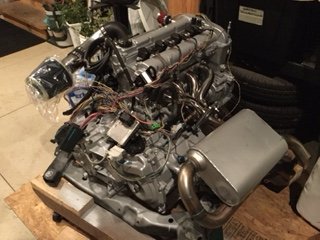
Here is the finished product. Just finishing up the rest of the other wiring harnesses before I start wrapping them up. I think that I should be able to test run the engine right on the cradle that way I can test the harnesses and the engine before even putting it into the frame (that was one of the things I was trying to do for the show getting everything running and tested. Nothing worst then chasing a problem under the gun.)
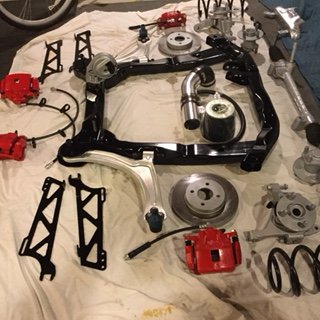
The last photo is of most of the donor parts cleaned and painted (powder coated). Everything has been wrapped up, logged and put into bins just in case the opportunity for a show build still arises. If it doesn't I'll be ready either way whether I build it here or there I'll have a Goblin to take some of the edge off school.
My name is Nathan Riexinger and I am a Biology Major (Pre-Dental Track) at Canisius College just finishing up my Junior year. With the very competitive nature of college and selective process for acceptance into dental school I needed a creative outlet. Shooting trap works until it gets cold out.... building cars works plus I have access to a heated garage.
So here is what I have going on. My dad (Bruce) and I have been talking with Adam for a while trying to do a complete "Goblin" build at one of the car shows. That is why I have not posted anything to this point, but after my latest conversation with Adam it doesn't look like our schedules are going to work for actually doing the build at a show. Disappointed but that being said this is the progress and what I have been working on.
The donor is a original 2008 Cobalt with a broken timing chain which was picked up for $500.00.
All the donor parts stripped down waiting to be cleaned. (Note... also trimmed the radiator ears off the cradle before having them powder coated)
I also came across a 2009 Cobalt engine VVT 2.2 Ecotec with only 7000 miles. For only $700.00. But here is the really good part; I was able to get the transmission, an extra cradle and the engine wiring harness for that price. In addition, seeing my donor was not wrecked he took all my spare parts and let me remove the dash and body wiring harness out of a wrecked 2009 Cobalt.
Here I am during spring break with the extra cradle used as a engine dolly. Needless to say I had to go all out if I was going to do this build at a show. So power washed repeatedly cleaned painted and then clear coated with hi temp paint.
Here is the finished product. Just finishing up the rest of the other wiring harnesses before I start wrapping them up. I think that I should be able to test run the engine right on the cradle that way I can test the harnesses and the engine before even putting it into the frame (that was one of the things I was trying to do for the show getting everything running and tested. Nothing worst then chasing a problem under the gun.)
The last photo is of most of the donor parts cleaned and painted (powder coated). Everything has been wrapped up, logged and put into bins just in case the opportunity for a show build still arises. If it doesn't I'll be ready either way whether I build it here or there I'll have a Goblin to take some of the edge off school.
 . I figured I would post them here that way I can search for answers in the videos and have the forum's wisdom going simultaneously.