Ark :D
Goblin Guru
Hello all,
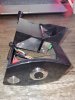
I recently designed and installed a fingerprint starter setup for my Goblin.
Thread index:
*edit* Tweaking this post to remove the "key did not need to be present" part ... after some real testing, it doesn't work consistently and that's no-bueno.
Parts List:
If you're interested in the 3D-printed bracket, I will ask permission of the forum member that initially designed it and shared it with me, before I am willing to share with anyone else. I doubt it'll be a problem, but I must show respect to the designer.
The fingerprint board and sensor and the Fortin stuff can all be found for much less than their MSRP's.
I recently designed and installed a fingerprint starter setup for my Goblin.
Thread index:
- Parts List - post #1
- Fingerprint sensor assembly detail - post #2
- Removing the TDM from the ignition module - post #3
- Final pics/video - post #4
*edit* Tweaking this post to remove the "key did not need to be present" part ... after some real testing, it doesn't work consistently and that's no-bueno.
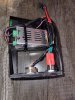
Parts List:
- 3D-printed push-button ignition bracket (this was not designed by me, but was shared with me by another forum member)
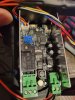
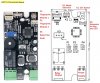
- GROW K215-V1.3+R503 Fingerprint Control Board + Sensor ... $35 on eBay
- Latching 16mm illuminated power button ... $10 on Amazon
- Some random 2-pin wire harnesses ... $10 on Amazon
- An adhesive-backed rocker switch ... $8 on Amazon
- {removed}
- {removed}
- Custom ignition switch adapter ... $50, but no longer available
- Various stuff I already had ... soldering iron/solder, wire taps, heatshrink tubing, heat gun
If you're interested in the 3D-printed bracket, I will ask permission of the forum member that initially designed it and shared it with me, before I am willing to share with anyone else. I doubt it'll be a problem, but I must show respect to the designer.
The fingerprint board and sensor and the Fortin stuff can all be found for much less than their MSRP's.
Last edited:
") I have next year's picked out already, too.
I have next year's picked out already, too.