
-
We've upgraded and reskinned the forum. Notice something off? Email us at [email protected] and we'll fix it.
You are using an out of date browser. It may not display this or other websites correctly.
You should upgrade or use an alternative browser.
You should upgrade or use an alternative browser.
V1 ccgillett's Track Goblin - '08 SS/TC


Desert Sasqwatch
Bigfoot Goblin

- Desert Sasqwatch Bigfoot Goblin
That is the fresh air vent port that goes into the engine and is attached to the valvecover vent - this one.
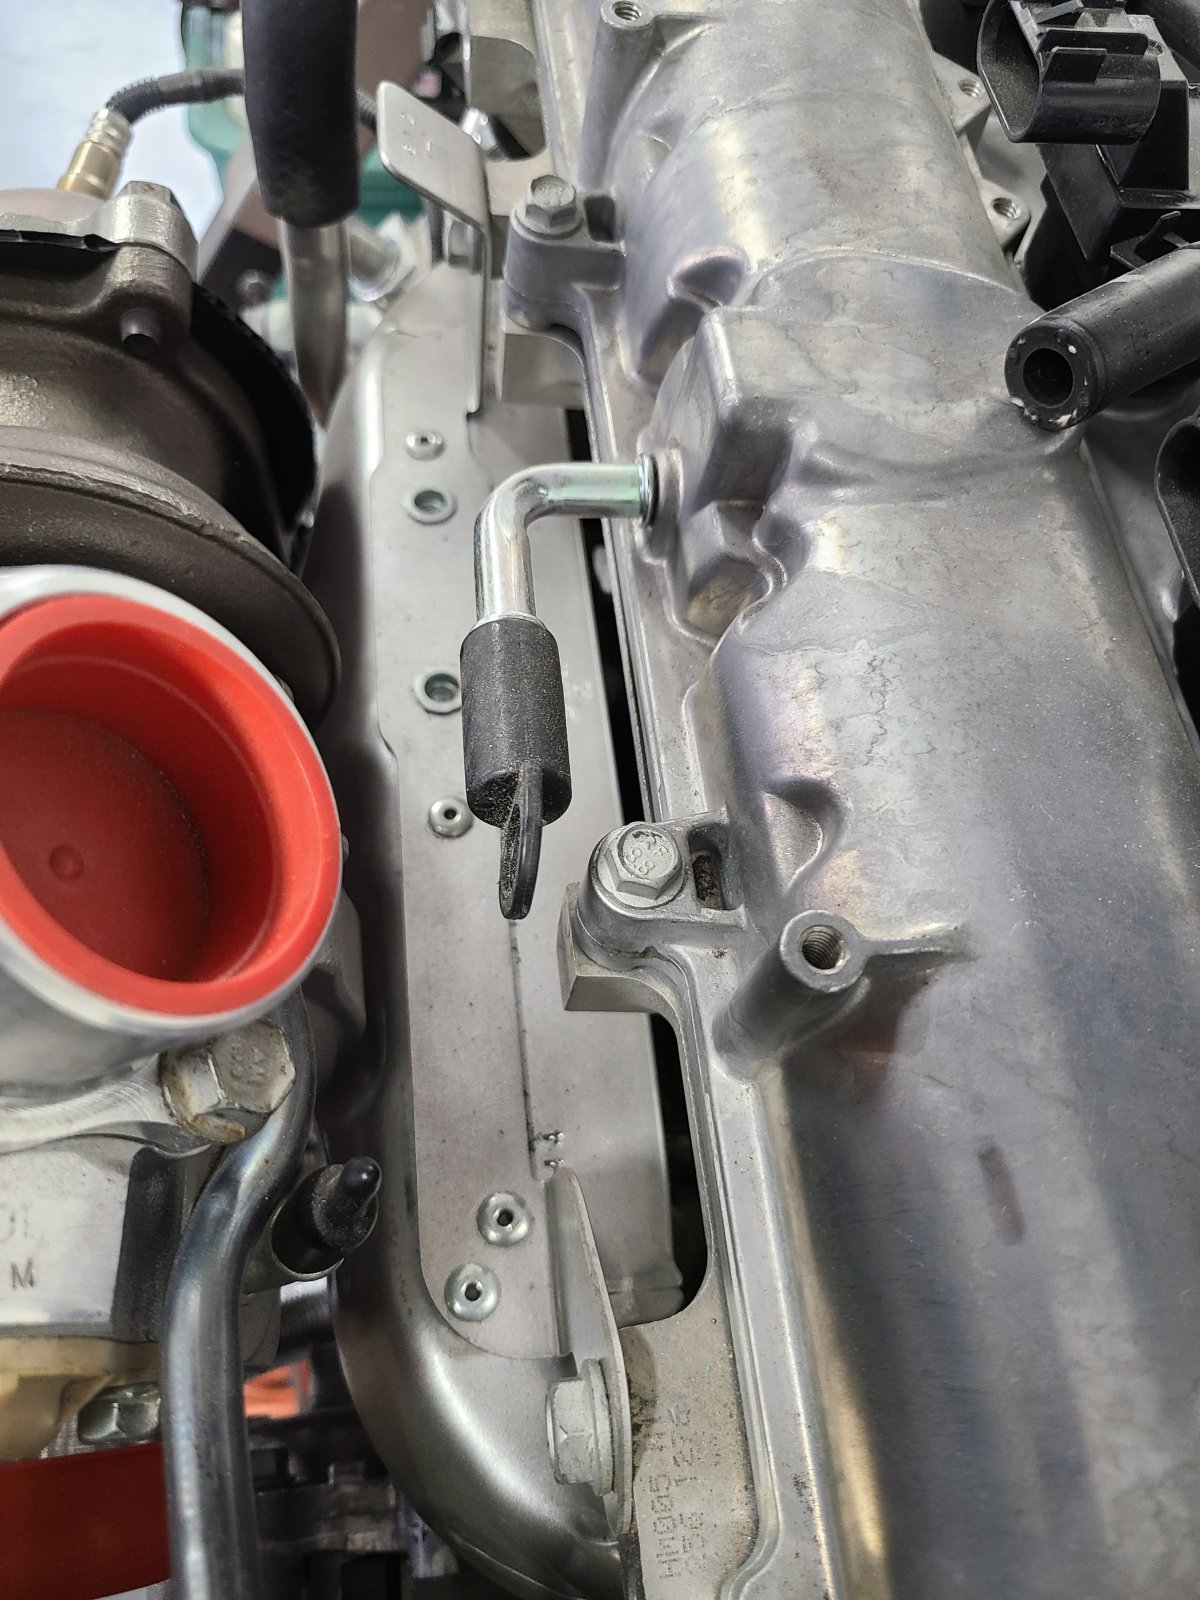
There needs to be the donor (or other sourced) check valve that only allows air to flow from the intake tube into the engine. Without it you will get oil mist into the intake tube under certain engine conditions.
There needs to be the donor (or other sourced) check valve that only allows air to flow from the intake tube into the engine. Without it you will get oil mist into the intake tube under certain engine conditions.


ccgillett
Well-Known Member

- ccgillett Well-Known Member
I will entitle this post: "I'm Dumb and I'm Grateful" 
I bought this car in 2021 so it's been with me almost 3 years. During those 3 years I've worked on it sporadically while family commitments and work largely overtook my entire life (I'm a CompSci guy and lead DevOps for a Fortune 300 insurance company headquartered in the Midwest). Being too busy has sucked, but a recent role change at work has given me some extra time back. That, and my daughter leaving for college in August and wanting to drive the Goblin on track before she goes has raised my sense of urgency on getting this done.
DUMB
All that is precursor for saying that I've solved and re-solved the same problem(s) a couple times over the past 36 months. After posting about the missing MAF tube, I started to think "I've solved this before". I recalled an email conversation with Adam about some 3rd party intercooler parts I was going to buy to make sure they were compatible.
In my garage I have one of those 6 foot tall wire rack shelves from Costco, on which lives all the Goblin parts not yet on the car. Last night I set up a table in the garage bay next to "your stupid racecar bay" and laid out all the parts related to the intercooler: the intercooler itself, the heat exchanger and fan, shroud for the NACA ducts in the nose, Bosch pump that attaches to the engine block, etc. Then I saw The Box from DF on the bottom shelf and I said "Hmmm I think that's the solution to my MAF/MAP issues". Sure enough, back in October 2021 I ordered ALL the bits from DF needed to fully plumb the intake system and intercooler, short of the some piping to get outside air through the filter and to the engine.....
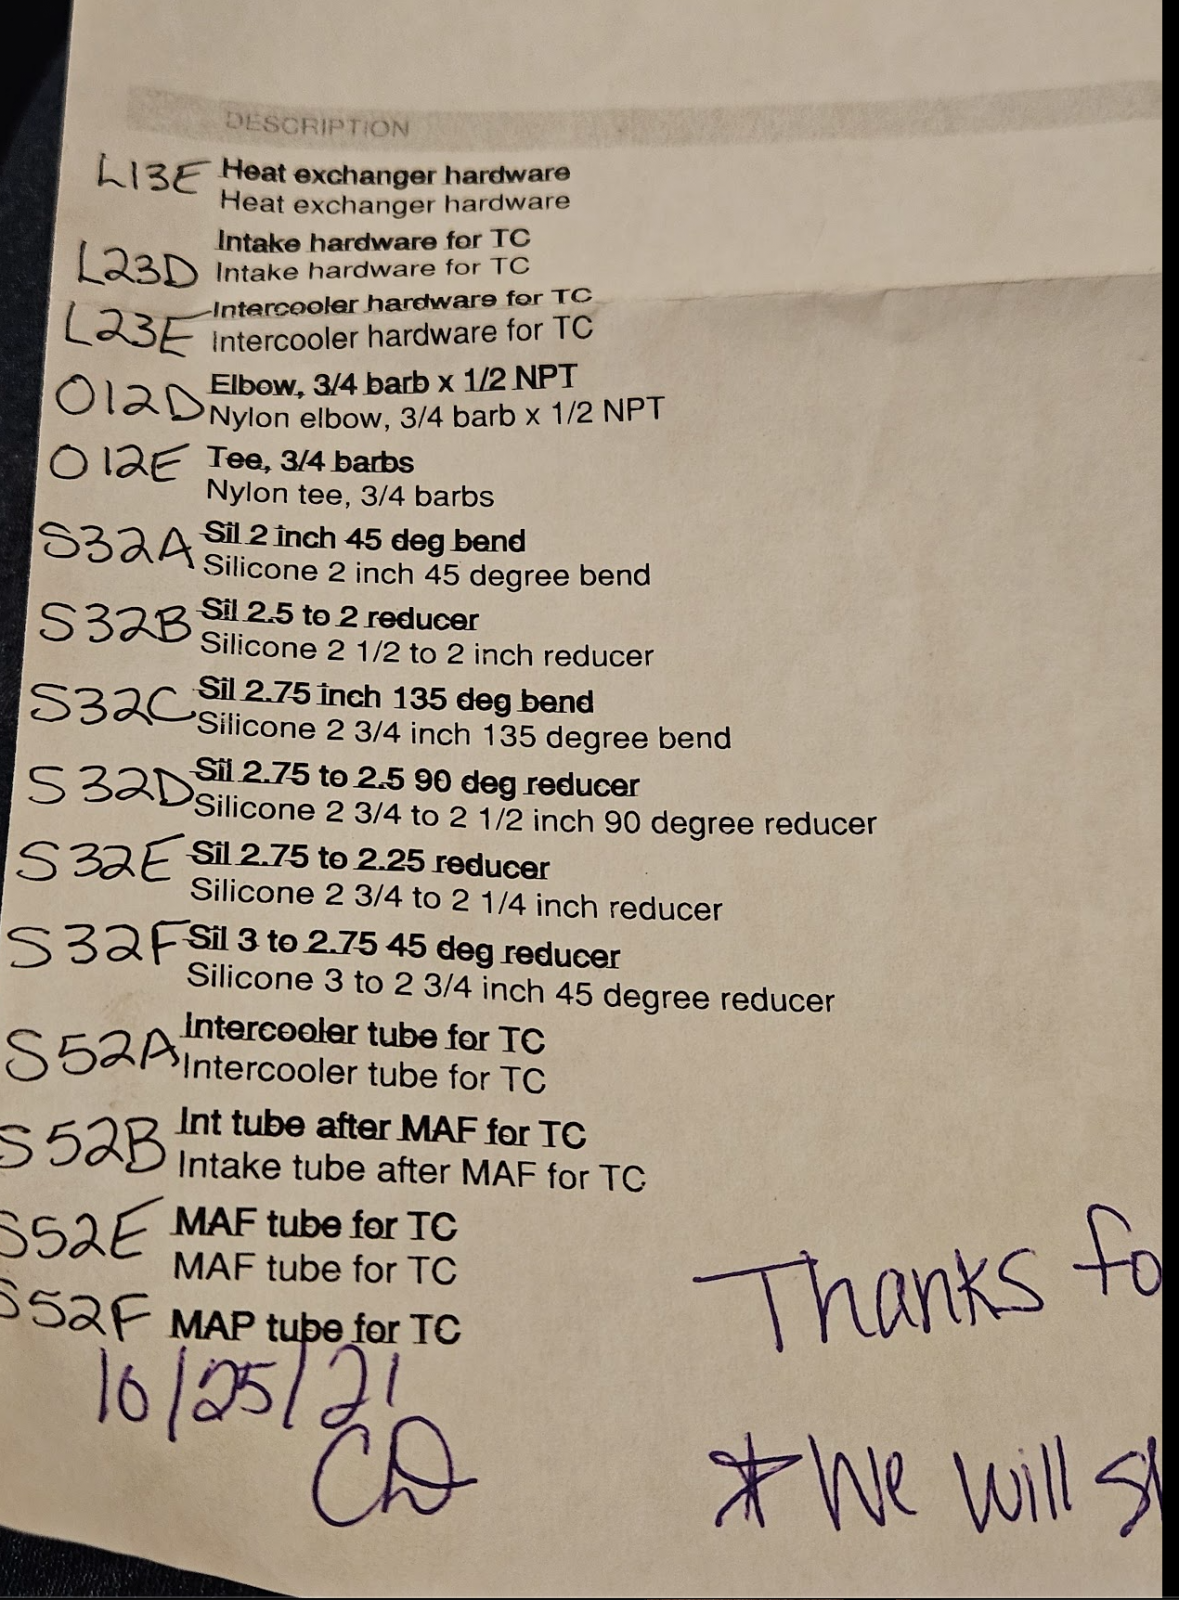
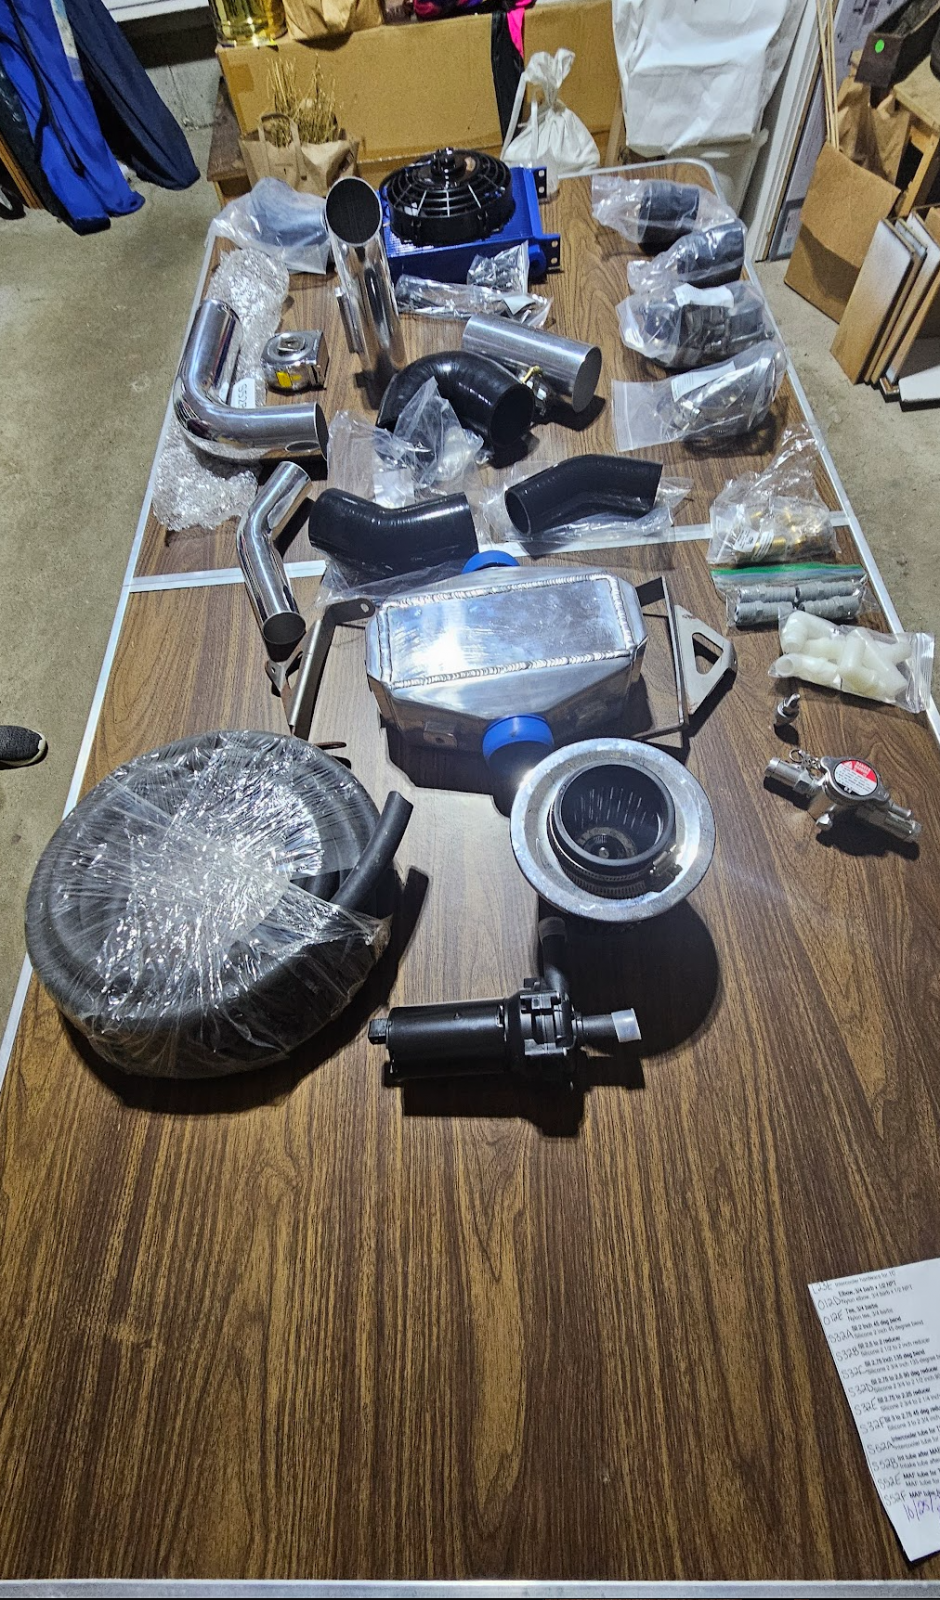
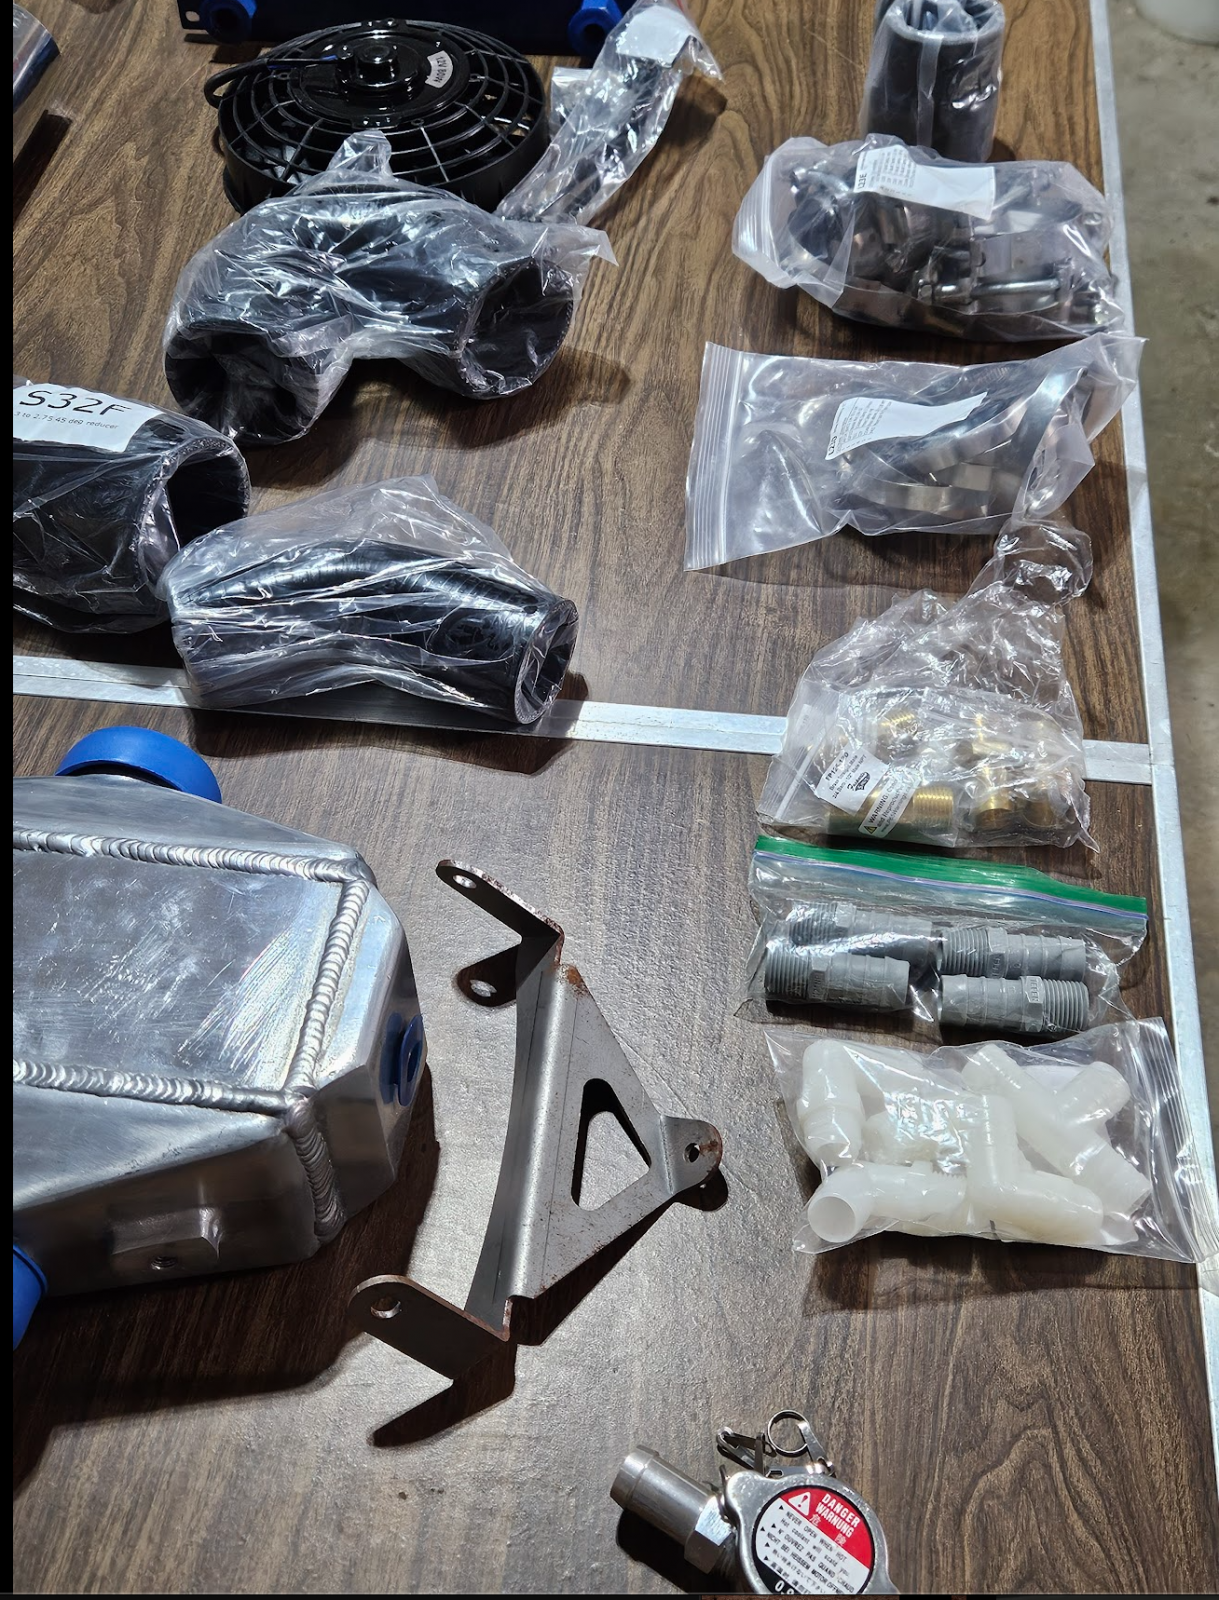
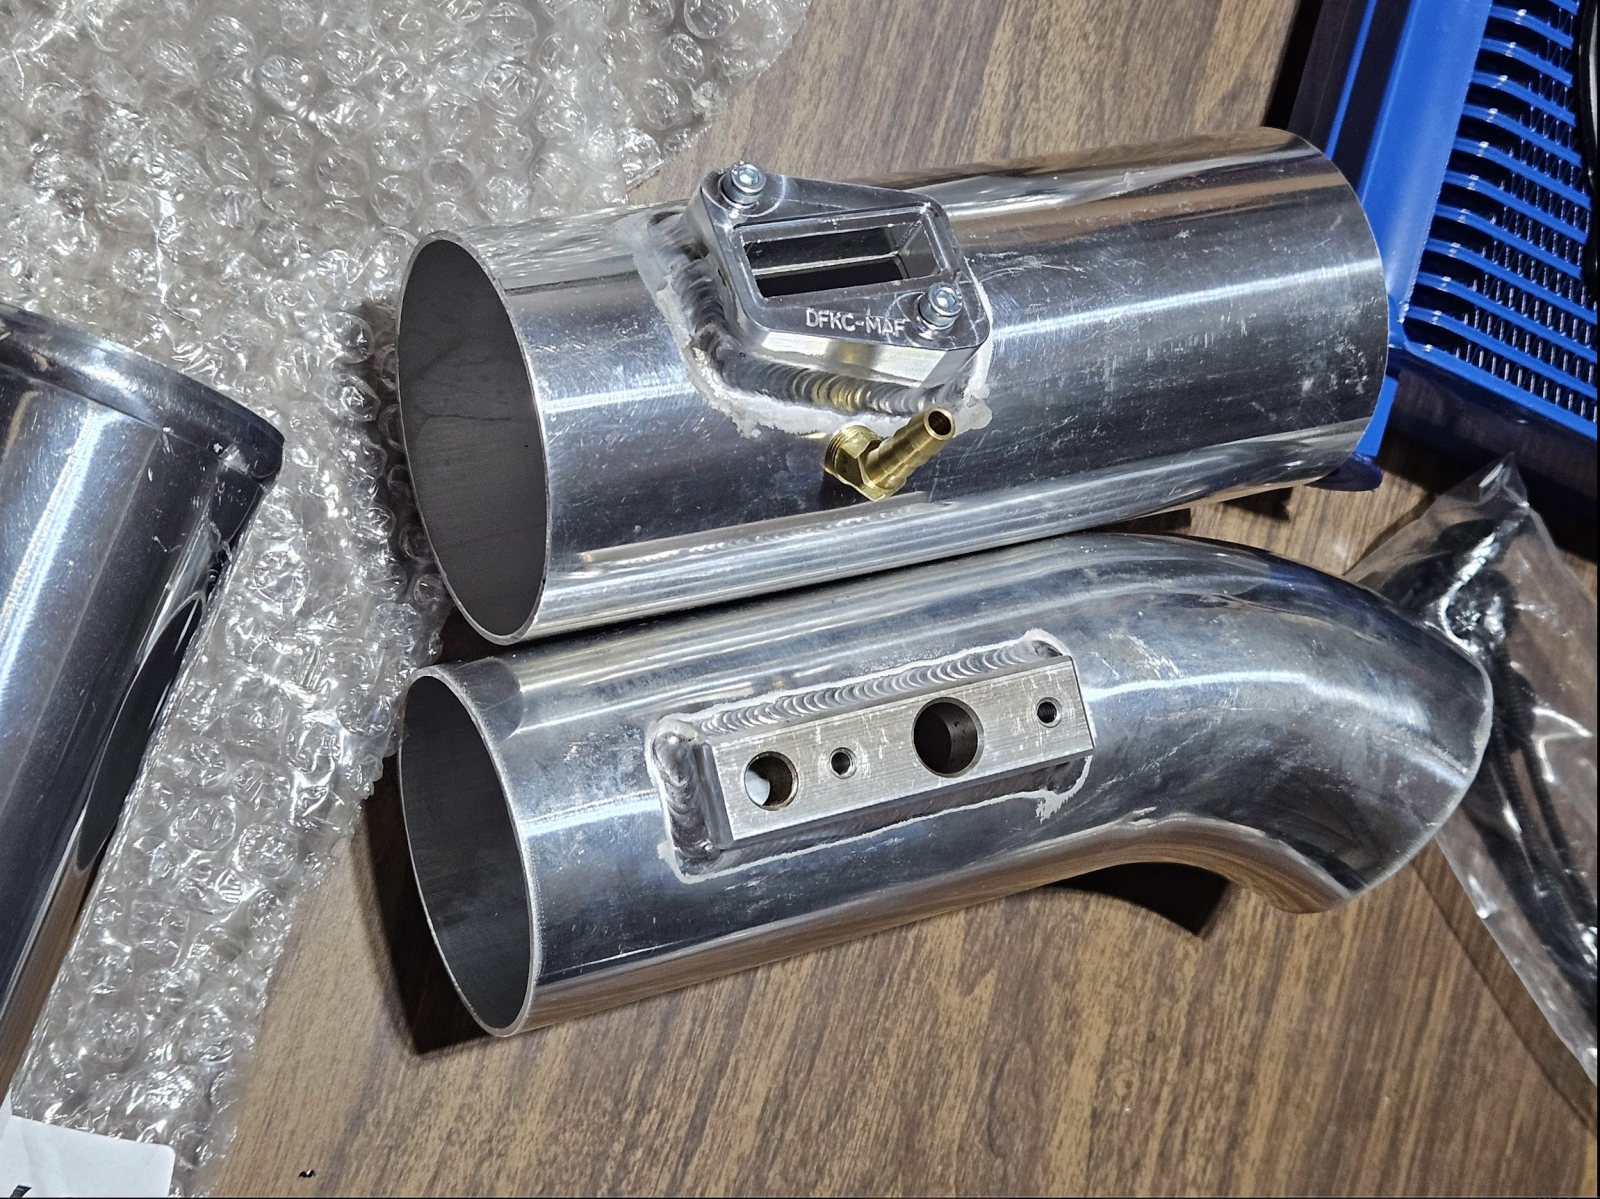
So: I'M AN IDIOT for forgetting all this! The lesson for n00b builders like myself, be they building relatively simple Goblins, or more complex cars like Factory Fives: Create an inventory of everything. Use spreadsheets or similar and identify all your parts by area of functionality, part number, reference to documentation (YouTube videos from DF in this case), etc. Number the boxes and connect those numbers to the parts in your spreadsheet. Photograph everything when you receive it, and keep the photos in a separate album.
So I have a massive list of parts that I've bought elsewhere and sourced from DF to complete the engine and turbo plumbing. I just need to figure out where all the pieces/parts go. Fortunately, Adam has a photo album dedicated to turbo plumbing, and I think most of the information I need is there, plus the photos you all have shared so far.
GRATEFUL
When the news broke a few weeks back about "Goblin v2" based on German running gear, I had a mini freak-out about support for Gen-1 hardware, and I mentioned in that thread about needing to purchase bodywork. Somebody here on the Forum (and they can identify themselves if they want) reached out to me privately and offered me a very good deal on a set of bodywork they were not going to use. I jumped on that deal, arranged shipping via uShip, and the hood and engine cover arrived here in Massachusetts on Friday. I laid the hood on the front of the car last night after my parts inventorying session, and wow everything sure looks different now:
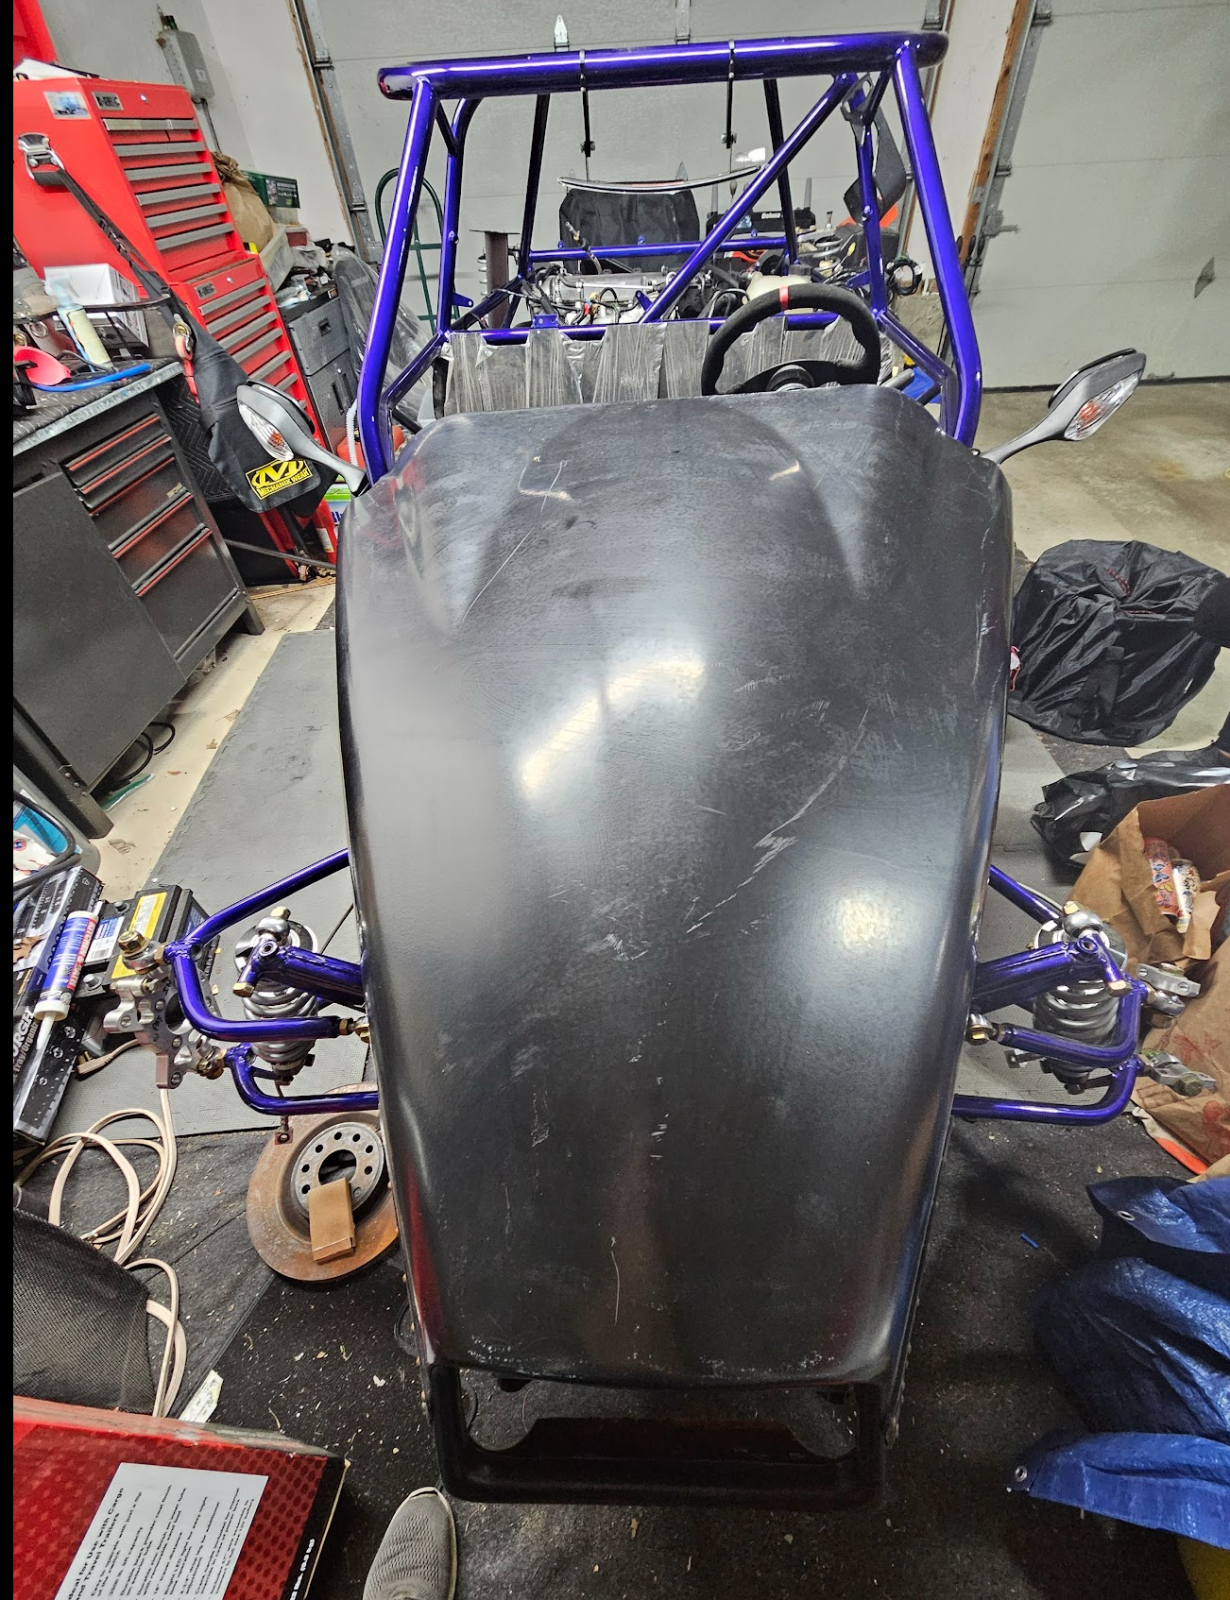
I am really grateful to the seller for making me a great deal on this bodywork, and for being super encouraging and supportive as I push through this build. And I'm very grateful to the entire DF Goblin community here and on Facebook for answering all my questions, and generally telling me to keep going.
Folks here who have built these cars in 2-3 weeks and have crazy skills probably don't what I'm talking about, but this has been a real challenge for me because I am learning everything (and I mean EVERYTHING) in real time. It's been a great experience so far - now I need to get 'er done.
I'm gonna go wrench. Thanks guys.....
I bought this car in 2021 so it's been with me almost 3 years. During those 3 years I've worked on it sporadically while family commitments and work largely overtook my entire life (I'm a CompSci guy and lead DevOps for a Fortune 300 insurance company headquartered in the Midwest). Being too busy has sucked, but a recent role change at work has given me some extra time back. That, and my daughter leaving for college in August and wanting to drive the Goblin on track before she goes has raised my sense of urgency on getting this done.
DUMB
All that is precursor for saying that I've solved and re-solved the same problem(s) a couple times over the past 36 months. After posting about the missing MAF tube, I started to think "I've solved this before". I recalled an email conversation with Adam about some 3rd party intercooler parts I was going to buy to make sure they were compatible.
In my garage I have one of those 6 foot tall wire rack shelves from Costco, on which lives all the Goblin parts not yet on the car. Last night I set up a table in the garage bay next to "your stupid racecar bay" and laid out all the parts related to the intercooler: the intercooler itself, the heat exchanger and fan, shroud for the NACA ducts in the nose, Bosch pump that attaches to the engine block, etc. Then I saw The Box from DF on the bottom shelf and I said "Hmmm I think that's the solution to my MAF/MAP issues". Sure enough, back in October 2021 I ordered ALL the bits from DF needed to fully plumb the intake system and intercooler, short of the some piping to get outside air through the filter and to the engine.....
So: I'M AN IDIOT for forgetting all this! The lesson for n00b builders like myself, be they building relatively simple Goblins, or more complex cars like Factory Fives: Create an inventory of everything. Use spreadsheets or similar and identify all your parts by area of functionality, part number, reference to documentation (YouTube videos from DF in this case), etc. Number the boxes and connect those numbers to the parts in your spreadsheet. Photograph everything when you receive it, and keep the photos in a separate album.
So I have a massive list of parts that I've bought elsewhere and sourced from DF to complete the engine and turbo plumbing. I just need to figure out where all the pieces/parts go. Fortunately, Adam has a photo album dedicated to turbo plumbing, and I think most of the information I need is there, plus the photos you all have shared so far.
GRATEFUL
When the news broke a few weeks back about "Goblin v2" based on German running gear, I had a mini freak-out about support for Gen-1 hardware, and I mentioned in that thread about needing to purchase bodywork. Somebody here on the Forum (and they can identify themselves if they want) reached out to me privately and offered me a very good deal on a set of bodywork they were not going to use. I jumped on that deal, arranged shipping via uShip, and the hood and engine cover arrived here in Massachusetts on Friday. I laid the hood on the front of the car last night after my parts inventorying session, and wow everything sure looks different now:
I am really grateful to the seller for making me a great deal on this bodywork, and for being super encouraging and supportive as I push through this build. And I'm very grateful to the entire DF Goblin community here and on Facebook for answering all my questions, and generally telling me to keep going.
Folks here who have built these cars in 2-3 weeks and have crazy skills probably don't what I'm talking about, but this has been a real challenge for me because I am learning everything (and I mean EVERYTHING) in real time. It's been a great experience so far - now I need to get 'er done.
I'm gonna go wrench. Thanks guys.....
Desert Sasqwatch
Bigfoot Goblin
- Desert Sasqwatch Bigfoot Goblin
That's great news! Not purchasing parts twice - and then locating the first ones - is always a good thing.
The inventory list and labeling boxes works for some people, my wife is one, but I've got this and I still misplace parts and spend time searching through boxes of parts. You're not alone in this, especially when your Goblin has been more 'kit' than 'car' for longer than you care to admit!
Hang in there, you'll get through this!

The inventory list and labeling boxes works for some people, my wife is one, but I've got this and I still misplace parts and spend time searching through boxes of parts.
You're not alone in this, especially when your Goblin has been more 'kit' than 'car' for longer than you care to admit!Hang in there, you'll get through this!

comegetjoe
Goblin Guru

- comegetjoe Goblin Guru
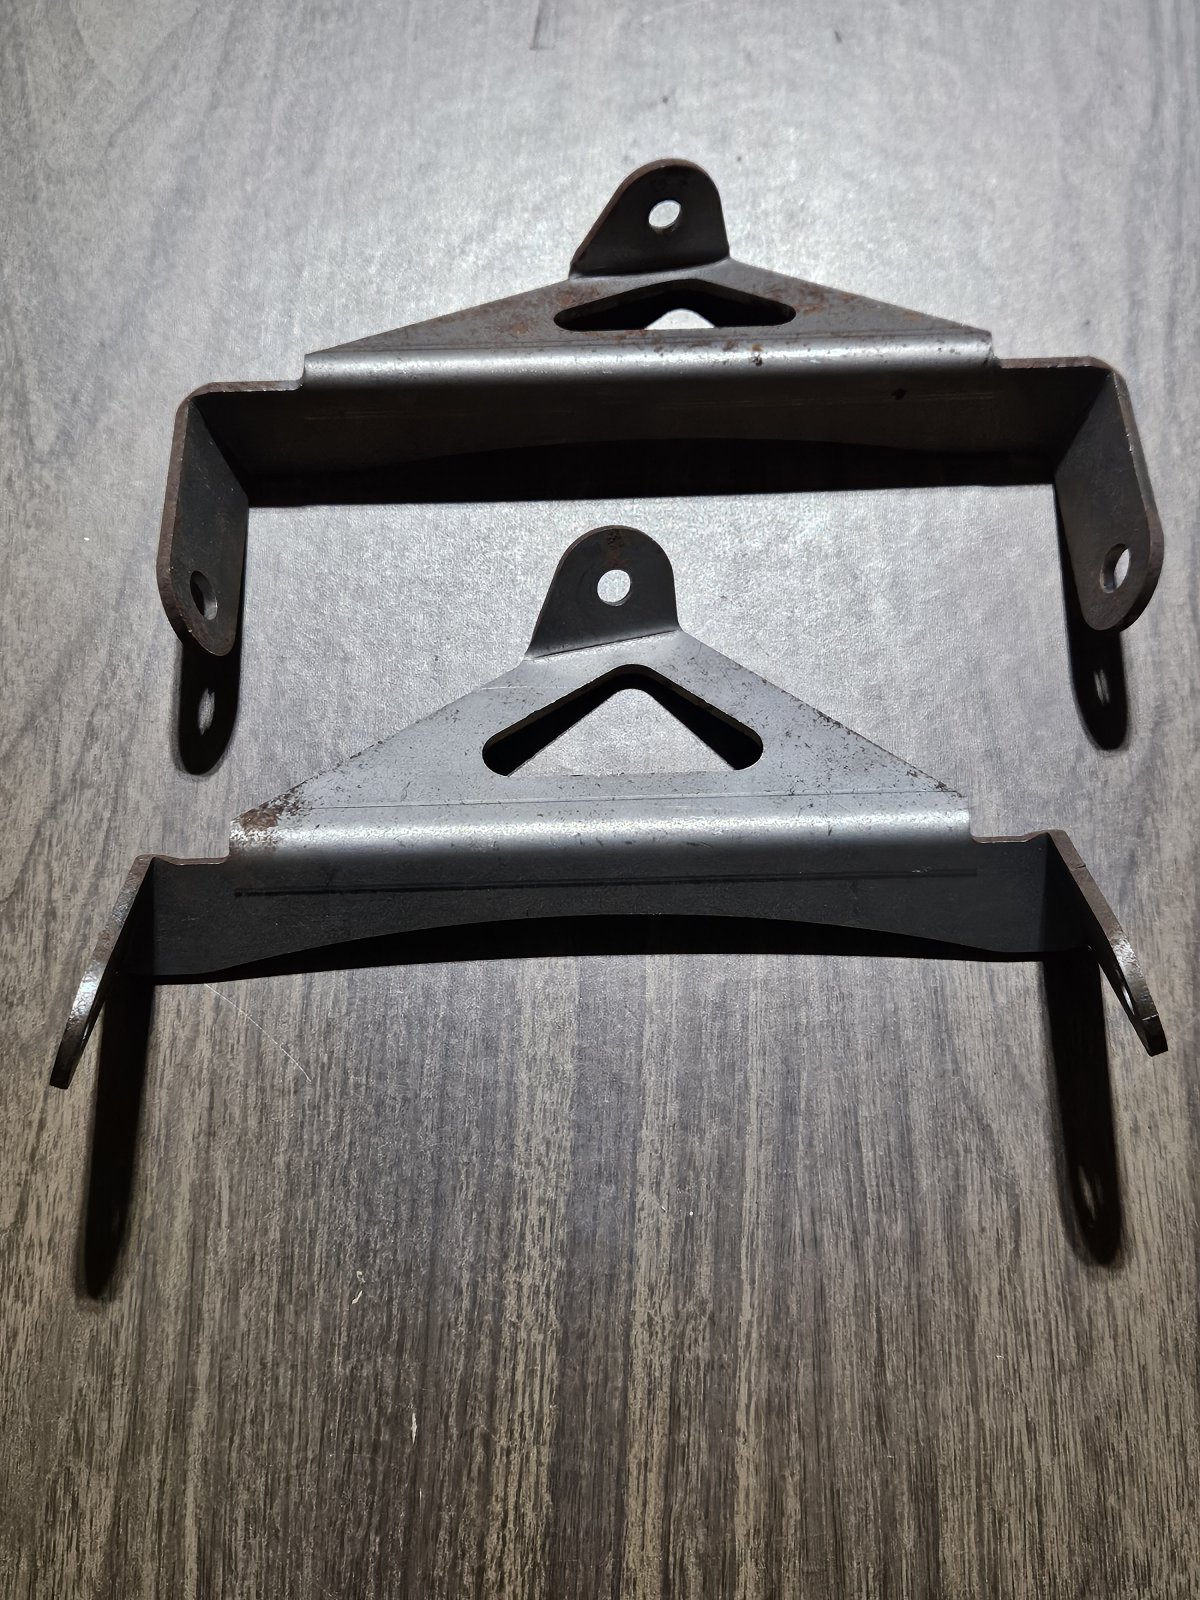
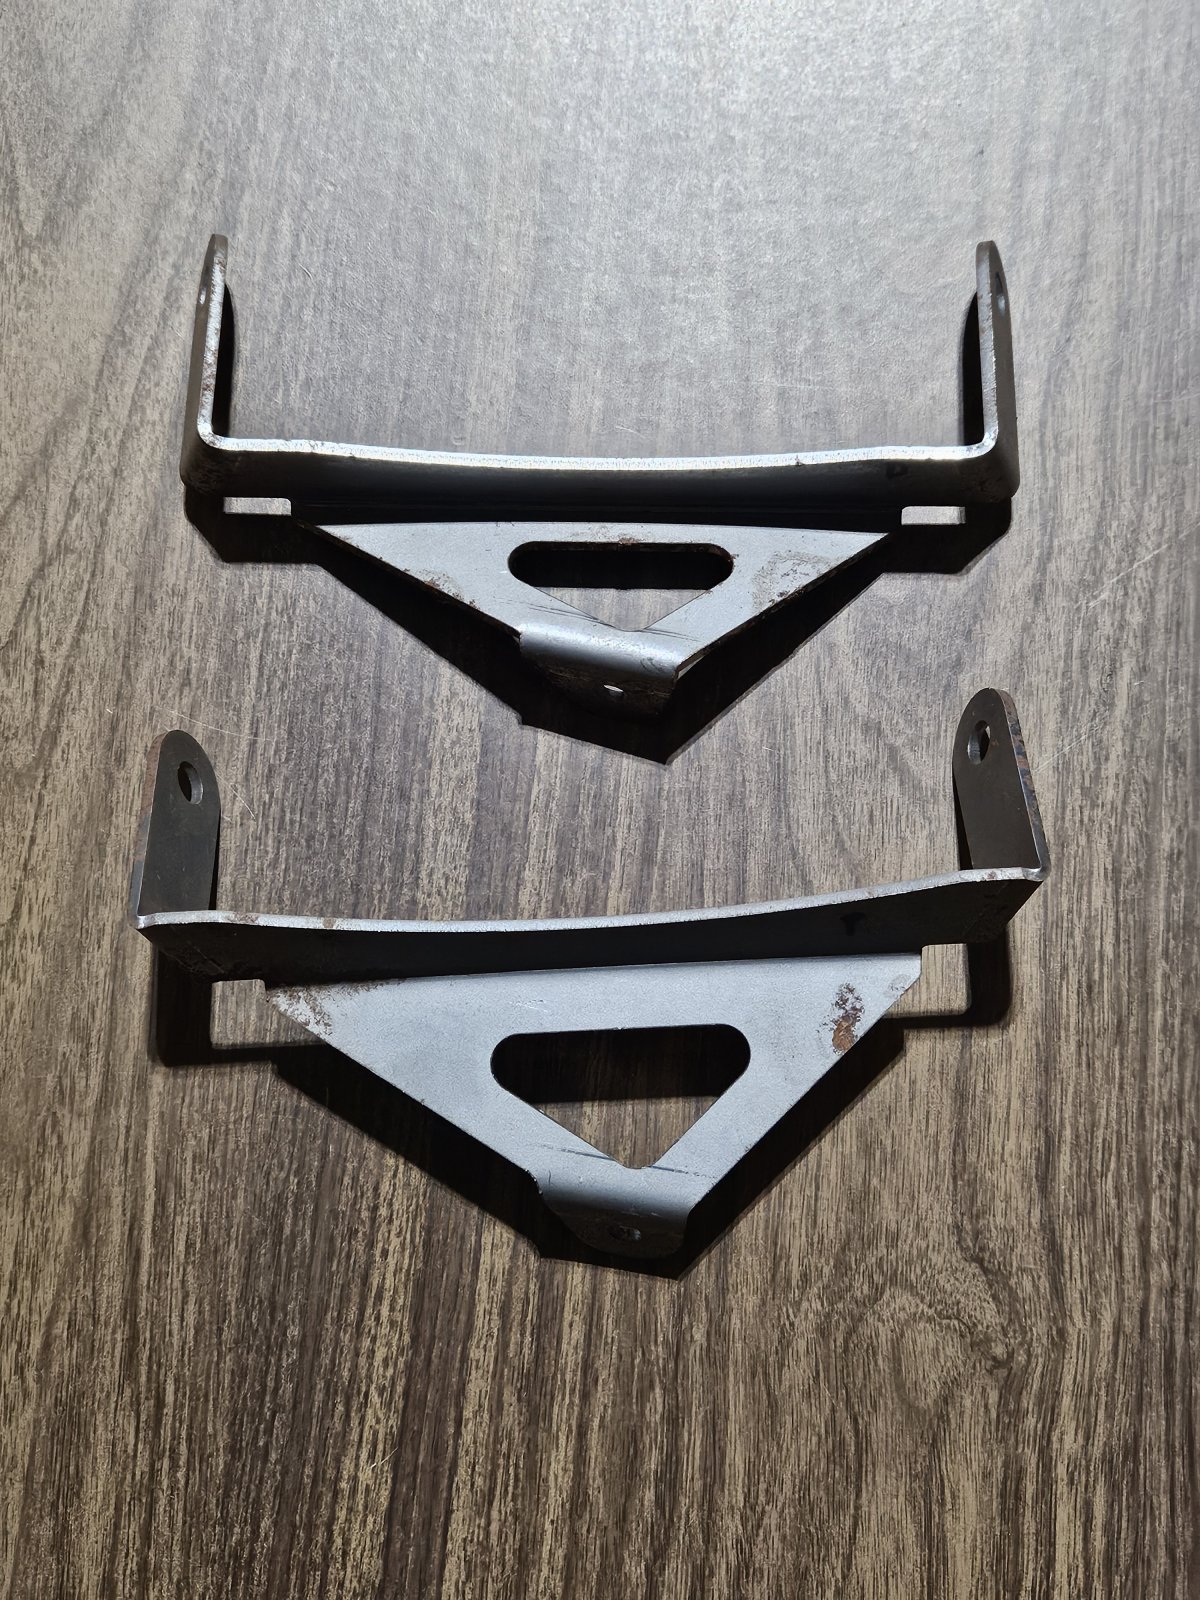
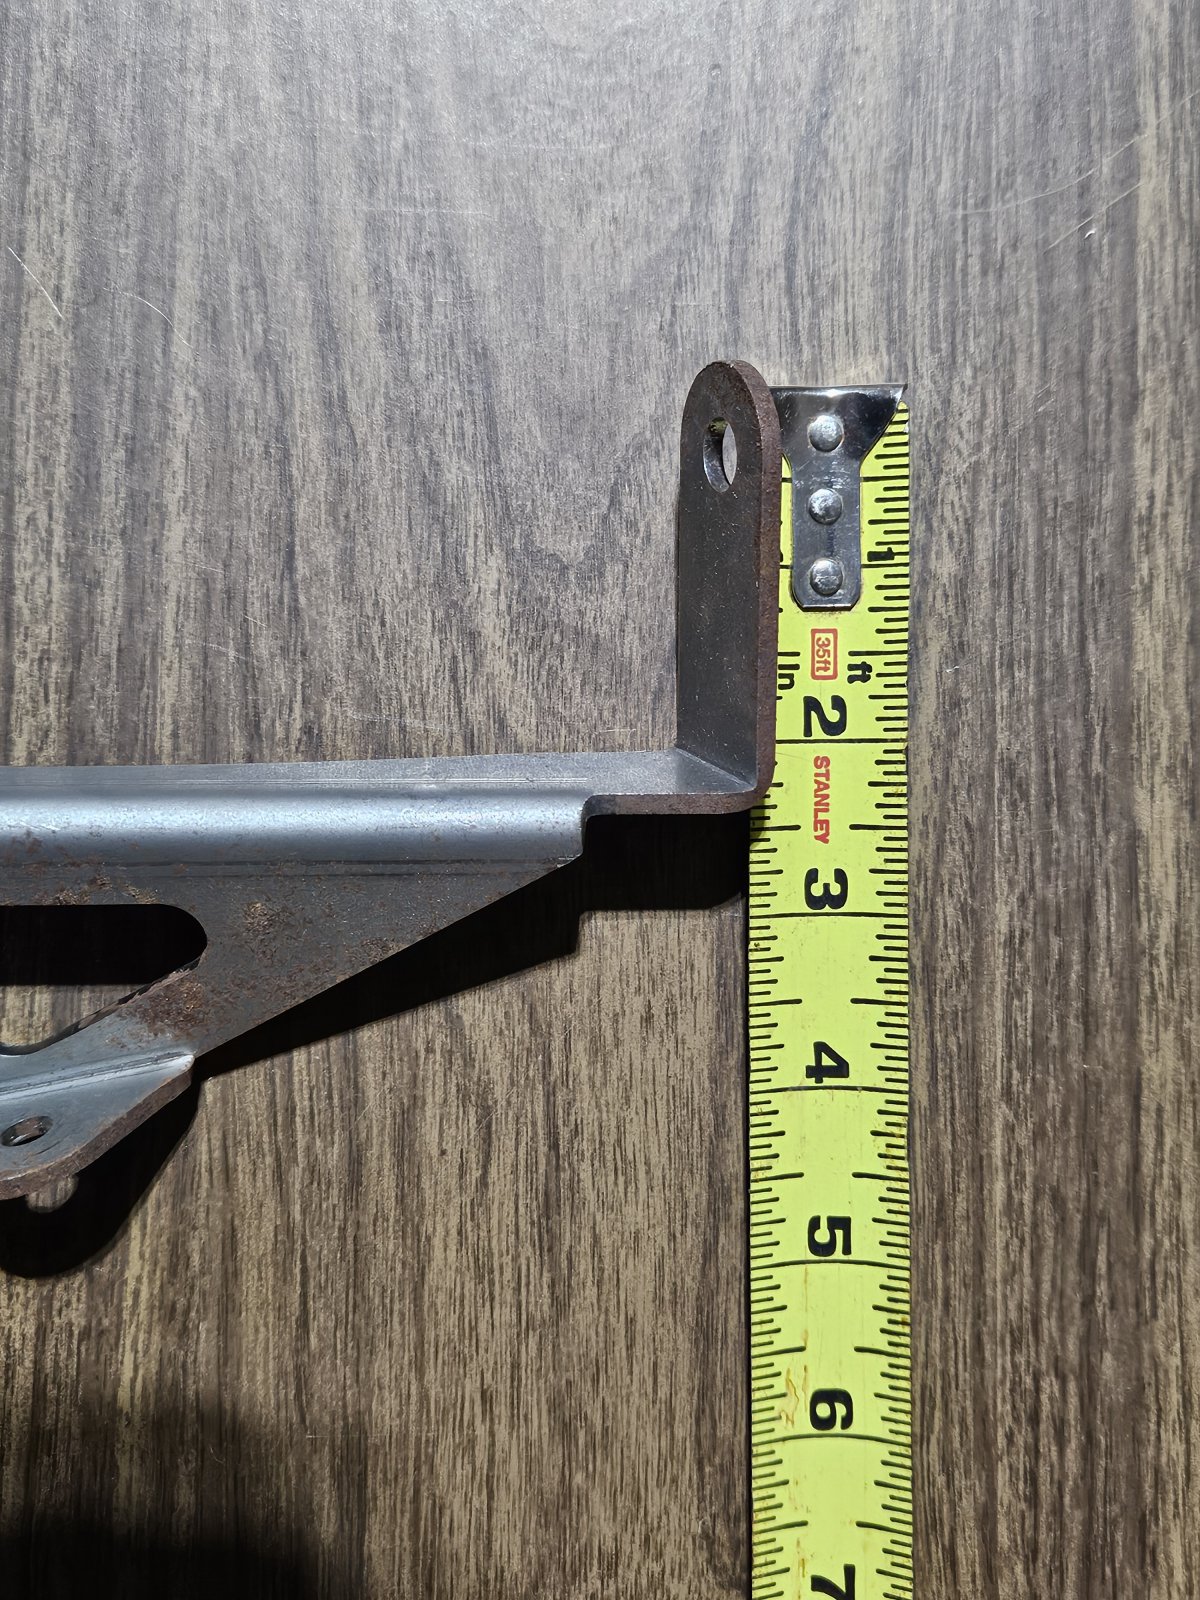
Special request. Could you snap a couple pictures more of that (what i assume) intercooler mounting bracket? I ordered a larger aftermarket intercooler, so my kit did not come with that bracket, but I still need to start somewhere fabbing a backet to hold my intercooler up.
You're not an idiot.
ccgillett
Well-Known Member
- ccgillett Well-Known Member
@comegetjoe Thank you, and here are some photos of the brackets, let me know if you need some more. These are asymmetrical and have a lot of angles and such. I am guessing fabricating these without CAD and and some machines will be difficult, but I hope it works out....


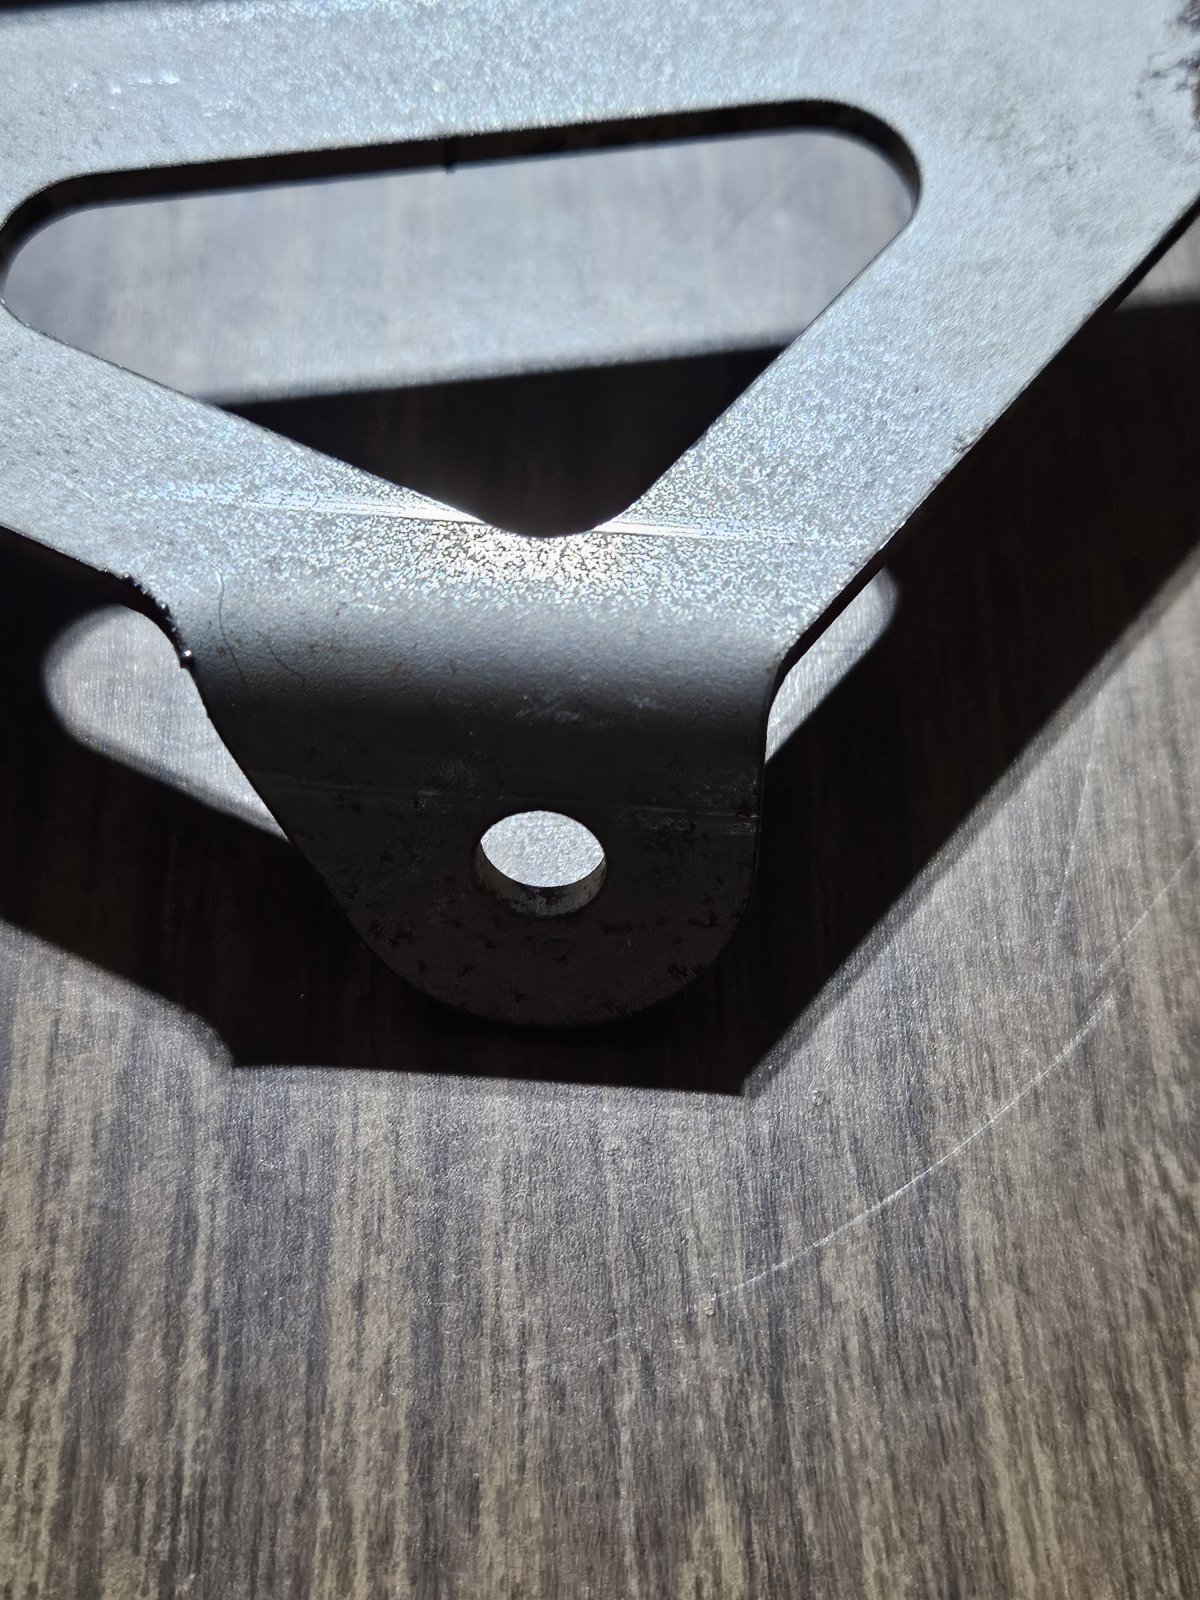

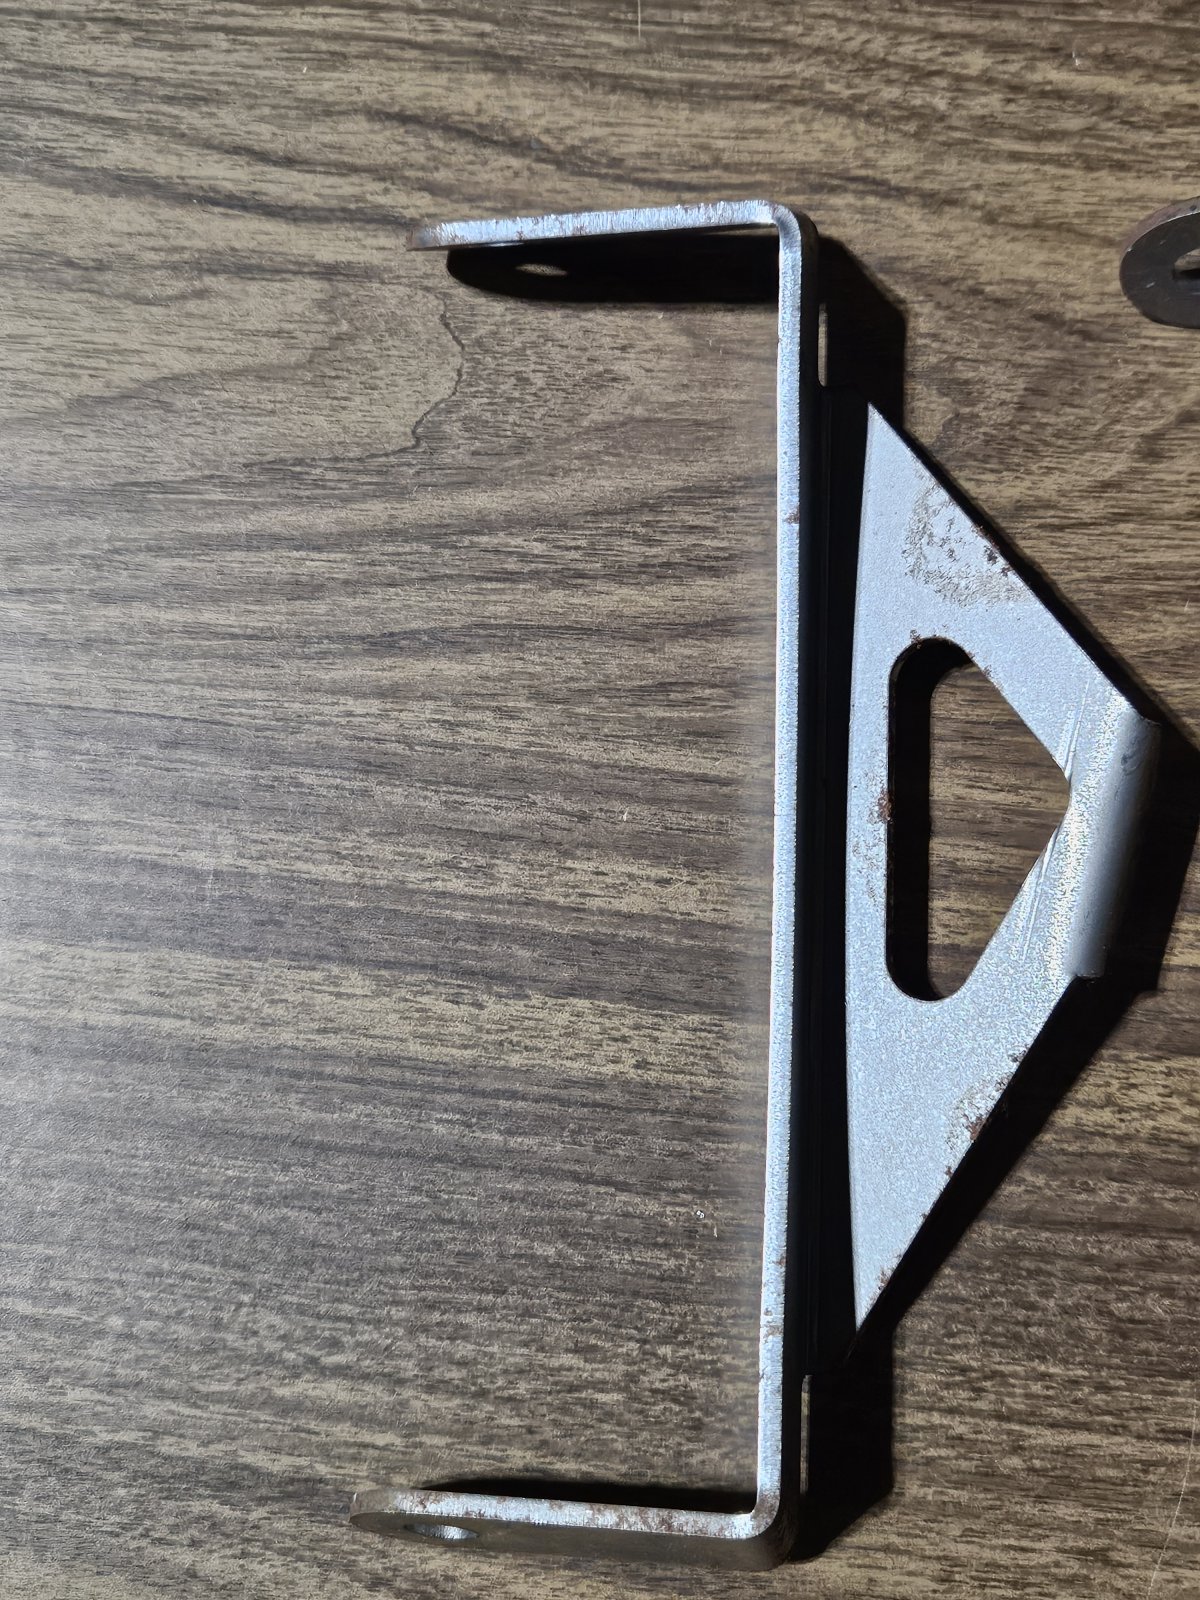
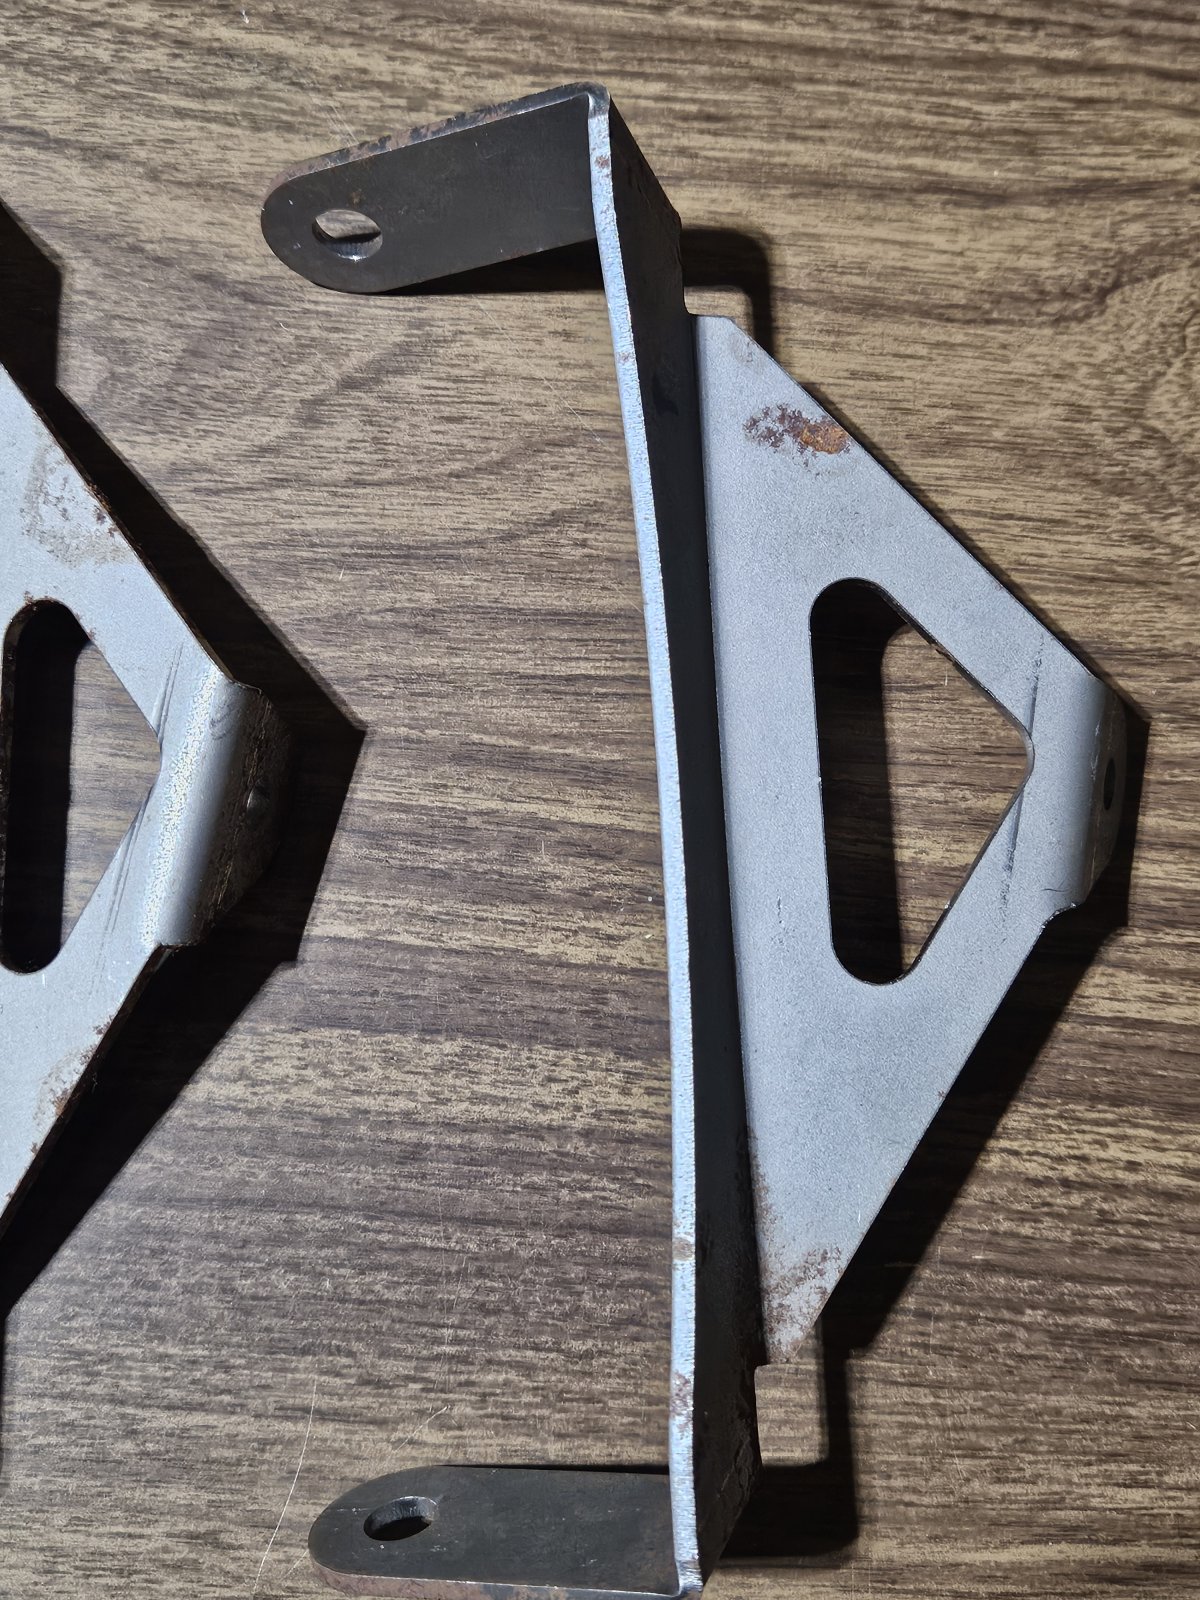
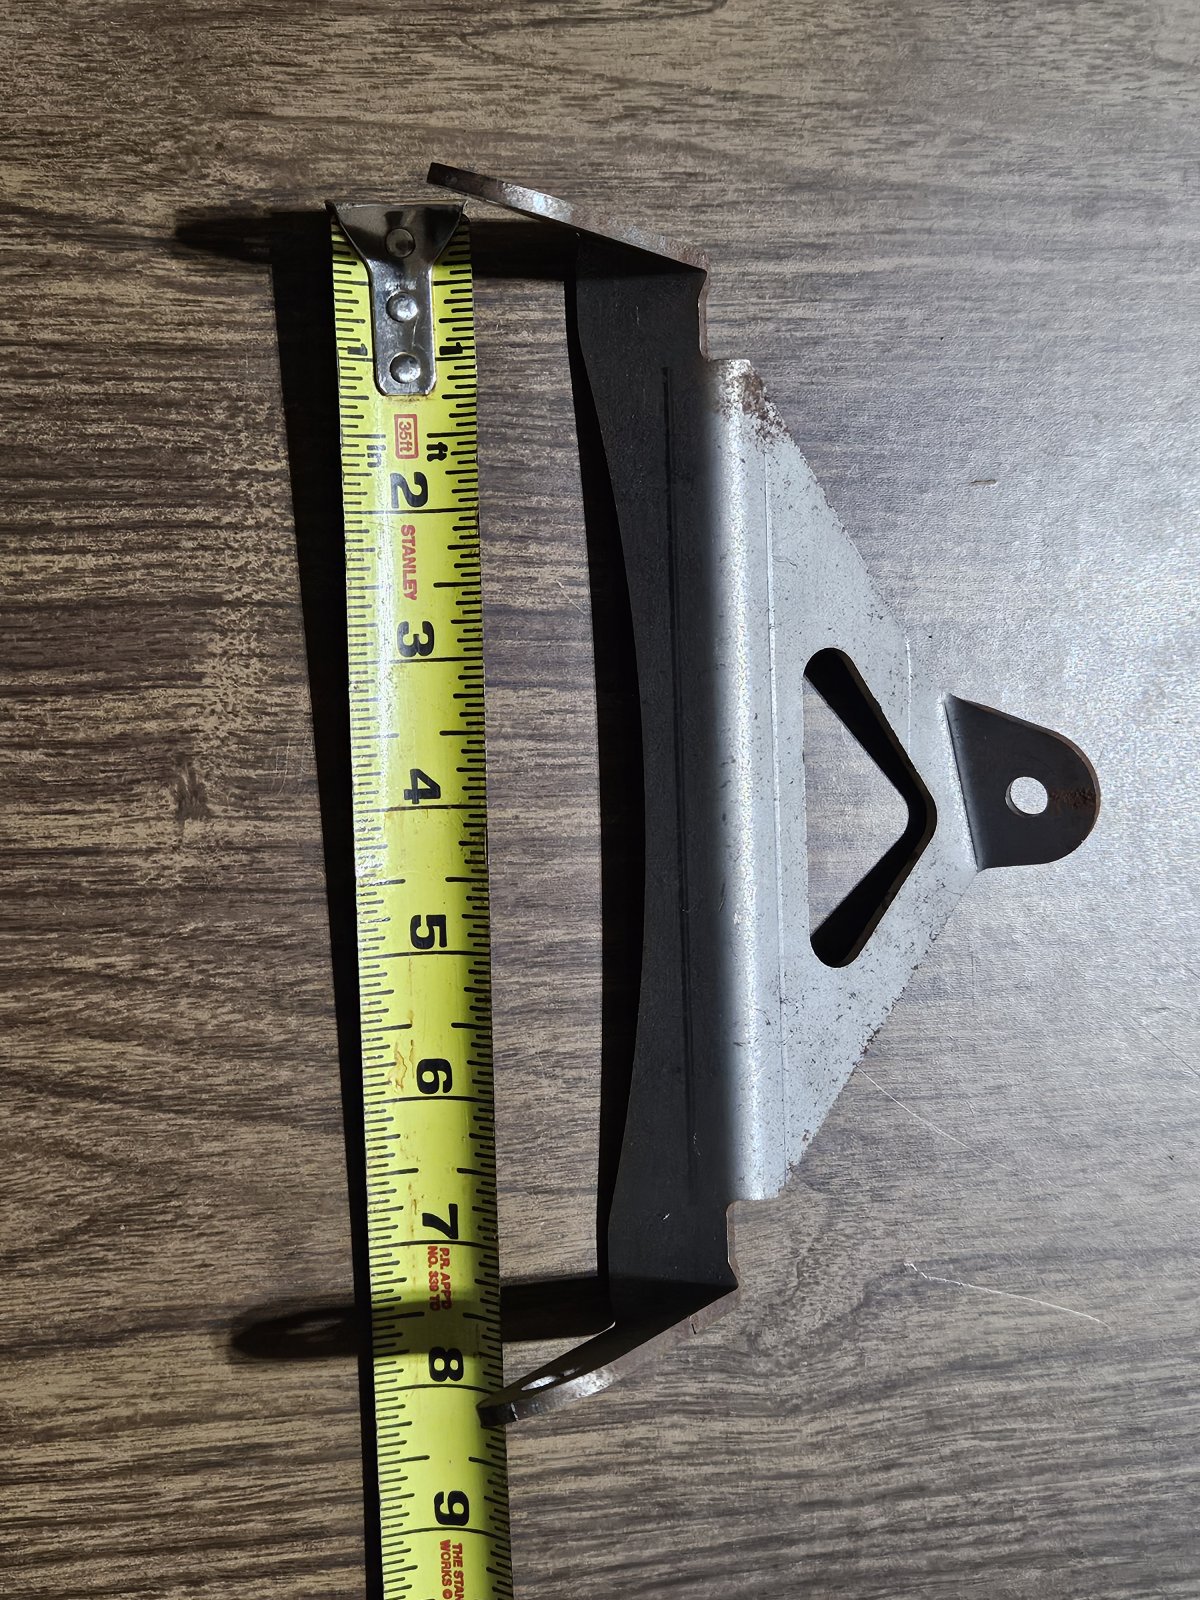

comegetjoe
Goblin Guru
- comegetjoe Goblin Guru
Thank you so much!!


ccgillett
Well-Known Member
- ccgillett Well-Known Member
Ok, so thought I would install the fuse box tonight, at least get the plastic holder in place, and install the multi-plugs (as show in this video). That quickly turned into a WTF moment when I discovered that the box won't fit as described.
There is some engine plumbing interfering with the installation of the plastic holder as shown in these photos:
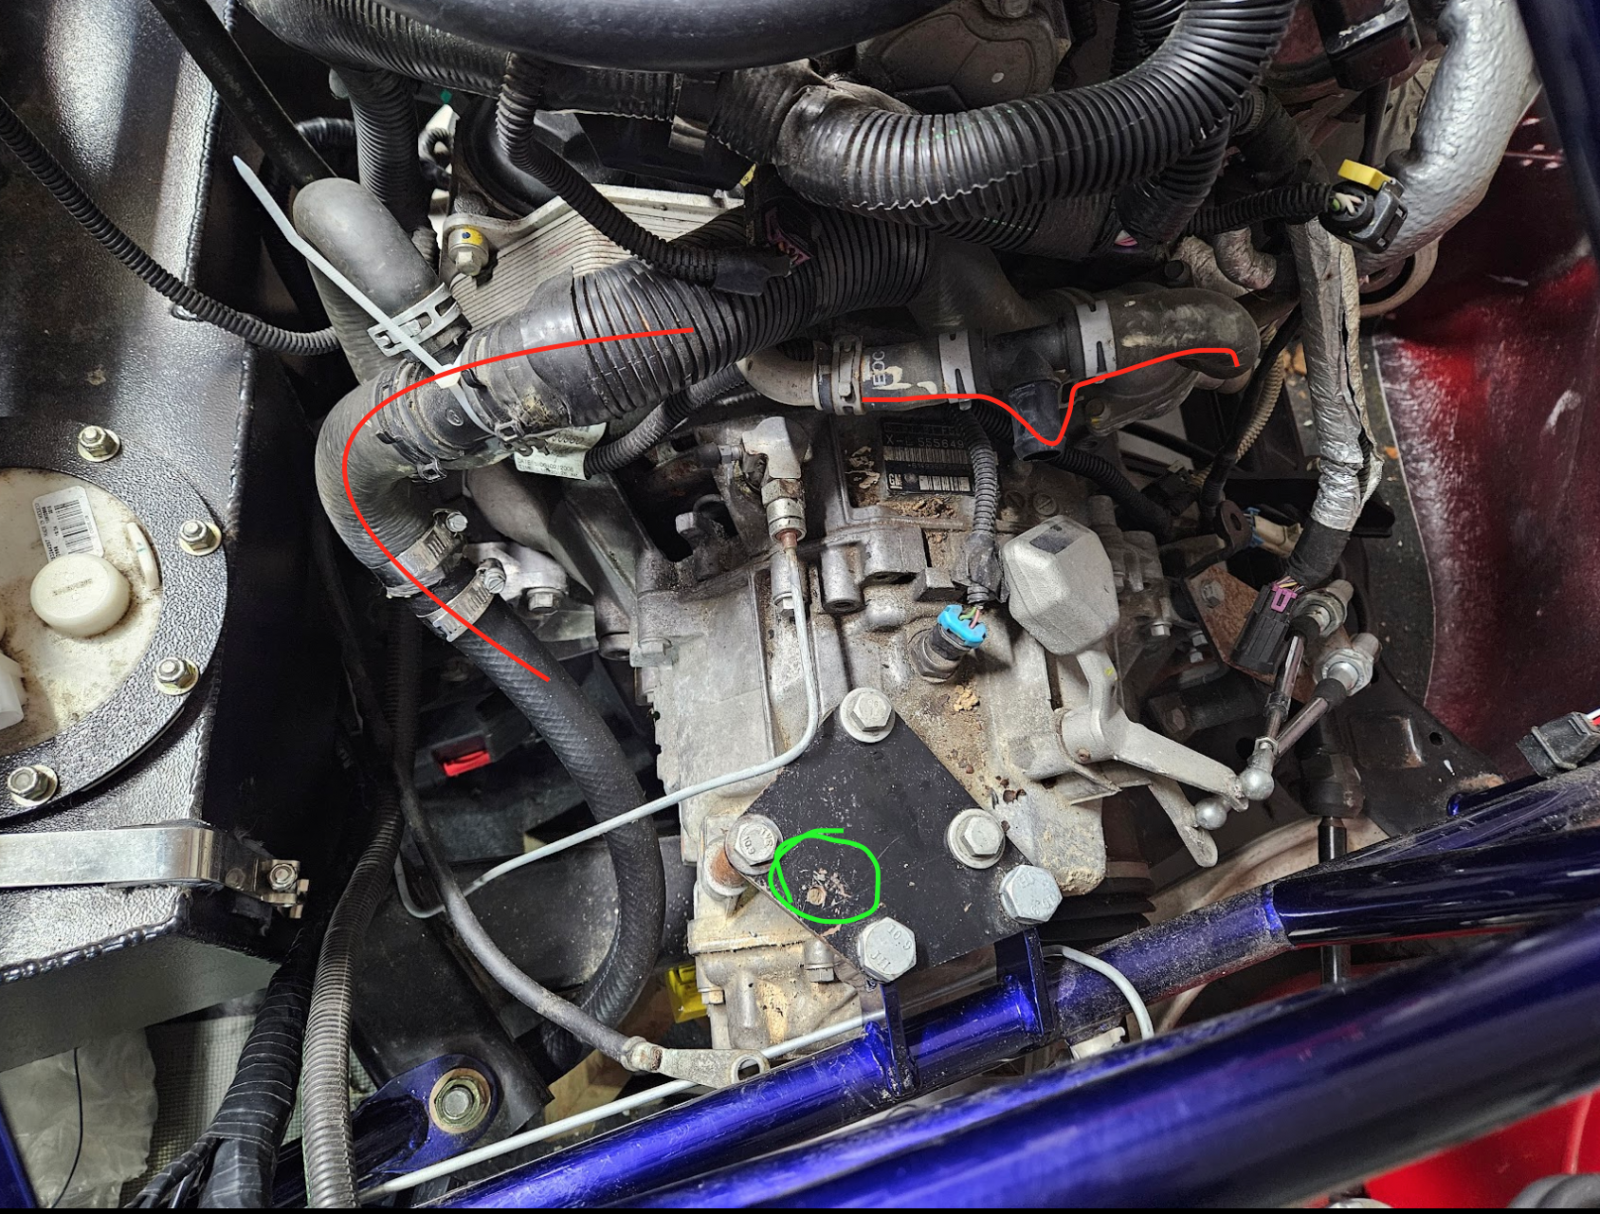
The two areas of interference ar marked in red, and the green circle shows the hole on the transmission mount where the plastic holder is bolted down. The nipple on the right connects to a hose that routes to the overflow reservoir. I half-assed a zip tie on the left hose bundle trying to pull it back to see if I could make it clear.
So questions here:
(1) Is that plumbing installed correctly? This was as I received the car from the prior builder
(2) Can I twist that nipple on the right upward so that it doesn't interfere?
(3) Can I manhandle those hoses and shove them out of the way?
I hate how this all looks, not super neat.
Also, the idea that the fusebox holder attaches to a down pipe on the chassis using an angle bracket and a coated clamp...my holder is approximately 1/2 mile from the point where that clamp attaches - the car in the video is an automatic transmission car and therefore has both PCM and TCM modules, whereas my car is manual and has no TCM. Does that mean my box is shorter and I should tie off somewhere else?
Another picture just for clarity:
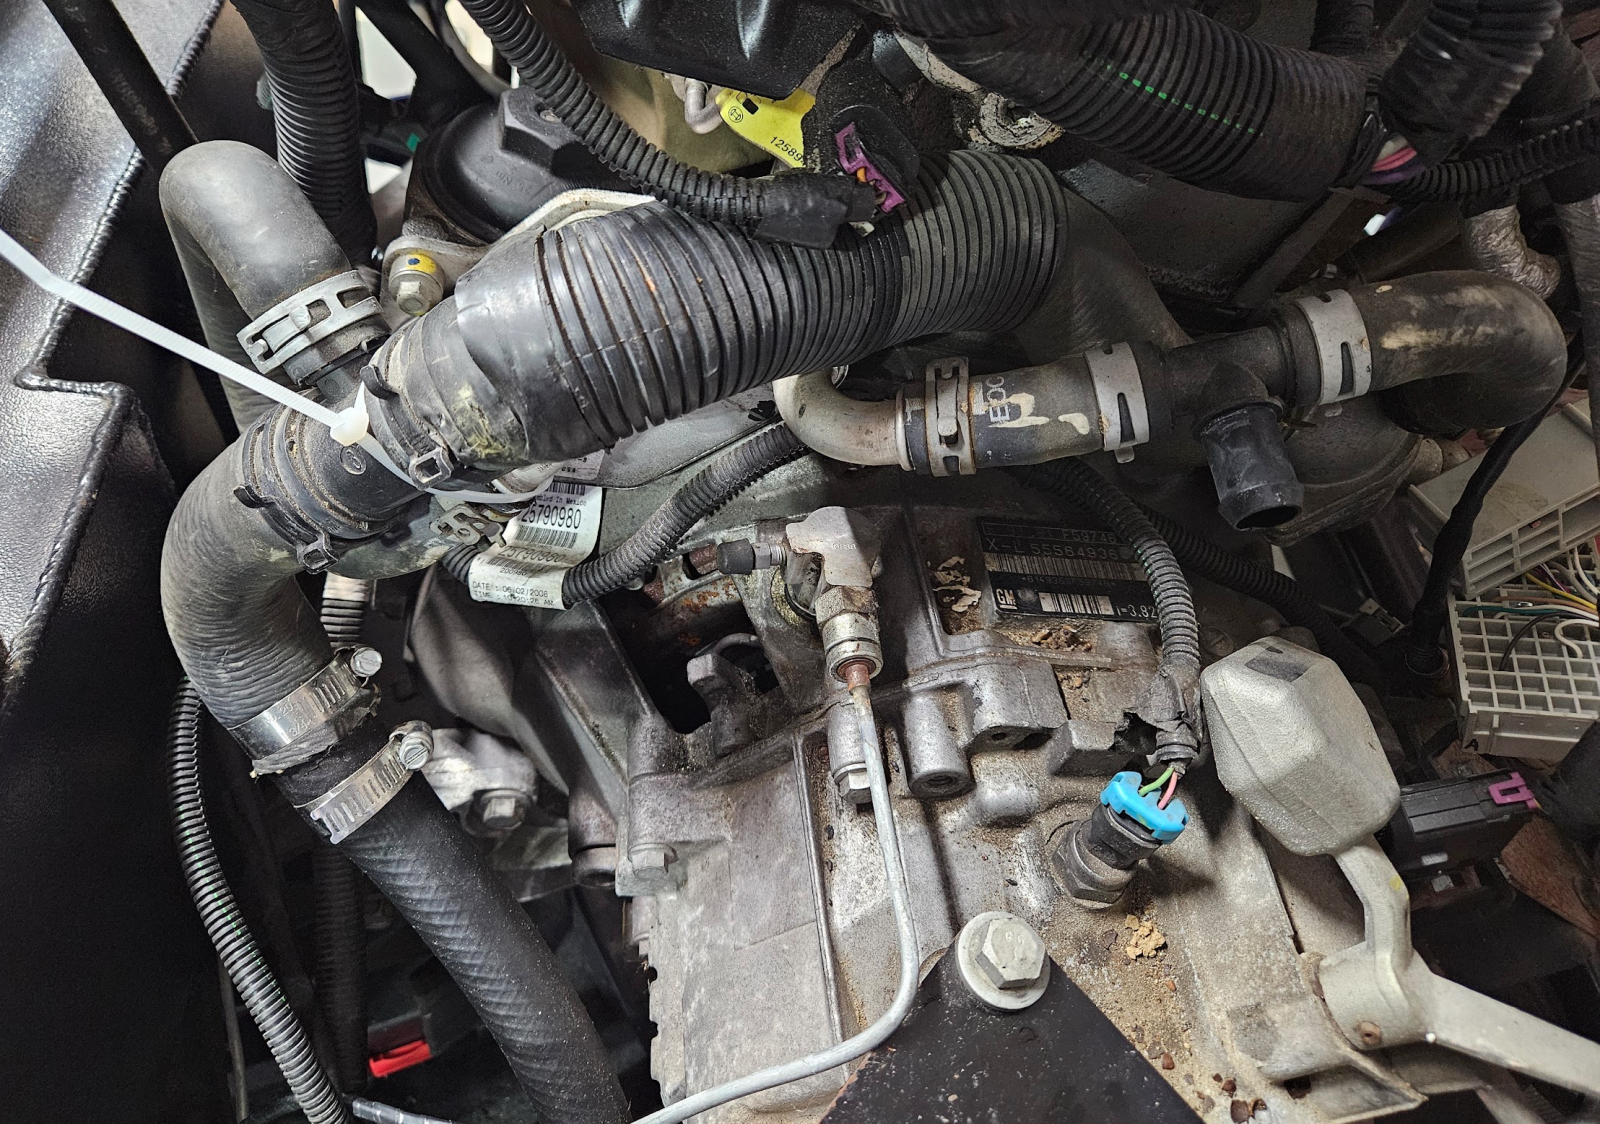
There is some engine plumbing interfering with the installation of the plastic holder as shown in these photos:
The two areas of interference ar marked in red, and the green circle shows the hole on the transmission mount where the plastic holder is bolted down. The nipple on the right connects to a hose that routes to the overflow reservoir. I half-assed a zip tie on the left hose bundle trying to pull it back to see if I could make it clear.
So questions here:
(1) Is that plumbing installed correctly? This was as I received the car from the prior builder
(2) Can I twist that nipple on the right upward so that it doesn't interfere?
(3) Can I manhandle those hoses and shove them out of the way?
I hate how this all looks, not super neat.
Also, the idea that the fusebox holder attaches to a down pipe on the chassis using an angle bracket and a coated clamp...my holder is approximately 1/2 mile from the point where that clamp attaches - the car in the video is an automatic transmission car and therefore has both PCM and TCM modules, whereas my car is manual and has no TCM. Does that mean my box is shorter and I should tie off somewhere else?
Another picture just for clarity:
Last edited:

Robinjo
Goblin Guru

- Robinjo Goblin Guru
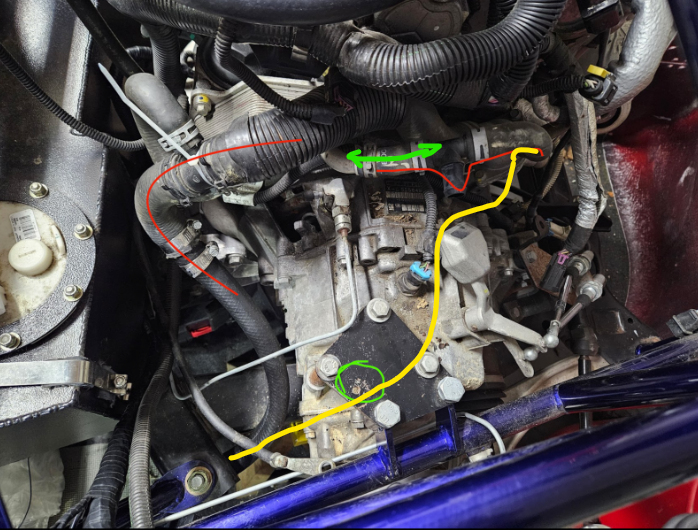
My hose takes a different route (in yellow) but I also have a SC version. The fuse box sits on top of the radiator hose and just barely (and I mean barely) misses the shift levers. It connects to a port right on the thermostat hosing. I also do not have that extra port pointing to the shift mechanism. Where does this hose (with green arrows) go?
Again, mine is a LSJ so this might be drastically different.....
Also, my frame is a newer design and we didn't have to mount the black plate to the frame. It was already welded in place.
Again, mine is a LSJ so this might be drastically different.....
Also, my frame is a newer design and we didn't have to mount the black plate to the frame. It was already welded in place.
Attachments

Last edited:
- Gtstorey Goblin Guru
All I can add is that mine is a tight fit, but don't remember any particular issues getting it mounted. But, yes you can adjust the hoses as needed to clear. Just don't add kinks or force them to rub on a sharp edge.
You might want to look at the photos here that helps show the location on the turbo, including a spacer.
Turbo Engine Photos - Google Photos
You might want to look at the photos here that helps show the location on the turbo, including a spacer.
Turbo Engine Photos - Google Photos
ccgillett
Well-Known Member
- ccgillett Well-Known Member
Yeah I think the best approach here is to add a spacer, I did find a photo earlier this morning from someone who did this on an early chassis number. I'm off to the hardware store at lunch time to see if I can put something together without having to do a McMaster-Carr ($$$$$$) order....All I can add is that mine is a tight fit, but don't remember any particular issues getting it mounted. But, yes you can adjust the hoses as needed to clear. Just don't add kinks or force them to rub on a sharp edge.
You might want to look at the photos here that helps show the location on the turbo, including a spacer.
Turbo Engine Photos - Google Photos
Similar threads


- Replies
- 4
- Views
- 260


