• We've upgraded and reskinned the forum. Notice something off? Email us at [email protected] and we'll fix it.

V1 Josh's City Goblin - 10 XFE Donor

Desert Sasqwatch
Nice! Great use of readily available materials, especially if you don't own a welder.

Another idea to make it look less like PVC pipe, use the black pipe fittings in place of the standard PVC connections, won't have that wonky 'pipe' look. Just a suggest: wrap it in a layer or two of fiberglass, but only after painting the PVC pipe - it can melt from the fiberglass resin (ask me how I know this). This will add some strength and make it look better.
 
jirwin
Fiberglass is my "Version 2" plan. I've been meaning to do fiberglass for a while now, but I've decided that it will be my "Winter 2023" project. Thanks for the heads up on the resin though, didnt know that!

I could have welded loops on but as you said - no welder. I like this better anyway to be honest because its removable/installable. Others can add this on after the fact if they like the design.
 
S
Fiberglass is my "Version 2" plan. I've been meaning to do fiberglass for a while now, but I've decided that it will be my "Winter 2023" project. Thanks for the heads up on the resin though, didnt know that!
Do you have a 3D printer? Fiberglass encapsulated 3D prints would be the ultimate V2.
 
S
I do! It can't print that big though. I have an MPCNC too though. Between the two I I can come up with something
You can brake it down into multiple prints to glue together, and since it's just a core, you can do a single perimeter and low infill to speed things up.
When I get around to doing a custom engine cover, this is the route I'll be taking.
 
Rauq
Like this?

42636
 
Rauq
I don't really have an apples to apples comparison as I added the duct at the same time I added the turbo.

Before the duct, I had to make sure the fan was running to control IAT2. With the duct, IAT2 is a little bit lower, but more importantly, as long as you're moving, having the fan on or off doesn't make much of a difference. Slightly lower IAT2 is also significant in that I also have higher IAT1 now than before (after the turbo and A2A intercooler)

I also added a phenolic intake manifold spacer, which drops IAT2 a bit, but also significantly reduces the huge climbs in IAT2 while sitting still.
 
jirwin
Switching to E85. I believe straight up nylon line is fine, but is there any reason to upgrade to an AN line setup? Nylon is obviously much cheaper
 
RCK605
Does it have any type of jacket or covering on the outside? I would be concerned of the nylon or PTFE rubbing through easily. Also, is it rated for 60+ psi or whatever your pump puts out?
 
jirwin
I'm talking just straight up nylon. Like the lines coming from the stock fuel pump. No jacket. Its what they use by default in the build guide videos I believe, so I don't see why not I guess
 
RCK605
Probably fine, but I also cut those off and changed to rubber because I didn't like them. I would still keep an eye on any wear points or wrap those areas with something.
 
jirwin
I may have accidentally figured out my grounding issue from earlier this summer, but I'm not sure. Can someone verify where the main big ground wire that goes on the stud beneath the fuse box goes? Searching thru the build videos but no luck yet.

42931
 
Last edited:
Joebob
I have a large ground from the stud under the fuseblock to a transmission threaded boss, but people also attach it to the engine block as well.
 
jirwin
Well it worked! Shes fast! Doesn't fall on its face up top anymore. Reading the "delivered torque" reading from the ECU, it supposedly gained 50 ft lbs lmao. Big update to come explaining what I did to convert it to E85.
 
Last edited:
jirwin
Conversion to E85!

This was quite a bit more involved than I had hoped for, but I got everything working! There are a few things that I want to clean up, but overall I'm pretty happy with how it turned out.

Parts installed:
On paper that's not a whole lot, but it was an experience to install.

Step 1 was to get the AEM fuel pump installed. This should apply to all non LNF cars. This was a bit difficult going into blind, but now that I know how to do it, its simple. The pump has a surge tank of sorts (a bucket really) where the fuel return dumps. This needs to CAREFULLY be pried off to access the fuel pump itself. Once that's removed, you need to do two modifications. First, the opening that the pump power wires come through.
42944
42945


After that, the fitting that attaches to the output of the fuel pump needs shortening because the AEM pump is about an inch taller than stock. All I did was pop the fitting out and use a hand saw to cut it at the flange. I used a utility knife to cut the rubber gasket short to match.
42946


After that, I drilled a hole in the cap to install this connector to allow the wires to safely pass thru. Really slick bit of kit. As extra insurance I put some Permatex Permashield in the opening.
42947


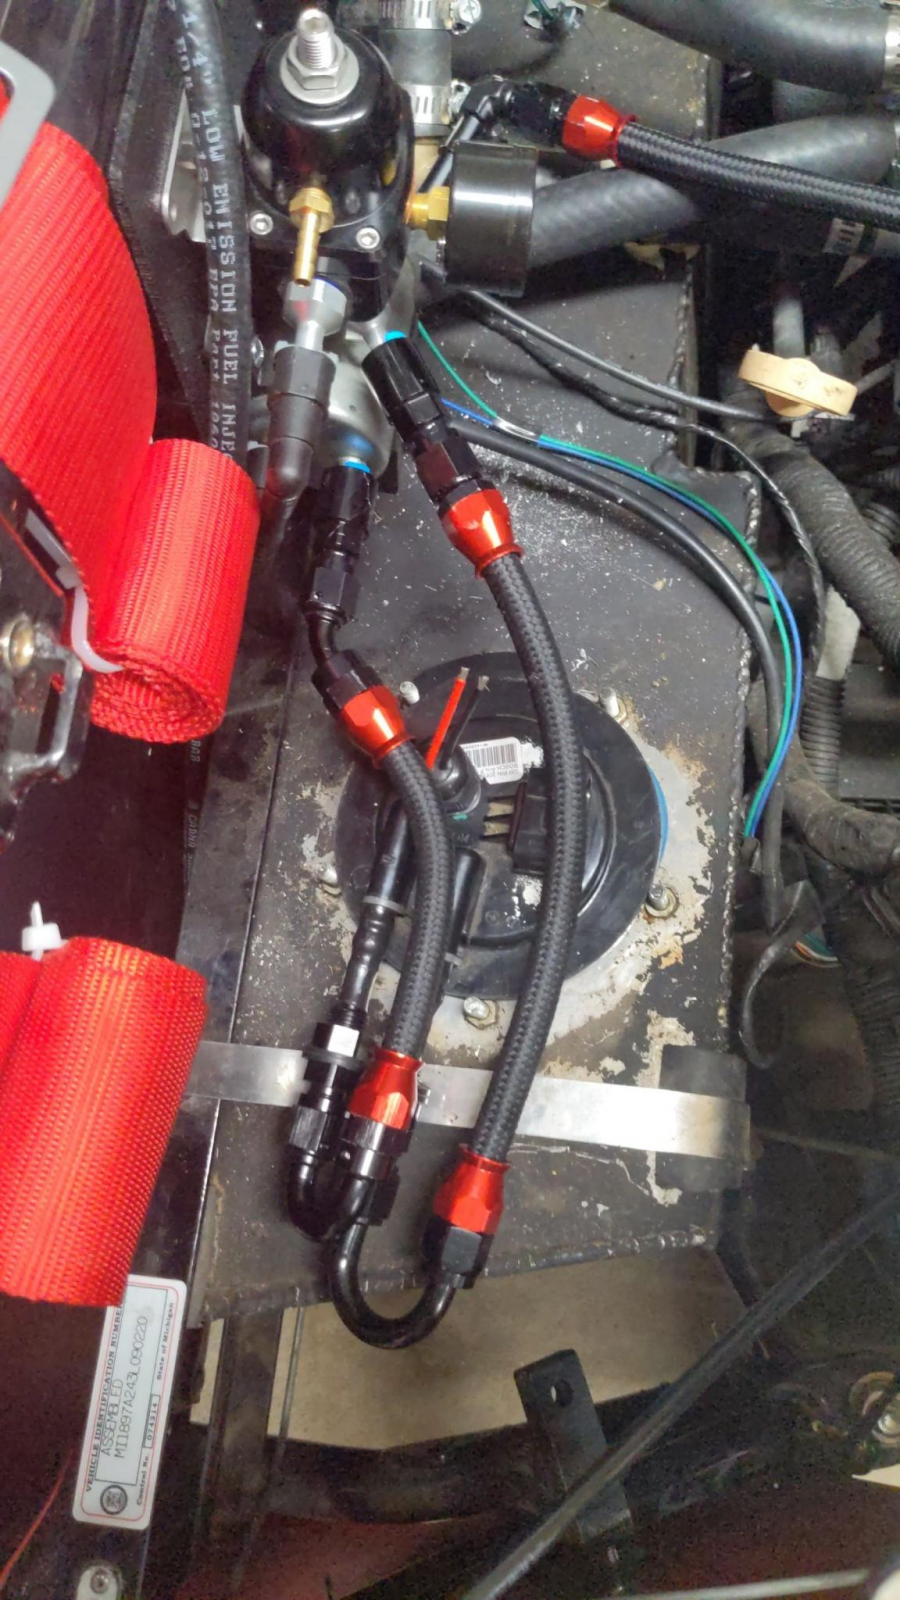
Now, onto the AN lines. There's nothing super fancy here. It was very difficult to figure out how to get the PTFE stuff to work at first (despite it being so simple on paper). It took me an entire evening to make 3 lines, but I got it figured out. None of them leaked so that's a plus. All I did to connect it to the stock pump is but the nylon lines short and shove in a barbed 6AN fitting. The ones I used are bulkhead because I had initially planned drilling my own send/return lines, but I found out there wasn't enough room. I also took the opportunity to add on a little place to mount the fuel pressure regulator and filter in a better spot. Please ignore the paint flaking, its on my list of things to fix :)

42948


Next was wiring. I found an okay-ish spot to put the (waterproof) relay. I opted to use the stock relay trigger to trigger the new relay because OEM has some fancier safety stuff. The fuel pump turns on when it gets ignition voltage, but shuts off if it doesn't get crank signal. This is why the fuel system "primes". Anyway, I used to electrical spade connectors cut in half width ways to pop into the relay. Not really super geeked about it as a permanent solution, but it works functionally fine. I couldn't find a breakout board to any kind of connector to do it more properly so I'm open to suggestions.
42950
42949


And that's pretty much it! Taking it for a test drive with the new tune it seems MUCH faster up top. Really excited to see where this takes the car. Definitely need bigger rear tires :)

Edit: Just realized I didnt explain the studs. The LE5/LAP head has M6 bolt holes, while the manifold expects M8. I put 2 M6 to M8 studs in to guaruntee alignment of the manifold and phenolic.

 
Last edited:
jirwin
Behind the Scenes

So, as eluded to previous posts I think I found my main ground that was missing before. I'm pretty sure this caused the scariest moment I've had building this thing. When I was snaking the old fuel line out, I think I snagged the end of that wire and it hit the positive terminal on the starter. Some fuel spilled from the fuel line as I was removing it, and this was enough to start a fire. Thankfully I saw the smoke first and immediately opened the hood and disconnected the battery (this is why I love the hinged hood lol). I know, I'm stupid, I should have done that first, but I just straight up forgot. Regardless, once that was off I turned back to the smoke and saw a small fire. I was able to blow it out birthday candle style. Crisis averted. It could have went waaaaaaaaaaaay worse because the fuel pump was out and the (mostly empty) fuel tank was completely exposed. Lesson learned.
42951
 
Back
Top