
• We've upgraded and reskinned the forum. Notice something off? Email us at [email protected] and we'll fix it.

V1 Seb's Goblin #454 (2008 SS/TC donor) - Registered

S
Managed to get my front ARB fabbed up today.
3/4"ODx.120 wall 4130 chromoly tubing formed on a custom tube bender that uses JD2 Model 3 dies.
I'm planning on using standard 2 piece shaft collars up against the bushings to keep the bar from shifting left to right.

41079


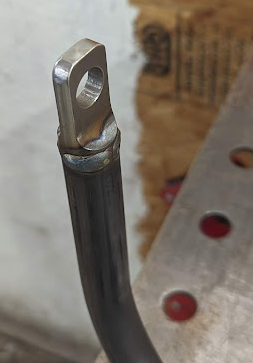
I made up some inserts to weld in for the linkage mounts, I think they look a little nicer than the smash and drill method.
41080


If the powder coater is on schedule, my frame should be done some time this week, so if all goes well, final assembly will start next weekend :cool:
 
S
Been a while since I posted an update. Finally got my frame back from powder coat and aluminum panels back from Line-X. Didn't get to work on it much this weekend, but was able to get through #11 - DF Goblin Assembly - Installing the Clutch Pedal (Early and Late Model Versions) video. Had a little issue with the brake line being about an inch too long, but it sounds like that may be common. I snaked it around inside the tunnel to shorten it up.
41398
 
S
Didn't get a whole lot of time to work on the goblin this weekend, but managed to get through video #21 - DF Goblin Assembly - Installing the Fuel Tank.
I had a few hiccups along the way. I got a little carried away with the band saw when trimming the ignition switch. Ran into this PCB board a bit. It doesn't look to me like I hit any traces, so I'm hopeful that it'll still work.
41546


Next issue was this TPMS receiver. The plastic was so brittle, I broke one of the tabs when removing it, then the other 2 broke off when I was trying to install it. I decided to bolt it to the firewall since all the tabs were gone. As I was drilling out a clearance hole, the lid broke into 2 pieces. As I was gluing it back together, it broke in half the other way... LOL
41547


It's barely hanging on there now. I may try to find one from the pick n' pull that's in good shape and swap out the case to mount it properly.

I wasn't really ready to start on the front suspension yet, but I just got my suspension parts back from the powder coater and wanted to see how the colors looked.

41548


I'm happy with it, but have no idea what I'm gonna do with the hood!

If all goes well, may be ready for a first start by the end of next weekend. :cool:
 
AMCAMX1969
Didn't get a whole lot of time to work on the goblin this weekend, but managed to get through video #21 - DF Goblin Assembly - Installing the Fuel Tank.
I had a few hiccups along the way. I got a little carried away with the band saw when trimming the ignition switch. Ran into this PCB board a bit. It doesn't look to me like I hit any traces, so I'm hopeful that it'll still work.
View attachment 41546

Next issue was this TPMS receiver. The plastic was so brittle, I broke one of the tabs when removing it, then the other 2 broke off when I was trying to install it. I decided to bolt it to the firewall since all the tabs were gone. As I was drilling out a clearance hole, the lid broke into 2 pieces. As I was gluing it back together, it broke in half the other way... LOL
View attachment 41547

It's barely hanging on there now. I may try to find one from the pick n' pull that's in good shape and swap out the case to mount it properly.

I wasn't really ready to start on the front suspension yet, but I just got my suspension parts back from the powder coater and wanted to see how the colors looked.

View attachment 41548

I'm happy with it, but have no idea what I'm gonna do with the hood!

If all goes well, may be ready for a first start by the end of next weekend. :cool:


Need to swap sides on the lower control arms, they are upside down
 
S
Had a little break in the heat today, so I decided to finish up the fab work on the front knuckle mods.
I made new ball joint mounting brackets for the top and bottom to move the roll center and allow for high misalignment spacers/increased travel.
I integrated the steering arm into the lower ball joint plate. The original goal was to hit parallel steer, but it wasn't really practical without moving the steering rack (which I didn't want to mess with). I ended up with ~36% Ackermann and the ability to adjust bump steer by moving the spacers around.
Here's the new and old side by side:
41585


I also added some gussets to increase the stiffness and keep the bolt head from turning.
I think eventually I'll redesign the whole thing to be a solid piece instead of the bolt together design, but this will at least get it on the road.
 
Last edited:
S
I was able to put in some hours on the build this weekend, but it feels like I didn't get much done. Lots of prep and paint for all the odds and ends really eats up the time.
I managed to get through video #26 - DF Goblin Assembly - SS/TC Engine Preparation.

I need to put the new clutch in, anyone know if it would be easier to do with the engine bolted to the chassis? I'm not sure if there's enough room to split it in there or not.

I got the front suspension fully assembled, hope it rides as good as it looks!
1690254894590.png1690254975632.png1690255039712.png
 
A
Managed to get my front ARB fabbed up today.
3/4"ODx.120 wall 4130 chromoly tubing formed on a custom tube bender that uses JD2 Model 3 dies.
I'm planning on using standard 2 piece shaft collars up against the bushings to keep the bar from shifting left to right.
View attachment 41079

I made up some inserts to weld in for the linkage mounts, I think they look a little nicer than the smash and drill method.
View attachment 41080

If the powder coater is on schedule, my frame should be done some time this week, so if all goes well, final assembly will start next weekend :cool:
I thought an anti sway bar had to be heat treated after forming? I'm no metallurgist and maybe that only applies to solid bars or ones formed with heat? Just a thought. I'm a stone ax man in a microchip world.
 
S
I thought an anti sway bar had to be heat treated after forming? I'm no metallurgist and maybe that only applies to solid bars or ones formed with heat? Just a thought. I'm a stone ax man in a microchip world.
In it's normalized state, 4130 has a yield strength of 60-70KSI. If it's heat treated (quenched), the yield strength can increase to 130-140KSI.
So, it doesn't need to be heat treated, unless it's going to see enough stress to exceed the 60-70KSI. My calculated stresses were in the 30-40KSI range at max deflection - heat treating not required in this case.
 
G
I need to put the new clutch in, anyone know if it would be easier to do with the engine bolted to the chassis? I'm not sure if there's enough room to split it in there or not.
If you can restrain the engine, I would do it out of the car. Strap it to a pallet. The first time I used my lift to pick up the trans and rolled the engine on a dolly up to it. Later, I just manhandled the trans on and off several times trying to track down the brake fluid leaking out of the trans case. A little rough on the back, but doable
 
A
In it's normalized state, 4130 has a yield strength of 60-70KSI. If it's heat treated (quenched), the yield strength can increase to 130-140KSI.
So, it doesn't need to be heat treated, unless it's going to see enough stress to exceed the 60-70KSI. My calculated stresses were in the 30-40KSI range at max deflection - heat treating not required in this case.
Wow! That is excellent information. If I ever manage to digest it it will be good to know. Ya gotta cut me some slack! I can’t count past 4130!(rockwell?) I’m a stone ax man in a microchip world, I’m typing this on a Underwood #3130. Don’t ask how, just chuckle and shake your head
 
escapepilot
I need to put the new clutch in, anyone know if it would be easier to do with the engine bolted to the chassis? I'm not sure if there's enough room to split it in there or not.
Definitely easier with it out of the chassis. Not much room between the bars. The clutch elbow is difficult to reach post assembly thanks to the harness and hoses everywhere in that area.
 
A
Definitely easier with it out of the chassis. Not much room between the bars. The clutch elbow is difficult to reach post assembly thanks to the harness and hoses everywhere in that area.
Super dumb moment for me, I couldn't get the "elbow" to latch down on the T/O bearing pipe. I was Almost to the point of beating on it!{man, I was pissed!} Only to discover it is keyed and only goes on in one position. (Rotate inlet/hose to ~7 o'clock!) Kept checking for clip probs and/or something inside the elbow and finally noticed the raised semi-circles machined on the bottom of the elbow! Happy Re-Assembly Everyone!
 
Robinjo
Definitely easier with it out of the chassis. Not much room between the bars. The clutch elbow is difficult to reach post assembly thanks to the harness and hoses everywhere in that area.
I have to take the fusebox out to bleed the clutch line. You might be able to with out removing it but it gives a lot more room. I don’t see how you pull a trans out without pulling the engine.
 
Sluggonaut
I did it during my build with the fusebox in - never again. I am about to bleed the brakes and clutch after dropping the motor for maintenance work and look forward to how much easier the clutch bleed process will be with the fusebox, wiring, and hoses out of the way.
 
S
I picked the hottest day of the year here to change the clutch, but got er done! Also put a remote bleeder line on it as I've heard it's hard to get to.
Engine is ready to go in now, just need another pair of hands to help me lift the chassis up over it.
 
Back
Top