Alignment

JBINTX

Goblin Guru
I stumbled on this info from back in January 2018. Is this still what is suggested?
@Lonny

  • Front
    • Ride height: set to where the lower control arm is level to the ground with you (and a passenger) in it
    • Toe: +.15 degree (toe in)
    • Camber: -1.5 degrees
    • Caster: 8.5 degrees
  • Rear
    • Ride height: Control arms level to the ground or slightly up toward the middle of the car. We normally end up with 7-8 inches from the ground to the lower lip of the subframe where the control arm slips in but this varies depending on tire size.
    • Toe: +.15 degree (toe in)
    • Camber: -1.5 degrees
The more camber you can get front and rear, the better it will be for track use. However, while it is easy to add camber up front, the rear is a different story. Since we don't yet have adjustable top plates, the only way to adjust the rear camber is the method in the Cobalt service manual:
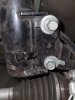
Basically you remove some material from the lower mounting hole of the strut to create a slot. Then you can get a little bit of camber adjustment.
 

Desert Sasqwatch

Goblin Guru
Rear camber can be adjusted using cam bolts - one or two per side - to get it correct or to the desired angle for the track.
Adjustable top plates would be better, but I have not seen anyone with them on the forum (yet).
 

JBINTX

Goblin Guru
Was the link you provided just a generic example, or are those the exact cam bolts we would use on the Goblin?
 

Ross

Goblin Guru
I have those bolts on my car, but I recommend grabbing a round file, and slotting the rear shock bolt hole, like GM and Lonny recommend.
 

Waterdriver

Goblin Guru
Was the link you provided just a generic example, or are those the exact cam bolts we would use on the Goblin?
I'm using the Moog version of the cam bolts, top and bottom strut mount holes. With both, you can achieve roughly -3 degrees of camber if needed.
 

KLMOTORSPORTS

Well-Known Member
I'm using the Moog version of the cam bolts, top and bottom strut mount holes. With both, you can achieve roughly -3 degrees of camber if needed.
Which Moog part number did you use....the single offset or double offset? Thanks!! Ken
 

JBINTX

Goblin Guru
Awesome, thanks! Will be ordering them from Rock
Ken: Keep this in mind - every build will be a little different, of course.
I installed the original bolts back into the lower shock tower. When I did my alignment, both rear axles were right at 1.5 deg. in. This is what some target especially for the track. I may get on the track, but I confess most of my miles will be on the open road. So, I set my rear at about 0.7 deg camber after running about 10 miles on the original setup and noticing that the outer edge of the tire barely touched the road. The adjustment bolts do not give you very much adjustment. You may have to install them in both the upper and the lower holes to get proper camber. I remember seeing someone (or somewhere) to install one in the upper first and see if it is enough.
Cheers!
 

Waterdriver

Goblin Guru
Sorry, JBINTX is correct. I went for the cheaper of the two.
Prior to installing I marked the bolt head with a paint pen to indicate the high side of the cam. Just to know which way the thing was pointed when making adjustments.
 

KLMOTORSPORTS

Well-Known Member
Ken: Keep this in mind - every build will be a little different, of course.
I installed the original bolts back into the lower shock tower. When I did my alignment, both rear axles were right at 1.5 deg. in. This is what some target especially for the track. I may get on the track, but I confess most of my miles will be on the open road. So, I set my rear at about 0.7 deg camber after running about 10 miles on the original setup and noticing that the outer edge of the tire barely touched the road. The adjustment bolts do not give you very much adjustment. You may have to install them in both the upper and the lower holes to get proper camber. I remember seeing someone (or somewhere) to install one in the upper first and see if it is enough.
Cheers!
Thanks for the info!
 

KLMOTORSPORTS

Well-Known Member
Sorry, JBINTX is correct. I went for the cheaper of the two.
Prior to installing I marked the bolt head with a paint pen to indicate the high side of the cam. Just to know which way the thing was pointed when making adjustments.
Great idea marking the bolt head...thanks!
 

lksohm

Well-Known Member
I did not cut a coil from my rear spring (reusing cobalt spring/strut). I figured i can always come back and remove material but not add it.

My axles angle down at about 4 degrees. Do I cut one turn off the spring to get the control arms level or are people getting different results by less or more spring removal?
 

ctuinstra

Goblin Guru
I did not cut a coil from my rear spring (reusing cobalt spring/strut). I figured i can always come back and remove material but not add it.

My axles angle down at about 4 degrees. Do I cut one turn off the spring to get the control arms level or are people getting different results by less or more spring removal?
You do cut them. I believe one full wrap of the spring.
 

Mayor West

Goblin Guru
I got the upgraded ones from DF, but I am pretty sure you need to follow their video and cut it.
I don't recall seeing a video of cutting the springs, did I miss it? I have two sets of stock springs in case I mess it up but wanted to see if I do the top of bottom and how much to cut on video first.
 
Last edited:

Ark :D

Goblin Guru
Bumping an old thread here, I know. Sorry.

20230905_070813.jpg

I recently installed a second set of camber bolts. This pic results in around -0.5 degrees of camber. I don't really trust these bolts, though. The specified torque is 65 ft lbs and that's what I used, but it feels too low. I haven't had any "slips" in any of the drives since I installed the second set, but it does make me nervous.

I read that the BC coilovers come slotted for camber adjustment, but mine didn't seem to come that way. I know you can file a slot into them, but I'm a bit leery of doing that.

I was seeing some excessive wear on the insides of my back tires, so I added the second camber bolts and re-did the rear alignment. Originally, I used the toe plates method but apparently, I didn't do a great job. This time around, I started with the toe plate method and then verified by counting threads on the toe links. One side had several more threads than the other side, so I evened up the number of threads showing, and verified by the toe plate method, and finally turned the toe links out another 1/4th turn to get a small amount of toe-in. This resulted in my originally well-centered steering now being a little off, like so:

20230903_130038.jpg

(Ignore the drifting horn button, I need to find a way to stick it in place so it doesn't rotate over time, lol).

No specific question......but I welcome any input.
 
Top