Seb's Goblin #454 (2008 SS/TC donor) - Registered

Sebnuts

Well-Known Member
Had some ups and downs this weekend. The weather was awesome on Saturday and I was able to get the tail lights wired up and working the way I wanted. I ran another set of wires from the front turn signals and used the 3rd brake light circuit so I could separate the functions as opposed to using the stock combined wire.
I had some trouble with the brake sensor. I broke the screw off in the donor sensor and couldn't get it out, so I bought a new one. I guess the new one needs to be calibrated or something, the brakes came on and stayed on when it was installed. I swapped out the new one for the old one and just zipped tied it on, will deal with the new sensor some other time.

The weather today was awful, 102°F and 70% humidity, but I managed to get the rest of the coolant lines installed and fired it up for the first time. Only had 3 DTCs, all of which were related to the evap system. I let it warm up and I think I got all of the air out of the coolant loop.
It seems like all of the buttons on the gauge cluster work so far, but I haven't tested the cruise control yet.

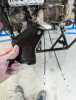
Moved onto the shifter, got to this point without too much issue
42315


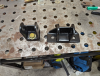
Last week I noticed I was missing the shifter cable bracket that mounts to the transmission. I contacted DF customer service, they promptly responded and mailed me one. It arrived yesterday afternoon. I panted it this morning, and then found out it didn't fit when I went to install it. Shame on me for not test fitting before painting I guess :rolleyes:
42316

The plate runs into a boss on the transmission. I'm not sure if I got the wrong part or if I'm just supposed to start grinding, but It was too hot and too late for me to get the grinder out this afternoon, so that will be a problem for next weekend.

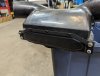
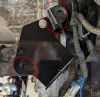
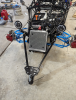
I also decided to put my heat exchanger in the rear ala @Rauq
42317


I think the kit was supposed to come with a plug for the "filler" tee, but I didn't have one in my kit. I picked up a 3/4" pex plug but it's a pretty loose fit. I may end up ordering one of these instead.
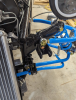
I also found out yesterday that my kit was missing some front brake line clamps. I ordered these to take care of that.

Getting close. After next weekend I may try to schedule my Troop C inspection.
 

Ross

Goblin Guru
Yeah, you have the correct SAAB part. I thought the 2 holes in that SAAB part line up with the DF top plate... not sure why yours doesn't fit.
You have a F35 transmission, right?
 

Sebnuts

Well-Known Member
Wrapped up a few items today!
Pulled out the BCM and mailed it off to Odo-Pro to have the odometer reset.
Heat exchanger fan and pump wiring are finished, which was that last bit of electrical I had to do.
Heat exchanger plumbing finished
42429


Brake line clamps installed
42430


I was too cheap to buy the DF tow bar package. Ended up picking up the HF one and modifying the mounts to be similar to the DF ones. They're a little heavier, and a lot uglier, but for $89.99, I'm not complaining!
1693104779723.png1693104803678.png1693104836734.png

Did some grinding on the transmission end shifter cable mount to clear the boss on the transmission and put a fresh coat of paint on it, should be good to install that tomorrow.
1693104999138.png

Getting really close to being ready for inspection:

Pre-Inspection to do's:
  • Bleed brakes
  • Bleed clutch
  • Shifter cables
  • Parking brake
  • Shim EPS
  • Alignment
  • Rear firewall
  • Tunnel cover
  • Seat Belts
  • Seats
 

Sebnuts

Well-Known Member
Got the clutch and brakes bled today, had a hell of a time with one of the lines leaking. I didn't have flare nut wrenches (should have went and bought some) and rounded off one of the small hexes with an open end wrench before it was tight enough to stop leaking. Ended up putting a pair of vise-grips on it and was able to get it snugged up enough.

Shifter and shift cables are installed and adjusted.

My clutch pedal hits my steering shaft, and my steering shaft rubs on the firewall opening. I saw this post by @Sluggonaut where he shimmed his EPS and that fixed both of his issues. I was going to do this, but as I was looking at it, there's no way shimming the EPS was going to give me any more clearance on the firewall, so I abandoned that plan. I may just clearance out my clutch pedal and firewall with a grinder/dremel, but haven't decided for sure yet.

I threw the tires on it and dropped it down off the jack stands, will do the alignment first thing next weekend.
Couldn't help myself, had to throw the hood on and see what it looked like
42449

42450


I'm thinking gray hood with black stripes. Kind of like this, but replace the small red pin striping with blue that matches the suspension.
42451


Pre-Inspection to do's:
  • Bleed brakes
  • Bleed clutch
  • Shifter cables
  • Parking brake
  • Shim EPS -> Fix steering shaft interference
  • Alignment
  • Rear firewall
  • Tunnel cover
  • Seat Belts
  • Seats
 

Sebnuts

Well-Known Member
I typically only work on the goblin on weekends, but I got my BCM back from Odo-Pros today so I went and installed it. 0 miles on the odometer and everything else seems to be working as it should $$.

I also scheduled my inspection for Sept. 9th, so no more lollygagging!

Verified that my intercooler pump and heat exchanger fan are working, had to top off the coolant loop a few times but looks like all the air is out now.

Seat belts and tunnel covers are installed.

Set the ride height the best I could. The concrete is terribly uneven in the hanger. After it's street legal I'll get it in my home garage and do a better job. I am a little worried about the speed humps in my subdivision, hopefully they're less than 5" tall LOL.

I ended up pushing/bending the clutch mount to get clearance from the steering shaft. The steering shaft still rubs the firewall a little, but I don't think it's bad enough to cause any issues.
I also realized I need to bleed the clutch again. The pedal doesn't return on it's own after every push, so I'm guessing there's still some air in there.

Pre-Inspection to do's:
  • Parking brake
  • Fix steering shaft interference
  • Alignment
  • Rear firewall
  • Tunnel cover
  • Seat Belts
  • Seats
  • Bleed the clutch
 

Sebnuts

Well-Known Member
Took a vacation day to make it a 4 day holiday weekend, weather was awesome and got a good amount done.

Parking brake with the Summit universal kit wrapped up, thanks to @wallace58 for the idea.
42521


Rear firewall installed with no major issues. I did have to add some clearance above the parking brake cables. This may not have been needed with the factory cables, but no big deal anyway.

Got the tape measure alignment done. Was shooting for 1.5° Camber and 1/8" toe in for the rear. Hit the 1.5° with a single camber bolt in the top hole of the strut.
Originally I was going to go for ~8° Caster, 0.5° Camber and 0" toe in the front, but after adjusting the toe, I had 8.2° Caster on one side and 8.3° caster on the other, with 0.3° Camber on both sides, so I decided that was close enough for now and didn't screw with it. I'm planning on having it done professionally anyway so I'm in the ball park for now.

Ran into some issues getting the stock seats in with stock seat belts. I had the seat belts mounted on the inside of the cabin area with the stock plastic sleeve on, covering up the bolt. There wasn't enough clearance for this setup and it wasn't allowing the seat to slide back. I got rid of the plastic sleeve and mounted the belt to the outboard side to resolve the issue.
42522


If I can get the wife to help me bleed the clutch tomorrow, I'll take it for a spin around the yard!

Pre-Inspection to do's:
  • Parking brake
  • Alignment
  • Rear firewall
  • Seats
  • Bleed the clutch
Post-Inspection to do's:
  • Parking brake switch wire
  • Outlet for charging HPTuners Tablet
  • Footwell Cover
  • Hood
    • Windscreen
    • Grill
    • Wrap
  • Wheels
  • Custom Engine Cover
  • New Seats
  • Harness
 

Sebnuts

Well-Known Member
All wrapped up and ready for inspection!
42565


And a couple glamor shots that I have to include with the paper work to get it titled and licensed:
42566

42567


Disabled the evap related DTCs with HPTuners, so now my cluster is MIL free. Only 2 of my tires are registering pressures. All 4 were working on the Cobalt last year, but hoping the batteries are just dead due to old age.

I took it for a couple laps on the grass. Hopefully there's no surprises during the inspection, and the paper work doesn't take too long to get through the system because I'm ready to hit some asphalt!

Pre-Inspection to do's:
  • Bleed the clutch
Post-Inspection to do's:
  • Parking brake switch wire
  • Outlet for charging HPTuners Tablet
  • Footwell Cover
  • Hood
    • Windscreen
    • Grill
    • Wrap
  • Wheels
  • Custom Engine Cover
  • New Seats
  • Harness
 

Sebnuts

Well-Known Member
Installed some big power adders today.
I believe this badge is in the neighborhood of +30HP
42835


And this one is at least +100HP
42836


I also got my USB plug wired in, so I can keep my HP Tuners tablet charged while tuning in the additional 60-70HP via minor MAF table adjustments.
42837


To do's:
  • Parking brake switch wire
  • Outlet for charging HPTuners Tablet
  • Footwell Cover
  • Hood
    • Windscreen
    • Grill
    • Wrap
  • Wheels
  • Aero
    • Splitter
    • Diffuser
  • Custom Engine Cover
  • New Seats
  • Harness
  • 5th Injector/E85 tune
 

JBINTX

Goblin Guru
Installed some big power adders today.
I believe this badge is in the neighborhood of +30HP
View attachment 42835

And this one is at least +100HP
View attachment 42836

I also got my USB plug wired in, so I can keep my HP Tuners tablet charged while tuning in the additional 60-70HP via minor MAF table adjustments.
View attachment 42837

To do's:
  • Parking brake switch wire
  • Outlet for charging HPTuners Tablet
  • Footwell Cover
  • Hood
    • Windscreen
    • Grill
    • Wrap
  • Wheels
  • Aero
    • Splitter
    • Diffuser
  • Custom Engine Cover
  • New Seats
  • Harness
  • 5th Injector/E85 tune
You saved the engine bay performance badge too! Atta boy
 

Sebnuts

Well-Known Member
Did a little piddling around today.
Unfortunately, Missouri is a 2 plate state. It seems it may not be enforced, but the law abiding citizen I am.... I fabbed up a little plate bracket that pins into the tow bar mount.
42980


42981


I don't love it, but seems like a good enough spot.

Also realized I installed my seat belt reels backwards, so they were sticking outside of the chassis. Spun them around 180°, much better now
42982


Does anyone know if the spring tension on the stock belt reels can be increased? Mine are very week, barely roll up even with no tension on them.

To do's:
  • Footwell Cover
  • Laminated Glass Windscreen
  • Hood
    • Chop
    • Grill
    • Wrap
  • 5th Injector/E85 tune
  • Aero
    • Splitter
    • Diffuser
  • Custom Engine Cover
  • New Seats
  • Harness
  • Wheels
  • Parking brake switch wire
 

Gtstorey

Goblin Guru
Seat belts probably need to be cleaned and lubed, but I don’t know if you can get to the mechanism on these to do that.
 

Rttoys

Goblin Guru
My front plate fell off. :confused: :D

the mailman seems to keep losing the replacement, but if it ever shows up, I would incorporate it into the front splitter somehow.
 

Ark :D

Goblin Guru
Did a little piddling around today.
Unfortunately, Missouri is a 2 plate state. It seems it may not be enforced, but the law abiding citizen I am.... I fabbed up a little plate bracket that pins into the tow bar mount.
View attachment 42980
@Sebnuts would you mind giving a little bit of detail on what you did to mount your headlights to the frame? I have had a solution in place for a long time (3d-printed pieces originally made by Mayor West) but I view them as a weakness in my build, since I've broken two sets of them now. The current set I'm using has been holding up, but I had them printed at 100% fill with what I think is a tougher material. I'm always looking for small upgrades though, ya know?

Also, what tires are you running?
 

Sebnuts

Well-Known Member
would you mind giving a little bit of detail on what you did to mount your headlights to the frame?
I went to home depot and found a piece of steel tubing with an ID that fit a 3/8" bolt pretty well. I don't remember the exact size, but it was square, and I have a big chunk left over at home I can measure if needed. I cut a length that fit in between the tabs of the light bucket and welded it to a bolt that matched the size of the frame threads (3/8-16 I believe), then used a lock nut to lock the rotation.
43004

43005


Also, what tires are you running?
They were just the cheapest "Ultra High Performance" tire I could find at the time - Federal 595RS-RR in stock size. They were only $118 a piece when I purchased the first pair in early 2021. I put them on the front of the cobalt donor and they were sticky enough to make the stock clutch slip :rolleyes:.
I purchased a matching pair in late 2022 and the price jumped to $152 a piece. Looks like they're up to $180 each now :mad:
 
Top