I know this is old, but I just went through this and have some pictures to accompany the process to make the re-positioning a but more intuitive. Once you know what's required, it's 'easy' but there's still a risk of pulling out the wiring or cracking plastic pieces - so patience and care are necessary.
I wouldn't recommend using pliers to pull the tubes out, one of the tubes is crimped and it's **** near impossible to know which one without putting the wiring and other plastic pieces at risk. Plus, to pull the tube out with it crimped requires the force necessary to remove King Arthur's sword - and you don't need to work that hard.
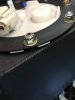
First, see the tabs that surround the pump on the outside - unlatch these. Use the springs to your advantage by just pulling up on the tab with some needle nose pliers and the spring pressure will separate the rest.
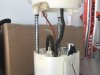
Next, find the crimped tube and use some vice grips to turn her into a circle again so it can move freely through the black insert and the white part. Then, remove the black insert holding the tubes in place.
Place the once-crimped tube into the other tubes hole and the non-crimped tube into the once-crimped tube position. ie Just swap the tubes, do not change the top white piece and be very careful with the wiring and crimping of the gas line itself when spinning things. There's a plug to the pump itself which can be removed, but there are some very thin wires without a plug - be mindful of those.
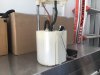
Then, replace the black inserts and don't forget to re-crimp the tube. This is what it should look like. Notice the white top centered over the pump housing now. Also notice my gas line is crimped (it can be uncrimped).
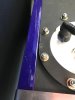
Line up the hole on the top white plastic to a stud. You will have to drill this larger or completely out. It's pretty brittle plastic and did not take kindly to my drill bit so I used a cutoff wheel to open it up a bit.
Your bobber should now be pointing towards the passenger seat - free and clear of obstruction. Opened hole at the 8 o' clock position.
Hope this helps!