• We've upgraded and reskinned the forum. Notice something off? Email us at [email protected] and we'll fix it.

V1 Cheqmate5000's Track Goblin #527 - 06 LSJ

C
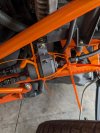
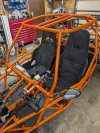
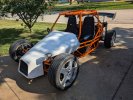
Moved on to the rear suspension. I had to keep the bolts loose until they were all started before torquing. Very exciting point as I am nearing the point where it can sit on all 4 wheels.
 

Attachments

  • PXL_20250509_220257997.jpg
    PXL_20250509_220257997.jpg
    481.5 KB · Views: 71
  • PXL_20250507_003437827.jpg
    PXL_20250507_003437827.jpg
    508.6 KB · Views: 70
  • PXL_20250504_011016455.jpg
    PXL_20250504_011016455.jpg
    339.5 KB · Views: 64
C
I wanted to have a clean radiator hose install. Passenger side looked good with a quick turn and not going over the supercharger.

The driver side I ended up buying a 90 degree tube and pressed in flares so that I could minimize the number of connections. Someday I could see doing more hardlines to make them look even better.
 

Attachments

  • PXL_20250515_023241560.jpg
    PXL_20250515_023241560.jpg
    235 KB · Views: 66
  • PXL_20250508_180333171.jpg
    PXL_20250508_180333171.jpg
    251.5 KB · Views: 76
  • PXL_20250508_180328973.jpg
    PXL_20250508_180328973.jpg
    307.8 KB · Views: 68
Rttoys
One look at the silver/black engine by the orange chassis and it was clear I needed to repaint the engine. Installing the engine by myself was exciting ... No injuries.
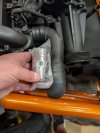
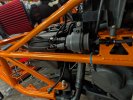
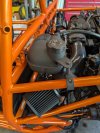
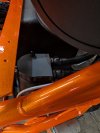
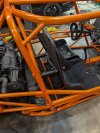
Sweet. Gotta gut that ac compressor though. :cool: 
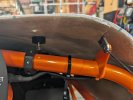
Saves weight and gives you a little room underneath if you want to add anything.
 
C
Decided to add a fill port to the passenger side to help prefill before vacuum filling the coolant.

First attempt at an aftermarket coolant reservoir didn't work because I couldn't find a correct radiator cap that would both hold the correct pressure and have the correct install depth.
 

Attachments

  • PXL_20250521_033016837.jpg
    PXL_20250521_033016837.jpg
    215 KB · Views: 73
  • PXL_20250522_030934919.jpg
    PXL_20250522_030934919.jpg
    299.3 KB · Views: 63
C
First round of fuel filter only lasted a few engine priming cycles. The fuel fitting to AN adapter blew out and sprayed gas everywhere. Short term fix was zip ties. Long term fix was a fuel filter/regulator that has AN fittings built into the housing. Still on the list is to paint it all flat black
 

Attachments

  • PXL_20250518_131932374.jpg
    PXL_20250518_131932374.jpg
    282.1 KB · Views: 70
  • PXL_20250916_000805459.jpg
    PXL_20250916_000805459.jpg
    317.3 KB · Views: 68
  • PXL_20250906_212452471.jpg
    PXL_20250906_212452471.jpg
    235.5 KB · Views: 63
C
Amazon/eBay carbon wing arrived in pretty good shape for the price and got it installed after gluing and wet sanding a small cut. The install width was slightly different from the Goblin so I used small spacers and had to modify the cross rod slightly.

Also routed the fuel and coolant overflow lines so they are hidden and dumping under the chassis.
 

Attachments

  • PXL_20250526_141311230.jpg
    PXL_20250526_141311230.jpg
    439.7 KB · Views: 67
  • PXL_20250526_143715281.jpg
    PXL_20250526_143715281.jpg
    364.5 KB · Views: 63
C
Difficult to see (intentionally) but I installed a catch can down under the vin tag next to the gas tank.

Decided to use the stock coolant reservoir with a lightweight mount. I don't love it but works and is nice that the coolant level sensor works again.
 

Attachments

  • PXL_20250523_192023662.jpg
    PXL_20250523_192023662.jpg
    283.8 KB · Views: 55
  • PXL_20250706_225836758.jpg
    PXL_20250706_225836758.jpg
    273.9 KB · Views: 59
  • PXL_20250523_192035968.jpg
    PXL_20250523_192035968.jpg
    240.2 KB · Views: 57
C
Fixed a few minor leaks. New axle seal, coolant copper washer and inspection plate gasket. Amazing this doesn't leak anything.
 

Attachments

  • PXL_20250530_230840011.jpg
    PXL_20250530_230840011.jpg
    172.9 KB · Views: 58
  • PXL_20250530_153324891.jpg
    PXL_20250530_153324891.jpg
    296.3 KB · Views: 53
  • PXL_20250531_023228460.jpg
    PXL_20250531_023228460.jpg
    195 KB · Views: 51
C
Decided I wanted a little more room for the heat exchanger fan under the ducting. Cut, fiberglass, sand, paint.
 

Attachments

  • PXL_20250822_013817477.jpg
    PXL_20250822_013817477.jpg
    201.7 KB · Views: 56
  • PXL_20250816_113911051.jpg
    PXL_20250816_113911051.jpg
    176.2 KB · Views: 58
  • PXL_20250816_190036593.jpg
    PXL_20250816_190036593.jpg
    262.7 KB · Views: 52
C
I have to slightly modify the front cooler mount due to the modifications of the shroud, fits nicely now.

Fabric dyed the red of the steering wheel as it doesn't fit the theme. Also bought some aluminum clamps for the front brake lines. Ended up modifying them to tuck the line close to the control arm, sandblast, powder, install
 

Attachments

  • PXL_20250902_161047816.jpg
    PXL_20250902_161047816.jpg
    296.8 KB · Views: 57
  • PXL_20250906_220008368.jpg
    PXL_20250906_220008368.jpg
    403.4 KB · Views: 53
  • PXL_20250822_021453302.jpg
    PXL_20250822_021453302.jpg
    272.3 KB · Views: 55
C
Fabricated "adjustable" seat brackets that are very tricky to adjust but they install the seats nice and low. I removed the logo from the seat cover. I didn't like how it turned out so I glued backing foam to the seat, ironed it, and then a second layer of foam. Maybe someday I will make custom seat covers to clean them up.

This also shows the custom shifter handle that I threaded using a cheap Amazon handle and powder coat. DF shifter went in smoothly and seems to work nicely.
 

Attachments

  • PXL_20250906_132302032.jpg
    PXL_20250906_132302032.jpg
    450.4 KB · Views: 66
  • PXL_20250905_021158599.jpg
    PXL_20250905_021158599.jpg
    441.9 KB · Views: 56
C
Custom mounts for a cheap Amazon rear view mirror.

Steering wheel holder.

Fabricated a mount for the license plate and plate light to tuck it up near the exhaust.
 

Attachments

  • PXL_20251019_140344103.jpg
    PXL_20251019_140344103.jpg
    262.5 KB · Views: 55
  • PXL_20251106_205450203.jpg
    PXL_20251106_205450203.jpg
    364.8 KB · Views: 52
  • PXL_20251016_235117947.MP.jpg
    PXL_20251016_235117947.MP.jpg
    409.1 KB · Views: 50
C
A white hood obviously isn't going to work. Epoxied in mounts for the mesh grill and picked up some flush mount hood pins.
 

Attachments

  • PXL_20251018_155335075.jpg
    PXL_20251018_155335075.jpg
    517.3 KB · Views: 50
  • PXL_20251018_013945774.jpg
    PXL_20251018_013945774.jpg
    337.6 KB · Views: 57
  • PXL_20251016_235358896.jpg
    PXL_20251016_235358896.jpg
    255.8 KB · Views: 58
  • PXL_20251018_013829316.jpg
    PXL_20251018_013829316.jpg
    306.2 KB · Views: 49
C
Took some time to weld up and paint the seat back supports so that the seats are completely rigid in the chassis.
 

Attachments

  • PXL_20250923_173152561.jpg
    PXL_20250923_173152561.jpg
    358.2 KB · Views: 52
  • PXL_20250918_235641551.jpg
    PXL_20250918_235641551.jpg
    222.3 KB · Views: 52
C
Blew up my PCM. Not sure how but consistent RAM faults. I ordered a replacement from Flashmasters. I had to perform the security relearn in order to make the system communicate without constant lock outs. I then ordered a HPtuners in order to perform the crank relearn. All fixed.

Side note, HP Tuners is pretty nice. I was testing the SC pump and you can trigger via the software without having to run the engine.
 

Attachments

  • PXL_20250905_022420579.jpg
    PXL_20250905_022420579.jpg
    277.2 KB · Views: 54
C
Random, I didn't have a positive post cover so I cut down the positive post and sealed the cover. My latches don't work great so I also have it zip tied to ensure it doesn't fly away. Maybe someday I will replace it.

With my large seats it was difficult to reach the reverse lockout lever. I welded in a Z shape extension and now it is easy to reach by the shifter.
 

Attachments

  • PXL_20250926_134736359.jpg
    PXL_20250926_134736359.jpg
    270.2 KB · Views: 58
  • PXL_20250927_170042455.jpg
    PXL_20250927_170042455.jpg
    208.4 KB · Views: 65
C
Installed the hood pins and started the bodywork process.
 

Attachments

  • PXL_20251020_143007750.jpg
    PXL_20251020_143007750.jpg
    216.8 KB · Views: 52
  • PXL_20251019_163027529.jpg
    PXL_20251019_163027529.jpg
    165 KB · Views: 52
  • PXL_20251020_195131865.jpg
    PXL_20251020_195131865.jpg
    250.6 KB · Views: 57
Back
Top