• We've upgraded and reskinned the forum. Notice something off? Email us at [email protected] and we'll fix it.

V1 ChrisH’s extended track goblin - 08 SS/TC donor #419

ATMironov
I'm in Redwood City, but I'm actually building the goblin in my brother's shop in Arizona. I will finish the car then bring it to the Bay Area in in January and start the SB100 process to get California tags. It looks like you are certainly building a much more sophisticated goblin, are you planning to use it on the track only or also the street?
I’m building the car primarily for track use, but do plan on registering it so it’s street legal.
I own Northern California Racing Club, we host track days in NorCal.
When the car is ready, bring it out for a day. First event will be my treat.
 
C
That would be awesome, thanks. I'm totally unfamiliar with the car racing groups in the area so any introduction to what you guys do would be really appreciated. Also, if there is anything I can lend a hand with or help out let me know, SF is only a 20 minute drive from my place.
 
SmsDetroit
I’m building the car primarily for track use, but do plan on registering it so it’s street legal.
I own Northern California Racing Club, we host track days in NorCal.
When the car is ready, bring it out for a day. First event will be my treat.
Careful. You may have a lot of us goblin folks making the trek out there with an offer like that
 
C
Coincidentally enough, a video came out today showing a race car driving around the streets of San Francisco which now seems relevant to this conversation.
 
C
Suspension Question: So I'm starting stage 2 of the goblin and was wondering if anyone remembers what bag contains the steel rod end mounts? I can't seem to find them in the suspension hardware bags. Thanks in advance.
 

Attachments

  • steel rod end mounts.jpg
    steel rod end mounts.jpg
    254.2 KB · Views: 257
C
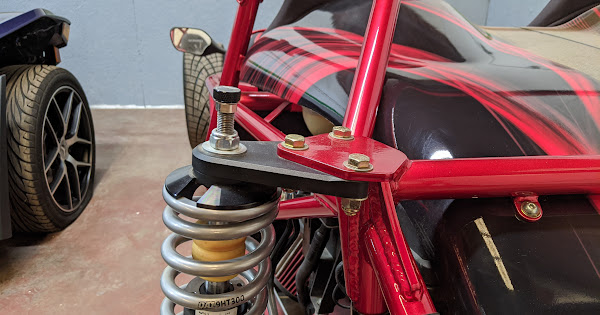
Some more progress today, and another suspension question. The rear coil overs are labeled FR and FL, I assume Front Right and Front Left. The FR coil overs are about two inches longer. What is the reason for this and does it lead to a mis-match in the number of threads left on the shock?
 

Attachments

  • IMG_0605.jpeg
    IMG_0605.jpeg
    379.2 KB · Views: 280
  • IMG_0606.jpeg
    IMG_0606.jpeg
    304.7 KB · Views: 271
  • IMG_0607.jpeg
    IMG_0607.jpeg
    315.8 KB · Views: 280
  • IMG_0608.jpeg
    IMG_0608.jpeg
    328.5 KB · Views: 272
  • IMG_0611.jpeg
    IMG_0611.jpeg
    322.4 KB · Views: 269
  • IMG_0612.jpeg
    IMG_0612.jpeg
    285.2 KB · Views: 273
  • IMG_0613.jpeg
    IMG_0613.jpeg
    257 KB · Views: 284
  • IMG_0614.jpeg
    IMG_0614.jpeg
    314.2 KB · Views: 288
  • IMG_0615.jpeg
    IMG_0615.jpeg
    447.9 KB · Views: 273
  • IMG_0604.jpeg
    IMG_0604.jpeg
    266.8 KB · Views: 302
Joebob
Some more progress today, and another suspension question. The rear coil overs are labeled FR and FL, I assume Front Right and Front Left. The FR coil overs are about two inches longer. What is the reason for this and does it lead to a mis-match in the number of threads left on the shock?
A good starting point is to thread the shock unit into the strut body until you can measure about 3.5" by pushing a tape measure up into the bottom of the strut body. Once on the ground, you can tweek for your desired ride height.

 
Desert Sasqwatch
You have a mismatch on the struts, those should be identical in length regardless of side. Did you purchase with your kit or buy separately? If with the kit contact Adam and explain what the problem is.
 
G
Were these assembled coilovers or are you saying some of the individual parts are longer on one side than the other side? The overall length of the assembly is adjustable so different lengths can be fixed.
 
C
Hey Gtstorey, I think you are correct. If I check the bottom of the shock there is space between the barrel and the bottom of the shock are different between the two and matches the difference I see in the threaded barrel. I take it off and adjust the overall length tomorrow. Thanks for the info.
 
C
Update on the progress in the last week. I was able to install the axels, shocks(thanks to the advice from the forum), spindles, hubs, brakes, toe link bar, heat exchanger, aluminum shifter, shifter cables, parking brake, DF quick release steering wheel, brake reservoir relocation, tunnel cover, wheels and tires. Things went fairly smoothly, but I do have a few questions for the forum.

When using the aluminum shifter, do the shifter cables cross or does the the driver side cable on the shifter also attach to the driver's side transmission linkage on an F35 transmission?

For the DF quick release steering wheel, what nut is used to hold the steering shaft adapter? The one I am currently using does not allow the steering shaft adapter and quick release adapter to sit flush with one another.

Lastly, do the stock seat have to be modified to be be installed? It looks like the distance between the mounting holes and the hooks on the seat frame are farther apart on the seat than on the floor panels. Also, it looks like the plastic trim on the stock seats hit the parking brake when in the correct position.

Thanks again for the help and input.
 

Attachments

  • IMG_0602.jpeg
    IMG_0602.jpeg
    362.2 KB · Views: 280
  • IMG_0603.jpeg
    IMG_0603.jpeg
    377.5 KB · Views: 285
  • IMG_0605.jpeg
    IMG_0605.jpeg
    379.2 KB · Views: 296
  • IMG_0606.jpeg
    IMG_0606.jpeg
    304.7 KB · Views: 289
  • IMG_0607.jpeg
    IMG_0607.jpeg
    315.8 KB · Views: 307
  • IMG_0613.jpeg
    IMG_0613.jpeg
    257 KB · Views: 284
  • IMG_0614.jpeg
    IMG_0614.jpeg
    314.2 KB · Views: 295
  • IMG_0615.jpeg
    IMG_0615.jpeg
    447.9 KB · Views: 279
  • IMG_0627.jpeg
    IMG_0627.jpeg
    313.6 KB · Views: 287
  • IMG_0626.jpeg
    IMG_0626.jpeg
    317.7 KB · Views: 278
  • IMG_0629.jpeg
    IMG_0629.jpeg
    328.3 KB · Views: 286
  • IMG_0661.jpeg
    IMG_0661.jpeg
    333.2 KB · Views: 273
  • IMG_0671.jpeg
    IMG_0671.jpeg
    266.4 KB · Views: 282
  • IMG_0676.jpeg
    IMG_0676.jpeg
    299.5 KB · Views: 285
  • IMG_0679.jpeg
    IMG_0679.jpeg
    246.1 KB · Views: 277
  • IMG_0680.jpeg
    IMG_0680.jpeg
    301.6 KB · Views: 276
  • IMG_0681.jpeg
    IMG_0681.jpeg
    286.7 KB · Views: 281
  • IMG_0685.jpeg
    IMG_0685.jpeg
    366.2 KB · Views: 284
  • IMG_0686.jpeg
    IMG_0686.jpeg
    321.8 KB · Views: 292
  • IMG_0687.jpeg
    IMG_0687.jpeg
    358.7 KB · Views: 285
Last edited:
C
A few more photos with the seats and hood in place but not installed.
 

Attachments

  • IMG_0688.jpeg
    IMG_0688.jpeg
    339.9 KB · Views: 279
  • IMG_0689.jpeg
    IMG_0689.jpeg
    369.3 KB · Views: 277
  • IMG_0690.jpeg
    IMG_0690.jpeg
    326.6 KB · Views: 301
  • IMG_0692.jpeg
    IMG_0692.jpeg
    356.1 KB · Views: 274
Ross
You can trim the plastic sides of the seats or just remove the plastic sides.
The front and back mounting points of the seats also need some trimming.

The cable on the driver's side of the billet shifter is the cable that moves when you do a first to second gear shift.
On the F35 transmission, that is passenger side cable.
 
Last edited:
Back
Top