Seb's Goblin #454 (2008 SS/TC donor) - Registered

Sebnuts

Well-Known Member
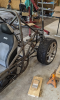
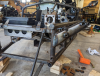
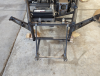
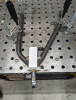
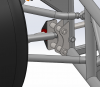
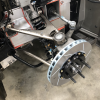
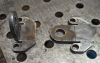
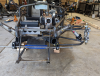
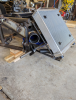
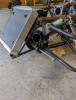
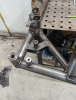
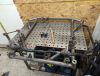
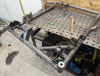
Had a good weekend. Managed to finish all of the fab work on the rear! :cool:
1682303837785.png
And it's completely bolt on.
1682303876946.png
Only time will tell on performance, but I'm really happy with the way it looks.

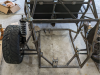
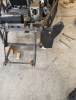
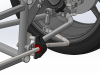
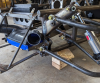
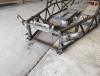
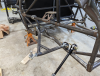
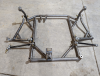
Up next, I need to finalize the mods on the front suspension. Unfortunately, it won't be bolt on, gonna have to poke some holes in the chassis.
 

Sebnuts

Well-Known Member
Moving on to the front, I put the new plasma table to work and made a drill template to accurately locate the new control arm and coilover mount points.
1683597037102.png

Borrowed this beast of a mag drill from work. Heavy SOB but made the drilling easy once I got it in position.
1683597101835.png

Just need to prep the holes a little with a flap disk and we'll be ready to weld in the new mount tubes.
1683597245078.png1683597264035.png

I needed to relocate the coilover mount point on lower control arm too. For this I plasma cut some brackets and used another 3D printed fixture to make sure everything was in the correct position:
1683597364576.png
The new bracket also has a mount point for the sway bar.

Next up on the list is front sway bar mounts. This is the design I have currently. I'm not in love with it but it's the best I've come up with so far. I'll continue to noodle on it this week, but I'll probably start cutting parts and see what it looks like mocked up this weekend.
1683597711887.png1683597742504.png
 

ATMironov

Well-Known Member
I ended up placing my sway bar above the frame. This was the best place I could manage using a straight bar and angled arms. You don’t seems to have those restrictions though. Haha.


Desert Sasqwatch

Goblin Guru
AARRGGHH!!! I want one of those! I had to do my relocation drilling the hard way! But, wow, yours did tun out nicely! :D Break out the welder and get things welded up. Curious to see how it will turn out.

BTW, what front swaybar are you planning to use? Make, model, diameter?
 

Sebnuts

Well-Known Member
BTW, what front swaybar are you planning to use? Make, model, diameter?
I'm going to bend my own out of chromoly tubing. I still need to finish my ride and roll rate calcs to determine the OD and wall thickness, but it will probably end up being thin wall 3/4"OD.
I can get bushings that go as low as 14mm and as high as 28mm, so I'll have plenty of wiggle room if I want to retune in the future.
 

Sebnuts

Well-Known Member
Chipped away at the front end some more this weekend.
I made some new ball joint mount plates to relocate the roll center and allow for the use of high misalignment spacers on the heim joints.
1684109292565.png1684109429637.png
I also got the ARB mounts tacked in. I don't think they look too out of place.
1684109544449.png
It clears the intercooler and ducts, pretty happy with that. I didn't put the radiator in yet to verify that the coolant lines clear it, but I'll be doing that first thing next weekend before welding anything in solid.
1684109817490.png
I have 2" of bump travel and over 2" of droop travel now with no binding, big win :cool:
I need to finish up the design of the new tie rod arm mount and maybe get that fabbed up next weekend.
 

ATMironov

Well-Known Member
Chipped away at the front end some more this weekend.
I made some new ball joint mount plates to relocate the roll center and allow for the use of high misalignment spacers on the heim joints.
Be cautious on the thickness of those ball joint mounts.
They are pretty notorious for bending. DF sells a beefed up version. I think they are made from 3/8 plate.
 

Sebnuts

Well-Known Member
I think they are made from 3/8 plate.
The original ones that came with my kit were 1/4" plate, the ones I made are the same. I didn't realize they sold a 3/8 version, strange that they wouldn't just supply that as the standard if the 1/4 version had issues.
I may just beef it up with some gusseting if needed.
 

Rauq

Goblin Guru
Be cautious on the thickness of those ball joint mounts.
They are pretty notorious for bending. DF sells a beefed up version. I think they are made from 3/8 plate.
For reference, when my kit was built the upper and lower brackets were the same thickness. I bent my original lowers. (I thought) Newer kits come with thicker lower brackets. If your lowers are not a least a bit thicker than stock Goblin uppers, there may be some risk there.
 

Sebnuts

Well-Known Member
Newer kits come with thicker lower brackets. If your lowers are not a least a bit thicker than stock Goblin uppers, there may be some risk there.
99% sure all of my stock steel brackets were the same @ 1/4", I'll have to double check now.
 

Joebob

Goblin Guru
They used to be in the store, but I don't see them anymore. Maybe I misunderstood what comes in newer kits.
They did the change over to the thicker brackets somewhere in the mid 300s. I am #270 and paid for the AT "upgrade" brackets before they were standard. I think they went thicker steering arms and then went thicker brackets. Just part of the continuous improvement.

Joe
 

Sluggonaut

Goblin Guru
I'm 364 and the upgraded brackets were still an option at the end of 2021. The beefier steering arms were standard then, but the brackets weren't standard yet.
 

Sebnuts

Well-Known Member
Good progress this weekend.
I verified that the front ARB location clears all of the radiator plumbing and intercooler ducts
1685408225899.png1685408246568.png
Finished welding everything up - Frame mods are done and we're ready to find a powder coater!
1685408319454.png

Originally I wasn't going to put an ARB on the rear, but I figured that would end up biting me in the ass later down the road, so I went ahead and added some mounts to the subframe
1685408430177.png
They're in the same location as the factory Cobalt ARB mounts, so an ARB from a non SS Cobalt is still an option.
1685408526013.png
Or a custom one using the same mounts & bushings that I'm using up front.
1685408569693.png

I still need to finish fabbing up the front steering arms and order some new springs. Ideally I can get all that done while waiting for the powder coater.
 

Sebnuts

Well-Known Member
I finished up my ride and roll rate calcs today and got new springs on order.
The general goals were ~2Hz frequency with a roll stiffness of 3°/G. Here's what I ended up going with:

Front Setup:
Roll Center Height - 1.5in
ARB Rate - 170lbs/in (custom 3/4"OD x .120"Wall 4130 tubing)
ARB Motion Ratio - 0.69
ARB Wheel Rate - 82lbs/in
Spring Rate - 200lbs/in
Motion Ratio - 0.65
Wheel Rate - 84.5lbs/in
Frequency - 1.92Hz/115cpm
Front Roll Rate - 352ft-lbs/°
Front Roll Rate Distribution - 44.6%
Front Total Lateral Load Transfer Distribution (TLLTD) - 41.9%

Rear Setup:
Roll Center Height - 3.3in
ARB - None
Spring Rate - 220lb/in
Motion Ratio - 0.95
Wheel Rate - 198lbs/in
Frequency - 2.15Hz/129cpm
Rear Roll Rate - 438ft-lbs/°
 

Keckster

Well-Known Member
Pretty similar setup to my spring rates. I've currently got 300 in front 220 rear. Haven't done any anti dive geometry in front yet but will lower spring rates once I do
 

Sebnuts

Well-Known Member
Pretty similar setup to my spring rates. I've currently got 300 in front 220 rear. Haven't done any anti dive geometry in front yet but will lower spring rates once I do
You need to be careful with lowering the rates on the stock front end, you're pretty limited on bump travel. If you have the "new" style bent plate ball joint mounts, you can overbend the upper mount a few degrees (basically get it to match the angle of the upper control arm) to help some.
 
Top