Desert Sasqwatch
Goblin Guru
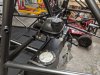
All the yellow connectors are for airbags or stock seatbelt tensioners - all safety impact stuff - don't need the yellow connections.
Your welcome! It wasn't an issue at all.Great job so far Brett, and just wanted to say thanks again for bringing my missing parts down with you. As for your wiring questions. I just clipped off the AC wires and put shrink wrap over the ends and tucked them into the wire loom. Same with the yellow connectors. As for the O2 sensor, you may not want to cut it out just yet. you may need it for your emissions. I'm pretty sure you are required to have a test to get registered.
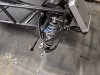
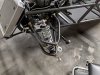


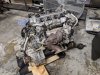
What did you use to paint your coolant tank? Looks great. I was thinking it’s the least attractive part in the engine bayGot some more done today. Started cleaning up the engine harness, installed the front shocks and control arms, installed the coolant tank, painted some more parts, ordered half shafts, got a battery, changed the spark plugs, and probably a bunch of other things I'm not thinking about.
Going to try and get the engine finalized this week and install it next weekend. I talked to Adam the other day and it looks like I am about 2 weeks out on the harness. Hopefully, it is here before Thanksgiving week since I have a bunch of time off. Honestly, the seats are looking like mid December so that might be the critical point to a test drive. Wife suggested a couple of milk crates. That might actually happen.
View attachment 18135View attachment 18136View attachment 18137View attachment 18138View attachment 18139View attachment 18140View attachment 18141
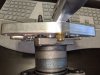
First, I used a Dremel to cut off the flange that protruded from the side (not the clip on the back since it is used as a refence for the mount).What did you use to paint your coolant tank? Looks great. I was thinking it’s the least attractive part in the engine bay
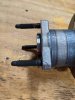
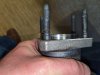
Five stud hubs. Here is the link to the ones I bought from amazon with the studs with the shoulders.Are these 4 stud or 5 stud hubs? Many aftermarket hubs are supposed to fit multiple vehicles and some features are not always compatible with every vehicle the manufacturer claims. Sorry this happened. I would still try to return them to get a more correct part. Call the place you purchased from and explain the situation, they may be willing to exchange even though you no longer have the original packaging.
I reached out to Adam and he indicated that drilling the holes down about 1/4 an inch to accommodate the shoulder should not be an issue. Looks like the shoulder is 10mm or about 25/64". Amazingly enough, I have a drill bit to handle it.I’d say you would have no problem drilling them as long as you have the right size bit to not go too big. The way that stud is designed is for the big shoulder to hold the shear load and line the hub up. The nuts just keep it tight.
| Make | Model | Engine | CC | KW | cylinder | Type | Year |
|---|---|---|---|---|---|---|---|
| CHEVROLET | NOVA | All | Steering Tie Rod End - FRONT OUTER | 88-85 | |||
| CHEVROLET | PRIZM | All | Steering Tie Rod End - FRONT OUTER | 02-98 | |||
| GEO | PRIZM | All | Steering Tie Rod End - FRONT OUTER | 97-89 | |||
| LEXUS | ES250 | All | Steering Tie Rod End - FRONT OUTER | 91-90 | |||
| SCION | XA | All | Steering Tie Rod End - FRONT OUTER | 06-04 | |||
| SCION | XB | All | Steering Tie Rod End - FRONT OUTER | 06-04 | |||
| TOYOTA | CAMRY | All | Steering Tie Rod End - FRONT OUTER | 91-87 | |||
| TOYOTA | CELICA | All | Steering Tie Rod End - FRONT OUTER | 99-86 | |||
| TOYOTA | COROLLA | All | Steering Tie Rod End - FRONT OUTER | 02-85 | |||
| TOYOTA | ECHO | All | Steering Tie Rod End - FRONT OUTER | 05-03 | |||
| TOYOTA | RAV4 | All | Steering Tie Rod End - FRONT OUTER | 00-96 | |||
| TOYOTA | TERCEL | All | Steering Tie Rod End - FRONT OUTER | 90-87 |
This was kind of impromptu. We have definitly hit critical mass in the Houston market. Jason and I were already talking about a get together.And y’all didn’t invite me. I r sad