A great weekend! 16 hours. I am nearly finished with stage II, I ordered my stage III parts.
Rear suspension completed, brakes, hoses and brake lines installed. I will use the anti-sway at least initially - Lonny and Adam say it make the rear end a bit looser, I like to slide the rear end so we will see.
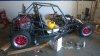
New brake pads all around. My 15" front wheels slightly rubbed the front calipers. See pictures. I ground just a bit of the calipers where they rubbed. Easy, quick.
Also remounted the brake fluid reservoir
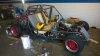
Got my seat belt, head rest bar back from powder coating. I have to cut down the seat belts too long as they mount high on the bar behind the seat where the head rests go.
My newly covered seats should be done this week.
I had to move the little oil pump for the automatic transmission I will use when towing the car. It was in the way of the rear toe link bar (oops).
I was thinking that I would have been able to drive it Saturday but I have a few bolts to tighten and a few other loose ends to clean up. This next weekend for sure I will be able to drive it.
View attachment 730
View attachment 731
On the backside of the wheel image notice the slight line where it was rubbing. I could have put a spacer behind the sheel offseting a bit more but it was easy to just take a bit of the caliper. See the grind marks.
View attachment 732
I will connect my tow bar to these heim joints (I used them instead of the nut on the bolt)
View attachment 733 View attachment 734 View attachment 735View attachment 735 On this image you can see the headrest / seat belt bar behind the seat. I just have one head rest / seat belt mounted as I need to pull it back off to get the seat belts cut down