Matt C's Street Goblin - Extended Frame #355 - 06 LS Donor

Matt C

Active Member
Welcome. I’m loving seeing other Michigan builders here. I’m up in Troy
Oh yeah, That's not too far at all. I dropped my chassis and random parts off at a Powder Coater in Monroe over the weekend, and they mentioned they just got done coating the exact same frame for someone. Not sure if they were around here or northern Ohio, but there might be someone else around this neck of the woods.
 

Matt C

Active Member
Finally started working on the Goblin a little bit this week. Started with the coolant hoses. It was going great, until I had about 6 inches left to pull through the frame rail, and the hose end ripped off away from the knot in the rope. Had to improvise a way to get the coolant hose back out again. Just hooked it up to my tractor and tied a tow strap from the Goblin to the back of the garage. Pulled it out like butter. Made a better knot and was able to get both coolant hoses in without a hitch.
 

Attachments

Rauq

Goblin Guru
I would speculate that Illusion Cherry is probably one of the most popular non-monochromatic frame colors. It looks good!
 

Matt C

Active Member
Well, it's been a while since I documented my progress. Been putting in an hour here an an hour there over the past few weeks. Didn't get as much done over the holiday break, but got a lot done last week.

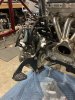
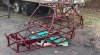
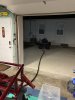
Got the steering, pedal box, brake booster and brake lines installed. That all went pretty smoothly. Put on new inner and outer tie rods since the donor's were so rusted, I had to cut them off the Cobalt.

29938


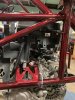
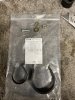
Few days later, worked on getting the radiator installed an plumbed in. Also got the fuel take mounted up. I realized, as I was putting in the fuel pump, that I was missing the retaining ring that goes on the top to hold the pump in place. A quick email to DF and one will be on the way soon.

29939


29940

(Yes, that's a wagon full leaves that my kids refuse to get rid of. They'll replace it with fresh dead leaves next fall too.)

I'm usually doing this on my own, but I had some help one day! He's a good supervisor.

29941


I got a surprising email on Monday that my wire harness was done and was on it's way back home. They must have worked on them over the holiday break. They only had it about a month. I wasn't really expecting it until mid February. They did a great job! Much better that I would have done. It was cut down from 22lbs to 12lbs. When installing the pedal box, I couldn't find my brake and clutch switches. I looked everywhere, but no luck so I bought new ones. Got the harness back, and boom, there were still connected to the harness. Must have forgotten to take them off before sending the harness to DF.
29942


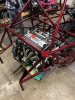
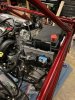
I was pretty eager to get the harness in. Got it just about done, just some wire ties to tighten up and connections to plug in.

29943


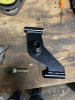
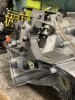
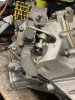
In preparing to mount the transmission back onto the engine, I read that the shift counter weight on the F23 transmission hits the frame in certain gears. Figured I'd trim it up a little bit before it's mounted.

29947


Also had to order a new clutch line that connects to the throw out bearing. The bleeder and line connection was completely rusted and wasn't going to work. Hopefully have that here in a few days.
29946
 

Attachments

Matt C

Active Member
Got the engine set in place tonight.

When installing the solid transmission mounts, I noticed the supplied bolts were too big in diameter to mount the rear solid. Thankfully my original bolts worked. When looking at the front mount, the supplied bolts are way too short. I thought maybe I got the wrong baggie (it does say it’s for an SS, which I don’t have). But the same hardware is shown in the picture of the kit in DF’s online store. Anyone ever installed the solid mounts on the F23? How did you end up mounting the front mount?
 

Attachments

Matt C

Active Member
Got a little more done tonight. Worked on mounting the BCM. Also got the fuse block mounted and the vehicle and engine harness all plugged in. Still have to bundle everything together. Thinking I’m going to have to order the next stage soon. Starting to run out of things to do. Just have a lot of fine tuning and cleaning up.
 

Attachments

Matt C

Active Member
Worked a little bit on the goblin tonight. Put the battery in and turned the ignition switch on to see if the gauge cluster lit up. It finally came alive, but is flashing “ Power Steering”. I also plugged my OBDII reader in and wasn’t able to communicate with the car. Looks like I have to check all my grounds and the forum.

Finished up the clutch line as well

Went to install the final rear radiator house and found out I was only provided 3 of the 4 1.125” hose splices. The 1.25” spice is too big to connect to the frame radiator hose. I’ll put it on my list of things I need to get from DF.

Does anyone know if the driver side radiator hose bracket (to keep it off the alternator belt) is included with stage 1 or 2? If it’s in the first stage, I didn’t get it.

Also, anyone know what these clamps are used for that come in the radiator hose hardware bag? I think the big one is for the harness bundle in the tunnel to be secured by the brake tee, but not 100%, and don’t know about the small one.
 

Attachments

Lonny

Administrator
Staff member
The hose clamps and hardware are to hold the right side radiator hose away from the belts and pulleys.
The small clamp goes around the frame and the larger clamp goes around the radiator hose.
They attach to each other using the bolt and nut and washers.

Email [email protected] and they will get you a tube sent out.
 

Matt C

Active Member
The hose clamps and hardware are to hold the right side radiator hose away from the belts and pulleys.
The small clamp goes around the frame and the larger clamp goes around the radiator hose.
They attach to each other using the bolt and nut and washers.

Email [email protected] and they will get you a tube sent out.
Awesome! That makes a lot more sense. Thanks Lonny!
 

Matt C

Active Member
What a day. Spend the entire day chasing down wires and reading up on how the OBD and Power Steering interact with the BCM and PCM. I'm still not able to connect my OBD reader to the Goblin. Just says there's a communication error. Also have a Power Steering message on the Speedo. Reading Ross's post on the data line wires and where they connect, and r3drckt OBD issues, I was able to able to rule out a few things.

First, I have power to the OBD port. I have 60 ohms resistant between pin 6 and 14 (data lines). I have 12v from pin 16 (power) to both pin 4 and 5 (grounds). Checked all body grounds and have good continuity.

Then I started chasing wires. I have continuity between the OBD port and the 6 pin connector at the power steering control module. I have continuity from the power steering control module to the BCM. This is where it gets weird. I cannot find the wires from the BCM to the PCM at the PCM.

According to Ross's post , the Tan/Black strip wire should be at on the C1 connector (the small blue plug on the right of the picture). I have a light blue wire which appears to be the AAP sensor. (Maybe Ross's version was for an LSJ, mines not that fancy). Instead my GMLAN data wires are supposedly on the C2 connector (the black one on the left) in spot 64 and 65. I'm just not sure how the BCM connects to the C2 connector, since that comes from the engine harness and not the reworked body harness. I'm thinking this might be part of my OBD/power steering issue. It's like the PCM isn't connected to the the GMLAN data wires. Also, I had DF rework the harness, so I'm learning these connections as I go. Anyone have experience with this sort of issue on an L61 with an F23 manual base LS Cobalt?

BCM, J2/C2, pin 2tan/black stripHigh speed GMLAN serial data +Goes to PCM, C1, pin 1 (C1 is the blue connector on the PCM)
BCM, J2/C2, pin 20tanHigh speed GMLAN serial data -Goes to PCM, C1, pin 2

30094
 

Attachments

Joebob

Goblin Guru
Have you made sure that you have connected the Body to Engine harness plug X101? For me, this links the LAN lines from the BCM to the TCM on my auto or to the ECM for a manual car.

I think it is this plug.
30101
 

Mahkoi

Well-Known Member
Worked a little bit on the goblin tonight. Put the battery in and turned the ignition switch on to see if the gauge cluster lit up. It finally came alive, but is flashing “ Power Steering”. I also plugged my OBDII reader in and wasn’t able to communicate with the car. Looks like I have to check all my grounds and the forum.

Finished up the clutch line as well

Went to install the final rear radiator house and found out I was only provided 3 of the 4 1.125” hose splices. The 1.25” spice is too big to connect to the frame radiator hose. I’ll put it on my list of things I need to get from DF.

Does anyone know if the driver side radiator hose bracket (to keep it off the alternator belt) is included with stage 1 or 2? If it’s in the first stage, I didn’t get it.

Also, anyone know what these clamps are used for that come in the radiator hose hardware bag? I think the big one is for the harness bundle in the tunnel to be secured by the brake tee, but not 100%, and don’t know about the small one.
I didn't get the driver side rad hose bracket in stage one which seems odd because it's running at the end of stage one. I was waiting to see if it came in a later kit before I called and asked for one. I have the hose zip tied to one of the tube frames for now so it doesn't rub.
 

Matt C

Active Member
I didn't get the driver side rad hose bracket in stage one which seems odd because it's running at the end of stage one. I was waiting to see if it came in a later kit before I called and asked for one. I have the hose zip tied to one of the tube frames for now so it doesn't rub.
Lonny told me that the two hose clamps and hardware in the K23A baggie are used to hold the coolant tube. I don’t think they’re using the steel J bracket that was in the videos anymore. I think I miss typed it when I was asking. It was for the passenger side, not the driver side.
 

Attachments

Matt C

Active Member
Have you made sure that you have connected the Body to Engine harness plug X101? For me, this links the LAN lines from the BCM to the TCM on my auto or to the ECM for a manual car.

I think it is this plug.
View attachment 30101
Yes, that’s the only tan/brown wire I found and it went to this connector. I checked the continuity from the BCM to the right pin in that connector and didn’t get anything. I’ll double check it tonight. Maybe the wire is broken somewhere.
 

Lonny

Administrator
Staff member
Some data wires go from the body harness to the engine harness and then from the engine harness to the ECM.

At any point in time have you heard the fuel pump prime?

Have you double checked that all five of the 7mm bolts have been firmly tightened in your fuse box? As you tighten them they will screw into the connector below and then start to feel snug. From there you will keep turning them until it pulls the connector up into the fuse box.
You should be able to do this with a 7mm nut driver and a firm twist. Any more than that probably means they are seated.

Have you checked all of the grounds?
There are one or two in the back. There are two places that are easy for grounds in the back.
Disconnect the fuel pump connector and check for continuity from the black wire to the transmission case. (This may not work if we had to replace the fuel pump connector, some of the replacement connectors have wire colors that do not match the same positions as a cobalt. If your not sure, post an image of your connector and I can verify that it is the same as a cobalt.)
The other place that needs to be checked for continuity to the transmission is the tail light ground wires that are rolled up near the fuse box.
If both of these have continuity then your grounds are good to go in the back.

In the front there is only one bundle of ground wires and the connect to the pedal support bar. They should be easy to visually inspect.

Do you have the 50 amp connector plugged in at the front?

If you had the engine harness unplugged at any time are you sure you have it plugged back up correctly? The connector that plugs into throttle body can be plugged into the wrong place.

Also the connector that connects to the throttle body can take a lot of force to get it to lock in place.

Does your throttle pedal move when you press the accelerator pedal?

Does your security light on your cluster go out after a few seconds?
 

Matt C

Active Member
Problem SOLVED!

So, with my set up, the data wires run from the BCM to the body to engine harness connector as Joebob mentioned above, then routes to the big C2 lever connector into the ECM. The two wires are tan and tan/brown and are twisted together (presumably to prevent interference with one another). I ran a continuity check from the BCM connector to the C2 ECM connector for each wire. Nothing. Then I swapped the probe to the opposite wire and bingo. Apparently, somewhere within the wire harness, the tan/brown wire got crossed with the just tan one, and vise versa. I peeled back the electrical tap at the connector (where it connects to the engine harness), cut the two wires and connected them opposite to each other. Now Tan goes to Tan/Black, and Tan/Black goes to Tan. Plugged everything back in, and my power steering message went away, and OBD now connects!

First major hurdle has been solved.

Thanks for everyone's help.

30123
 
Top