OptimizePrime
Goblin Guru
I was hoping to get my Goblin on the dyno this weekend so I had some empirical data to support what I'm saying but it was an extra 3hrs on top of a long drive already. Either way, I'm motivated to get this out as there is a lack of information specific to getting a TC Goblin up and running well before you go about other aspects of your tune.
Helpful Threads: LINK
Cliff notes of first step, you do not want to mess with the MAF Calibration table as you're not 'relocating' your MAF, even though it's in a different position compared to the Cobalt. You want to modify the table your ecu looks at for fuel vs rpm vs load. *Edit* - while this is still accurate, if you're consistently off in a certain Hz level by > +-1.5% then change those specific Hz levels by multiplying by % to get it closer. After making this change, keep an eye on your fuel vs rpm vs load values as they may need updating.
This guide is mainly focused on how to set up HP Tuners to optimize your tuning workflow, what you need to adjust and look out for to get a good foundation to build from. I am by no means a professional tuner, my only experience tuning a vehicle outside of this is with my 600whp eclipse using ECMLink - but the concepts are still the same regardless of tuning software. With that said, I don't know the dark corners of HP Tuners or LNF platforms, any advanced questions should be deferred to google and the cobaltss crowd. If you have any tips / tricks / stuff to add please join in
This guide assumes your vehicle is in otherwise good heath and you assume all responsibility for any damages following anything I'm about to outline. With that out of the way, lets get started.
My setup:
Stock LNF with factory turbo
Forge BPV with 23psi spring (yellow)
Re-clocked both knock sensors so the lead faces 9pm (this apparently helps with phantom knock)
GM 3bar map sensors
Relocated MAF/filter outside of the vehicle
2.5" intercooler pipes
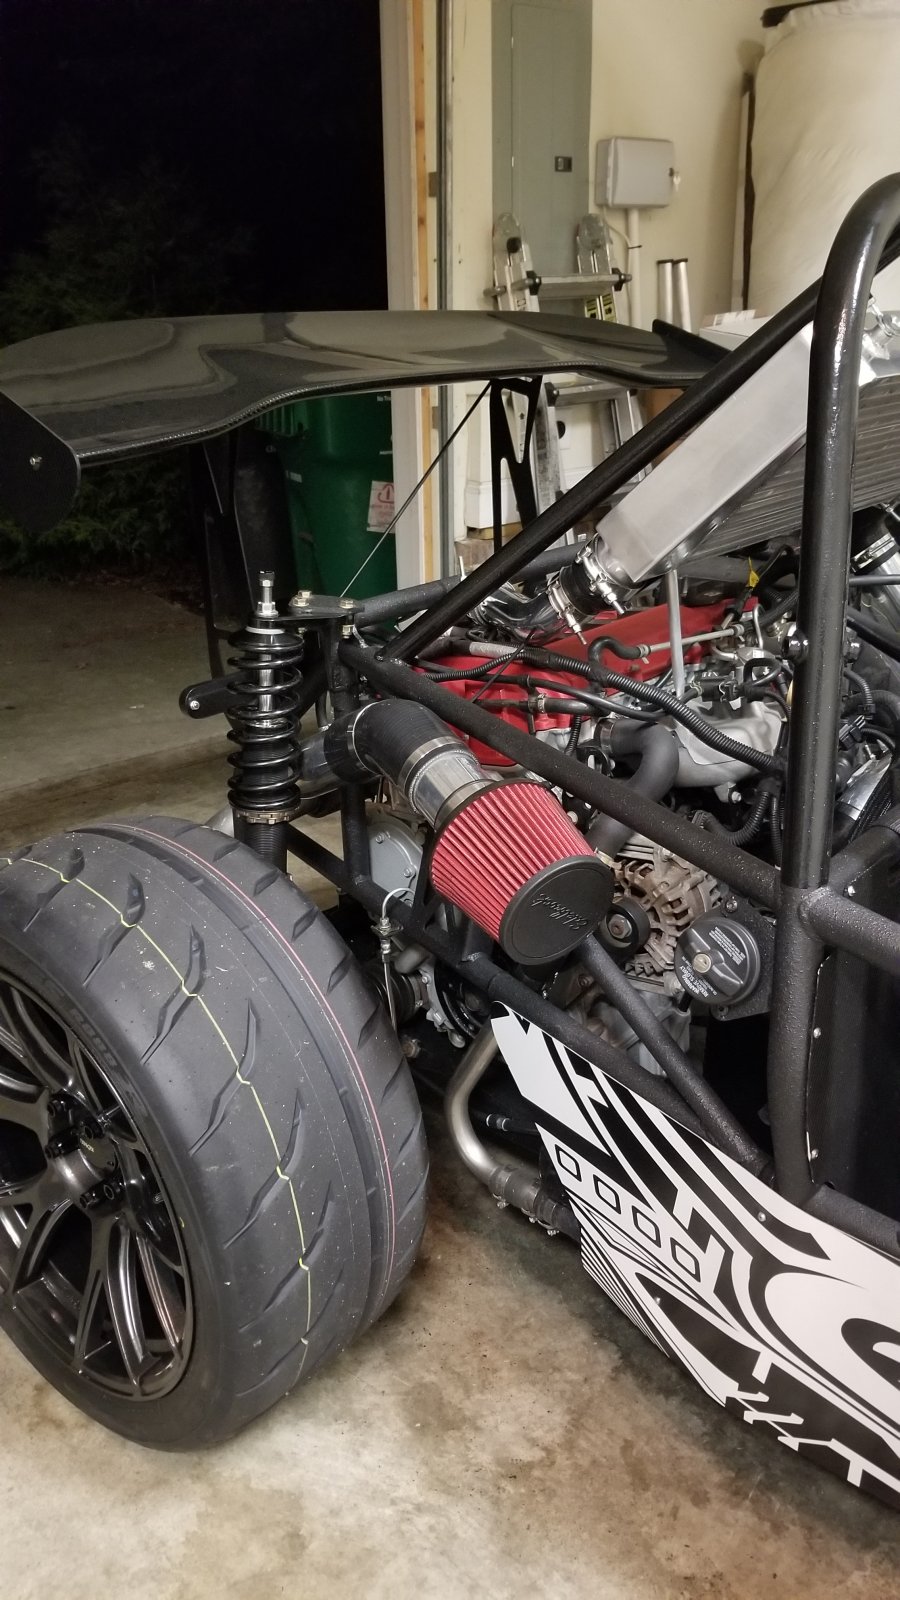
I don't think any of the above materially factors in to just getting your fuel trims aligned, but it's worth mentioning in case you're looking at other aspects of my tune files and copying verbatim. I have linked the layout you'll need to follow along - it should already have the tables setup so you can easily copy and paste from VCM Scanner into VCM Editor
HPTuners VCM Scanner Defaults (layout, charts, maths etc)

Before messing with boost, timing, camshaft angles, afr's etc. you have to nail down your fuel trims - which is really what this step is focused on. These values change depending on season and elevation so it's likely something you'll become familiar with over time.
Before you run your first scan, you'll have to modify your stock tune. Open VCM Editor and modify your MAF Correction > Base table all to 1. Don't touch your Airflow vs. Frequency table. You can see the rest of the tunes settings here: LINK
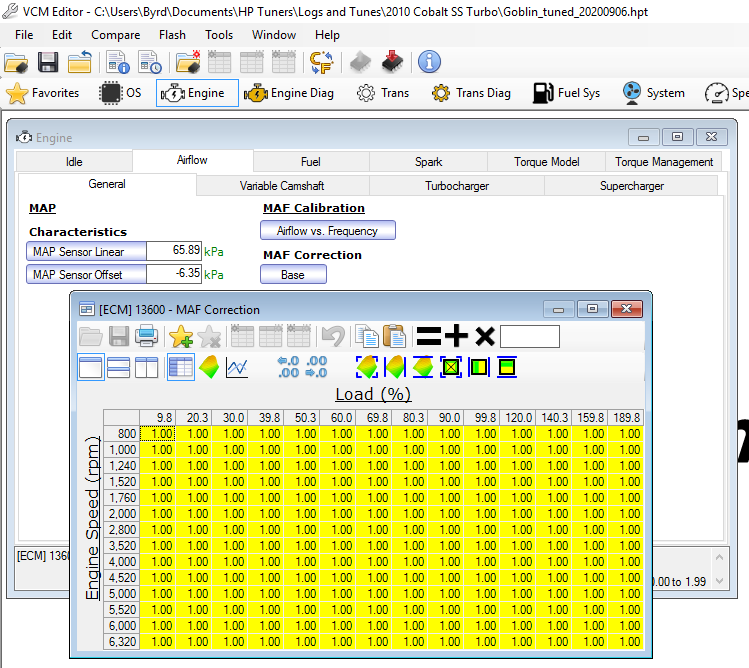
At this point, that should be the only change you make - write the file to your vehicle. Your vehicle trims are now baselined, and it's likely to run really rich - and that's okay. Time to go for a drive...
Unplug your EVAP sensor and bring your vehicle to operating temperature. Start your scan and go for a long drive which consists of idling, stop and go, highway, boost. You want a broad range of RPMs with boost/vaccuum levels so the data you copy over is pretty comprehensive of most driving conditions. This first scan will likely have the most dramatic change in how your vehicle idles and drives, so be sure to have a solid first baseline scan.
Step 1
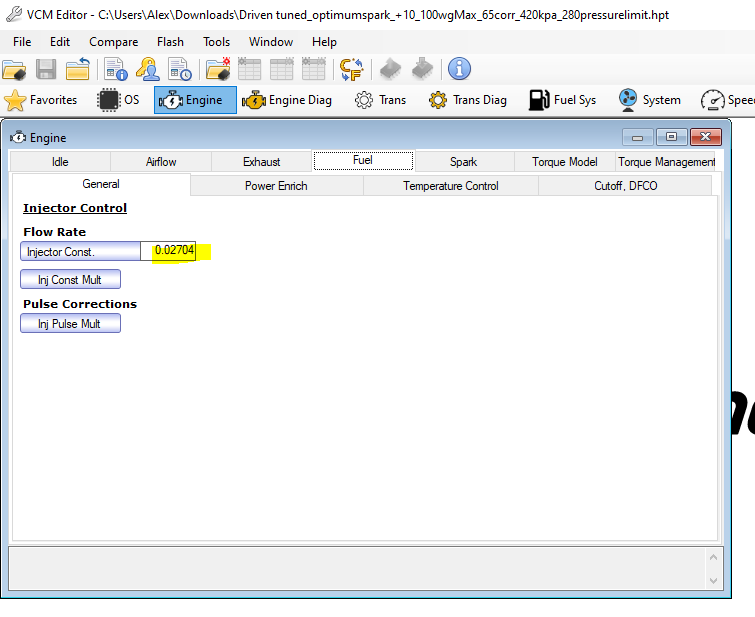
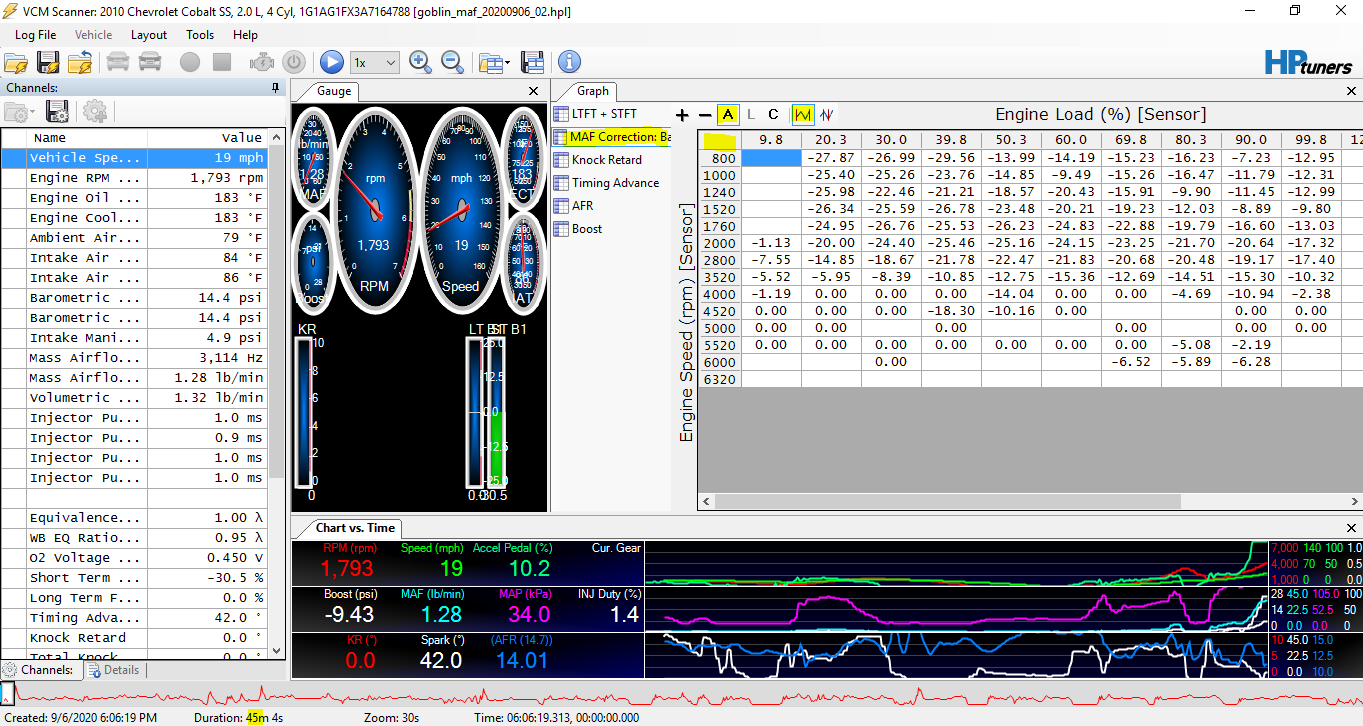
Once you have your scan saved, look at the MAF Correction Base table - mine was pulling ~20% fuel across the board which is pretty nutty. Your scan may look totally different from mine and this is where a judgement call has to be made. In my scenario, I'm pulling a ton of fuel across the board so it would make sense to actually change the Fuel > Injector Const. by 3-5% less (since it's pulling fuel) until the percentages are closer to 0% or a mix of negative to positive depending on whether you're in boost or off boost. Do not automatically go to pulling 20% out of your Injector Const. as it doesn't work like that. Do not copy my Injector Const, it'll be different for everyone.
Step 2
After you're comfortable with Step 1, look at the LTFT + STFT graph in your scan. You're looking for Hz levels +- 1.5%, this will not be a blanket copy and paste the whole histogram activity, it's usually certain sections or cells. So copy these cells and head to the MAF Calibration > Airflow vs Frequency and Paste Special %. Go for another scan and you'll start to see things get closer. Do Step #2 a few times until you're comfortable.
Step 3
Assuming you did Step 1 and Step 2 effectively, your scan's histogram should be centering around 0% more or less and this is for load based fine tuning. Get your scan and right click the top-left corner of the chart with nothing in it > Copy (not copy with axis).
*make sure you're looking at the A (average) and the full scan*
Go to VCM Editor and open MAF Correction > Base table and right click > Paste Special > Multiply by %
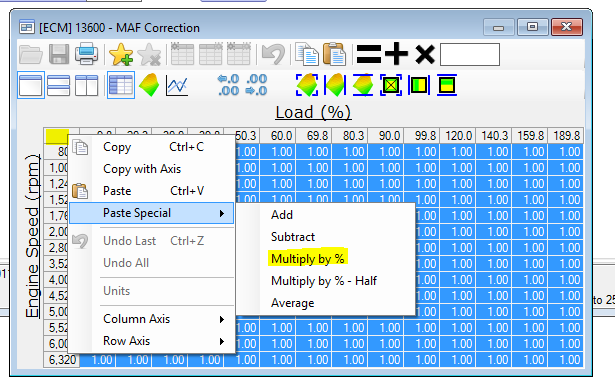
Save and write that to your vehicle. You can now start your car and take it for a drive. You should notice that she's drastically more smooth (and probably not smelling like gas as much, you still don't have cats). You're not done yet! You should do this at least two more times but instead of Paste > Multiply by % you'll choose Multiply by % - Half. Ideally you want these values to be within +/- 1% although you may drive yourself crazy getting there. There is an element of 'close enough' to which you can move on and start your actual tune which i'll get to in another post. I was satisfied with a total difference averaging ~3% ¯\_(ツ)_/¯
After you're comfortable with the trims, plug your EVAP sensor back in. More to come...
Helpful Threads: LINK
Cliff notes of first step, you do not want to mess with the MAF Calibration table as you're not 'relocating' your MAF, even though it's in a different position compared to the Cobalt. You want to modify the table your ecu looks at for fuel vs rpm vs load. *Edit* - while this is still accurate, if you're consistently off in a certain Hz level by > +-1.5% then change those specific Hz levels by multiplying by % to get it closer. After making this change, keep an eye on your fuel vs rpm vs load values as they may need updating.
This guide is mainly focused on how to set up HP Tuners to optimize your tuning workflow, what you need to adjust and look out for to get a good foundation to build from. I am by no means a professional tuner, my only experience tuning a vehicle outside of this is with my 600whp eclipse using ECMLink - but the concepts are still the same regardless of tuning software. With that said, I don't know the dark corners of HP Tuners or LNF platforms, any advanced questions should be deferred to google and the cobaltss crowd. If you have any tips / tricks / stuff to add please join in
This guide assumes your vehicle is in otherwise good heath and you assume all responsibility for any damages following anything I'm about to outline. With that out of the way, lets get started.
My setup:
Stock LNF with factory turbo
Forge BPV with 23psi spring (yellow)
Re-clocked both knock sensors so the lead faces 9pm (this apparently helps with phantom knock)
GM 3bar map sensors
Relocated MAF/filter outside of the vehicle
2.5" intercooler pipes
I don't think any of the above materially factors in to just getting your fuel trims aligned, but it's worth mentioning in case you're looking at other aspects of my tune files and copying verbatim. I have linked the layout you'll need to follow along - it should already have the tables setup so you can easily copy and paste from VCM Scanner into VCM Editor
HPTuners VCM Scanner Defaults (layout, charts, maths etc)
Before messing with boost, timing, camshaft angles, afr's etc. you have to nail down your fuel trims - which is really what this step is focused on. These values change depending on season and elevation so it's likely something you'll become familiar with over time.
Before you run your first scan, you'll have to modify your stock tune. Open VCM Editor and modify your MAF Correction > Base table all to 1. Don't touch your Airflow vs. Frequency table. You can see the rest of the tunes settings here: LINK
At this point, that should be the only change you make - write the file to your vehicle. Your vehicle trims are now baselined, and it's likely to run really rich - and that's okay. Time to go for a drive...
Unplug your EVAP sensor and bring your vehicle to operating temperature. Start your scan and go for a long drive which consists of idling, stop and go, highway, boost. You want a broad range of RPMs with boost/vaccuum levels so the data you copy over is pretty comprehensive of most driving conditions. This first scan will likely have the most dramatic change in how your vehicle idles and drives, so be sure to have a solid first baseline scan.
Step 1
Once you have your scan saved, look at the MAF Correction Base table - mine was pulling ~20% fuel across the board which is pretty nutty. Your scan may look totally different from mine and this is where a judgement call has to be made. In my scenario, I'm pulling a ton of fuel across the board so it would make sense to actually change the Fuel > Injector Const. by 3-5% less (since it's pulling fuel) until the percentages are closer to 0% or a mix of negative to positive depending on whether you're in boost or off boost. Do not automatically go to pulling 20% out of your Injector Const. as it doesn't work like that. Do not copy my Injector Const, it'll be different for everyone.
Step 2
After you're comfortable with Step 1, look at the LTFT + STFT graph in your scan. You're looking for Hz levels +- 1.5%, this will not be a blanket copy and paste the whole histogram activity, it's usually certain sections or cells. So copy these cells and head to the MAF Calibration > Airflow vs Frequency and Paste Special %. Go for another scan and you'll start to see things get closer. Do Step #2 a few times until you're comfortable.
Step 3
Assuming you did Step 1 and Step 2 effectively, your scan's histogram should be centering around 0% more or less and this is for load based fine tuning. Get your scan and right click the top-left corner of the chart with nothing in it > Copy (not copy with axis).
*make sure you're looking at the A (average) and the full scan*
Go to VCM Editor and open MAF Correction > Base table and right click > Paste Special > Multiply by %
Save and write that to your vehicle. You can now start your car and take it for a drive. You should notice that she's drastically more smooth (and probably not smelling like gas as much, you still don't have cats). You're not done yet! You should do this at least two more times but instead of Paste > Multiply by % you'll choose Multiply by % - Half. Ideally you want these values to be within +/- 1% although you may drive yourself crazy getting there. There is an element of 'close enough' to which you can move on and start your actual tune which i'll get to in another post. I was satisfied with a total difference averaging ~3% ¯\_(ツ)_/¯
After you're comfortable with the trims, plug your EVAP sensor back in. More to come...
Last edited:
