Towerdog's Indiana Street Goblin Build (#250) 07 SS/SC Donor
- Thread starter Towerdog
- Start date
Towerdog
Goblin Guru
Haynes...
Attachments
-
 281.3 KB Views: 184
 -
 303.1 KB Views: 186
SmsDetroit
Goblin Guru
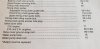
Looks like it’s 89in lbs which would be 7.4 foot pounds
baustin
Well-Known Member
I tried this with the first replacement gasket I was using due to slight seepage, didn't help. Tried to reseat it multiple times, still leaked. I ordered another replacement gasket from ZZP and it worked perfect with no RTV. The first gasket was Fel-Pro, second was ZZP; first was fairly stiff but to an untrained hand felt like a decent gasket, second felt softer and more flexible/gummy.Does anyone put a dab of RTV in the sharp corners on the valve cover along with the gasket?
Towerdog
Goblin Guru
Hmm... I went with a Mahle Brand over the ZZP as I wanted to replace the grommets also. I have not used there product's before but that was the only brand I could get the supercharger gasket in.I tried this with the first replacement gasket I was using due to slight seepage, didn't help. Tried to reseat it multiple times, still leaked. I ordered another replacement gasket from ZZP and it worked perfect with no RTV. The first gasket was Fel-Pro, second was ZZP; first was fairly stiff but to an untrained hand felt like a decent gasket, second felt softer and more flexible/gummy.
I have learned the hard way about cheap gaskets... Years ago my ex took her Camry to get the oil changed.... They drained the oil and put a new filter on. That little four banger ran for a month before she blew! Anyway I bought a rock auto master rebuild kit... Cheapest one of course, besides most of the gaskets being incorrect the valve cover gasket was molded in mirror!
baustin
Well-Known Member
Same reason for me with the Fel-Pro, I wanted the screw grommets as well and when I ordered it was available and cheaper I think. I don't know what exactly was on the engine when I bought it, might have been OEM but probably was aftermarket but at an unknown age and seeping a tiny amount I figured it wouldn't hurt to replace. Oh well, the work to reseal/replace the gasket multiple times was good experience.Hmm... I went with a Mahle Brand over the ZZP as I wanted to replace the grommets also. I have not used there product's before but that was the only brand I could get the supercharger gasket in.
Towerdog
Goblin Guru
Well this week has been a juggling show of "work" cleaning. Painting, cleaning and today help a buddy clean his whole burnt out shop out that caught fire on wensday. I caint imagine having that happen. Not totally thrilled about how my engine is turning out but it is a sight better than what I started with... waiting on gaskets to show up to get it put back together.... will post pics when it is done.
Goblin Graber
Well-Known Member
At least if you decide you’re not happy with how the engine is turning out at least you’ve done all the hard work. It’ll be easy to shoot it another color now.
Towerdog
Goblin Guru
Well I doubt I'll do that... not a big fan of red... but it is a GM color, and red stiched seats and steering wheels are easy to come by. Part of it is casting flaws in the valve cover and SC but I don't know if it is worth blocking and grinding them all out.At least if you decide you’re not happy with how the engine is turning out at least you’ve done all the hard work. It’ll be easy to shoot it another color now.
I'll just have to make something POP somewhere else to keep eyes off them lol.
I dont have a theme or have even settled on the final colors yet like you have. But have decided to keep the engine stock till I get used to driving it. Next winter will be for upgrades.
Towerdog
Goblin Guru
Well my engine re-assembly has been on hold since Friday as I am on day 12 waiting for parts from Rock Auto...
So I started on my wiring harness Monday night and this is what I have learned so far:
1- In the videos he shows' to tie knots in wires,,,, Well you end up with a lot of knots but still need to know what each knotted wire is so I labeled each wire that was cut.
2- There are times in the videos that he refers to wires by color and not what they were to. For instance the "Light blue" wire that needs to point forward of the fuse box in the wire bundle. I scratch my head for two hours going back in the videos looking for the light blue wire,, I had a light blue 3rd brake light wire but that did not make sense to me because it was not mentioned anywhere else. I had saved it in case I wanted a 3rd brake light. Fast forward one or two videos and the "light blue" wire is referred to the 3rd brake light wire used to make the cruise work.
3- I'm currently stuck! In Wiring Harness Guide Part 6 - Organizing the Main Harness, Pt. 3 @ 1:25 he mentions "fuse block ground" Is that one of the four ground wires or am I missing something?
Goblin Graber
Well-Known Member
The fuse box ground he is referring to is a black wire coming from the tan fuse box plug.Well my engine re-assembly has been on hold since Friday as I am on day 12 waiting for parts from Rock Auto...
So I started on my wiring harness Monday night and this is what I have learned so far:
1- In the videos he shows' to tie knots in wires,,,, Well you end up with a lot of knots but still need to know what each knotted wire is so I labeled each wire that was cut.
2- There are times in the videos that he refers to wires by color and not what they were to. For instance the "Light blue" wire that needs to point forward of the fuse box in the wire bundle. I scratch my head for two hours going back in the videos looking for the light blue wire,, I had a light blue 3rd brake light wire but that did not make sense to me because it was not mentioned anywhere else. I had saved it in case I wanted a 3rd brake light. Fast forward one or two videos and the "light blue" wire is referred to the 3rd brake light wire used to make the cruise work.
3- I'm currently stuck! In Wiring Harness Guide Part 6 - Organizing the Main Harness, Pt. 3 @ 1:25 he mentions "fuse block ground" Is that one of the four ground wires or am I missing something?
Towerdog
Goblin Guru
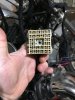
Describe "Tan". The rectangle or the square? The rectangle has no blacks in it the square has a thick black with a ground lug that is taped separately.The fuse box ground he is referring to is a black wire coming from the tan fuse box plug.
Thanks
Goblin Graber
Well-Known Member
The square one. It was pin B2 on my base model, but it should be a thick black wire in F2 on an SS.Describe "Tan". The rectangle or the square? The rectangle has no blacks in it the square has a thick black with a ground lug that is taped separately.
Thanks
Attachments
-
 260.2 KB Views: 166
Towerdog
Goblin Guru
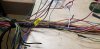
When you don't like soldeing.... Just kidding. It works great for twisting multiple wires tightly together before soldering.
Attachments
-
 229.5 KB Views: 228