TravMac's Extended Track Goblin (#253) - 2007 SS/SC Doner

TravMac

Well-Known Member
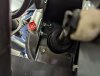
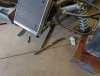
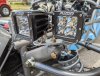
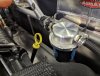
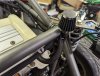
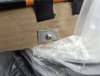
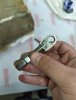
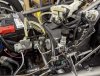
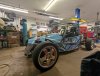
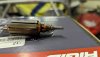
Looked more at the throttle body data after my previous post, and saw a really bad sweep in the position sensors. Ended up replacing it and works like new. After a bit of a tear down, turns out the motor was actually all but used up in the old throttle body. One of the brushes was all but gone, and the commutator was worn in a ton. Kind of fun to realize it was used up at around 190k miles.

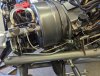
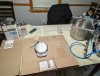
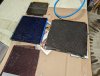
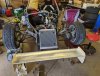
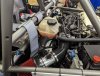
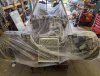
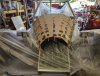
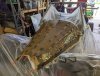
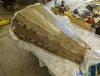
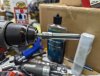
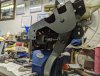
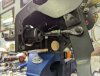
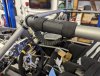
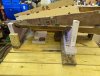
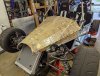
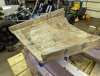
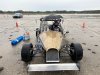
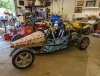
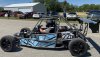
Once it was good runnin again, did a few other things too. Added in a longer breather for the fuel tank so I wasn't throwing E85 everywhere, finished my last side panel close outs with wrap, and made a hood form. Almost completed the hood too, until there was an issue forming the lexan. It requires a ton more heat than I had expected it to. Either way, the car was running great again, so had a last second decision to do an autocross last weekend, and it didn't disappoint!

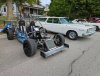
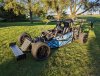
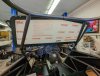
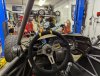
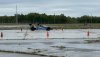
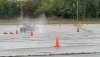
My times are getting more consistent, although haven't made really any changes to the car. Just learning what I can and getting seat time. I did run into one more issue with a master cylinder sticking and holding pressure in all my lines. Quick crack of the line fixed the issue, so when my proportioning valve is installed, so will a new master cylinder.

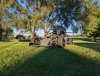
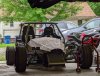
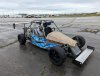
Overall, this will be the last race for most the summer season as the next few won't work with my schedule (at least not right now). There are a few more later in the fall I'll be looking forward to instead. For now, can focus on doing windshield and stuff for registration. I did get some cool gopro vids, so have to figure out making a place to store and share those. Might be able to overlay the HP tuners data logging too. For now, a few pics should be good!

PXL_20220708_000726386.jpgPXL_20220707_192719204.jpgPXL_20220708_000338903.jpgIMG_5066.JPGIMG_5100.JPG
 

TravMac

Well-Known Member
I think I figured out saving my little gopro snippets to YouTube. The first video is the fastest lap from the weekend. The second video is the slowest lap, that also had a spin that was kind of fun to see. I uploaded all 5 runs to the new channel, so hopefully I'll continue to share and upload videos there!


TravMac

Well-Known Member
Did a bit of tinkering more than expected over the weekend, so quick update:

Installed brake proportioning valve for the front brakes to try and even the front to rear end. Fastened the valve nice and tucked away near the pedal box. Can't quite reach from in car, but seems like a set and forget thing after it's dialed in. Still waiting on the new master cylinder to replace it, but then the system will get a good brake bleed.

Did a few test carbon panel layups to test some new equipment and material. They all turned out great! The blue has really caught my eye...

Started on front wing mounting solution that will be sturdy, yet quickly removeable. The picture of parts is obscure, but will make sense next time I get to it. Just need my hands on the welder!

PXL_20220716_233523110.jpgPXL_20220717_224045239.jpgPXL_20220716_192323401.jpgPXL_20220717_112611721.jpgPXL_20220717_224031780.jpg
 

TravMac

Well-Known Member
Did the first "slow" thing in the Goblin and went to my home town's car show! Drove it up town with an ORV sticker since I'm still shy my plates, but with a small country crowd, nobody gave me trouble. Lots of cool stuff in town to see. No trophies for me though - racecar of the day went to someone's hellcat...

Also reaching the finish line on a few projects. Got the front wing mounted, the rigid headlights wired and mounted, and the new master cylinder on. Also have hood front mount figured out! Will be a dzus fastener with the other bolts on the sides. Still contemplating going straight to carbon, or doing something for the wrap. Either way will look cool! Also a few pictures below of my catch can, my tank breather, and my plugged vacuum line for manual brakes on the LSJ. Lots of little things I haven't really had good pictures of until now.

Some bad news is my front wing mount with more than 1 person in the car does some scraping on the street. Might have to re-think some stuff, but for now it's a great V1 for racing around. Another bit of bad news is my master cylinder is still sticking... which means it's not the master cylinder. I'm running manual brakes and just using the brake booster as a glorified spacer plate. Maybe something in there is sticking internally. Either way, something to play with and figure out.

PXL_20220730_174245449.jpgPXL_20220731_172635994.jpgPXL_20220730_031457927.jpgPXL_20220730_031446859.jpgPXL_20220730_031435178.jpgPXL_20220730_031414758.jpgPXL_20220731_123443570.jpgPXL_20220801_000212170.jpgPXL_20220801_000102683.jpg
 

TravMac

Well-Known Member
Sitting down and staring at the car a bit more, it was finally time to do something more final for getting this thing registered. I've wanted so badly to finish the hood to make it look complete, and get the windshield mounted in the car. With that said, looking at the cardboard hood template, i thought to myself...
35000


I've seen the use of carbon and low density cores before, so why not try the same with cardboard? Maybe it would be stiff enough and give a good template - if not a great working V1. I also didn't want to waste a lot of the carbon that I'm able to use for the project. So a run to Lowes later, I got fiberglass and resin for seeing if this would work. So far, this layup is just the top layer, but is enough to hold the hood shape and have a surprising amount of stiffness. In a few weeks, I plan to do the underside, as well as the edges for a full composite sandwich hood design. Then it'll be wrapped with the matching design of my side panels. Learned a lot doing it this way, so V2 will be even better! V2 will for sure be carbon, but not sure if will be a sandwich or be simply a wet layup over a formed template (most likely over V1).

The windshield was part 2 of the weekend. I had this frame and glass from a buddy who built and registered an Exocet, but this weekend I saw the glass was cracked. So temporarily I'm going to replace with lexan and see if that will pass inspection. Save a bit of cash on a new sheet of glass. Regardless it's very easily removeable with only a few bolts holding it to the frame. It's also a bit wide, but again does fit a sheet of safety glass if I get any flack for it - just will have to spend the cash to go get a new one. It also does clash with the new hood a bit, but that's a few grinder adjustments away from being taken care of.

PXL_20220813_210006299.jpgPXL_20220814_154830475.jpgPXL_20220814_171604475.jpgPXL_20220814_175550466.jpgPXL_20220814_184814177.jpgPXL_20220814_210048123.jpgPXL_20220814_211126265.jpgPXL_20220814_220722058.jpgPXL_20220814_220733109.jpg
 

Desert Sasqwatch

Goblin Guru
While you're at it creating a new hood, why not add some much needed cabin ventilation? Adding a slot vent intake above the top of the radiator and running a plenum on the underside of the hood would be easy. Plus it adds some additional stiffness to the hood. Here is what I did with the DF hood - so far:


The air over the top of the radiator is cooler air, since it will only be flowing if your moving. The radiator fan sucks the hot air to the space behind the radiator leaving cool air in front of it.
 

TravMac

Well-Known Member
While you're at it creating a new hood, why not add some much needed cabin ventilation? Adding a slot vent intake above the top of the radiator and running a plenum on the underside of the hood would be easy. Plus it adds some additional stiffness to the hood. Here is what I did with the DF hood - so far:


The air over the top of the radiator is cooler air, since it will only be flowing if your moving. The radiator fan sucks the hot air to the space behind the radiator leaving cool air in front of it.
Honestly, I haven't had too much issue running into a hot cabin, but I've also only ever done racing with the thing. I do have ideas for blocking out unwanted air based on a few of the other forum posts I've seen, but nothing yet on capturing airflow for myself as a driver. Then again, that's the cool thing about this V1 - I can see how it affects the cabin, see where stiffness needs an addition, and bake all the learnings into V2!
 

SmsDetroit

Goblin Guru
Sitting down and staring at the car a bit more, it was finally time to do something more final for getting this thing registered. I've wanted so badly to finish the hood to make it look complete, and get the windshield mounted in the car. With that said, looking at the cardboard hood template, i thought to myself...
View attachment 35000

I've seen the use of carbon and low density cores before, so why not try the same with cardboard? Maybe it would be stiff enough and give a good template - if not a great working V1. I also didn't want to waste a lot of the carbon that I'm able to use for the project. So a run to Lowes later, I got fiberglass and resin for seeing if this would work. So far, this layup is just the top layer, but is enough to hold the hood shape and have a surprising amount of stiffness. In a few weeks, I plan to do the underside, as well as the edges for a full composite sandwich hood design. Then it'll be wrapped with the matching design of my side panels. Learned a lot doing it this way, so V2 will be even better! V2 will for sure be carbon, but not sure if will be a sandwich or be simply a wet layup over a formed template (most likely over V1).

The windshield was part 2 of the weekend. I had this frame and glass from a buddy who built and registered an Exocet, but this weekend I saw the glass was cracked. So temporarily I'm going to replace with lexan and see if that will pass inspection. Save a bit of cash on a new sheet of glass. Regardless it's very easily removeable with only a few bolts holding it to the frame. It's also a bit wide, but again does fit a sheet of safety glass if I get any flack for it - just will have to spend the cash to go get a new one. It also does clash with the new hood a bit, but that's a few grinder adjustments away from being taken care of.

View attachment 35010View attachment 35009View attachment 35008View attachment 35007View attachment 35006View attachment 35005View attachment 35004View attachment 35003View attachment 35002
I have the DF windshield and they didn’t say anything
 

TravMac

Well-Known Member
Found out why the brakes are locking up with a bit of help of some friends! The brake booster that was being used as a spacer had been taken apart and rebuilt during the early stages of the build. Turns out an internal couple of nuts were not properly set as spacing between the pushrod and brake booster during the rebuild. So as the master cylinder was tightened down on the booster, the thin booster metal was bending to bottom out on the nuts. The more it bent, the more the pushrod was forced to hold pressure in the system. Oops. So this weekend... eliminated the booster completely!

A bit of planning, cutting, and welding later... got a new pushrod made such that the mc can be mounted directly to the pedal box. It was made adjustable with a capture loop in the event it came outside the booster cylinder location, it would stay in line with the cylinder bore. Included a few pictures below! Not quite a tilton pedal box, but it's a start! Started to do the fiberglass of the bottom of the hood too, but ran out of daylight before the working week starts. Hoping the end of next month will have that done and on too.

PXL_20220827_021820054.jpgPXL_20220827_022010387.jpgPXL_20220827_181140376.jpgPXL_20220827_174212813.jpgPXL_20220827_183713795.jpgPXL_20220827_183720323.jpgPXL_20220827_205649058.jpgPXL_20220828_015909104.jpg
 

TravMac

Well-Known Member
Few updates for the weekend. Added a couple grab handles for the driver and passenger sides of the upper roll hoop. They were a neat amazon find which honestly fits and works great! I added in a bit of grip mat to keep them well located (the stuff for drawer bottoms cut to size only under the handle). I also trimmed the extra Velcro bit to really clean up the look. 10/10 would recommend!

Also made a lot more progress for the hood build. Fiberglassed the bottom surface, trimmed to the final shape that I liked on car, and fiberglassed the edges to seal the whole thing. I'm amazed how much more stiff it is with the sandwhich layer on the bottom! Still a bit of trimming and glassing to do, but nearly there. Right now the current build comes in just over 9lbs. Once wrapped, I'll get the final weight of it. Can't wait to show the final product on car! Then I might be able to finally post a pic in the "completed goblin" page...

PXL_20220911_173030505.jpgPXL_20220911_203120216.jpgPXL_20220911_203115725.jpgPXL_20220910_175121425.jpgPXL_20220910_184534182.jpgPXL_20220910_234700222.jpgPXL_20220911_000952216.jpgPXL_20220911_230251574.jpg
 

TravMac

Well-Known Member
Spent the weekend at autocross, and was it ever WET! I'm impressed the goblin handled the water so well without running into any electrical issues. Brakes felt the best they ever have thanks to removing the booster completely and adding in the proportioning valve! Hood didn't break either, so that is great news. Started to wrap the fiberglass when we got back home and dry. Doesn't look half bad if I do say so myself. Get to finish it in a few weeks and get those "finished" beauty pics I've been waiting to post.

Videos to come up of autocross when I get them pulled from the GoPro. I am very clearly running into fueling issues in some of the turns. This usually happens during extended hard lefts where the fuel pools to one side of the tank. I even ran nearly full, but still had some hiccups while coming onto the power out of those kind of corners. Is anyone else having a similar issue in autocross? I only started running into it when the track sort of dried and I could actually carry speed. I have some ideas in mind, but will be more for this winter. Otherwise the thing continues to run great and surprise me at every turn. One autocross left this year on October 8th!

PXL_20220925_175148636.jpgPXL_20220924_154447043.jpgIMG_0220.jpgIMG_0367.JPGIMG_0309.JPGIMG_0261.JPGIMG_0436.JPGPXL_20220926_223847117.jpg
 

Sparvy

Active Member
Spent the weekend at autocross, and was it ever WET! I'm impressed the goblin handled the water so well without running into any electrical issues. Brakes felt the best they ever have thanks to removing the booster completely and adding in the proportioning valve! Hood didn't break either, so that is great news. Started to wrap the fiberglass when we got back home and dry. Doesn't look half bad if I do say so myself. Get to finish it in a few weeks and get those "finished" beauty pics I've been waiting to post.

Videos to come up of autocross when I get them pulled from the GoPro. I am very clearly running into fueling issues in some of the turns. This usually happens during extended hard lefts where the fuel pools to one side of the tank. I even ran nearly full, but still had some hiccups while coming onto the power out of those kind of corners. Is anyone else having a similar issue in autocross? I only started running into it when the track sort of dried and I could actually carry speed. I have some ideas in mind, but will be more for this winter. Otherwise the thing continues to run great and surprise me at every turn. One autocross left this year on October 8th!

View attachment 35838View attachment 35844View attachment 35843View attachment 35840View attachment 35841View attachment 35842View attachment 35839View attachment 35845
Somthing is up if your nearly full and running into fueling issues. If you were below 1/4 of a tank and had a long left sweeper I could see the pickup possibly getting starved but with a near full tank it should easily still be submerged. I've been on track will less than 1/4 tank and haven't run into the issue yet but still start a session around 3/4 full just in case.
 

TravMac

Well-Known Member
Somthing is up if your nearly full and running into fueling issues. If you were below 1/4 of a tank and had a long left sweeper I could see the pickup possibly getting starved but with a near full tank it should easily still be submerged. I've been on track will less than 1/4 tank and haven't run into the issue yet but still start a session around 3/4 full just in case.

I appreciate it guys. I guess I should say I'm thinking it's fuel, although could be a few other things too. What I do know is it's an intermittent power drop, on throttle, during acceleration, only after a long left sweeper (equally long right is fine). It is only a fraction of a second and then back to going normal. I did notice it at one previous event, only it seemed to happen after a half tank. However when I noticed this event, I immediately filled it and still had it happen. For fear of burning something up, I took the corner a bit slower on my next round - and no issue. I feel like it's too repeatable in location on track to have been some random electrical gremlin, but I guess anything is possible.
 

TravMac

Well-Known Member
Shoot, didn't see the replies! Yea I have a good vent, that's not plugged or leaking. I did have to alter the pump housing to fit the E85 pump, so maybe it's since cracked the reservoir bucket and not holding constant fuel around the pump. I would have run it that day, except I didn't bring it with the planned rain and water. I do have one run where I think I caught it a few weeks back, but don't see anything odd in the numbers. It also doesn't log every channel, so that's a setup thing I have to play with... More to come though. The final autox of the year is next weekend, so I'll be logging for sure there.
 

Desert Sasqwatch

Goblin Guru
My $0.02:
For the leaking vent during cornering, can you extend the height of the tube higher in the chassis to see if it makes a difference? Like maybe about the height of the top of the roll bar? Or maybe extend the tube so it is over behind the driver's side? I would bet the lateral forces are not high enough to push fuel up or over that far for it to leak.

For the fuel starvation, is the E85 pump using/installed into the stock Cobalt plastic housing/sump? Beyond cracked plastic allow fuel to leak from reservoir tray, the lateral forces in a long, hard left turn will likely still pull most of the fuel from this small reservoir built into the bottom of the fuel pump.

Some have tried using the fuel mats (Holley?) to wick fuel back to the left side of the tank - don't recall reading how successfully they work? Believe someone also tried installing extra baffling around the fuel sump inside the bottom of the tank. Don't recall hearing about success with this mod, but baffling is the best way to slow fuel slosh - given the stock design of the Goblin fuel tank.

My inner engineer has thought about cutting a circular section out of the bottom of the tank (original aluminum) about 1-2 inches larger diameter than the bottom of the fuel pump case. An aluminum cylinder, the same size of the cutout, would be welded into this section, dropping the circular cutout about 1 inch and the cylinder would extend upward into the tank about 2 inches - making a 3 inch deep reservoir. This new cylinder would be solid about 3/4 the way around the right side to keep fuel from traveling toward the right side of the tank during lefthand cornering and have slotted openings on the left 1/4 side to let fuel into this sump when driving straight or during righthand turns.

Granted not everyone will be able to cut up their tank or have access to an aluminum welder to make this kind of modification. But this to me seems a logical way to help eliminate the fuel starvation issue for those who track their Goblins to help keep a larger quantity of fuel at the base of the fuel pump. Oh and Racer X gives a thumbs up for this idea too. :cool:
 

TravMac

Well-Known Member
Your thoughts aren't bad at all. I have seen the holly mats in action, and they work quite well. Unfortunately, that requires a bit more re-design of the current "stock" fuel setup + aftermarket pump (and a bit more pocket change). You are correct too that the aftermarket pump I have is in the stock reservoir, so it shouldn't be pumping through that much fuel all at once - especially since I'm not nearly at WOT in a corner like this. I also thought about cutting a hole in the center of the tank and simply relocating the setup to an area where you are most likely to always have fuel. Having the aluminum tank really helps for modification! Again though, that's just a time and effort item that may be for this winter. Making any of these decisions without data isn't what I want to do either, so going to try my best to reproduce it at the next event (without blowing anything up? ha). Maybe I'm just barking up the wrong tree. As for the vent, it's working well, not sure if Rttoys had another idea along that line of things.
 

Gtstorey

Goblin Guru
I find it hard to believe that the pump pickup is unsubmerged at 3/4 tank. 1/2 tank maybe, but at 3/4 tank you could almost turn the car on it’s side and still have the pickup submerged.
Run some data logs with all of the fuel, timing and throttle pids. You also need to set the rate that it’s reading pretty tight.
 
Top