Zack Graber’s City frame #239 - 08 2.2 supercharged auto

Goblin Graber

Well-Known Member
Hi everyone. My name is Zack Graber and I’m in Billings Montana. I was looking for a new project to build with my two year old son who is now obsessed with the garage. The Jeep I was building was way to much fab work that he couldn’t be around.

I almost pulled the trigger on an 818 from factory five til I came across the goblin. I called and talked to Lonny for a bit and knew this was the project for us. I put a deposit down for #239 and now the wait is almost over. It should ship next week hopefully.

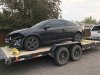
I found a wrecked 08 Cobalt 2 hours from my house for $1,000 the next weekend so it was game on. I’ve never been so excited to load up a wrecked pile of crap, but my wife was seriously questioning my sanity when we got there. Is this thing really worth $1,000?!?

The donor is now completely stripped and thanks to my little brother stopping by with his Deere it’s now back on the trailer. I’ve been slowly working on my wiring harness and it’s almost done. I’m taking my time with it not cuz it’s hard but because I really don’t want to clean up all the gross donor parts yet.

Stay tuned. My garage is pulling up with a bunch of sweet parts for this thing.
 

Attachments

Desert Sasqwatch

Goblin Guru
Zack, welcome to the forum. Wow, you are already knee deep into this with a donor and a kit almost ready to be delivered. This will be a fantastic father and son project, especially if you can keep his attention - he is 2. ;). Let us know the details of your donor, auto or manual, and it's okay for your wife to question your sanity. Bringing home a wrecked car gets the same reaction every time! :D
 

Goblin Graber

Well-Known Member
The donor was an 08 automatic coupe. It seems like I’m one of the only ones now not building an SS/TC car. I do have an M62 with a dual pass and a 3” pulley to put on it when I get there. I took the motor and trans out in my driveway to pressure wash it yesterday. Good news is the decade of crud cleaned right off. Bad news is it slipped off the furniture dolly rolling it back in and I cracked the oil pan. Now I’m waiting for one of those to show up before I do the motor.
 

Goblin Graber

Well-Known Member
I have been looking through every post on this forum since I ordered my kit. There is tons of helpful advice on here and I’d like to add to that starting with some donor tear tear tips.

I ordered break hoses and hubs from DF and after talking with them meant I didn’t need much from the back. If you don’t plan to pull the hubs from the back I highly recommend taking the fuel tank out as soon as you drain it. Having the front wheels still on will give you a lot more room under the car and it won’t be on such a sketchy angle on the jack stands. You’ll need the fuel tank, filler neck, and fuel pump wiring. You can get to the fuel filler neck bolt just fine by taking out the clips in the back of the fender liner. No need to take off the wheel to remove the liner. Go ahead and leave the fuel filter behind too. They’re cheap and yours has probably been there forever. Go the your local hardware store and grab eight M10x1.5 flange nuts for the new hubs. That way you can leave the rear wheels and tires on.

The next thing is the dash. I tore down the donor by myself so it really helped to do as much dash tear down as I could while it was in the car. Pull out the radio, glove box, airbags, and upper dash cover while it’s still loosely attached. That will take some weight off. The dash is pretty heavy still so instead of wrestling it out of the car I just pulled it straight back and laid it on the floor to finish tearing it apart. The dash never left the car.

Leaving the wheels and tires on the back brings me to my last trick. Instead of setting the shell on a furniture dolly wrap a chain around the upper radiator support and use your engine hoist. It makes it super easy to roll it out of your garage.
 
Last edited:

Anks329

Well-Known Member
I have been looking through every post on this forum since I ordered my kit. There is tons of helpful advice on here and I’d like to add to that starting with some donor tear tear tips.

I ordered break hoses and hubs from DF and after talking with them meant I didn’t need much from the back. If you don’t plan to pull the hubs from the back I highly recommend taking the fuel tank out as soon as you drain it. Having the front wheels still on will give you a lot more room under the car and it won’t be on such a sketchy angle on the jack stands. You’ll need the fuel tank, filler neck, and fuel pump wiring. You can get to the fuel filler neck bolt just fine by taking out the clips in the back of the fender liner. No need to take off the wheel to remove the liner. Go ahead and leave the fuel filter behind too. They’re cheap and yours has probably been there forever. Go the your local hardware store and grab eight M10x1.5 flange nuts for the new hubs. That way you can leave the rear wheels and tires on.

The next thing is the dash. I tore down the donor by myself so it really helped to do as much dash tear down as I could while it was in the car. Pull out the radio, glove box, airbags, and upper dash cover while it’s still loosely attached. That will take some weight off. The dash is pretty heavy still so instead of wrestling it out of the car I just pulled it straight back and laid it on the floor to finish tearing it apart. The dash never left the car.

Leaving the wheels and tires on the back brings me to my last trick. Instead of setting the shell on a furniture dolly wrap a chain around the upper radiator support and use your engine hoist. It makes it super easy to roll it out of your garage.
Great advice here! Wish you had posted this like 10 months ago when I was struggling to get the fuel tank and such out of my donor. It was one of the last things I was trying to get out, and I couldn't, safely, get under the car to get some of that stuff out. I ended up buying a new fuel pump, building a new wiring connector for it, new fuel filter and fuel lines.

Also, great idea about the dash! That thing is heavy.
 

Goblin Graber

Well-Known Member
Made it to the end of the ninth harness video. My table looks like a disaster but the harness is looking good. I did make a huge mistake last night and cut off the EPS data connector. I didn’t just cut it out either. I cut one of the pairs of data wires super short on the BCM plug. Luckily the parts manager at the GMC Cadillac store I worked at forever was working today. He just let me go back and grab a handful of pins for free. Crisis avoided
2D4472AC-F2AE-4C67-9F07-48C6F91227BC.jpeg


Here’s also a sneak peak at the color scheme. Matte purple ghost metallic vinyl for the hood and sides, purple NRG seats and quick release, and some bronze Avid1 wheels. I’m still undecided on the chassis. I’m thinking either satin black or going wild and trying to match the bronze on the wheels and do black control arms. I have some prismatic samples ordered to see if something stands out.
1662FD9C-1608-4D26-AFA4-D601F462ABE4.jpeg
 

Kenny123

Well-Known Member
Made it to the end of the ninth harness video. My table looks like a disaster but the harness is looking good. I did make a huge mistake last night and cut off the EPS data connector. I didn’t just cut it out either. I cut one of the pairs of data wires super short on the BCM plug. Luckily the parts manager at the GMC Cadillac store I worked at forever was working today. He just let me go back and grab a handful of pins for free. Crisis avoided View attachment 18086

Here’s also a sneak peak at the color scheme. Matte purple ghost metallic vinyl for the hood and sides, purple NRG seats and quick release, and some bronze Avid1 wheels. I’m still undecided on the chassis. I’m thinking either satin black or going wild and trying to match the bronze on the wheels and do black control arms. I have some prismatic samples ordered to see if something stands out. View attachment 18087
Looks like it'll be stradman approved! (For those who don't know stradman is a youtuber)
 

Goblin Graber

Well-Known Member
Got through the 10th harness video. It’s getting real close now. One thing I don’t see addressed in the last video is the handful of loose grounds I still have in the main harness between the fuse block and BCM. I found an old wire harness map picture and it shows a tunnel ground coming out of the harness. This doesn’t seem to be in the new video series. Should I put a ground lug there or just tie all those to the grounds in the dash?
FE691A23-8FE7-40D1-B829-7079031F4518.jpeg
 

Ross

Goblin Guru
The tunnel ground was eliminated shortly after my frame #121, as it was a difficult location to get to.
I used 3 grounding spots in my car: 1. on the battery box, 2. on the pedal box, 3. on the driver's side transmission mount.
The grounding wires were routed to the nearest one.
 

Goblin Graber

Well-Known Member
Thanks Ross. I’ve got the same spots you do so I’ll stick with those and not add the tunnel ground. In the video he tells you to knot them up and that they will be dealt with later. Then later he just taped up the harness.
 

Goblin Graber

Well-Known Member
I did want to share 1 another mistake I made, 2 why I think I did it, and 3 how to fix it. Hopefully this keeps someone from making this same mistake.

1. At the end of thinning the main harness I had another 3 wire plug with a grey, white, and black wires near where the taillight plugs were. I couldn’t think of a use for any more wires that were back there so I removed it. Turns out it was the Battery Current Sensor connector. This is an essential circuit to regulate alternator output.

2. I did some research and this is on all base model cobalts. Lonny is working on a turbo harness, so it’s never mentioned.

3. Now on to fixing it. Sure you can solder wires back to your connector and bcm plug but I found a better way. You should have this plug with about 5 feet of wire attached to it that was for the passenger seat weight sensor.
6B3F4B09-5537-4CDE-87EE-8C239A72D249.jpeg


This connector is the same as the one used for the current sensor. This lets you keep one clean factory end. Here are how the wires need connected. The connector pin out in all data shows pin B should be tan/white but it’s actually black.
Pin A Dark Blue - BCM pin 63 Grey
Pin B Pink - Ground near the dash harness
Pin C Yellow - BCM pin 68 White.
Here is the diagram for the connector. I added the schematic as well.
163856A5-9806-48E7-ADCB-018A2BB6CD16.jpeg
2BAAD43A-CD9D-4745-9116-AC0F0FBFB867.png

Hope this helps someone.
 
Last edited:

Goblin Graber

Well-Known Member
And now your Goblin harness is ready to go! Now on to cleaning up and painting the donor parts. This thing should really come together pretty fast once I get the kit.
324CFEC0-7412-4D7F-BDE0-D1F1667C71C1.jpeg
BEDEDD14-0134-4FEB-BC2B-0066890DCE0F.jpeg
 

Goblin Graber

Well-Known Member
If you’re on the fence at all about doing your harness or sending it off save the money. You can totally do it! If you have a turbo SS it should be as easy as following along to the videos. My harness was definitely different in my donor so here’s some stuff to help someone that doesn’t have an SS/TC get their harness done.

If your car isn’t turbo charged it should have a battery current sensor. Make sure you keep that in the harness. Pull the plug back to the BCM and tape it up when you tape the headlight wires in the last video. Tie the ground wire from that plug to one of the dash ground wires.

These next 3 things are specifically for automatic cars.
1.You will have a third connector on your ignition switch for the park interlock switch. Tape it up just like the other two in the video.
2. Automatic cars need a high speed data signal to the transmission controller. Instead of the data wires you cut from the ABS module going to the ECM connector like in the video they will go to the engine to body harness connector. There are two pairs in that connector to loop the signal in and out. The cut set are the ones to extend later in the videos.
3. My car had option code AP3 for remote start. In order for that to work the BCM needs to think the hood is closed. On my car the hood closed wire was a purple wire on pin 3 of the BCM plug. Attach a wire there and hook it up to a ground.
4. You will have a small 4 pin connector left in your main harness that will trace back to the BCM. That connector is for the shift interlock solenoid on your shifter. Add 18” extensions to these. Start pulling those back toward the fuse block. Split them from the harness when there’s about 20” of wire left from the connector.
ABE806C0-4793-4831-AA93-F18A3F224710.jpeg
54BA52A4-ED5C-45CB-AEF9-FB038FC904A2.jpeg


My “Special Edition” Cobalt didn’t even come with fog lights. If yours doesn’t you will not have the purple wire that gets zip tied to the dash harness later. The DF button panel is setup to switch the tan wire from the fog light switch and get the BCM to turn on the purple wire. Just add a red or pink wire to your button panel wires. I connected that wire to the pink wire by the BCM that Lonny had you set aside for the heat exchanger fan.

My car also had the basic radio so there was no “second amplifier connector“ to steal a power wire from. That’s the red wire that gets zip tied next to the purple one on the dash harness. I extended the extra red/white wire coming from the fuse block for this. I plan to use this to power an AFR gauge so I added a ground wire to it as well and connected it with the dash grounds.

I am going to run a third brake light. If you plan to as well add another ground wire when you’re doing your rear lights. Tape up that ground with the light blue third brake light so you have the pair ready to go.
 
Last edited:

Goblin Graber

Well-Known Member
Decided to go out and cleanup and paint some of my junk parts. I mean donor parts. A little VHT satin black epoxy and some Mother's back to black has this stuff looking good.
13167B64-DC2F-4E79-ABAB-710510C0E28D.jpeg
I still have the steering rack and the brake calipers to paint. Those things are pretty gross and are going to take some serious cleaning!
 
Top