
-
We've upgraded and reskinned the forum. Notice something off? Email us at [email protected] and we'll fix it.
You are using an out of date browser. It may not display this or other websites correctly.
You should upgrade or use an alternative browser.
You should upgrade or use an alternative browser.
V1 Alex and the Extended City Frame - 08 Sport/Automatic Donor
Briann1177
Goblin Guru
- Briann1177 Goblin Guru
I went to the hardware store and picked up some M10x1.5 flange nuts. Work perfectly.

Karter2026
Goblin Guru

- Karter2026 Goblin Guru
Just go buy 8 new studs.
- Bretter Well-Known Member
I did consider that for a bit. But with the quality of studs there initially, I'm not sure the rest of the hub is better and I don't want to guess.Just go buy 8 new studs.
I have learned a tremendous amount about cars and the cobalt ecosystem in particular over the last 6-9 months. These were originally purchased from primechoiceauto.com - I am sure that their "lifetime warranty" and decent ratings on Amazon played into my early, inexperienced decision at the time.
9 months after purchase may be a bit long for a refund but I may investigate. Certainly this is part of my "learning tax"

- Bretter Well-Known Member
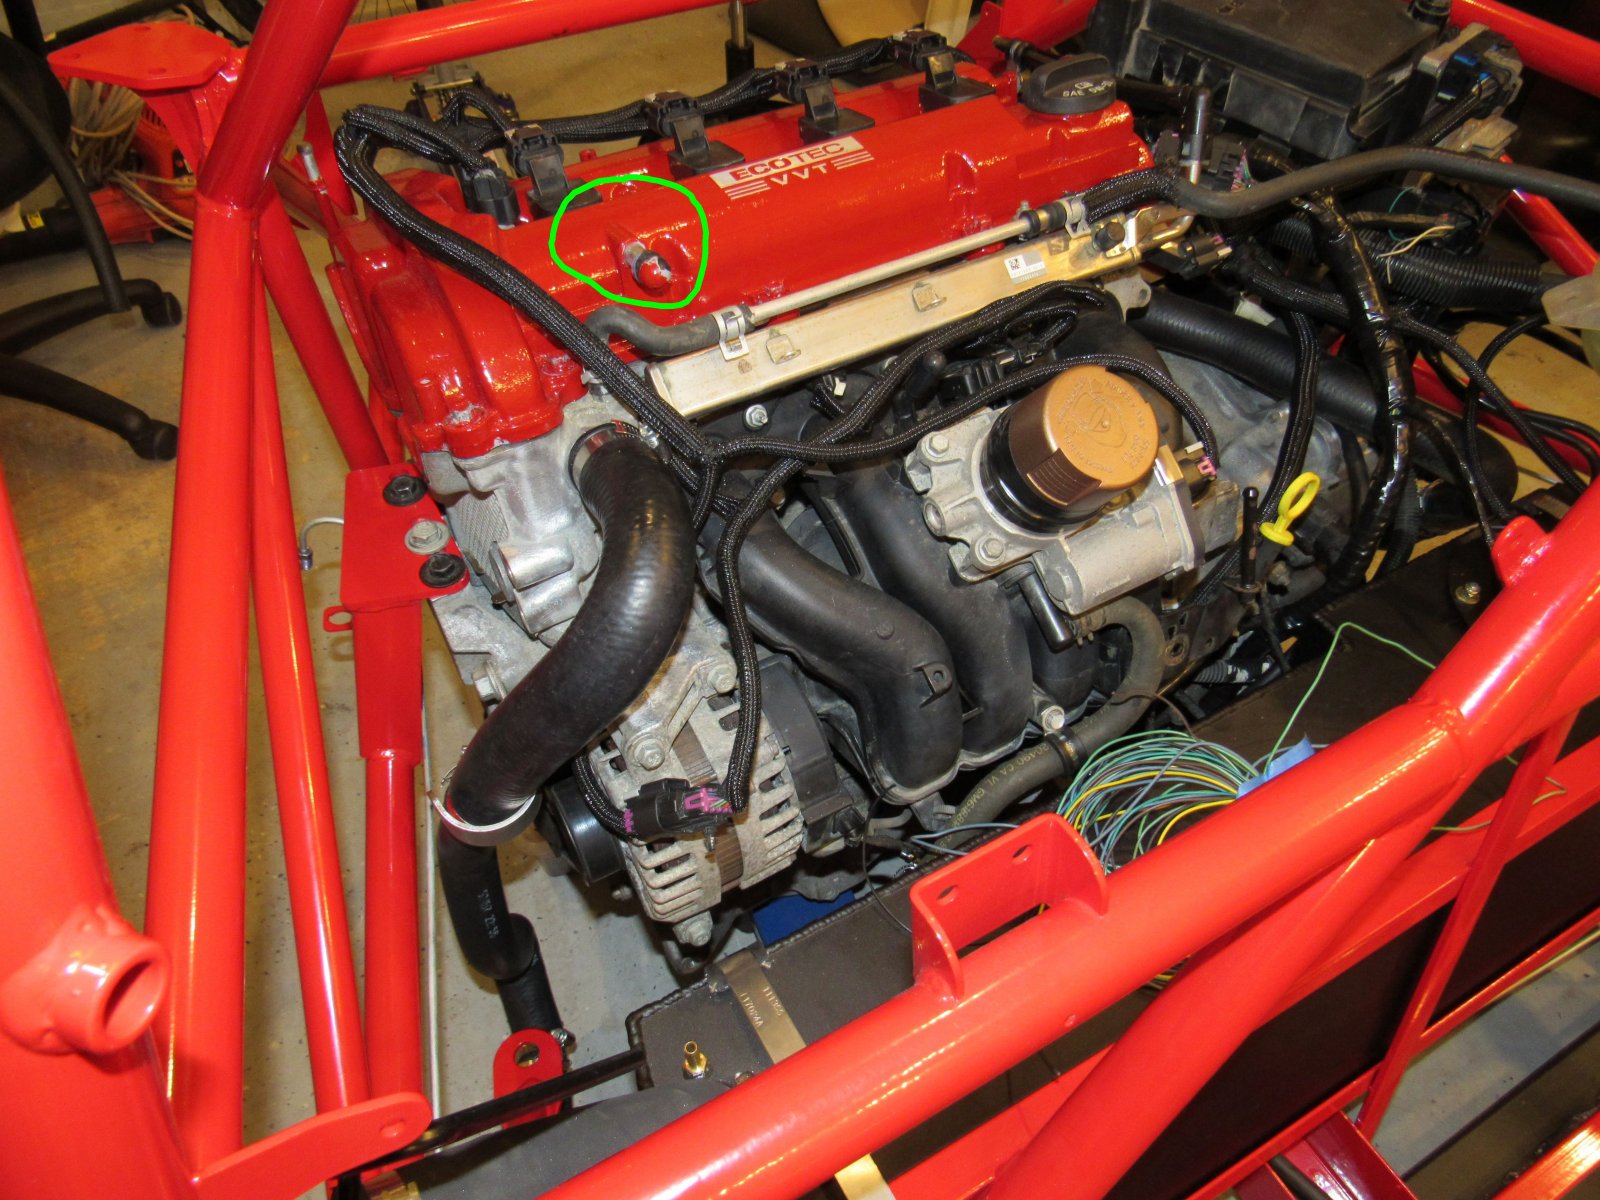
Trying to debug why our motor wouldn't run on it's own, I think I found a problem. We put a vacuum cap on the valve cover to keep dust out - see below. I am pretty sure in normal operation this needs to be vented or piped to the intake between the MAF and butterfly valve. Unfortunately we didn't have it vented - so could this be a cause of our problems on running the engine do you think? i.e. if we ran this engine with this line capped, what should we expect? Problems? What kind?
Briann1177
Goblin Guru
- Briann1177 Goblin Guru
I don't think a cap on the breather will prevent the engine from running on its own at least not immediately. At the most it would eventually blow the cap off as crank case pressures increased.
You're right though in that it does need to run to your intake tube. I believe there is also a check valve that sits between the capped off port and your intake. The check valve should prevent fresh air from being forced into your crankcase.
You're right though in that it does need to run to your intake tube. I believe there is also a check valve that sits between the capped off port and your intake. The check valve should prevent fresh air from being forced into your crankcase.

ctuinstra
Goblin Guru

- ctuinstra Goblin Guru
Does it even try to start? Surely you have the paint cap removed from the intake. I had my headlight harned plugged into the coil packs, yes, the connections are the same and I was trying to spark off my headlights! It didn't take long to figure out that we had no spark and checking over the harness I checked and swapped those two and sure enough it started right up.


- Bretter Well-Known Member
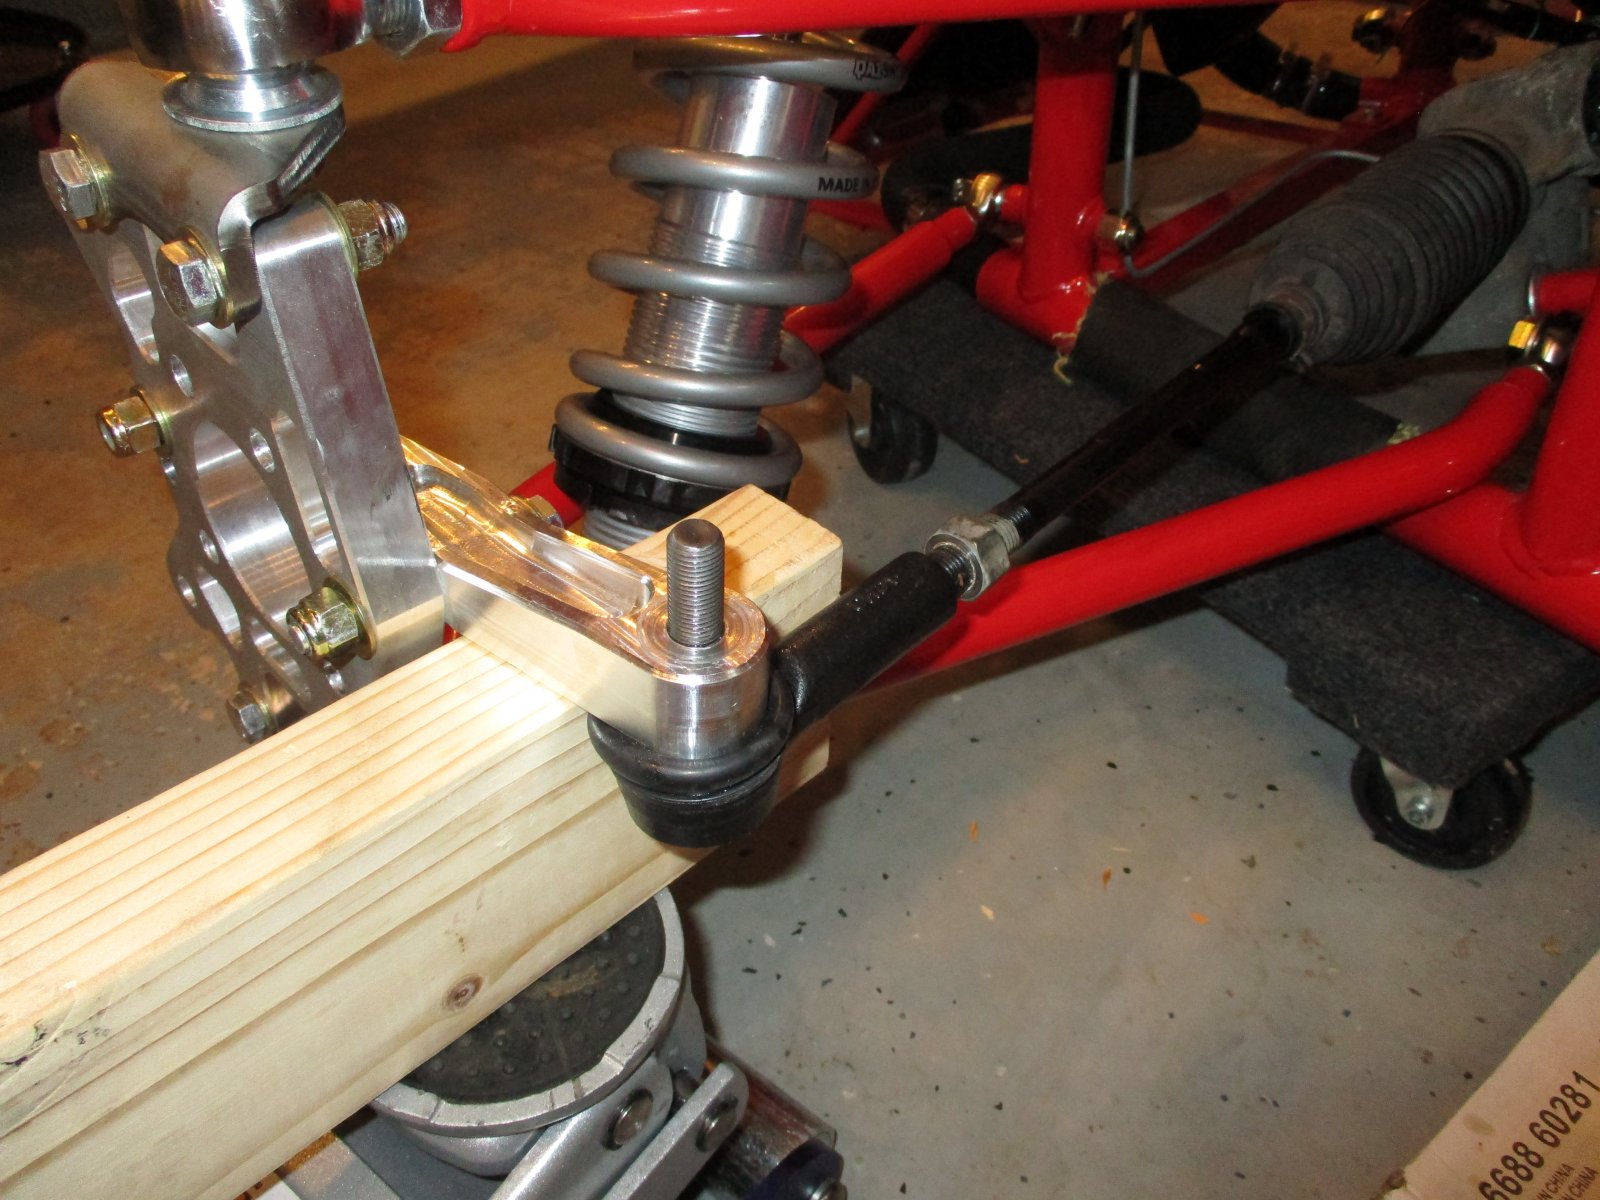
We changed out the rod ends so that the short ones were on the front. Then trying to align the uprights close to what they should be, we tried to take off the rod end but it was stuck hard. Tried using penetrating oil and even a 3# sledge to try and knock it out with no luck. Any tricks of the trade out there to get conical rod ends out?
ctuinstra
Goblin Guru
- ctuinstra Goblin Guru
Yep, and you ain't going to like it. Hit the end of the knuckle with a hammer. This will slightly deform it enough to push it out. This is an old trick that always works but can damage the finish. Maybe try it the first couple of times with a piece of hardwood between it and the hammer.We changed out the rod ends so that the short ones were on the front. Then trying to align the uprights close to what they should be, we tried to take off the rod end but it was stuck hard. Tried using penetrating oil and even a 3# sledge to try and knock it out with no luck. Any tricks of the trade out there to get conical rod ends out?
Briann1177
Goblin Guru
- Briann1177 Goblin Guru
Or take the steering arm off and try to find the correct angle to pull it out. It should wiggle right off.

Waterdriver
Goblin Guru

- Waterdriver Goblin Guru
Use a 2 jaw puller. So as not to deform your steering knuckle.
https://m.lowes.com/pd/Sunex-Tools-...saoHmRuNXtxHpjVEAmsF2MI4zUPPs_9hoCPQEQAvD_BwE
https://m.lowes.com/pd/Sunex-Tools-...saoHmRuNXtxHpjVEAmsF2MI4zUPPs_9hoCPQEQAvD_BwE
- Bretter Well-Known Member
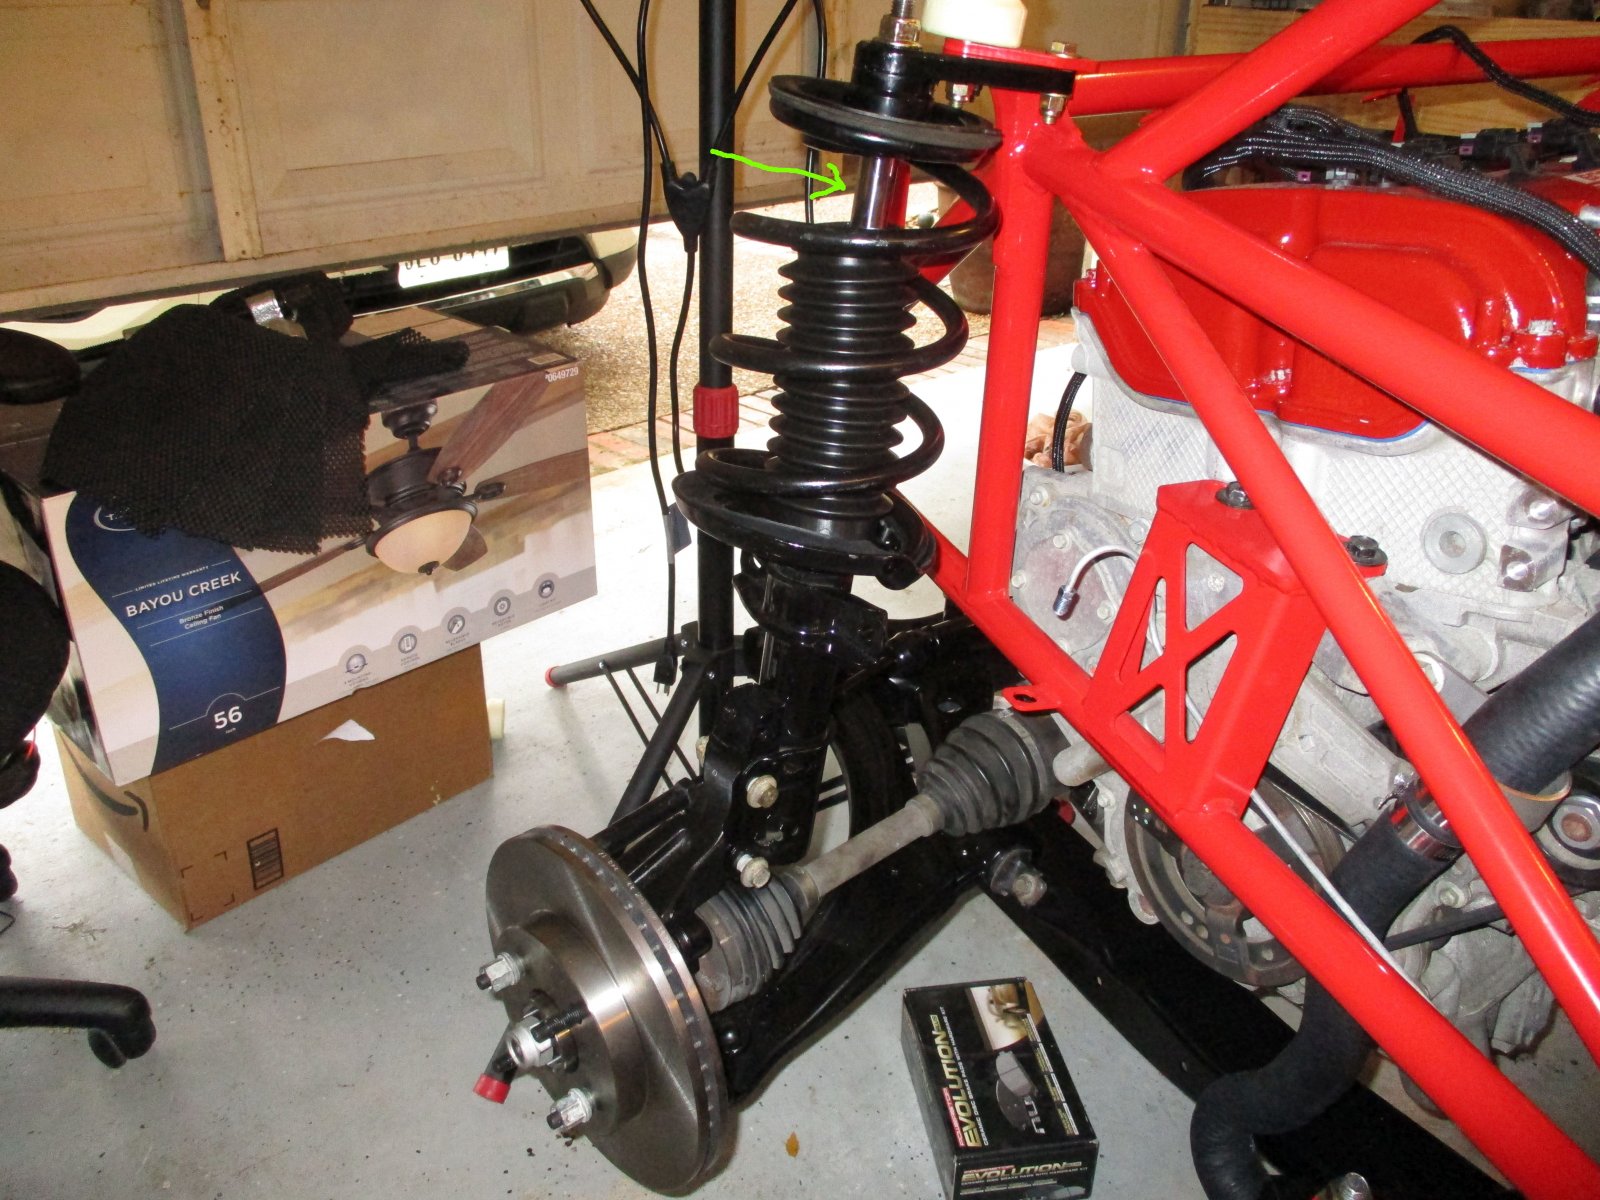
On rear struts, what are people doing with the dust boot? The old ones were pretty ratty so we purchased new ones and they just aren't long enough. Granted the struts are full extension now with no weight on them (1st picture green arrow), but even with full weight, there is still a gap. The boots came with what looks like a bumper I think - looks like originally it would go on the end of the shaft where the aluminum spacer is now. I'm thinking to hollow out the center further and put it like the green arrow in picture #2. Other options?
Also in 3rd picture, the tab for the upper plate rotated to this position naturally. It puts the deepest part of the top plate towards the right rear of the car (directly opposite the tab). Looking around at the forums, it seems there are several pictures with different positions, so is there a "correct" or best reasonable orientation of the top plate?
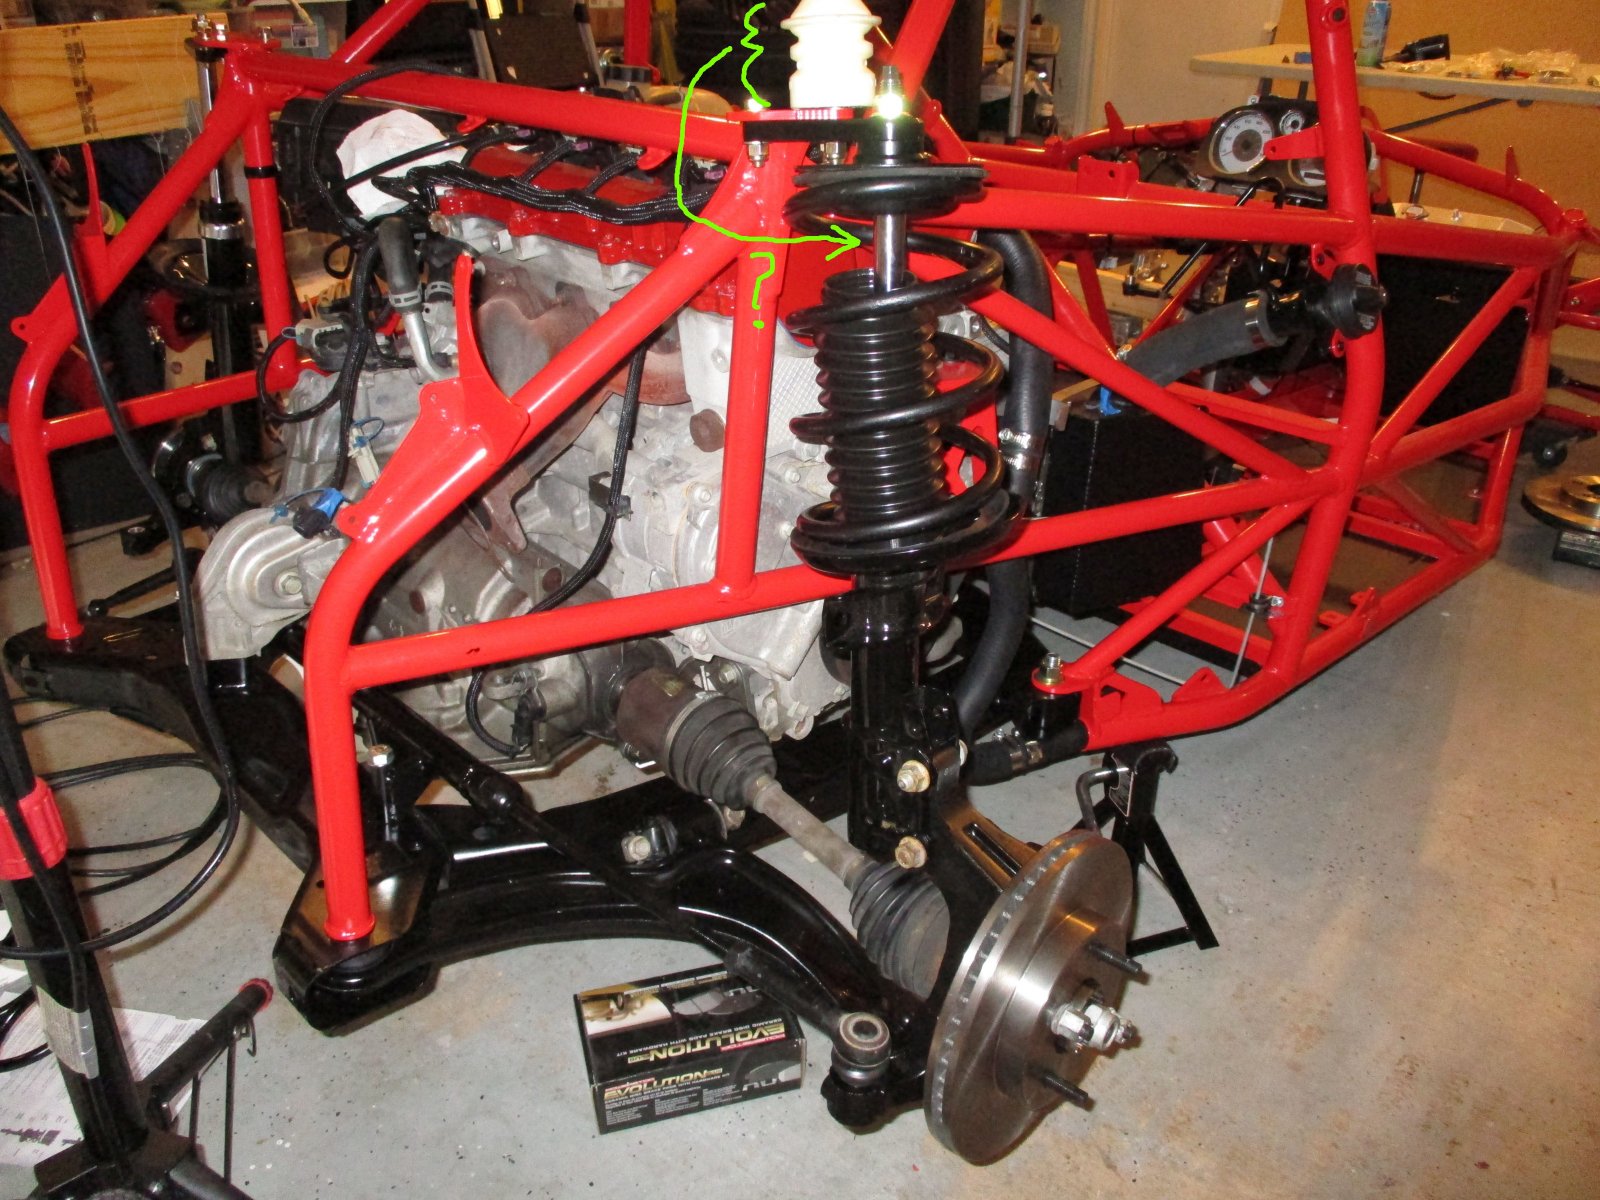
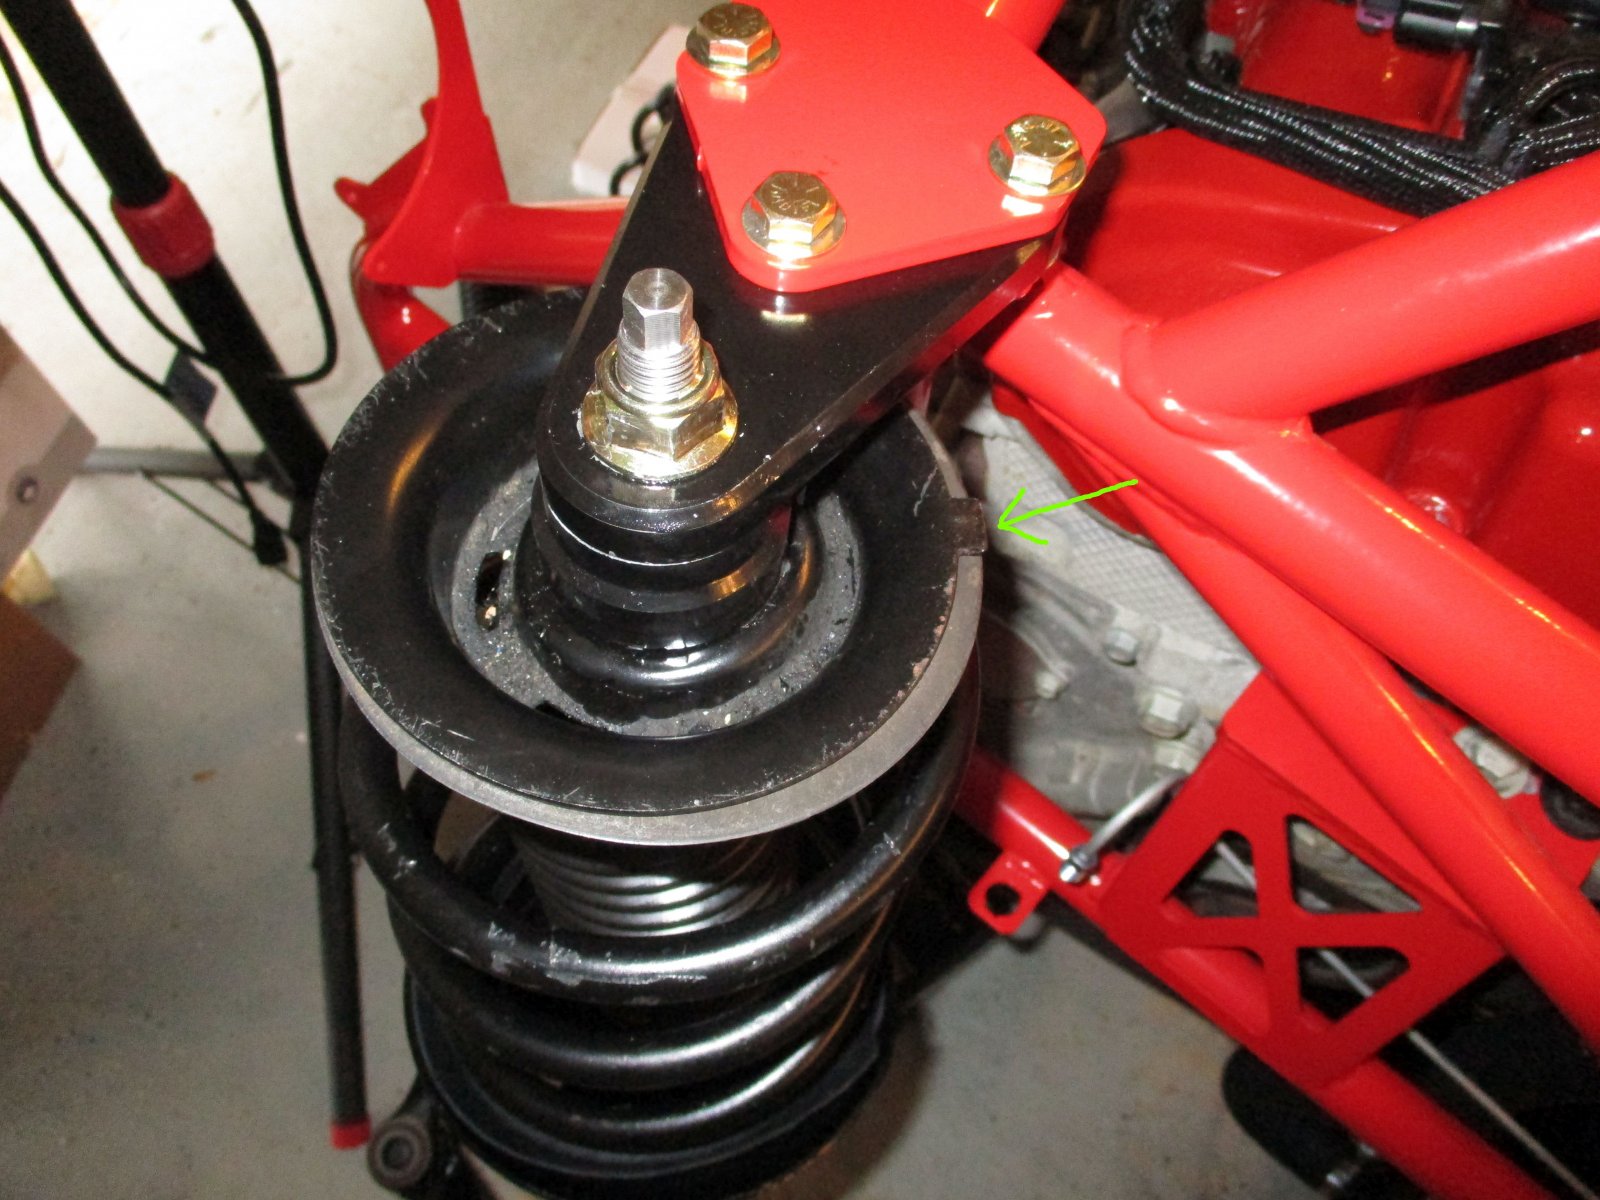
Also in 3rd picture, the tab for the upper plate rotated to this position naturally. It puts the deepest part of the top plate towards the right rear of the car (directly opposite the tab). Looking around at the forums, it seems there are several pictures with different positions, so is there a "correct" or best reasonable orientation of the top plate?
Waterdriver
Goblin Guru
- Waterdriver Goblin Guru
I might depend on if you cut a 1/2 or 1 coil off the spring.
I cut a full coil off and indexed the tab directly towards the chassis.
I cut a full coil off and indexed the tab directly towards the chassis.
- Bretter Well-Known Member
The new Moog hubs are in and on the Goblin. No problems whatsoever with them - they are great!
As for the brake rotors, the rear ones fit great since they are meant to work with a 4-lug hub/rotor. The fronts on the other hand are drilled for a 4-lug hub from the original 5-lug. They move very slightly so I think they need a centering ring to ensure they are centered/balanced as best as possible. They need a ring to go from 57.1mm (hub) to 65.5mm (rotor interior diameter). I cannot find a hub centric ring with those dimensions (no problem on the 57.1 to 73.1 for the wheels).
There are some from 57.1 to 66.6 which would require machining down to the 65.5 (probably go to 65.1mm for clearance). Is there another option for finding/purchasing these centering rings?
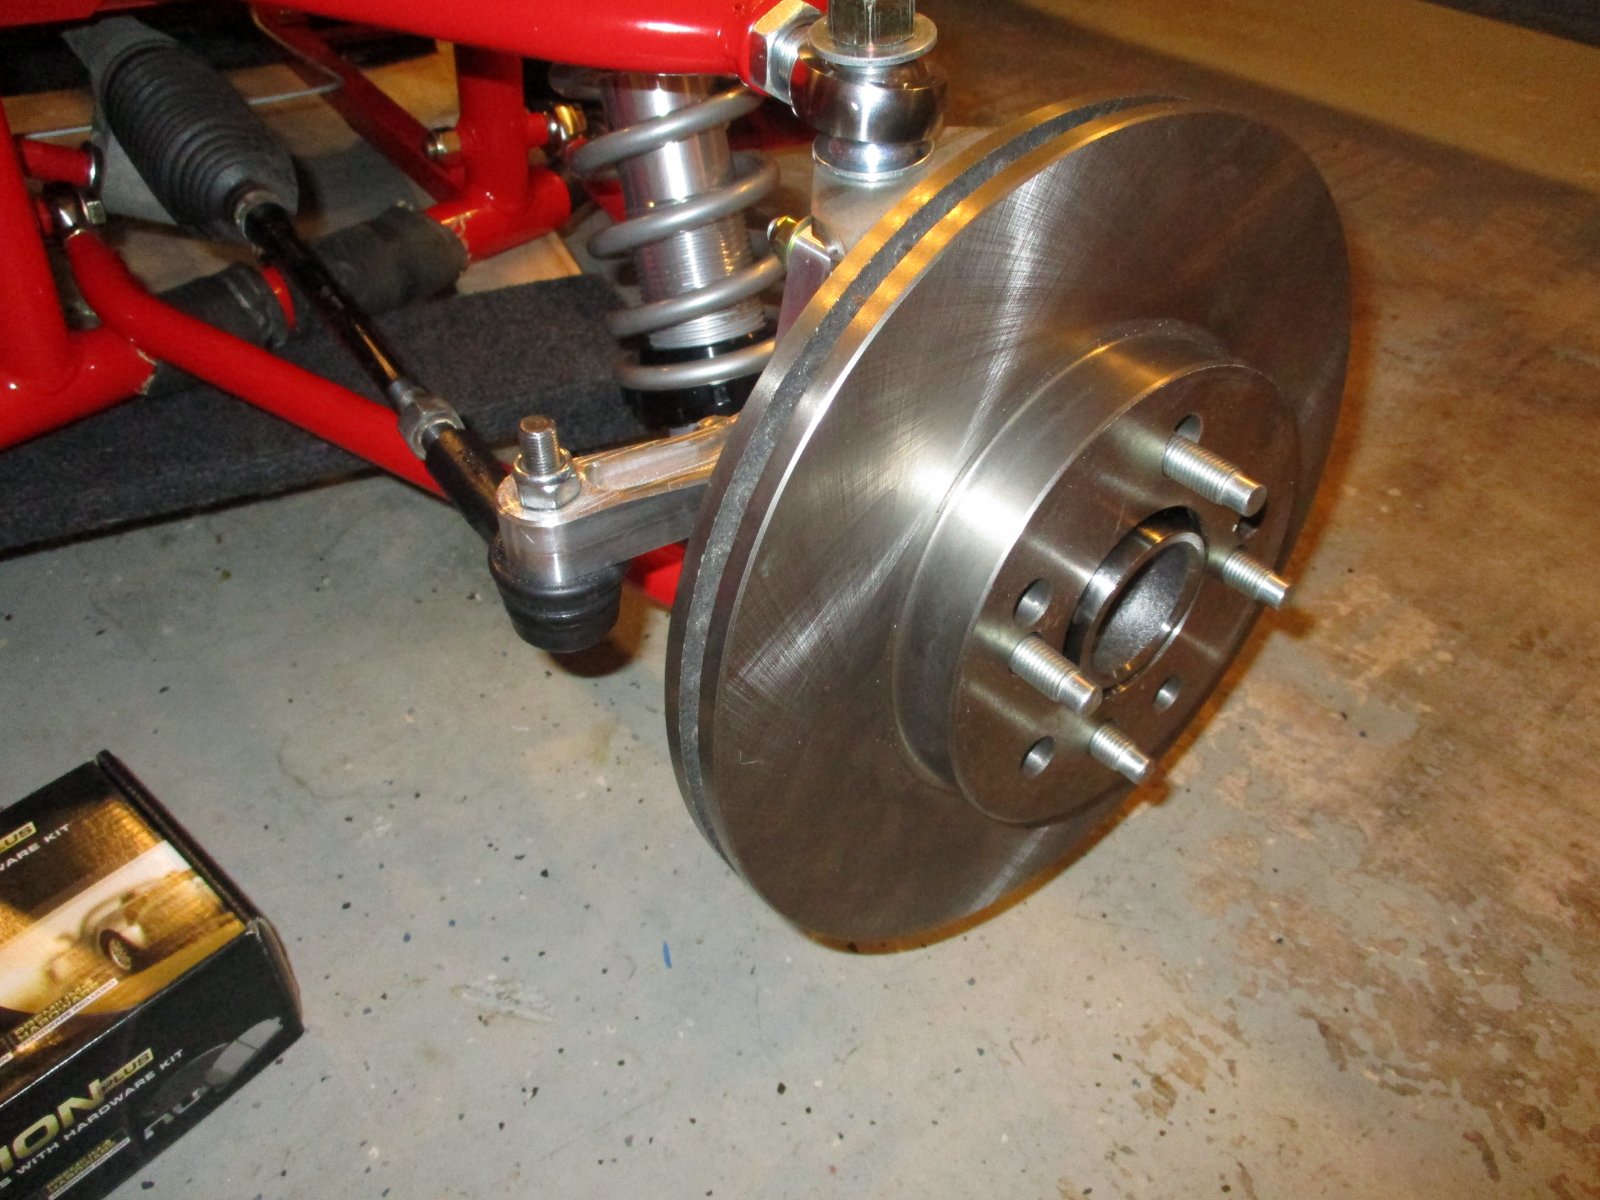
As for the brake rotors, the rear ones fit great since they are meant to work with a 4-lug hub/rotor. The fronts on the other hand are drilled for a 4-lug hub from the original 5-lug. They move very slightly so I think they need a centering ring to ensure they are centered/balanced as best as possible. They need a ring to go from 57.1mm (hub) to 65.5mm (rotor interior diameter). I cannot find a hub centric ring with those dimensions (no problem on the 57.1 to 73.1 for the wheels).
There are some from 57.1 to 66.6 which would require machining down to the 65.5 (probably go to 65.1mm for clearance). Is there another option for finding/purchasing these centering rings?
Briann1177
Goblin Guru
- Briann1177 Goblin Guru
Similar threads

- Replies
- 8
- Views
- 1K


- Replies
- 13
- Views
- 329
- Replies
- 168
- Views
- 19K

- Replies
- 13
- Views
- 2K