
-
We've upgraded and reskinned the forum. Notice something off? Email us at [email protected] and we'll fix it.
You are using an out of date browser. It may not display this or other websites correctly.
You should upgrade or use an alternative browser.
You should upgrade or use an alternative browser.
V1 BAR-AIR's build up in Buffalo N.Y.


BAR-AIR
Well-Known Member

- BAR-AIR Well-Known Member
Well Dan sorry about the doctors bills. As for the cat, my dog said he has not found one he didn't like!! (All taste like chicken I guess). Hopefully these photos will make you feel better. As for the wiring, if you just want to plug and play it is pretty straight forward. But if you also want to make it looks like it was made for the car it is going to take some time. Originally it looked like a rats nest. NOTE: if you have not installed the front wall I would suggest drilling for the BCM before installing it would have been a lot easier drilling on the bench it could also use a stiffener the wall is a little light for the BCM.
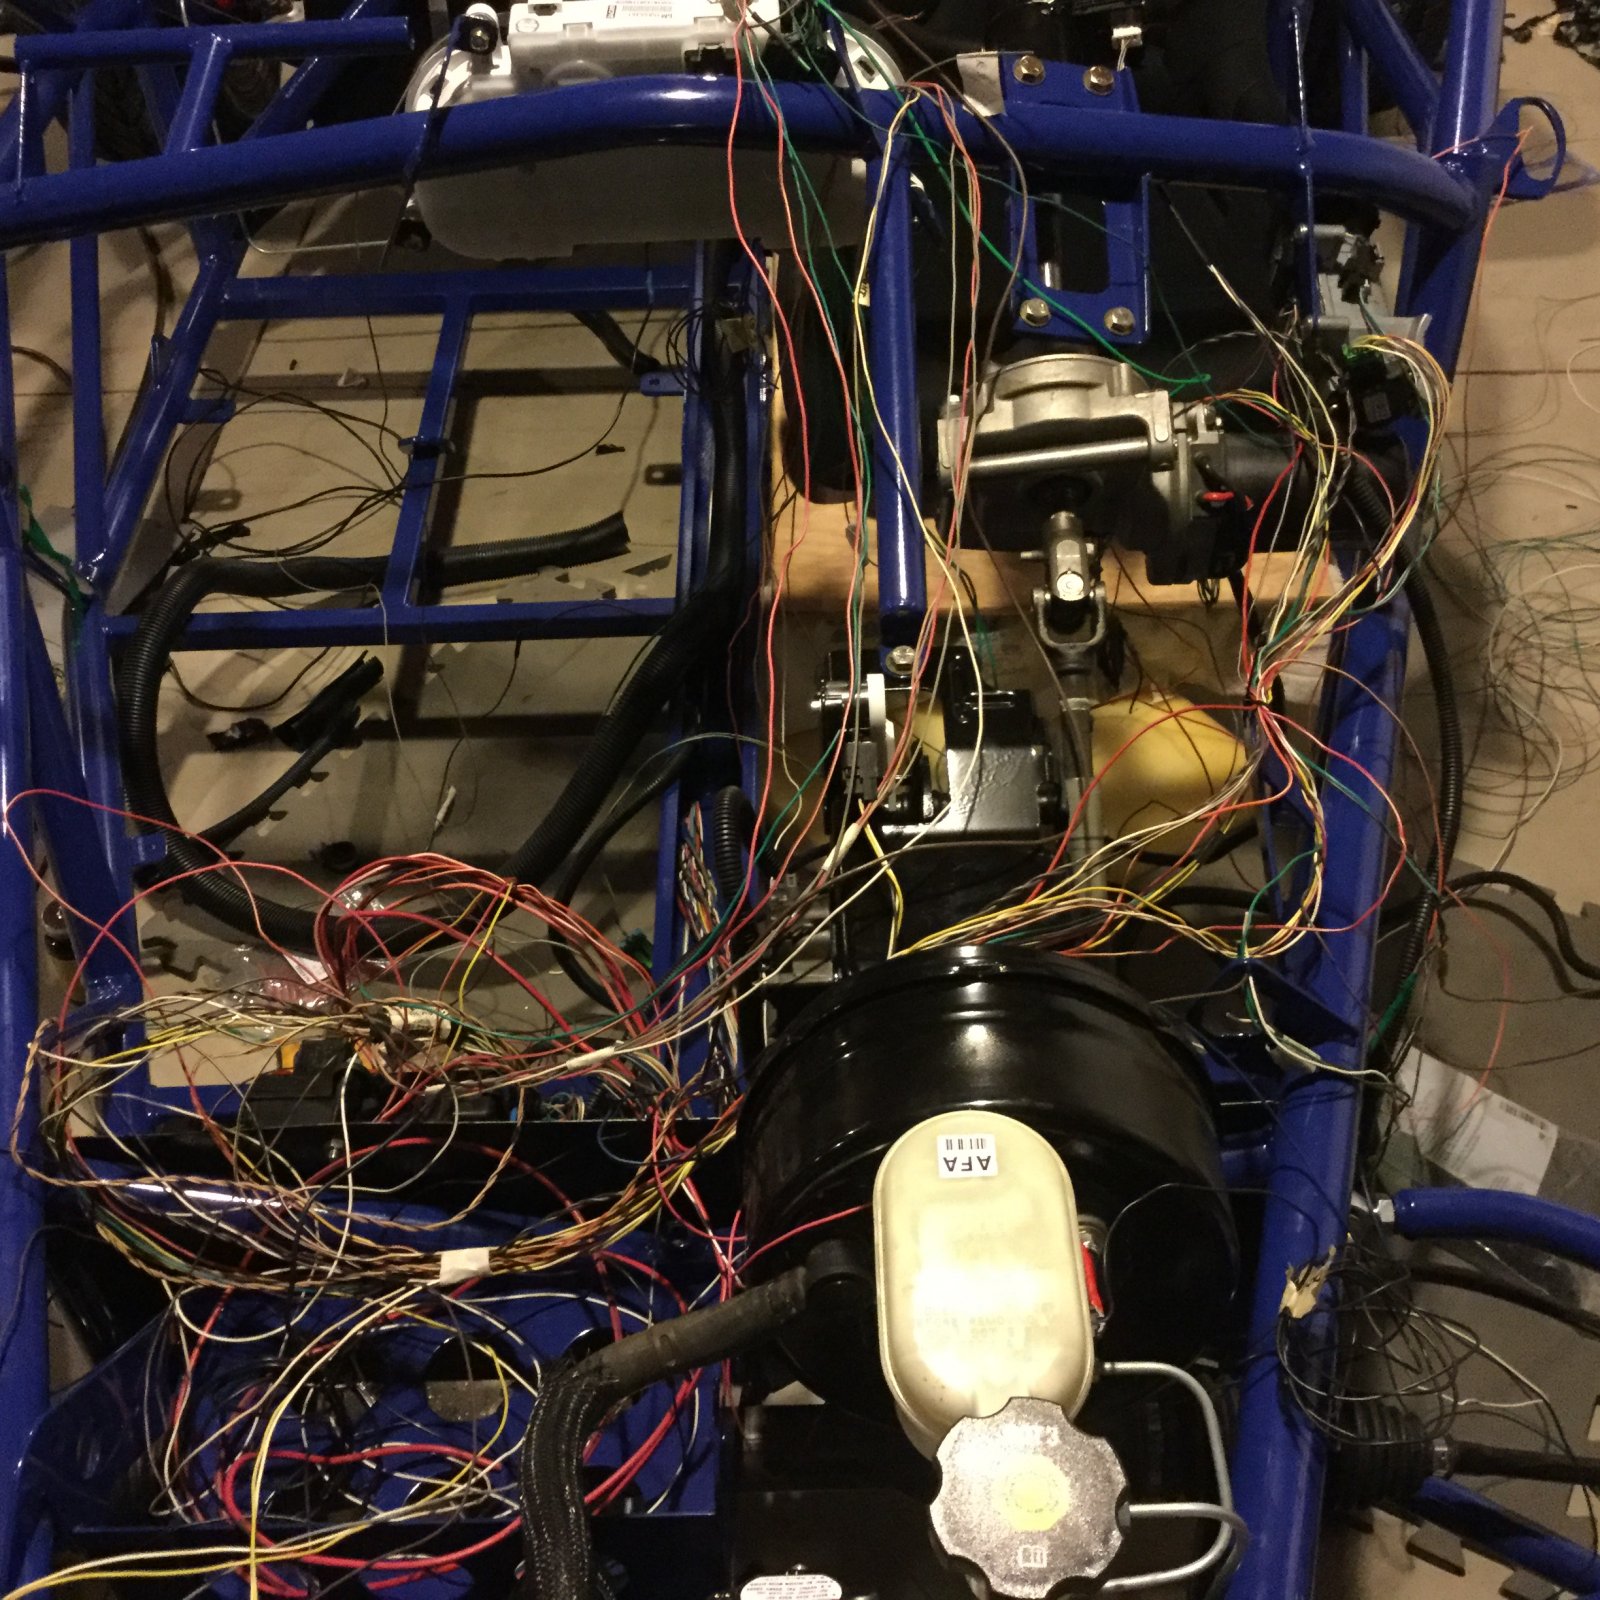
BAR-AIR
Well-Known Member
- BAR-AIR Well-Known Member
Sorry, loaded the text before the pictures so reverse order.
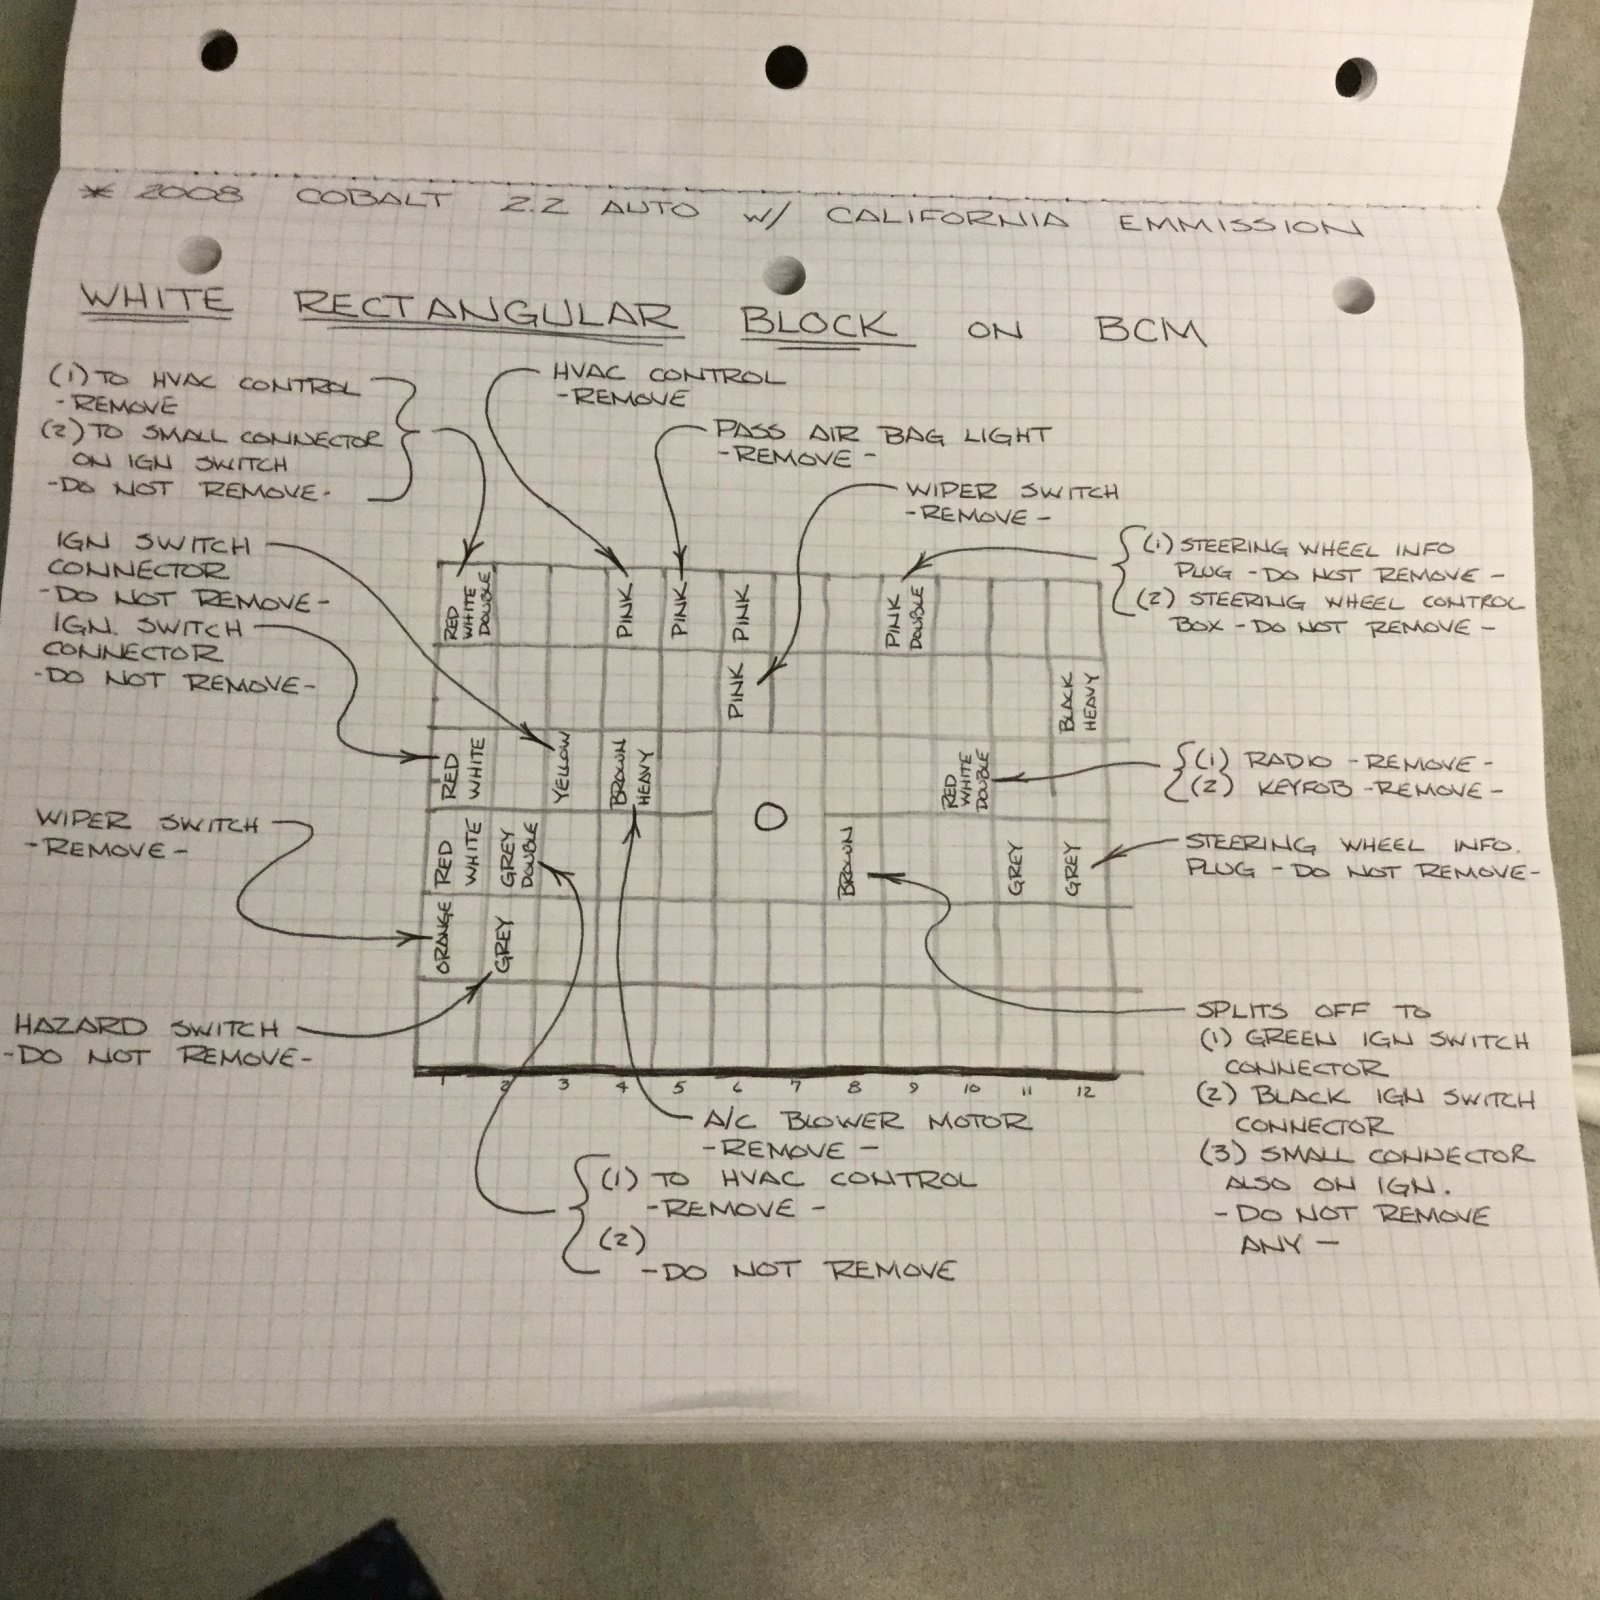
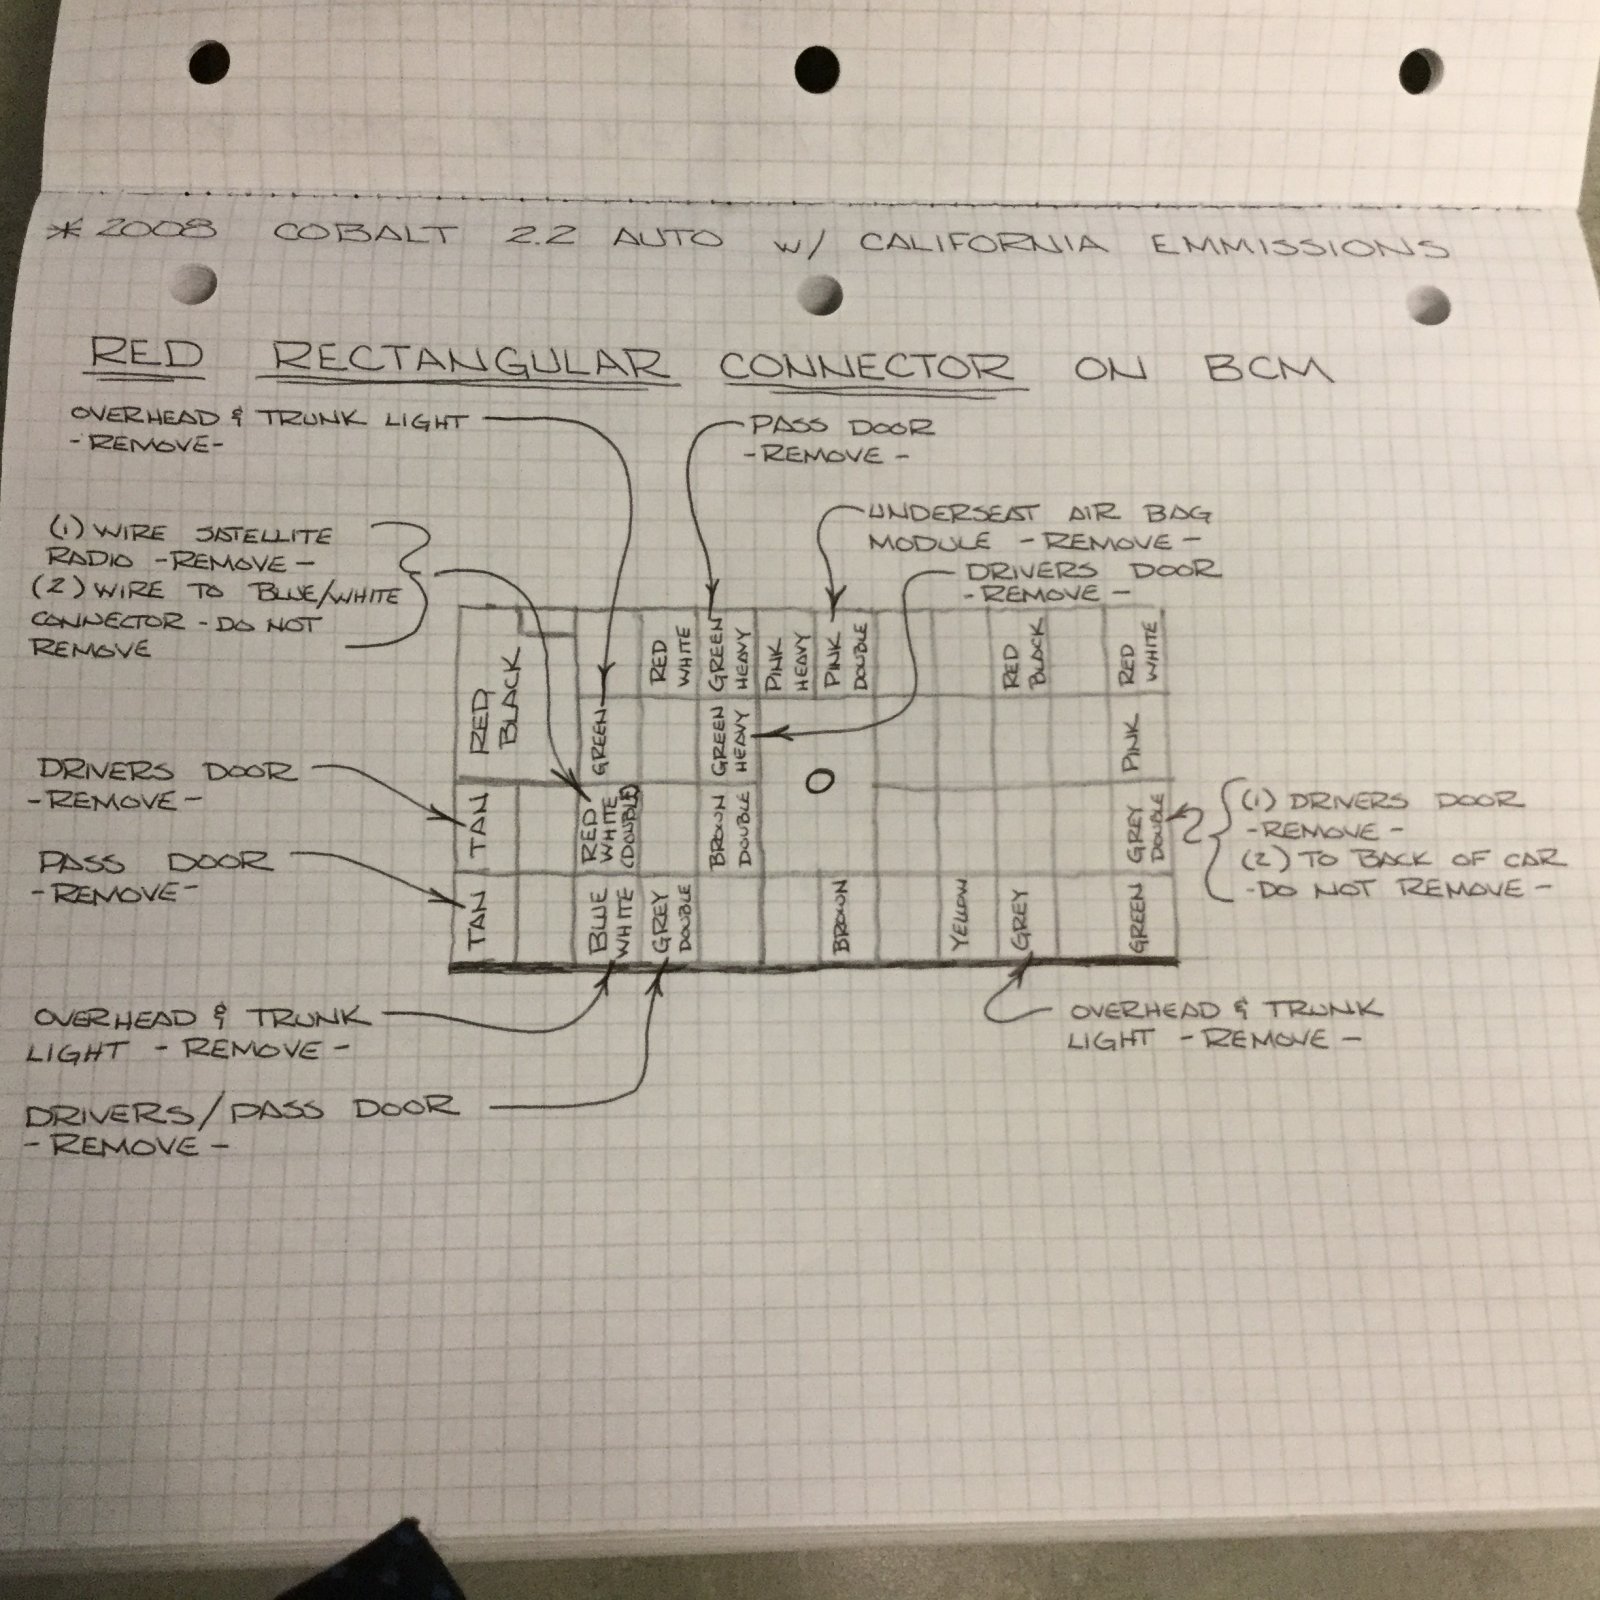
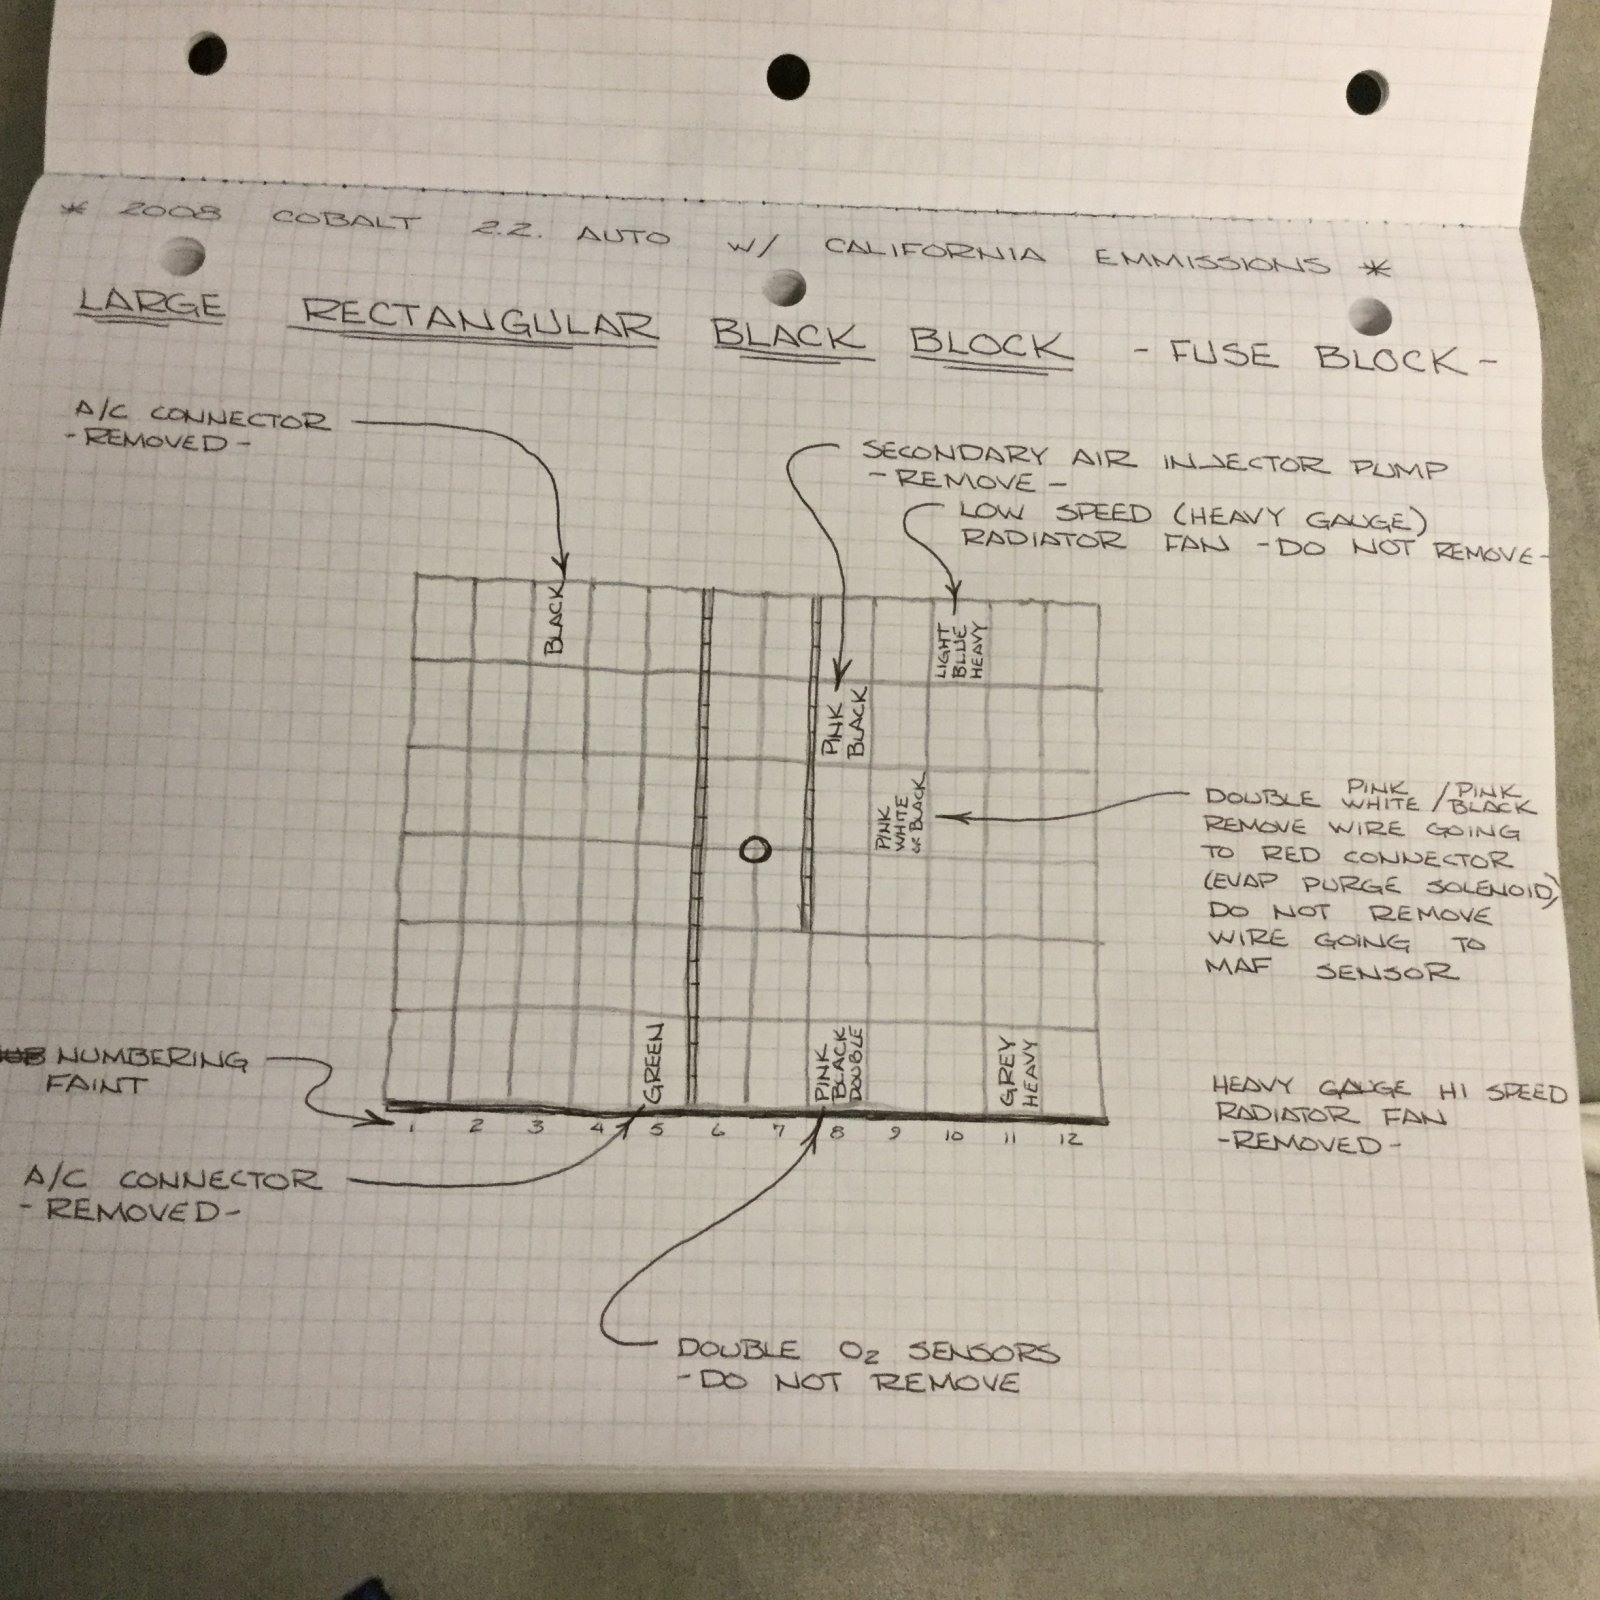
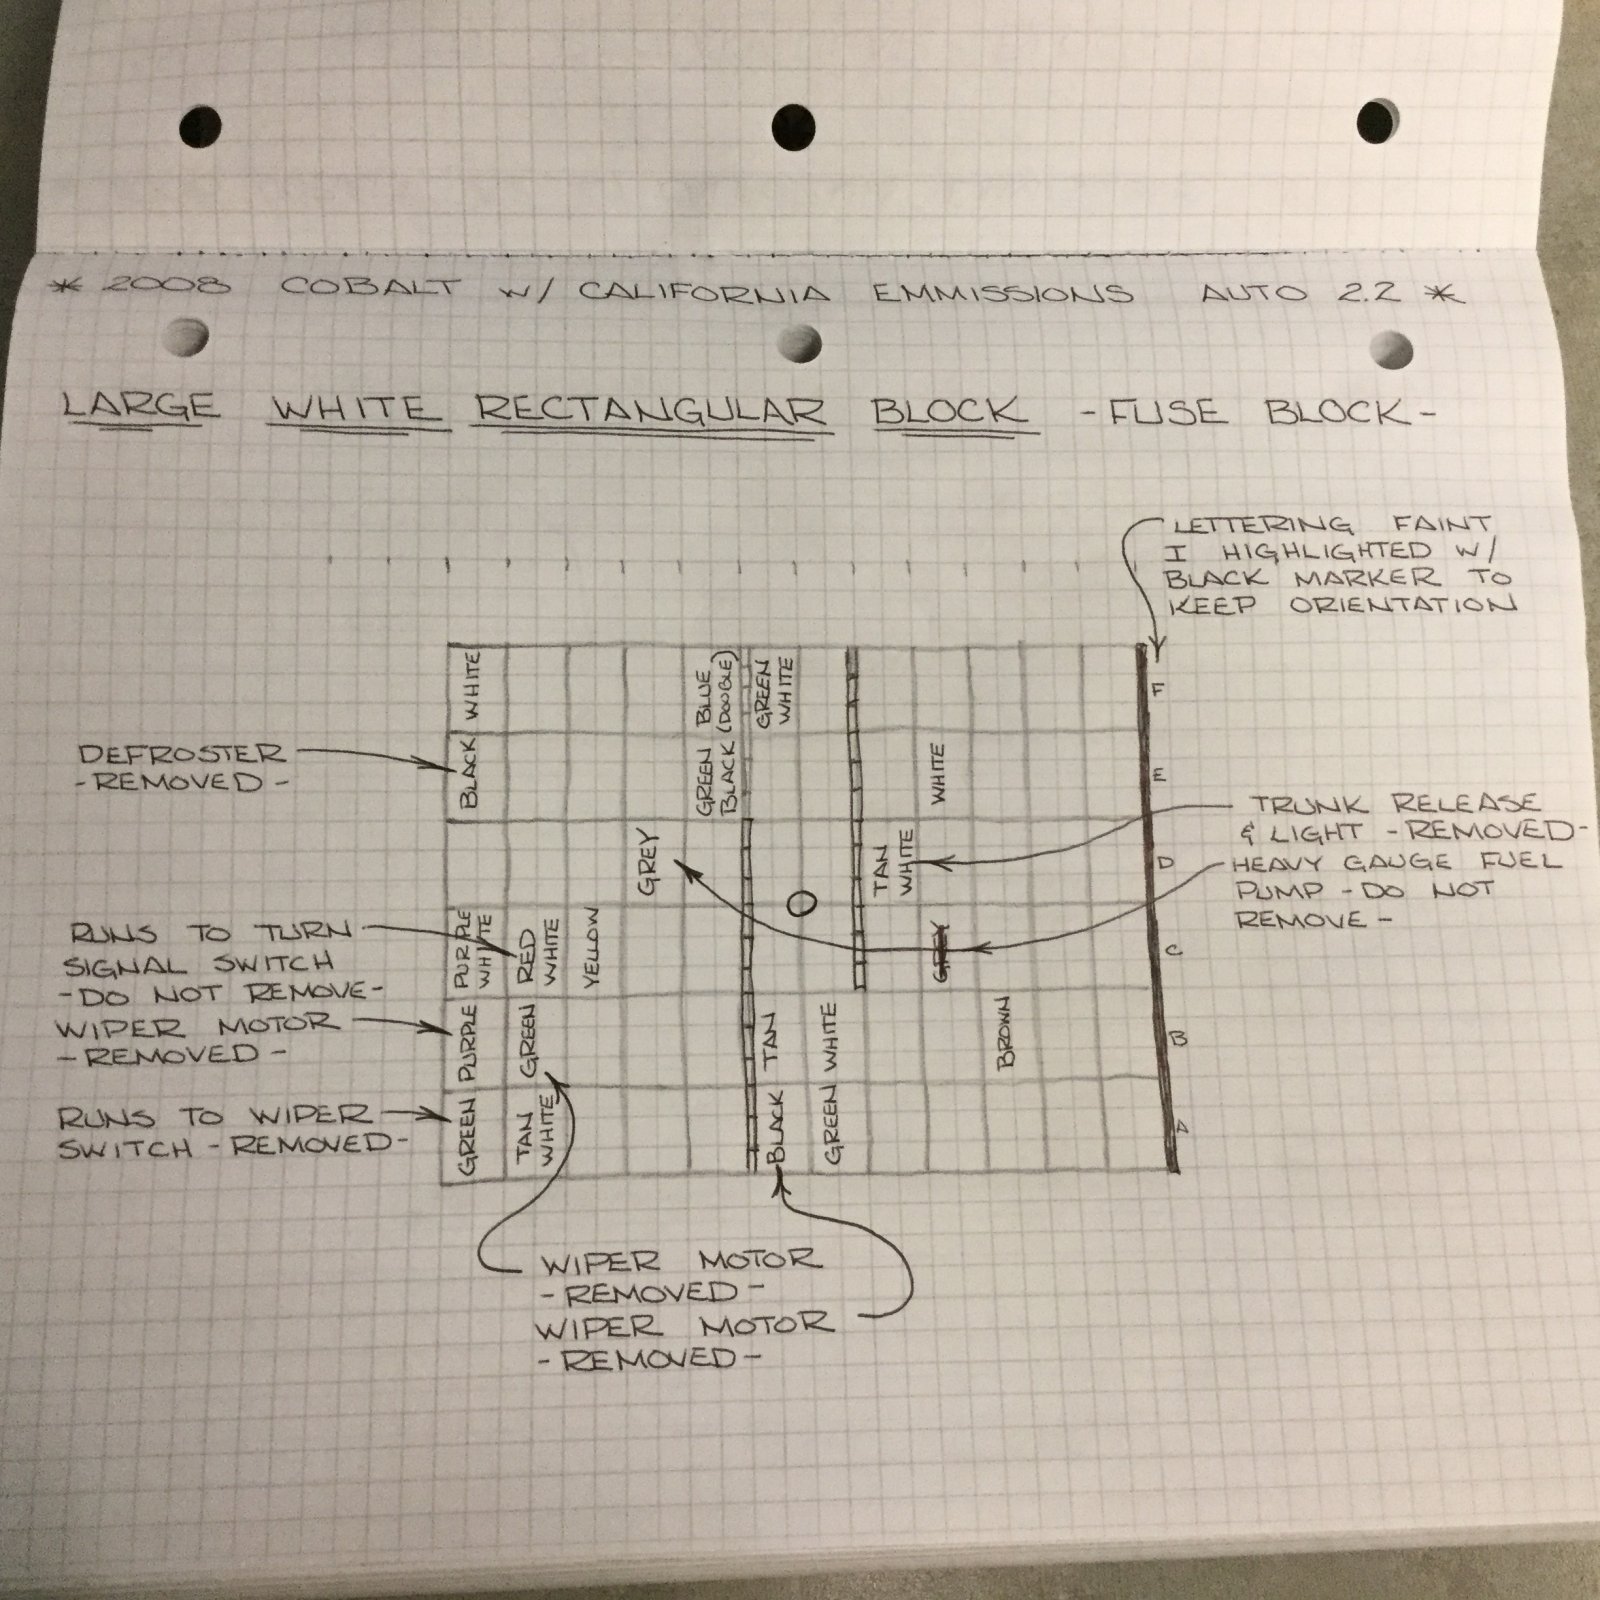
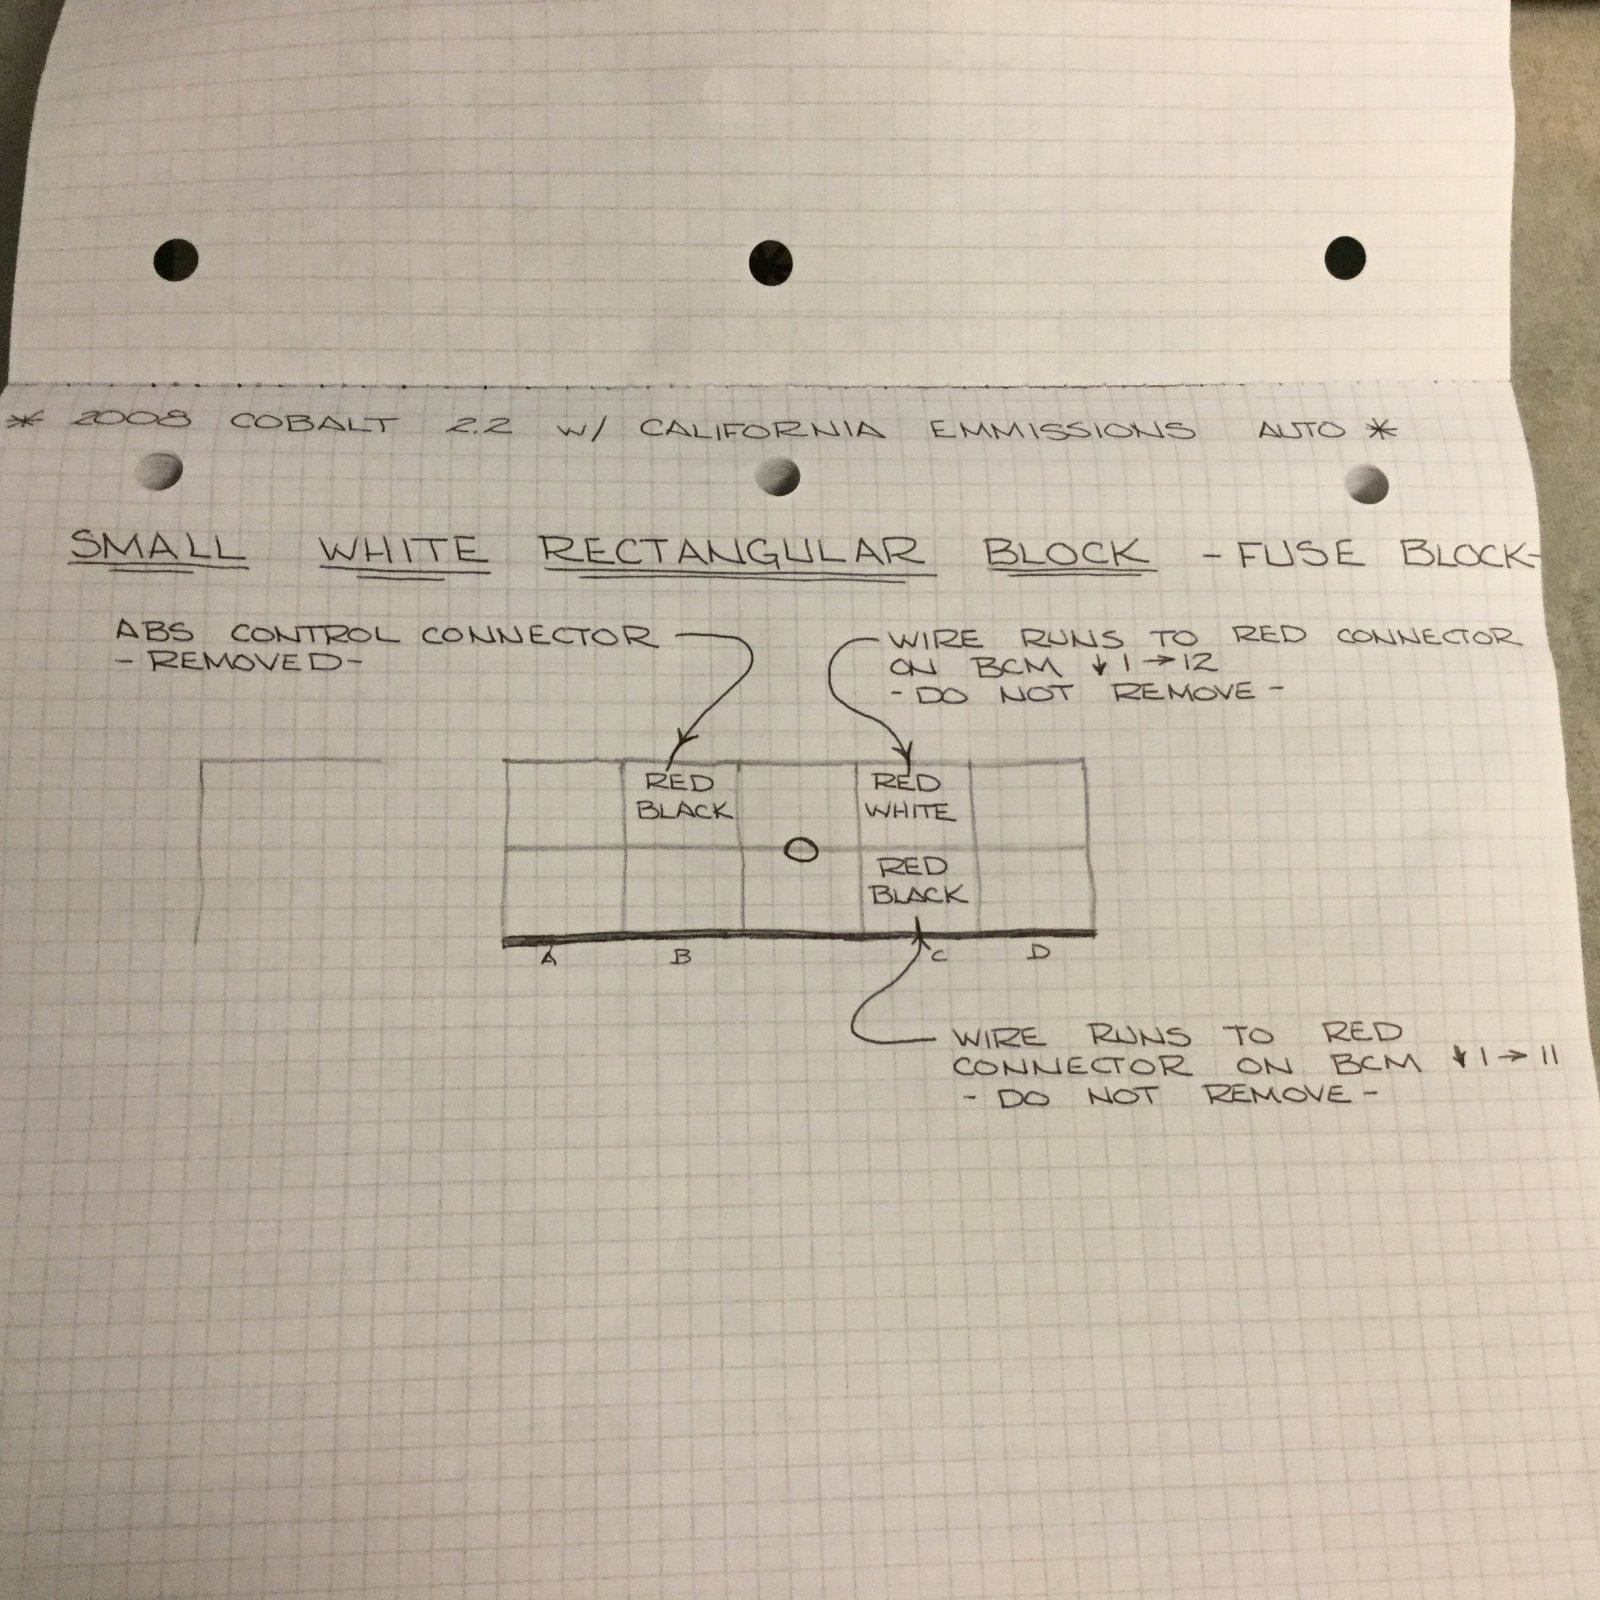
 Good Evening,
Here are some of my notes from the electrical system. Hopefully as each of us goes through the build process we can make it a little easier for the next builder and improve the end product for all of us. (The guys at Dfkitcar's have done a great job, the attention to the detail is awesome with that being said I look forward to seeing the finished build notes so that I can see everything I did wrong.
All the notes are for a 2008 Cobalt with an automatic transmission and the California emissions. There are probably mistakes with spelling, names of components and misc. I'm sure there is someone that could make these look pretty it is just not me. As I said earlier, if we could add to it and make a kind of master list it would make the wiring harness a lot less intimidating.

Here is the headlight fuse block with the mirrors and taillight wires.
THX, Bruce
Here are some of my notes from the electrical system. Hopefully as each of us goes through the build process we can make it a little easier for the next builder and improve the end product for all of us. (The guys at Dfkitcar's have done a great job, the attention to the detail is awesome with that being said I look forward to seeing the finished build notes so that I can see everything I did wrong.
All the notes are for a 2008 Cobalt with an automatic transmission and the California emissions. There are probably mistakes with spelling, names of components and misc. I'm sure there is someone that could make these look pretty it is just not me. As I said earlier, if we could add to it and make a kind of master list it would make the wiring harness a lot less intimidating.
Here is the headlight fuse block with the mirrors and taillight wires.
THX, Bruce
Last edited:


BAR-AIR
Well-Known Member
- BAR-AIR Well-Known Member
I guess that was misleading. I still ran the 1" radiator hose through the lower frame (marine semi rigid is to large OD to fit through the frame) after the frame I used larger 1" barbed hose connectors to run the semi rigid up to the engine single run no piecing radiator hoses together. Next time I'm home I'll get you a more updated photo of the lines this is just an early mock up with the semi rigid (way longer then needed) you can bend a pretty tight radius without collapsing the line. At the engine, I cut one of the barbed fittings down so one end fits snugly into the radiator casting then slide a 6" X 1 1/2" dia. Radiator hose over the 1" semi rigid hose connect the 1" hose over the barbed end then slide the 6" x 1 1/2" hose over both the engine outlet and the 1" hose and barbed fitting. Two clamps one at the engine and one over the barbed end with the two hoses (barb keeps it from collapsing) it makes a really nice clean look.
BAR

Swift06
Member

- Swift06 Member
Quick question: How did you get the interior wiring loom out of the firewall? The last hard part of the interior that I need to remove feels like a "spikey computer" just behind the big hole that the wiring goes through. I've found two bolts, but I think there's at least one more. Tips?
BAR-AIR
Well-Known Member
- BAR-AIR Well-Known Member

DanPerryy
Well-Known Member

- DanPerryy Well-Known Member
Great notes for suggested inprovements on Alex's page.
For the exhaust I have been considering just running both cats (no muffler) and use the stock isolation accordion, wrapping the cats on top of one another, mounted to the frame through a heat isolation brackets. I have had past problems with cracking tube manifolds, exhaust pipes due to vibration on suspended weight.
On the tow bar mount - I did see Lonny's front tow bar mounts attached to the upper front suspension mounts. It looked good (and was VERY simple) but I think it could deform the suspension mount in a very hard stop. Lonny is flat towing his a few thousand miles this weekend. In having spent a lot of time with him and Adam over the past months I know that he looks at EVERYTHING.
One reason I switched to the track frame was to eventually provide a top windshield mount. For now I will use the plastic windshield.
The front fuse block / BCM is not waterproof. The second battery box is a good idea. Picture???
In retrospect, for perfection - and realizing that all of us have different custom features of our cars - I think your idea of essentially completely assembling the vehicle, welding our own tabs / mounts as needed and then disassemble and powder coat the frame is the best way to build the perfect Goblin. You spend significantly more time before you drive it.
For the exhaust I have been considering just running both cats (no muffler) and use the stock isolation accordion, wrapping the cats on top of one another, mounted to the frame through a heat isolation brackets. I have had past problems with cracking tube manifolds, exhaust pipes due to vibration on suspended weight.
On the tow bar mount - I did see Lonny's front tow bar mounts attached to the upper front suspension mounts. It looked good (and was VERY simple) but I think it could deform the suspension mount in a very hard stop. Lonny is flat towing his a few thousand miles this weekend. In having spent a lot of time with him and Adam over the past months I know that he looks at EVERYTHING.
One reason I switched to the track frame was to eventually provide a top windshield mount. For now I will use the plastic windshield.
The front fuse block / BCM is not waterproof. The second battery box is a good idea. Picture???
In retrospect, for perfection - and realizing that all of us have different custom features of our cars - I think your idea of essentially completely assembling the vehicle, welding our own tabs / mounts as needed and then disassemble and powder coat the frame is the best way to build the perfect Goblin. You spend significantly more time before you drive it.
BAR-AIR
Well-Known Member
- BAR-AIR Well-Known Member
Good Afternoon,
Just going to add some photos to my build page and see if I can get some feed back on some of the ideas I'm working on.

There is a bunch going on in this photo. 1st the mock up for a windscreen using 1 1/2" or 1 1/4" tube (have to have safety glass in NY w/wipers) it would have a three point mount two on the vertical dash tubes the third being on the back roll bar. NOTE: on the passenger tire is a piece of 1 1/2" ID tube that I split to mount over the existing frame. The two pieces of wood running between the front and rear roll bar will be either 1 1/2" or 1 1/4" tube -first for easier access into the car, second to help support the windscreen because without them anyone getting into or out of the car is going to use the windscreen hoop. The piece of wood (also will be tube) running along the bottom of the windscreen will actually be straight in the middle and then slope down on the ends to mimic the hood. The local glass shop will cut the glass then the rubber seal can be urethaned directly to the tubes and the glass installed.
The second is the spoiler in front of the car (again bumpers separate from the car structure are required in NY) the bumper structure must be 16" from the ground. I have looked at simple hoops, T bars, complete tube bumpers that being said I had the spoiler from my donor just sitting in front of the car any ideas how to incorporate a bumper structure into the looks of a simple spoiler?
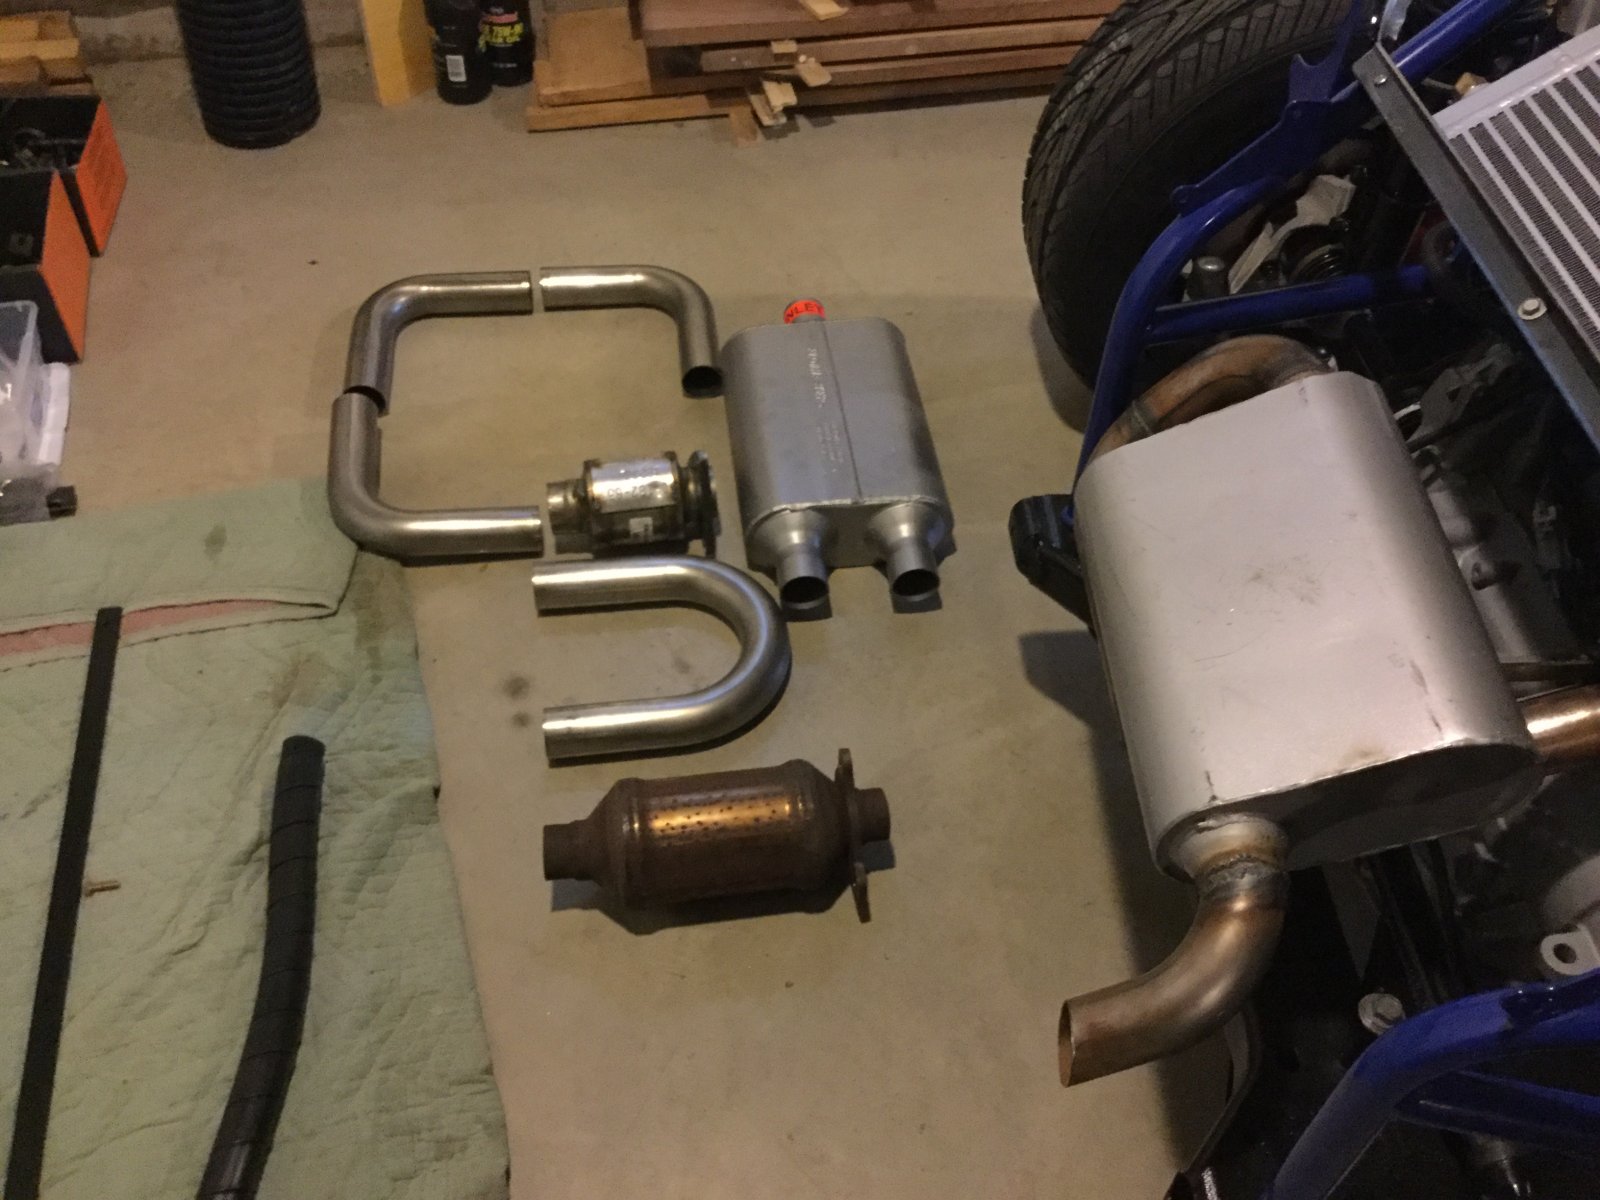
 Dan here is a photo of the exhaust set up.
You can see the stock kit exhaust on the car (again required to have a catalytic converter in NY). On the floor you can see the stock Cobalt catalytic converter with the pipes cut down then welded to the stock flange it is really heavy and 11" in length. Right above it is a Walker CalCat (Calif. and NY approved) direct replacement converter for the Cobalt it is about a third the weight of the stock and is only 6" in length. In addition there are the stainless tubes for the rest of the exhaust. (Just for more of a challenge I went with double outlets on the muffler. Plan to just parallel them down like the stock kit exhaust). As I stated in a earlier post whether you are using the stock kit exhaust or one with a converter there is a lot of weight being only supported by the stock exhaust manifold (or aftermarket header) would really like to tie the exhaust into the rear frame on either side of the muffler without transferring the heat to the frame. Looking for suggestions? Additional Note: talking to the Dyno shop he needs an additional O2 sensor on the exhaust if able preferably before the catalytic.
Thx, Bruce
Just going to add some photos to my build page and see if I can get some feed back on some of the ideas I'm working on.
There is a bunch going on in this photo. 1st the mock up for a windscreen using 1 1/2" or 1 1/4" tube (have to have safety glass in NY w/wipers) it would have a three point mount two on the vertical dash tubes the third being on the back roll bar. NOTE: on the passenger tire is a piece of 1 1/2" ID tube that I split to mount over the existing frame. The two pieces of wood running between the front and rear roll bar will be either 1 1/2" or 1 1/4" tube -first for easier access into the car, second to help support the windscreen because without them anyone getting into or out of the car is going to use the windscreen hoop. The piece of wood (also will be tube) running along the bottom of the windscreen will actually be straight in the middle and then slope down on the ends to mimic the hood. The local glass shop will cut the glass then the rubber seal can be urethaned directly to the tubes and the glass installed.
The second is the spoiler in front of the car (again bumpers separate from the car structure are required in NY) the bumper structure must be 16" from the ground. I have looked at simple hoops, T bars, complete tube bumpers that being said I had the spoiler from my donor just sitting in front of the car any ideas how to incorporate a bumper structure into the looks of a simple spoiler?
You can see the stock kit exhaust on the car (again required to have a catalytic converter in NY). On the floor you can see the stock Cobalt catalytic converter with the pipes cut down then welded to the stock flange it is really heavy and 11" in length. Right above it is a Walker CalCat (Calif. and NY approved) direct replacement converter for the Cobalt it is about a third the weight of the stock and is only 6" in length. In addition there are the stainless tubes for the rest of the exhaust. (Just for more of a challenge I went with double outlets on the muffler. Plan to just parallel them down like the stock kit exhaust). As I stated in a earlier post whether you are using the stock kit exhaust or one with a converter there is a lot of weight being only supported by the stock exhaust manifold (or aftermarket header) would really like to tie the exhaust into the rear frame on either side of the muffler without transferring the heat to the frame. Looking for suggestions? Additional Note: talking to the Dyno shop he needs an additional O2 sensor on the exhaust if able preferably before the catalytic.
Thx, Bruce

AleX1/9
Well-Known Member

- AleX1/9 Well-Known Member
Looks like really good progress!
Question on the exhaust, does it have a flex joint somewhere in the system? You really wouldn't want to attach the exhaust to the frame unless it does, as the engine will rock back and forth under torque. The better solution in my opinion is adding a solid brace from the block or trans to the bottom of the exhaust to take the weight off the manifold and flanges. That way you don't have to add a rubber mount or a flex joint.
Question on the exhaust, does it have a flex joint somewhere in the system? You really wouldn't want to attach the exhaust to the frame unless it does, as the engine will rock back and forth under torque. The better solution in my opinion is adding a solid brace from the block or trans to the bottom of the exhaust to take the weight off the manifold and flanges. That way you don't have to add a rubber mount or a flex joint.
BAR-AIR
Well-Known Member
- BAR-AIR Well-Known Member
That is my concern,
Would like to go with exhaust donuts on either side of the muffler then connecting to the rear frame. That should give the flexibility for any engine movement (Note: the engine is solid mounted to the frame already so there should be little movement -stock rubber mounts are cosmetic they could be solid, the upper engine mounts directly to the frame).
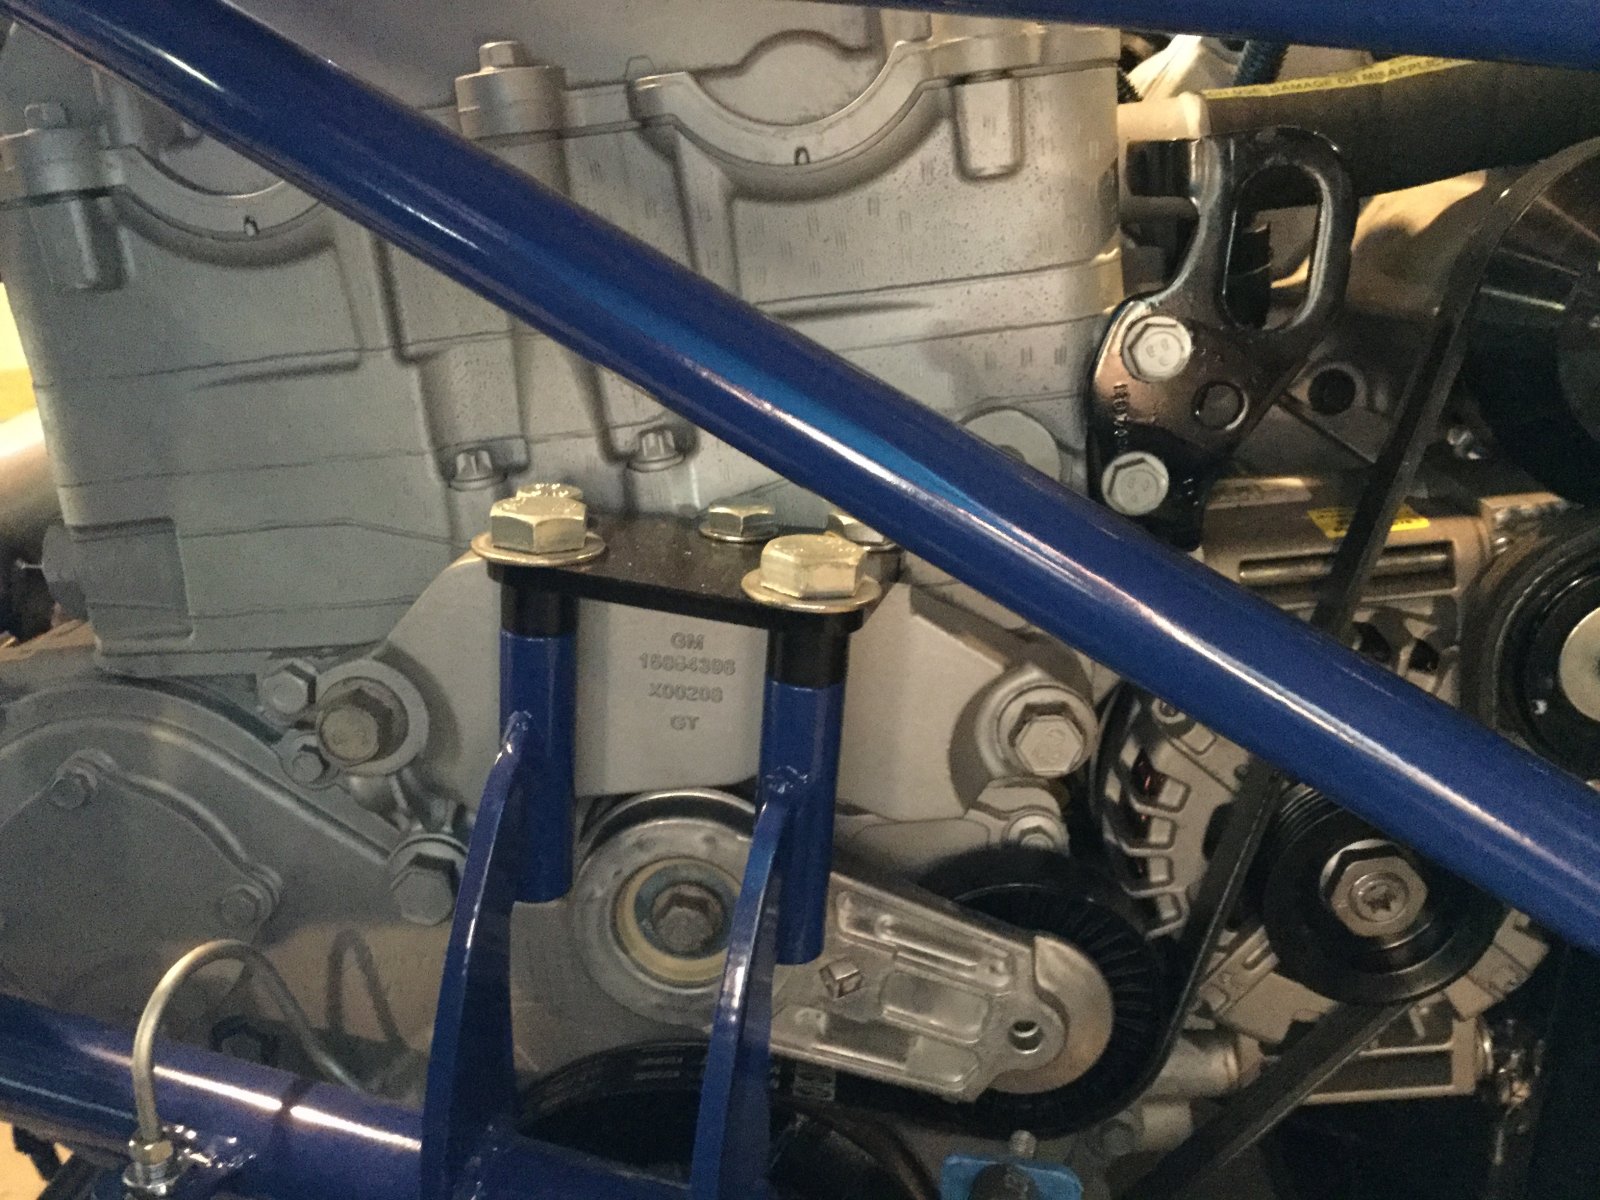
But the donuts would also give the exhaust some additional support there is going to be a lot of torque on that exhaust the first pot hole you hit (I'm just guessing but you probably have about 10 lbs. on about a 12" arm). The donuts would also isolate the temperatures going to the frame. I really think we are going to have issues with the exhaust cracking the manifold in the future.
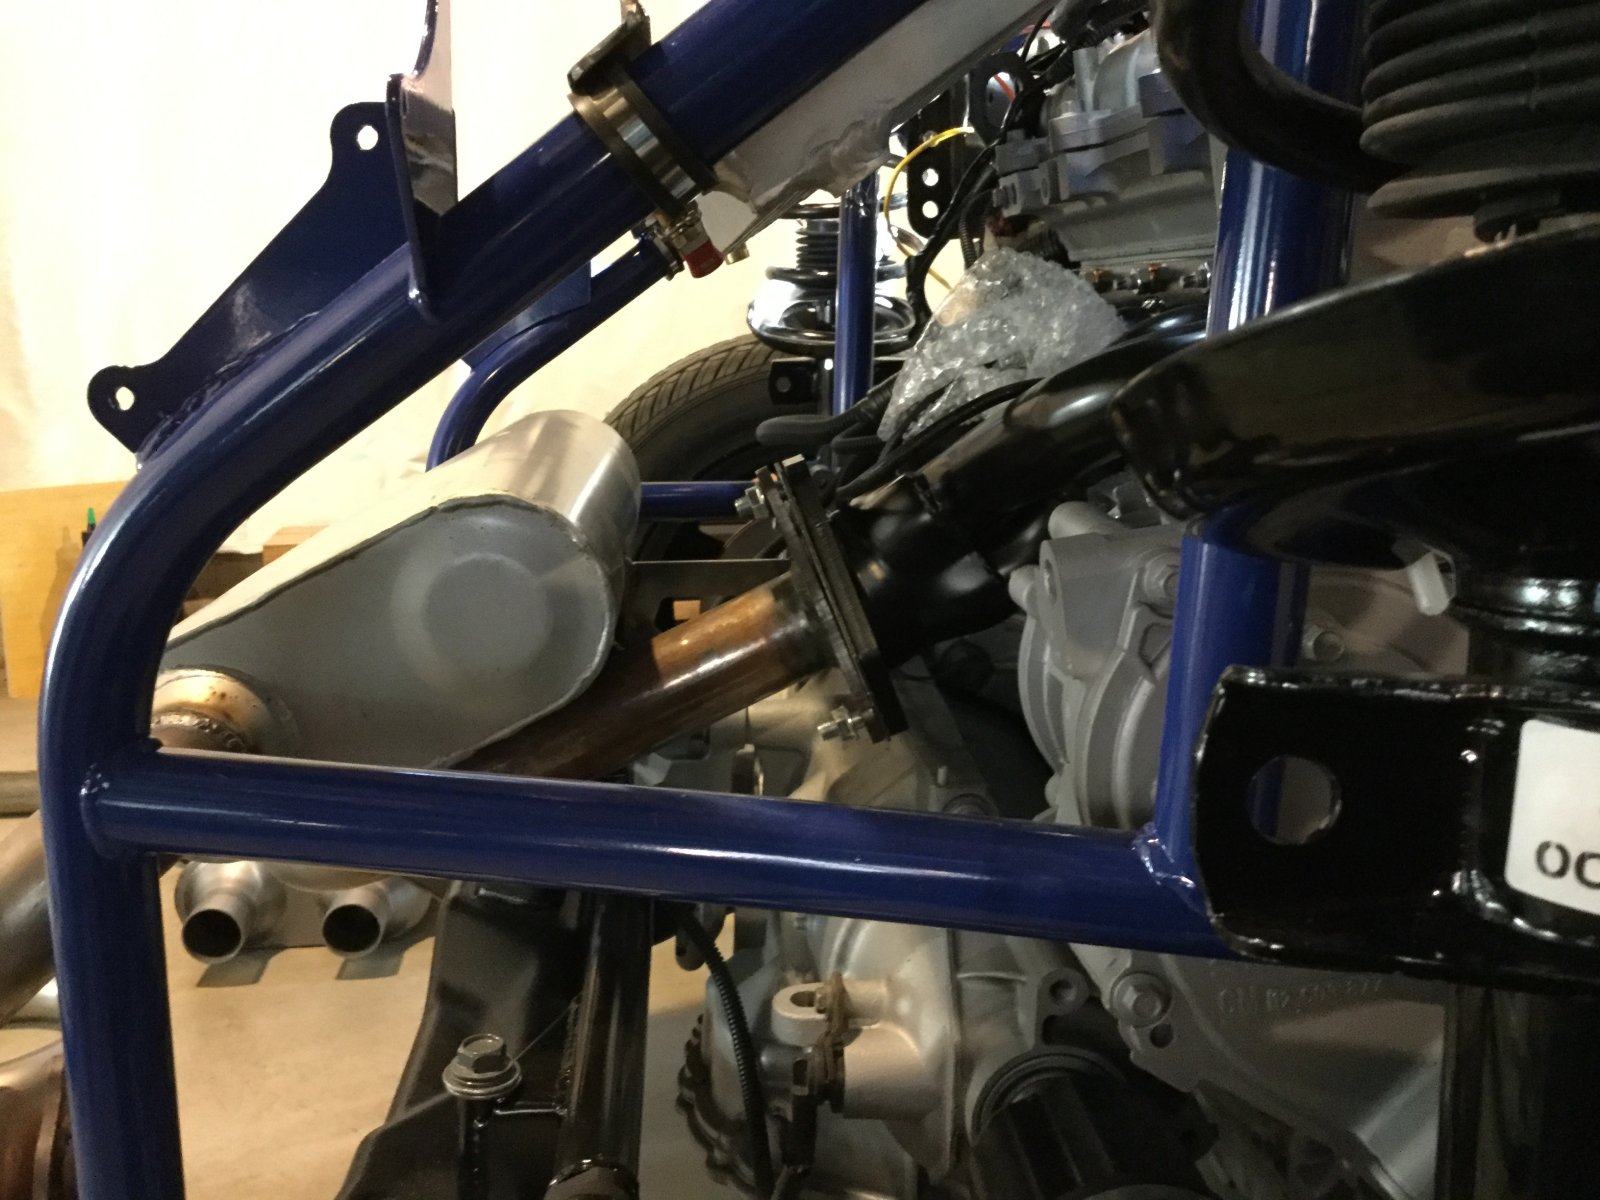 THX, Bruce
Would like to go with exhaust donuts on either side of the muffler then connecting to the rear frame. That should give the flexibility for any engine movement (Note: the engine is solid mounted to the frame already so there should be little movement -stock rubber mounts are cosmetic they could be solid, the upper engine mounts directly to the frame).
But the donuts would also give the exhaust some additional support there is going to be a lot of torque on that exhaust the first pot hole you hit (I'm just guessing but you probably have about 10 lbs. on about a 12" arm). The donuts would also isolate the temperatures going to the frame. I really think we are going to have issues with the exhaust cracking the manifold in the future.
BAR-AIR
Well-Known Member
- BAR-AIR Well-Known Member
Good Evening,
Looking for some input. Was able to bend up some 1 1/4" tube today and am going to try and fish mouth the ends tomorrow so that I can start welding up the windscreen frame and upper tubes.
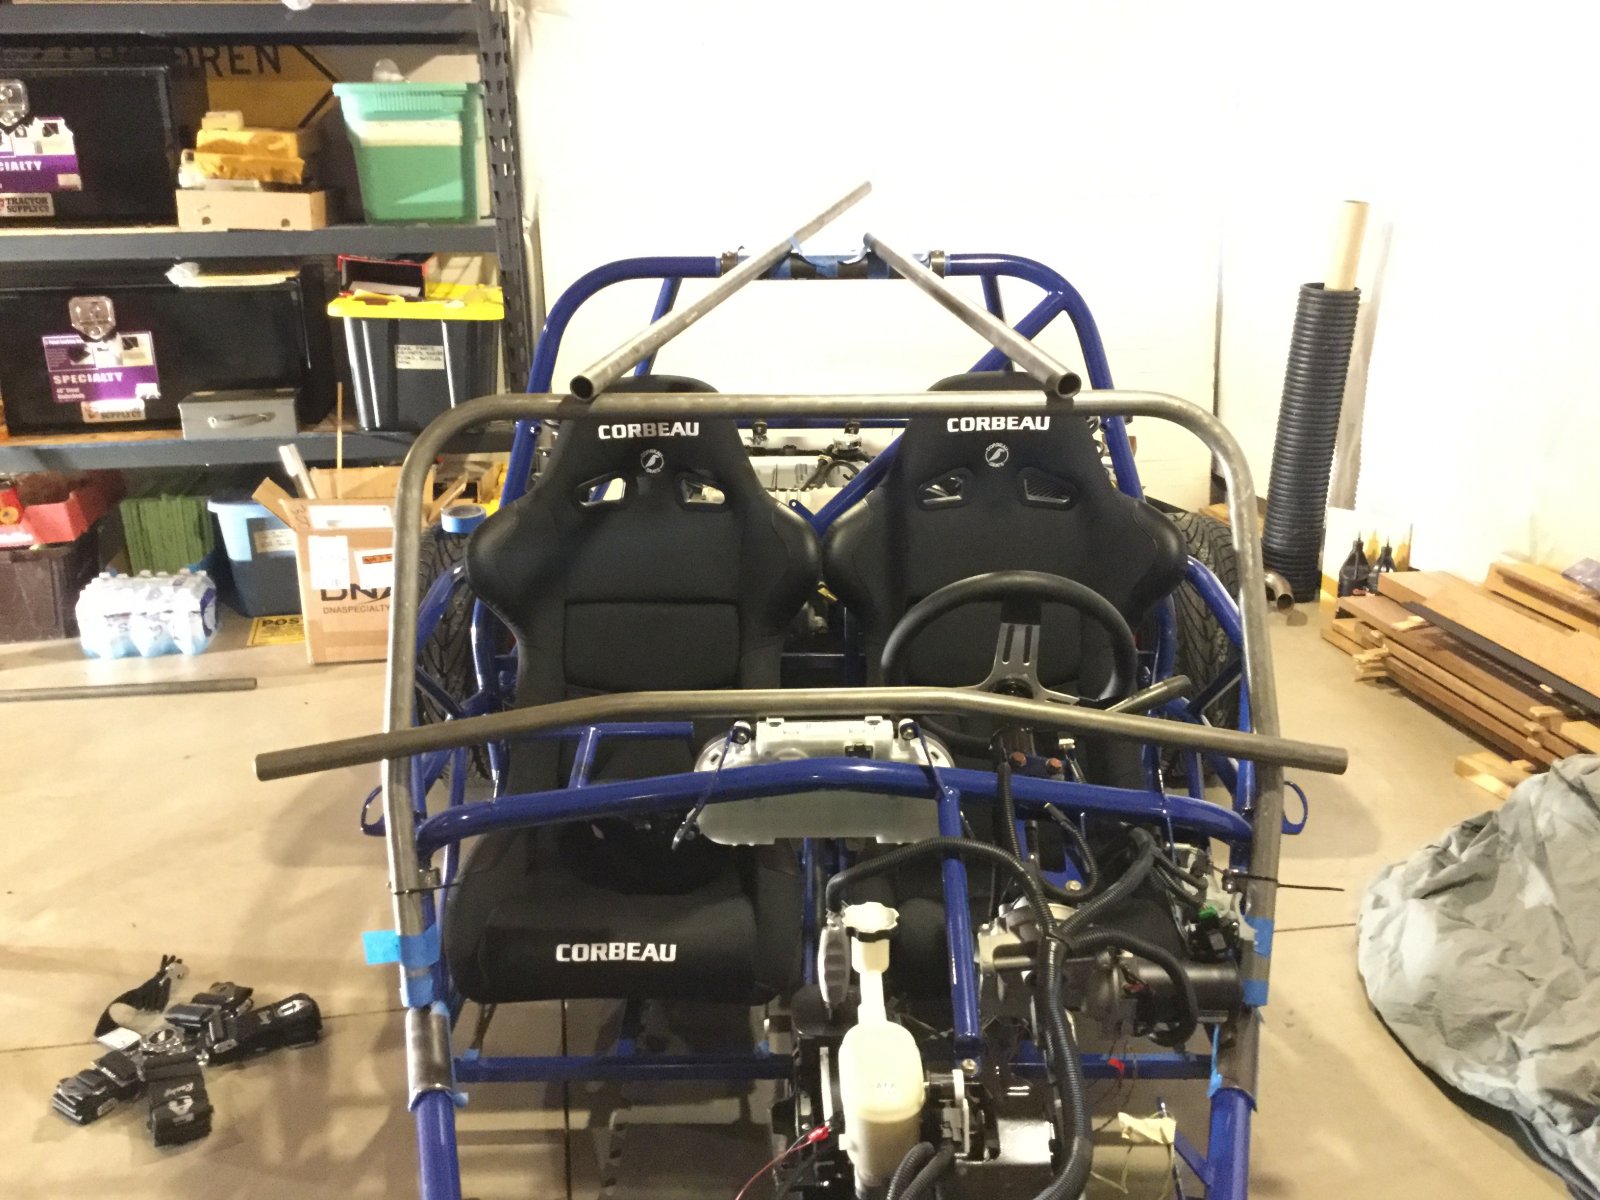 Here is a photo of the front.
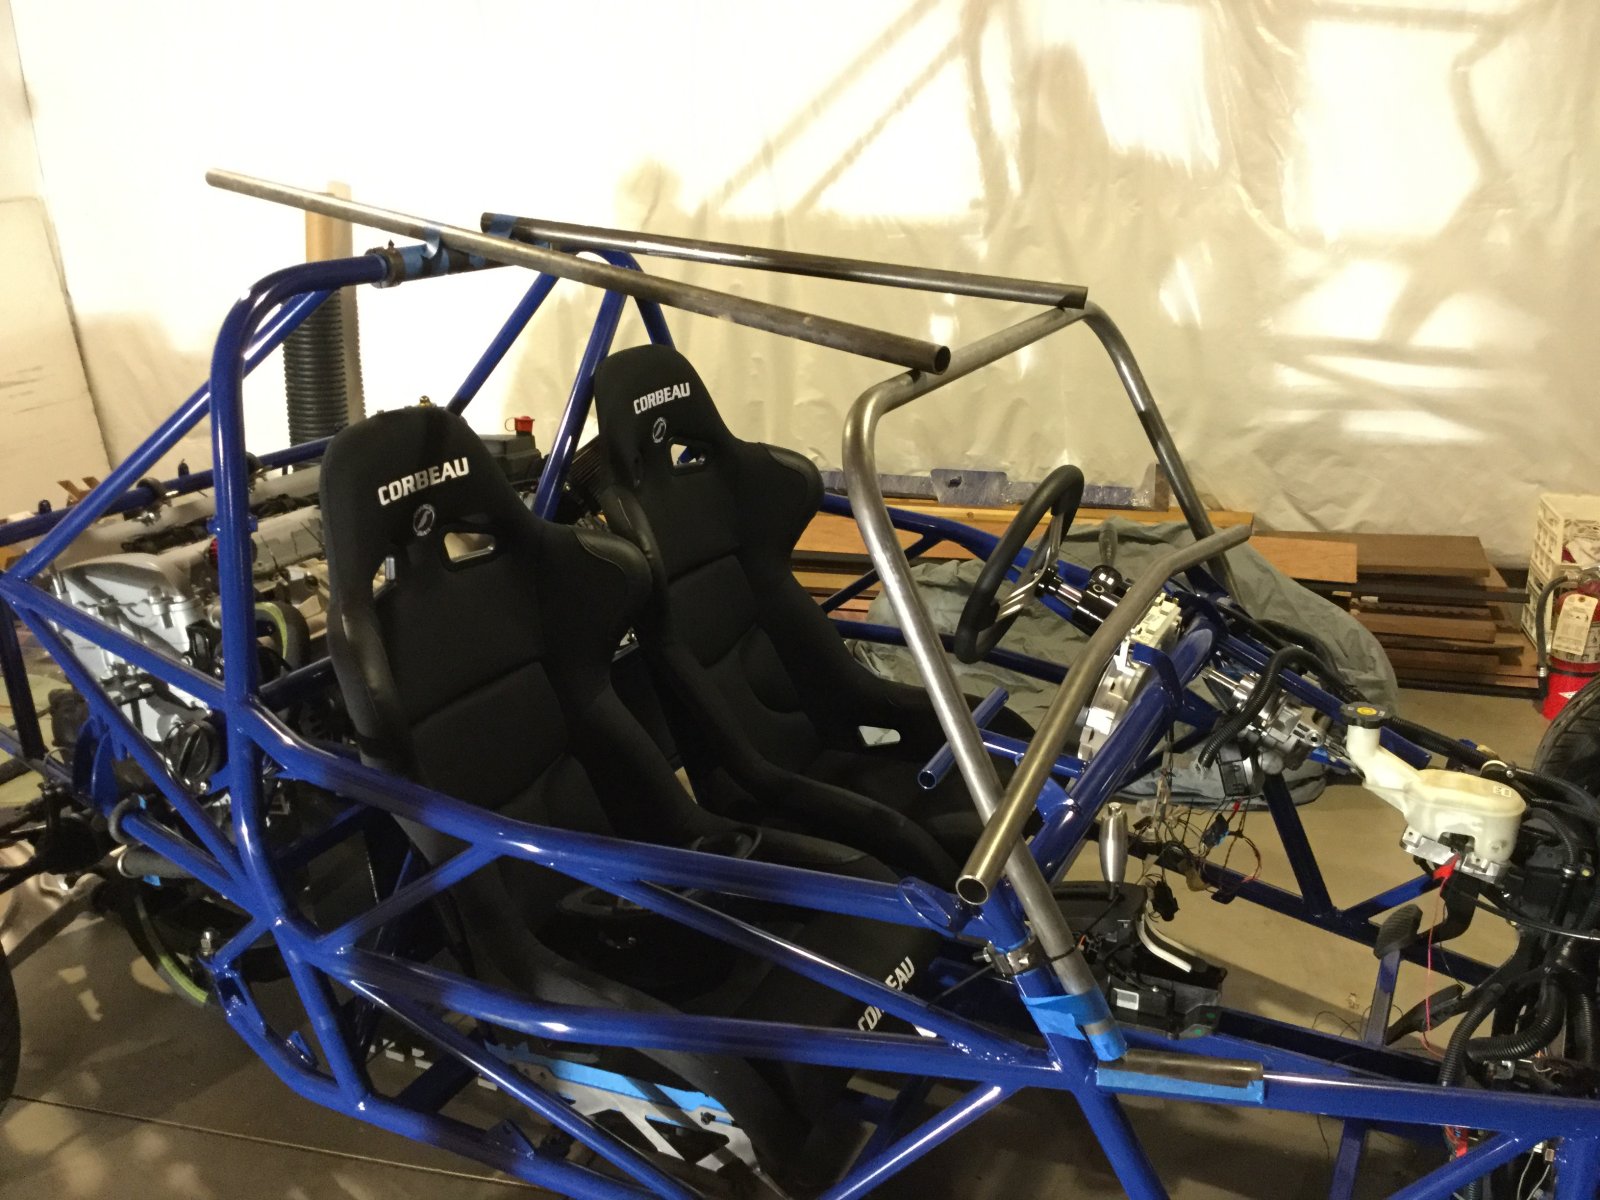 The lower cross tube is slightly bent out of square need to make a different one but you can get the idea. The other thing is that if I run the upper tubes as shown will have to bend them also ( the difference in height is 4" between the rear roll bar and the windscreen frame ) that way I can run the tubes level with the rear roll bar for 20" then bend them down to the windscreen frame -approx. 15 degree bend. Reasoning, normal use they would be fine straight put a helmet on and you would be pretty close to them.
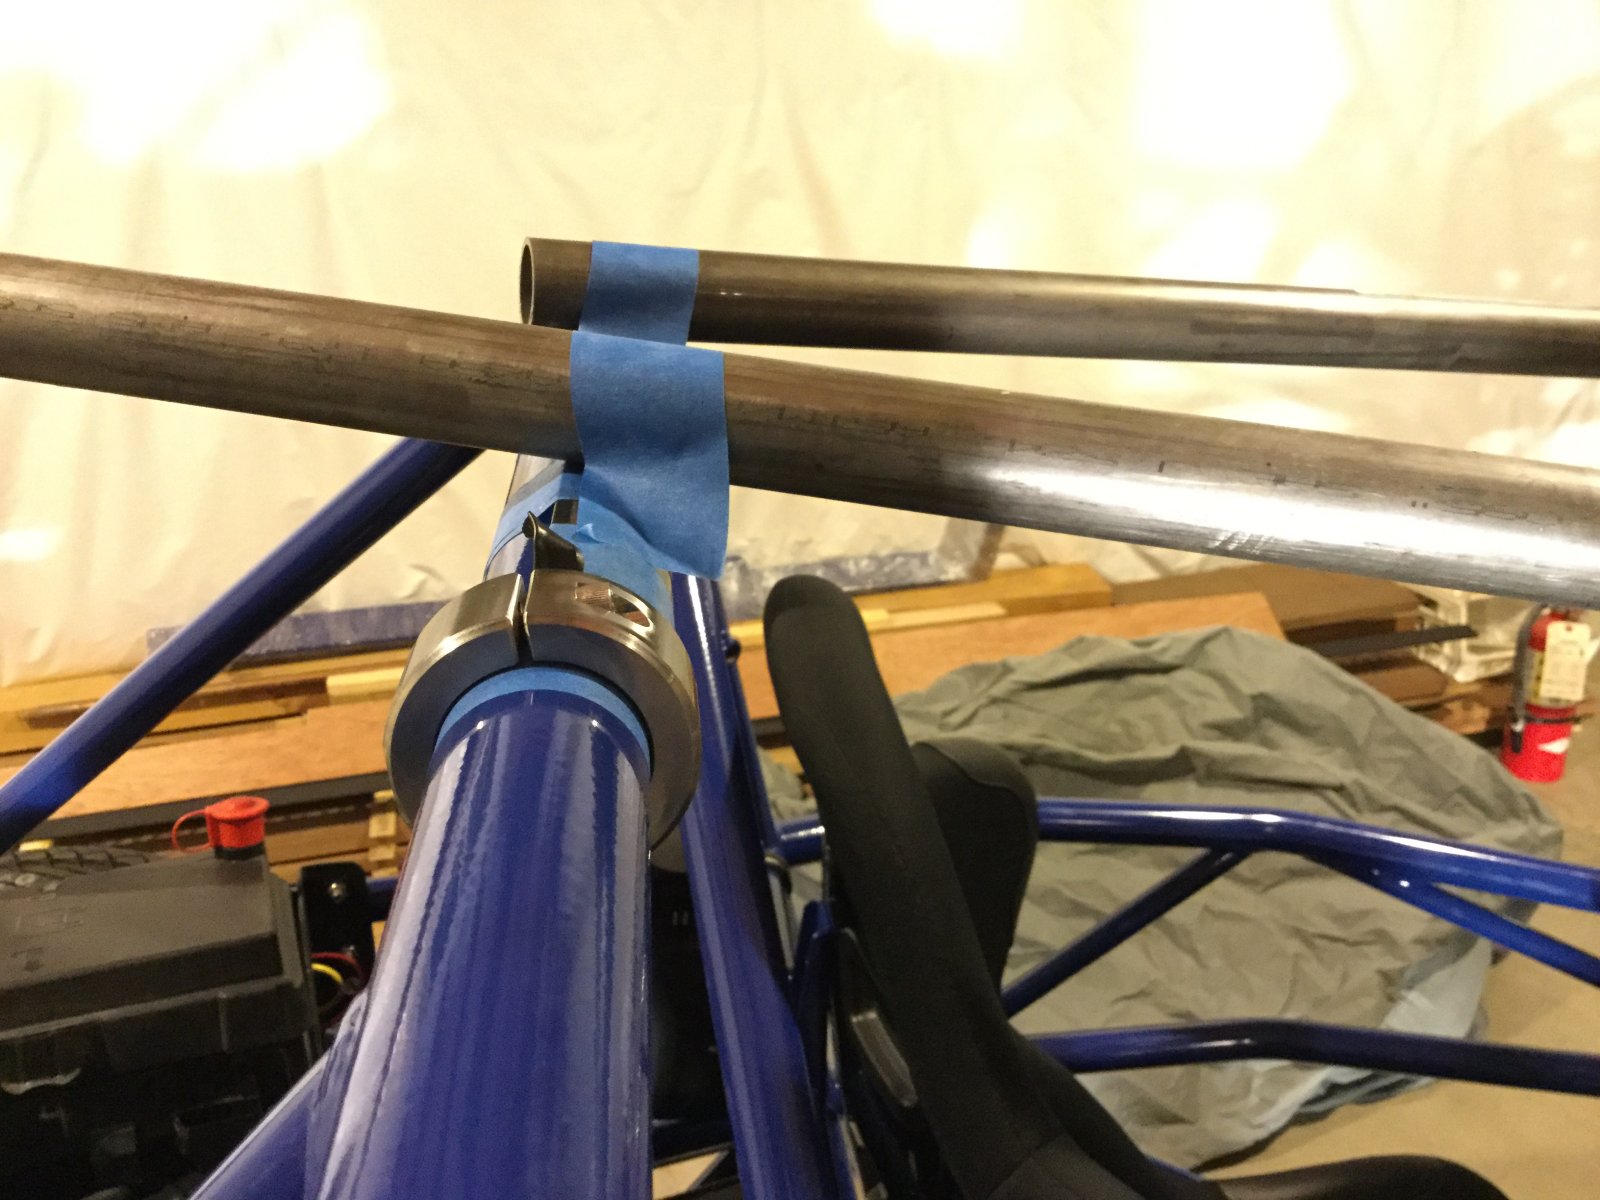
Looking to use split clamps welded to a piece of 1 1/2" ID tube that I split.
See anything that I am missing?
THX, Bruce
Looking for some input. Was able to bend up some 1 1/4" tube today and am going to try and fish mouth the ends tomorrow so that I can start welding up the windscreen frame and upper tubes.
Looking to use split clamps welded to a piece of 1 1/2" ID tube that I split.
See anything that I am missing?
THX, Bruce
BAR-AIR
Well-Known Member
- BAR-AIR Well-Known Member
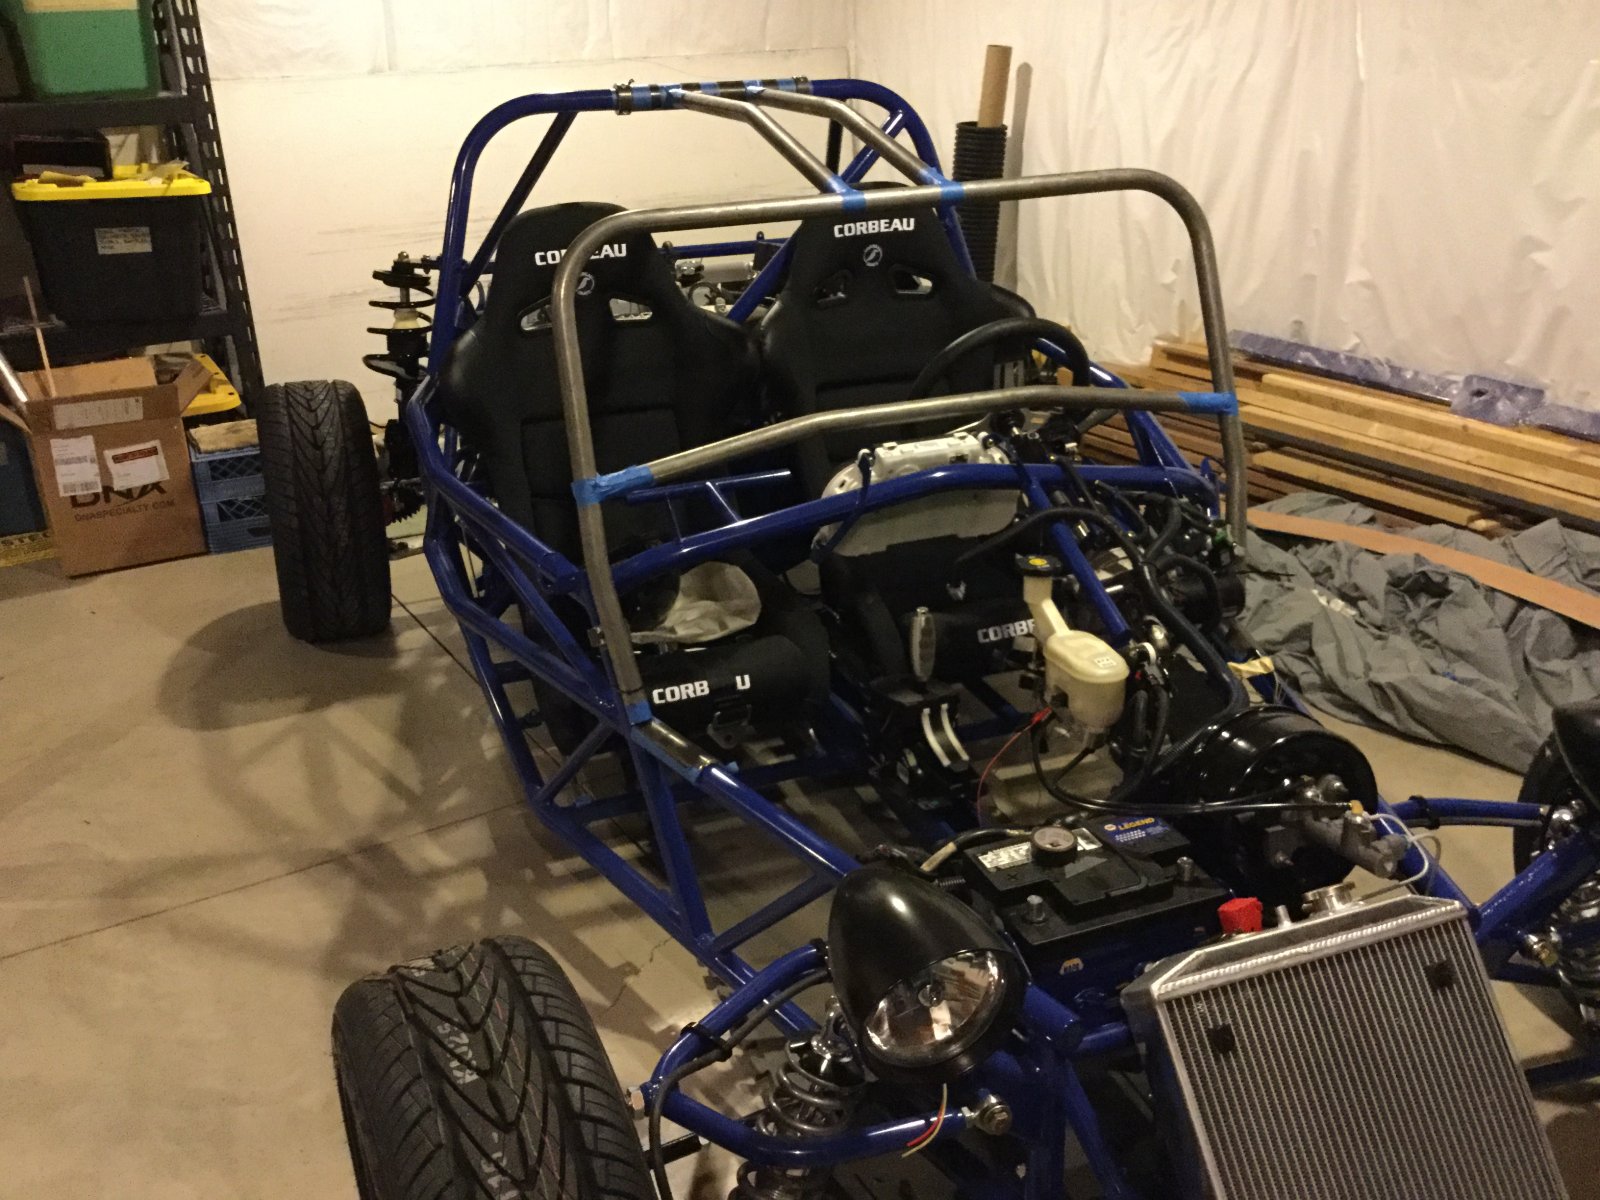
Here is the windscreen frame all mocked up. (Not as fortunate as Adam, had to fish mouth the tubes the old fashioned way - by hand-....
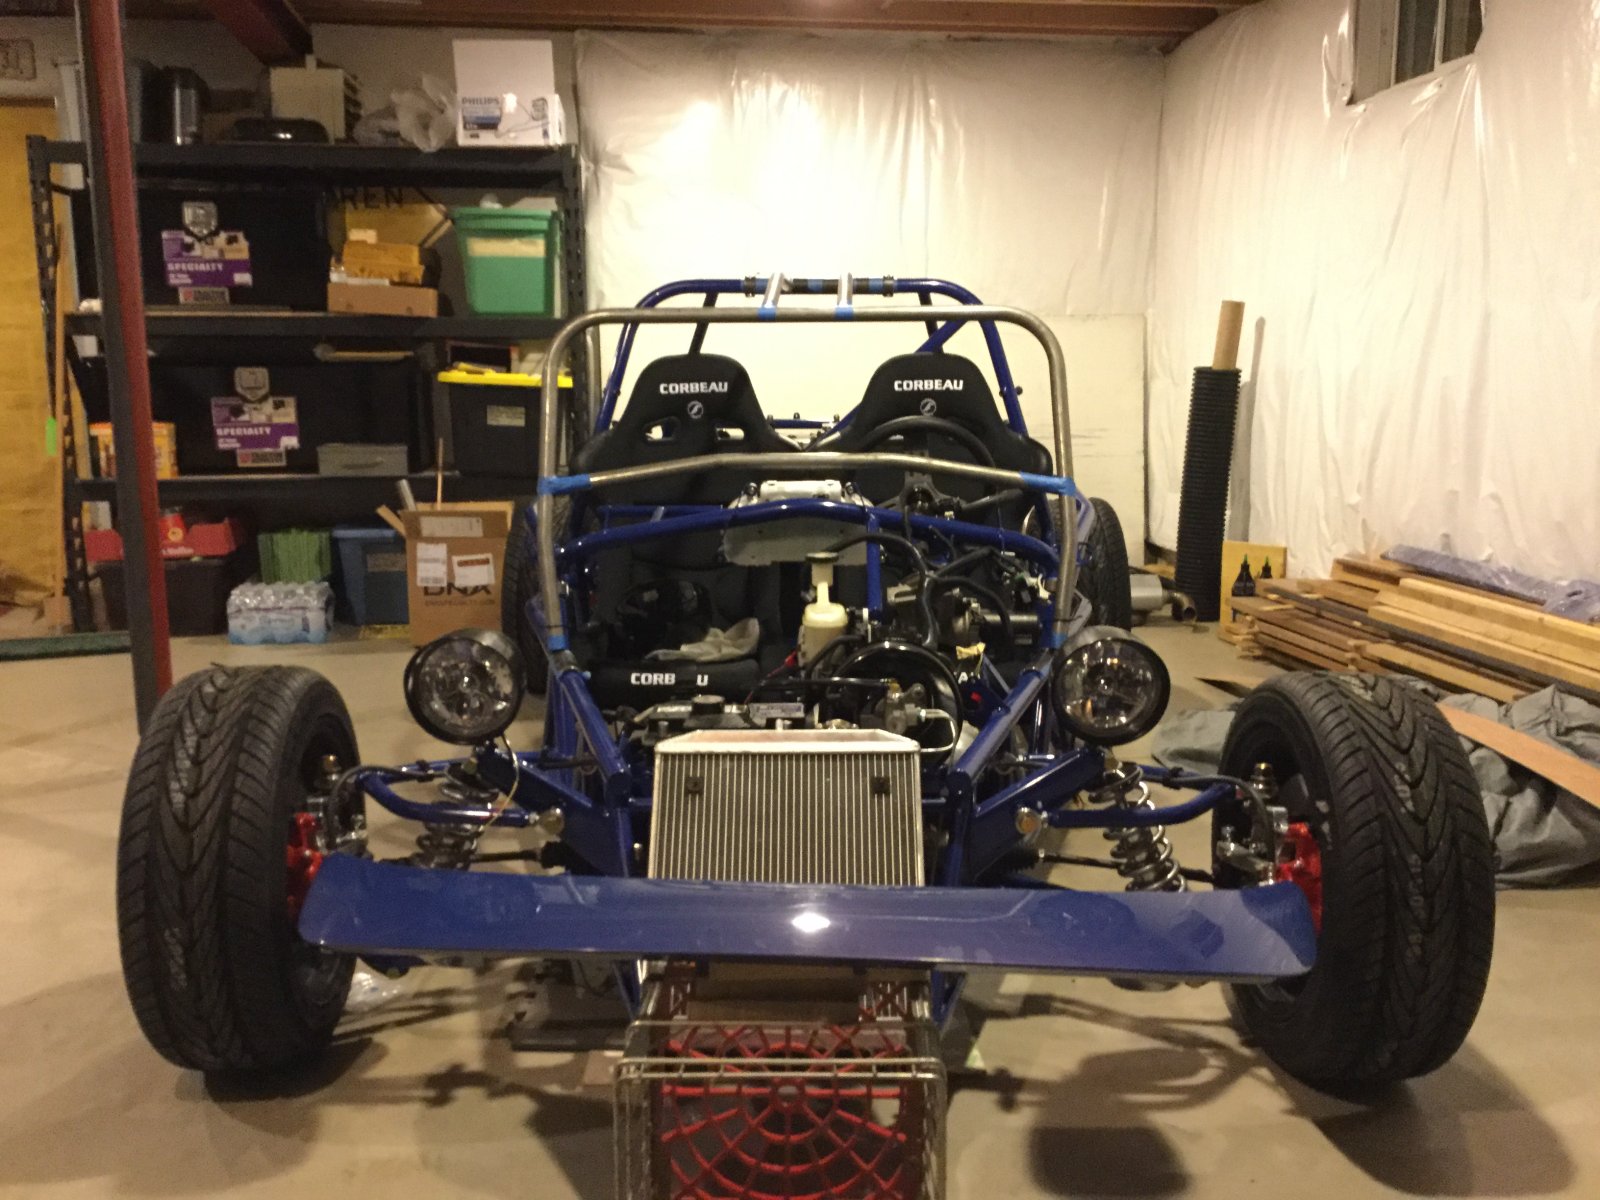 Also ended up running the top tubes straight instead of angling them to the windscreen corners - just too little head room especially if you had to have a helmet on. Good news is with them straight was able to drop the top of the windscreen 1 1/2" proportionally looks a lot better.


Similar threads


- Replies
- 3
- Views
- 169

- Replies
- 4
- Views
- 537

- Replies
- 13
- Views
- 2K

