Desert Sasqwatch
Bigfoot Goblin
- Desert Sasqwatch Bigfoot Goblin
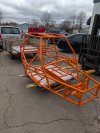
The driver's seat is moved over how far? Looks like at least 3 inches? Is there still room for a passenger seat - or no seat?
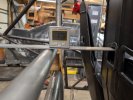
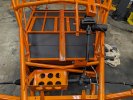
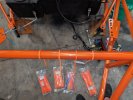
I chose to mount my triple reservoir 90 degrees to what you're showing, mounted off the upper bar and guage panel legs. Rigid enough and braking force helps push the fluid forward through the reservoir outlets and into the hoses.Added tabs for bolt in back supports for the aluminum seats.
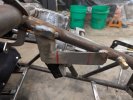
Decided I didn't like the stock brake/clutch reservoir so added a bracket for the aftermarket one.

I watched your build closely. I was just trying to run slightly shorter lines and wanted them tied together in case I put a speaker under the hood somedayI chose to mount my triple reservoir 90 degrees to what you're showing, mounted off the upper bar and guage panel legs. Rigid enough and braking force helps push the fluid forward through the reservoir outlets and into the hoses.